


#目前GPU算力资源预计17日上线,在此之前本代码只能使用CPU运行。
#考虑到本代码中的模型过大,CPU训练较慢,
#我们还将代码上传了一份到 https://www.kaggle.com/boyuai/boyu-d2l-modernconvolutionalnetwork
#如希望提前使用gpu运行请至kaggle。


import time
import torch
from torch import nn, optim
import torchvision
import numpy as np
import sys
sys.path.append("/home/kesci/input/")
import d2lzh1981 as d2l
import os
import torch.nn.functional as F

device = torch.device('cuda' if torch.cuda.is_available() else 'cpu')

class AlexNet(nn.Module):
    def __init__(self):
        super(AlexNet, self).__init__()
        self.conv = nn.Sequential(
            nn.Conv2d(1, 96, 11, 4), # in_channels, out_channels, kernel_size, stride, padding
            nn.ReLU(),
            nn.MaxPool2d(3, 2), # kernel_size, stride
            # 减小卷积窗口,使用填充为2来使得输入与输出的高和宽一致,且增大输出通道数
            nn.Conv2d(96, 256, 5, 1, 2),
            nn.ReLU(),
            nn.MaxPool2d(3, 2),
            # 连续3个卷积层,且使用更小的卷积窗口。除了最后的卷积层外,进一步增大了输出通道数。
            # 前两个卷积层后不使用池化层来减小输入的高和宽
            nn.Conv2d(256, 384, 3, 1, 1),
            nn.ReLU(),
            nn.Conv2d(384, 384, 3, 1, 1),
            nn.ReLU(),
            nn.Conv2d(384, 256, 3, 1, 1),
            nn.ReLU(),
            nn.MaxPool2d(3, 2)
        )
         # 这里全连接层的输出个数比LeNet中的大数倍。使用丢弃层来缓解过拟合
        self.fc = nn.Sequential(
            nn.Linear(256*5*5, 4096),
            nn.ReLU(),
            nn.Dropout(0.5),
            #由于使用CPU镜像,精简网络,若为GPU镜像可添加该层
            #nn.Linear(4096, 4096),
            #nn.ReLU(),
            #nn.Dropout(0.5),

            # 输出层。由于这里使用Fashion-MNIST,所以用类别数为10,而非论文中的1000
            nn.Linear(4096, 10),
        )

    def forward(self, img):

        feature = self.conv(img)
        output = self.fc(feature.view(img.shape[0], -1))
        return output
net = AlexNet()
print(net)
载入数据集
# 本函数已保存在d2lzh_pytorch包中方便以后使用
def load_data_fashion_mnist(batch_size, resize=None, root='/home/kesci/input/FashionMNIST2065'):
    """Download the fashion mnist dataset and then load into memory."""
    trans = []
    if resize:
        trans.append(torchvision.transforms.Resize(size=resize))
    trans.append(torchvision.transforms.ToTensor())

    transform = torchvision.transforms.Compose(trans)
    mnist_train = torchvision.datasets.FashionMNIST(root=root, train=True, download=True, transform=transform)
    mnist_test = torchvision.datasets.FashionMNIST(root=root, train=False, download=True, transform=transform)

    train_iter = torch.utils.data.DataLoader(mnist_train, batch_size=batch_size, shuffle=True, num_workers=2)
    test_iter = torch.utils.data.DataLoader(mnist_test, batch_size=batch_size, shuffle=False, num_workers=2)

    return train_iter, test_iter

#batchsize=128
batch_size = 16
# 如出现“out of memory”的报错信息,可减小batch_size或resize
train_iter, test_iter = load_data_fashion_mnist(batch_size,224)
for X, Y in train_iter:
    print('X =', X.shape,
        '\nY =', Y.type(torch.int32))
    break
训练
lr, num_epochs = 0.001, 3
optimizer = torch.optim.Adam(net.parameters(), lr=lr)
d2l.train_ch5(net, train_iter, test_iter, batch_size, optimizer, device, num_epochs)


VGG11的简单实现
def vgg_block(num_convs, in_channels, out_channels): #卷积层个数,输入通道数,输出通道数
    blk = []
    for i in range(num_convs):
        if i == 0:
            blk.append(nn.Conv2d(in_channels, out_channels, kernel_size=3, padding=1))
        else:
            blk.append(nn.Conv2d(out_channels, out_channels, kernel_size=3, padding=1))
        blk.append(nn.ReLU())
    blk.append(nn.MaxPool2d(kernel_size=2, stride=2)) # 这里会使宽高减半
    return nn.Sequential(*blk)
conv_arch = ((1, 1, 64), (1, 64, 128), (2, 128, 256), (2, 256, 512), (2, 512, 512))
# 经过5个vgg_block, 宽高会减半5次, 变成 224/32 = 7
fc_features = 512 * 7 * 7 # c * w * h
fc_hidden_units = 4096 # 任意
def vgg(conv_arch, fc_features, fc_hidden_units=4096):
    net = nn.Sequential()
    # 卷积层部分
    for i, (num_convs, in_channels, out_channels) in enumerate(conv_arch):
        # 每经过一个vgg_block都会使宽高减半
        net.add_module("vgg_block_" + str(i+1), vgg_block(num_convs, in_channels, out_channels))
    # 全连接层部分
    net.add_module("fc", nn.Sequential(d2l.FlattenLayer(),
                                 nn.Linear(fc_features, fc_hidden_units),
                                 nn.ReLU(),
                                 nn.Dropout(0.5),
                                 nn.Linear(fc_hidden_units, fc_hidden_units),
                                 nn.ReLU(),
                                 nn.Dropout(0.5),
                                 nn.Linear(fc_hidden_units, 10)
                                ))
    return net
net = vgg(conv_arch, fc_features, fc_hidden_units)
X = torch.rand(1, 1, 224, 224)

# named_children获取一级子模块及其名字(named_modules会返回所有子模块,包括子模块的子模块)
for name, blk in net.named_children():
    X = blk(X)
    print(name, 'output shape: ', X.shape)
ratio = 8
small_conv_arch = [(1, 1, 64//ratio), (1, 64//ratio, 128//ratio), (2, 128//ratio, 256//ratio),
                   (2, 256//ratio, 512//ratio), (2, 512//ratio, 512//ratio)]
net = vgg(small_conv_arch, fc_features // ratio, fc_hidden_units // ratio)
print(net)
batchsize=16
#batch_size = 64
# 如出现“out of memory”的报错信息,可减小batch_size或resize
# train_iter, test_iter = d2l.load_data_fashion_mnist(batch_size, resize=224)

lr, num_epochs = 0.001, 5
optimizer = torch.optim.Adam(net.parameters(), lr=lr)
d2l.train_ch5(net, train_iter, test_iter, batch_size, optimizer, device, num_epochs)

1×1卷积核作用
1.放缩通道数:通过控制卷积核的数量达到通道数的放缩。
2.增加非线性。1×1卷积核的卷积过程相当于全连接层的计算过程,并且还加入了非线性激活函数,从而可以增加网络的非线性。
3.计算参数少
def nin_block(in_channels, out_channels, kernel_size, stride, padding):
    blk = nn.Sequential(nn.Conv2d(in_channels, out_channels, kernel_size, stride, padding),
                        nn.ReLU(),
                        nn.Conv2d(out_channels, out_channels, kernel_size=1),
                        nn.ReLU(),
                        nn.Conv2d(out_channels, out_channels, kernel_size=1),
                        nn.ReLU())
    return blk
# 已保存在d2lzh_pytorch
class GlobalAvgPool2d(nn.Module):
    # 全局平均池化层可通过将池化窗口形状设置成输入的高和宽实现
    def __init__(self):
        super(GlobalAvgPool2d, self).__init__()
    def forward(self, x):
        return F.avg_pool2d(x, kernel_size=x.size()[2:])

net = nn.Sequential(
    nin_block(1, 96, kernel_size=11, stride=4, padding=0),
    nn.MaxPool2d(kernel_size=3, stride=2),
    nin_block(96, 256, kernel_size=5, stride=1, padding=2),
    nn.MaxPool2d(kernel_size=3, stride=2),
    nin_block(256, 384, kernel_size=3, stride=1, padding=1),
    nn.MaxPool2d(kernel_size=3, stride=2),
    nn.Dropout(0.5),
    # 标签类别数是10
    nin_block(384, 10, kernel_size=3, stride=1, padding=1),
    GlobalAvgPool2d(),
    # 将四维的输出转成二维的输出,其形状为(批量大小, 10)
    d2l.FlattenLayer())
X = torch.rand(1, 1, 224, 224)
for name, blk in net.named_children():
    X = blk(X)
    print(name, 'output shape: ', X.shape)
batch_size = 128
# 如出现“out of memory”的报错信息,可减小batch_size或resize
#train_iter, test_iter = d2l.load_data_fashion_mnist(batch_size, resize=224)

lr, num_epochs = 0.002, 5
optimizer = torch.optim.Adam(net.parameters(), lr=lr)
d2l.train_ch5(net, train_iter, test_iter, batch_size, optimizer, device, num_epochs)
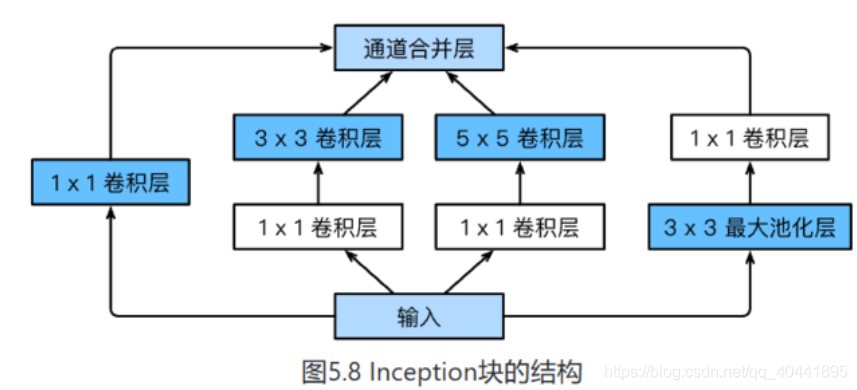
class Inception(nn.Module):
    # c1 - c4为每条线路里的层的输出通道数
    def __init__(self, in_c, c1, c2, c3, c4):
        super(Inception, self).__init__()
        # 线路1,单1 x 1卷积层
        self.p1_1 = nn.Conv2d(in_c, c1, kernel_size=1)
        # 线路2,1 x 1卷积层后接3 x 3卷积层
        self.p2_1 = nn.Conv2d(in_c, c2[0], kernel_size=1)
        self.p2_2 = nn.Conv2d(c2[0], c2[1], kernel_size=3, padding=1)
        # 线路3,1 x 1卷积层后接5 x 5卷积层
        self.p3_1 = nn.Conv2d(in_c, c3[0], kernel_size=1)
        self.p3_2 = nn.Conv2d(c3[0], c3[1], kernel_size=5, padding=2)
        # 线路4,3 x 3最大池化层后接1 x 1卷积层
        self.p4_1 = nn.MaxPool2d(kernel_size=3, stride=1, padding=1)
        self.p4_2 = nn.Conv2d(in_c, c4, kernel_size=1)

    def forward(self, x):
        p1 = F.relu(self.p1_1(x))
        p2 = F.relu(self.p2_2(F.relu(self.p2_1(x))))
        p3 = F.relu(self.p3_2(F.relu(self.p3_1(x))))
        p4 = F.relu(self.p4_2(self.p4_1(x)))
        return torch.cat((p1, p2, p3, p4), dim=1)  # 在通道维上连结输出
GoogLeNet模型
完整模型结构
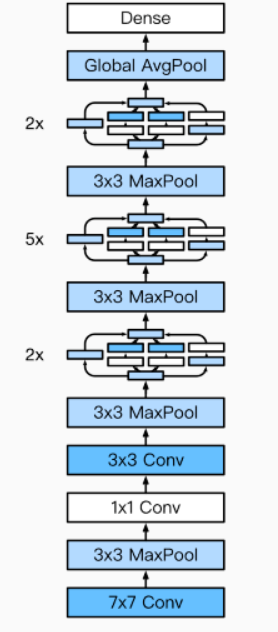
b1 = nn.Sequential(nn.Conv2d(1, 64, kernel_size=7, stride=2, padding=3),
                   nn.ReLU(),
                   nn.MaxPool2d(kernel_size=3, stride=2, padding=1))

b2 = nn.Sequential(nn.Conv2d(64, 64, kernel_size=1),
                   nn.Conv2d(64, 192, kernel_size=3, padding=1),
                   nn.MaxPool2d(kernel_size=3, stride=2, padding=1))

b3 = nn.Sequential(Inception(192, 64, (96, 128), (16, 32), 32),
                   Inception(256, 128, (128, 192), (32, 96), 64),
                   nn.MaxPool2d(kernel_size=3, stride=2, padding=1))

b4 = nn.Sequential(Inception(480, 192, (96, 208), (16, 48), 64),
                   Inception(512, 160, (112, 224), (24, 64), 64),
                   Inception(512, 128, (128, 256), (24, 64), 64),
                   Inception(512, 112, (144, 288), (32, 64), 64),
                   Inception(528, 256, (160, 320), (32, 128), 128),
                   nn.MaxPool2d(kernel_size=3, stride=2, padding=1))

b5 = nn.Sequential(Inception(832, 256, (160, 320), (32, 128), 128),
                   Inception(832, 384, (192, 384), (48, 128), 128),
                   d2l.GlobalAvgPool2d())

net = nn.Sequential(b1, b2, b3, b4, b5,
                    d2l.FlattenLayer(), nn.Linear(1024, 10))

net = nn.Sequential(b1, b2, b3, b4, b5, d2l.FlattenLayer(), nn.Linear(1024, 10))

X = torch.rand(1, 1, 96, 96)

for blk in net.children():
    X = blk(X)
    print('output shape: ', X.shape)

#batchsize=128
batch_size = 16
# 如出现“out of memory”的报错信息,可减小batch_size或resize
#train_iter, test_iter = d2l.load_data_fashion_mnist(batch_size, resize=96)

lr, num_epochs = 0.001, 5
optimizer = torch.optim.Adam(net.parameters(), lr=lr)
d2l.train_ch5(net, train_iter, test_iter, batch_size, optimizer, device, num_epochs)


 3019
3019


 被折叠的 条评论
为什么被折叠?
被折叠的 条评论
为什么被折叠?
 到【灌水乐园】发言


