


开发中常用的几种 Content-Type
(1)application/x-www-form-urlencoded
浏览器的原生 form 表单,如果不设置 enctype 属性,那么最终就会以 application/x-www-form-urlencoded 方式提交数据。该种方式提交的数据放在 body 里面,数据按照 key1=val1&key2=val2 的方式进行编码,key 和 val 都进行了 URL
转码。

(2)multipart/form-data
该种方式也是一个常见的 POST 提交方式,通常表单上传文件时使用该种方式。
(3)application/json
告诉服务器消息主体是序列化后的 JSON 字符串。
(4)text/xml
该种方式主要用来提交 XML 格式的数据。
浏览器默认使用application/x-www-form-urlencoded 方式,
axios 默认使用 application/json 方式。
例1:
在前后端分离中,前端使用Vue,后端使用SpringBoot。登录时,
前端代码:
     this.$axios({
        method: "post",
        /url: "http://localhost:9090/shiro/sys/login",
        data: {
          username: this.username,
          password: this.password
        }
      })
         .then(result => {
         }
注意:这里没写 Content-Type,axios 默认使用 application/json 方式提交,写的话,可以写在
$axios({})中data 同级,如:
this.$axios({
  method: "POST",
     url: "/shiro/testPictureUpload",
     data: data,
     headers: {
       token: this.token,
       'Content-Type': 'multipart/form-data' // 传递图片 headers 里得这样写
     }
   }).then(res => {
   }
后端代码:
/**
     * 登录
     */
    @ApiOperation(value = "登陆", notes = "参数:用户名 密码")
    @PostMapping("/sys/login")
    public Map<String, Object> login(@RequestBody @Validated LoginDTO loginDTO, BindingResult bindingResult,HttpServletRequest request) {
        Map<String, Object> result = new HashMap<>();
        if (bindingResult.hasErrors()) {
            result.put("status", 400);
            result.put("msg", bindingResult.getFieldError().getDefaultMessage());
            return result;
        }

        String username = loginDTO.getUsername();
        String password = loginDTO.getPassword();

        //用户信息
        User user = shiroService.findByUsername(username);
        //账号不存在、密码错误
        if (user == null || !user.getPassword().equals(password)) {
            result.put("status", 400);
            result.put("msg", "账号或密码有误");
        } else {
            //生成token,并保存到数据库
            result = shiroService.createToken(user.getUserId());
            result.put("status", 200);
            result.put("msg", "登陆成功");
        }
        return result;
    }
其中后端使用 LoginDTO 这个实体类来接受前端提交过来的数据,
LoginDTO 类
/**
 * 登录传输类
 */
@Data
public class LoginDTO {
    @NotBlank(message = "用户名不能为空")
    private String username;
    @NotBlank(message = "密码不能为空")
    private String password;
}
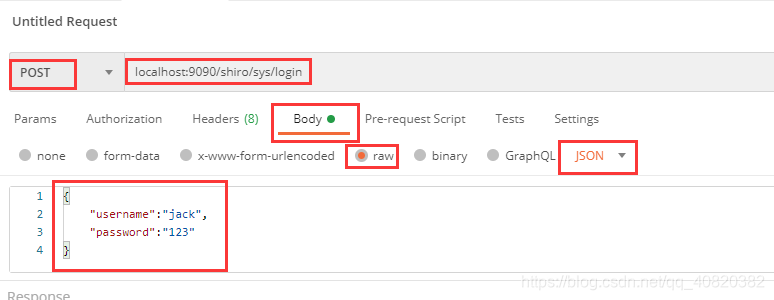
也可以使用postman进行登录测试:
例2:
在前后端分离中,前端使用Vue,后端使用SpringBoot。提交表单时:
前端配合elementUI
前端代码
<el-form :label-position="labelPosition" :model="ruleForm" status-icon ref="ruleForm"
label-width="70px" class="demo-ruleForm">
<el-form-item label="设备外形图:" label-width="130px">
<el-upload
action="string"
:auto-upload="false"
list-type="picture-card"
:on-preview="handlePictureCardPreview"
:on-remove="handleRemovePlan"
:file-list="picture"
:on-change="OnChangeOutLookPlan"
>
<i class="el-icon-plus"></i>
</el-upload>
</el-form-item>
</el-form>
<el-button type="primary" @click="testPictureUpload">testPictureUpload</el-button>
data() {
return {
labelPosition: 'left',
// 图片上传相关
dialogVisible: true,
dialogImageUrl: 'https://gimg2.baidu.com/image_search/src=http%3A%2F%2Fa4.att.hudong.com%2F27%2F67%2F01300000921826141299672233506.jpg&refer=http%3A%2F%2Fa4.att.hudong.com&app=2002&size=f9999,10000&q=a80&n=0&g=0n&fmt=jpeg?sec=1614780040&t=335e293322bac198f2af7379a03a52f6',
planBool:false,
picture: [],
param: new FormData(),
token: this.getToken()
}
}
methods: {
OnChangeOutLookPlan(file, fileList) {
console.log(fileList)
this.picture = []
this.picture.push(file)
},
handleRemovePlan() {
this.planBool = true
this.picture = []
},
handlePictureCardPreview(file) {
this.dialogImageUrl = file.url;
this.dialogVisible = true;
},
// 测试图片上传
testPictureUpload() {
// 设置数据, 后台用这个接收 @RequestParam("txt") String txt
this.param.set("txt",'66666')
for (var i = 0; i < this.picture.length; i++) {
/**
* 设置数据, 后台接收方式一: @RequestParam("picture") MultipartFile picture
* 后台接收方式二: HttpServletRequest request
* MultipartHttpServletRequest request1 = (MultipartHttpServletRequest) request;
* Map<String, MultipartFile> fileMap = request1.getFileMap();
* MultipartFile pictures = fileMap.get("picture");
* System.out.println(pictures);
*/
this.param.set('picture', this.picture[i].raw);
}
var arr = []
this.param.forEach(function (value) {
arr.push(value)
});
var lastArr = arr
var data = this.param
console.log(lastArr)
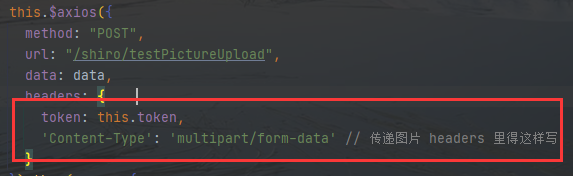
this.$axios({
method: "POST",
url: "/shiro/testPictureUpload",
data: data,
headers: {
token: this.token,
'Content-Type': 'multipart/form-data' // 传递图片 headers 里得这样写
}
}).then(res => {
console.log(res)
});
},
}
注意,testPictureUpload 方法的 headers 里加了 token 和 ‘Content-Type’
后台代码:
 @RequiresPermissions({"save"}) // 意思是,当前登录的用户得有save权限才能使用该接口
    @PostMapping("/testPictureUpload")
    public Map<String, Object> testPictureUpload(@RequestHeader("token") String token,
                                                 @RequestParam("txt") String txt,
                                                 @RequestParam("picture") MultipartFile picture,
                                                 HttpServletRequest request) {
        MultipartHttpServletRequest request1 = (MultipartHttpServletRequest) request;
        Map<String, MultipartFile> fileMap = request1.getFileMap();
        MultipartFile pictures = fileMap.get("picture");
        System.out.println(" 用这个 HttpServletRequest 接收图片: " + pictures);

        System.out.println("用这个 @RequestParam MultipartFile 接收图片: " + picture);

        System.out.println("testPictureUpload");
        Map<String, Object> map = new HashMap<>();
        map.put("status", 200);
        map.put("msg", "当前用户有testPictureUpload权利");
        return map;
    }
注意:@RequestHeader(“token”) 可以获取token 中的值,@RequestParam(“picture”) MultipartFile picture, 获取图片。注意前端
this.param.set('picture', this.picture[i].raw);
得和后端
@RequestParam("picture")
的picture对应


 1597
1597


 被折叠的 条评论
为什么被折叠?
被折叠的 条评论
为什么被折叠?
 到【灌水乐园】发言


