


来源:https://www.bilibili.com/video/BV1ki4y147oK?p=4
上一节链接:https://blog.csdn.net/qq_40893824/article/details/106996441
下一节链接:https://blog.csdn.net/qq_40893824/article/details/107034720
源码:
https://github.com/13407196713/layui-springboot
目录
插件下载
ECharts
思路来源:https://blog.csdn.net/weixin_42528089/article/details/95487734
1 下载做法:
搜索 ECharts

官网:https://echarts.apache.org/zh/download.html


JQuery
思路来源:https://blog.csdn.net/qq_40976321/article/details/90552297
下载网址:http://www.jq22.com/jquery-info122


如何使用
https://echarts.apache.org/zh/tutorial.html#5%20分钟上手%20ECharts

实例:https://echarts.apache.org/examples/zh/index.html
1 新建 1.hmtl,它和 echarts.min.js 在同一级目录

这样,下面的基本代码里 <script src="echarts.min.js"></script> 才会生效
基本代码:
<html>
	<head>
		<script src="echarts.min.js"></script>
	</head>

<body>
	<div id="main" style="width: 600px;height:400px;"></div>
	<script type="text/javascript">
		// 基于准备好的dom,初始化echarts实例

		//这里写图片代码

		// 使用刚指定的配置项和数据显示图表。
		myChart.setOption(option);
	</script>
</body>
</html>
style="width: 600px;height:400px;" 是图片大小,没有的话,图片为 0,显示不出来
2

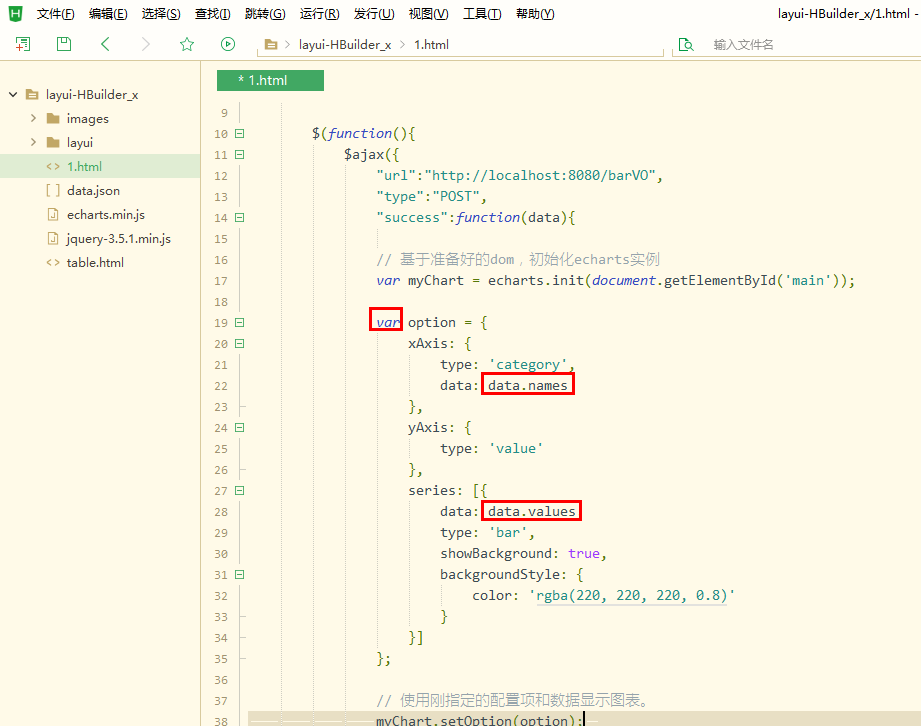
上图左边代码 全部粘贴进 下图红框处:


柱状图
后端数据修 改成 前端数据图表标准
1 echarts.min.js 和 1.html 复制进 layui-HBuilder_x

将其代码粘贴进 1.html 对应位置

2


上图 2 处红框处,想把它用柱状图表示
product_id 用对应对应汉字名字,这样就要关联查询

现在是 集合里有1个名字、有 1 个数值,有很多个集合
可 我需要 一个集合全是名字,另一集合全是数值
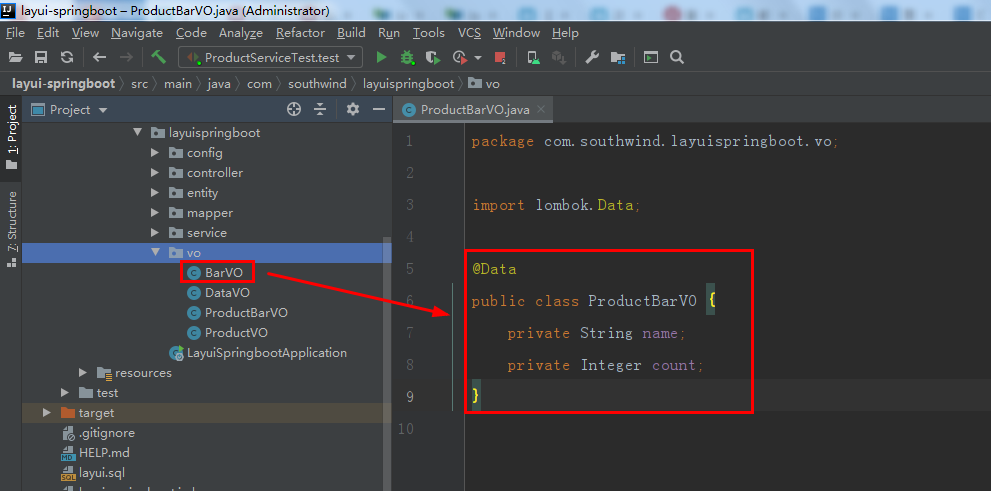
3 vo 中,新建实体类 ProductBarVO
对应 集合里有1个名字、有 1 个数值,有很多个集合
package com.southwind.layuispringboot.vo;

import lombok.Data;

@Data
public class ProductBarVO {
    private String name;
    private Integer count;
}
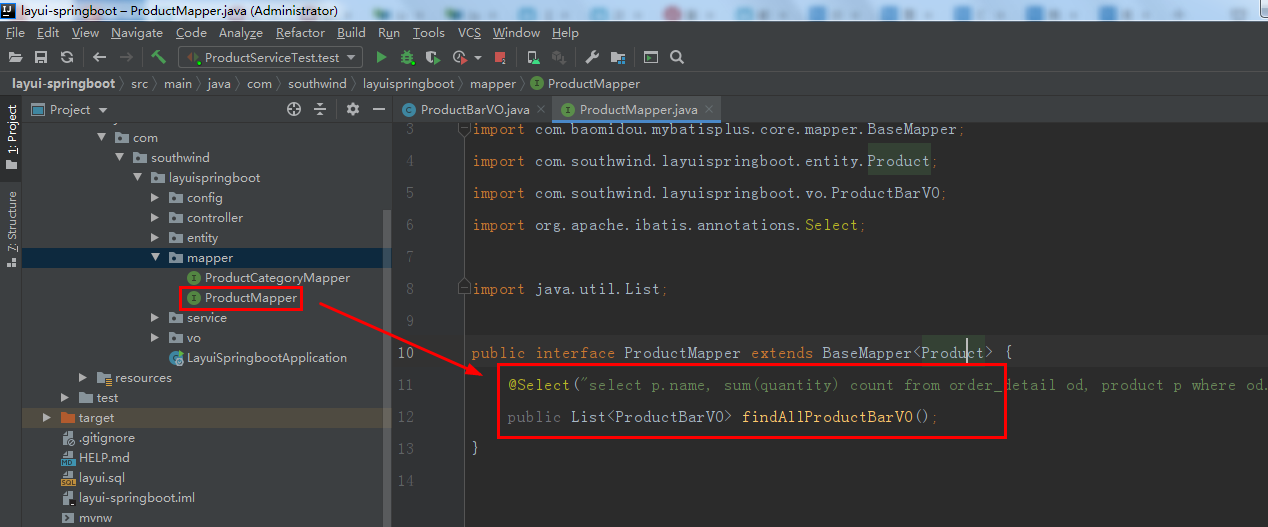
4 mapper/ ProductMapper 中,加入代码:
    @Select("select p.name, sum(quantity) count from order_detail od, product p where od.product_id = p.id group by product_id")
    public List<ProductBarVO> findAllProductBarVO();
5 test/ java/ com/ southwind/ layuispringboot/ mapper/ ProductMapperTest 中加入代码:
    @Test
    void test2(){
        List<ProductBarVO> list = mapper.findAllProductBarVO();
        int i = 0;
    }
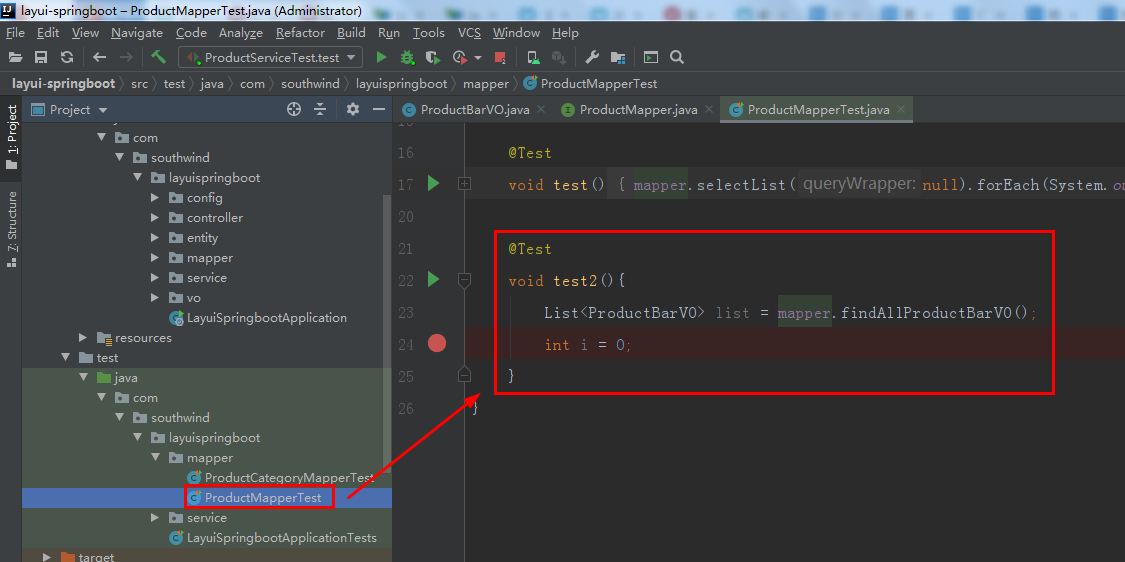
在 int i = 0; 那里打断点,debug


是 集合里有1个名字、有 1 个数值,有很多个集合
转换成:一个集合全是名字,另一集合全是数值!
6 vo 里新建 实体类 BarVO
package com.southwind.layuispringboot.vo;

import lombok.Data;
import java.util.List;

@Data
public class BarVO {
    private List<String> names;
    private List<Integer> values;
}

7 service/ ProductService 中,加入 public BarVO getBarVO();:

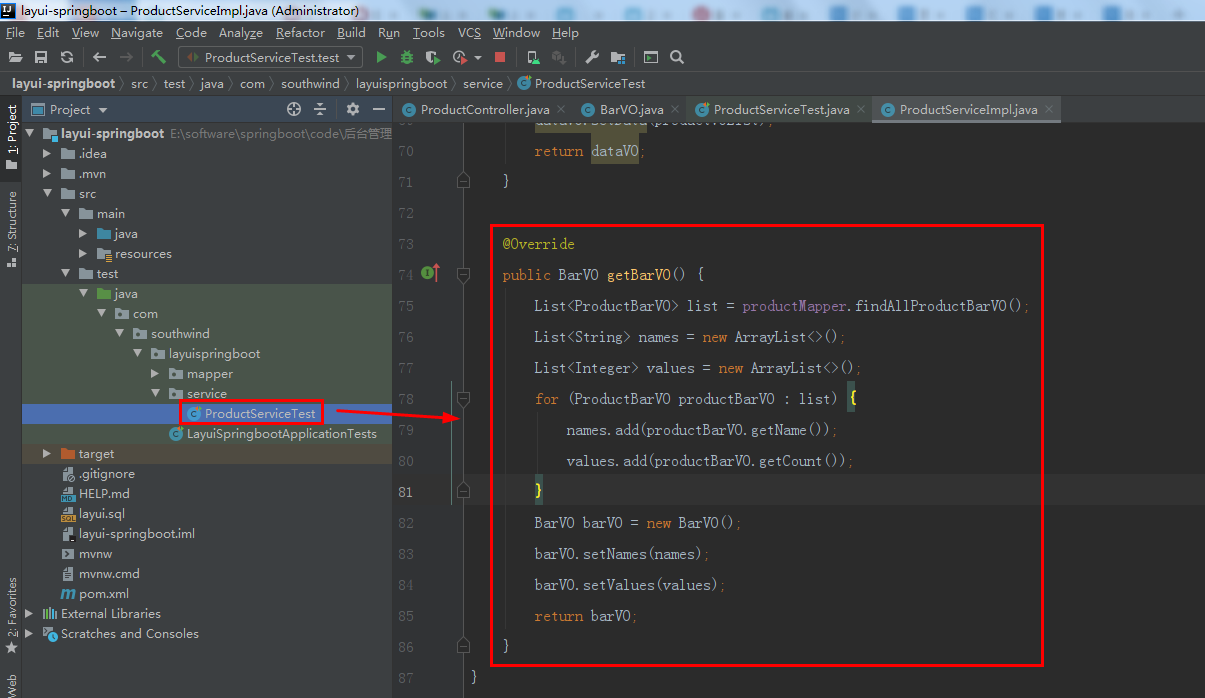
8 service/ impl/ ProductServiceImpl 中,加入代码:
    @Override
    public BarVO getBarVO() {
        List<ProductBarVO> list = productMapper.findAllProductBarVO();
        List<String> names = new ArrayList<>();
        List<Integer> values = new ArrayList<>();
        for (ProductBarVO productBarVO : list) {
            names.add(productBarVO.getName());
            values.add(productBarVO.getCount());
        }
        BarVO barVO = new BarVO();
        barVO.setNames(names);
        barVO.setValues(values);
        return barVO;
    }
9 test/ java/ com/ southwind/ layuispringboot/ service/ ProductServiceTest 中,加入代码:
@Test
    void test(){
        BarVO barVO = service.getBarVO();
        int i = 0;
    }

在 int i = 0; 那里打断点,debug


一个集合全是名字,另一集合全是数值!
符合 前端数据标准!
后台数据传到 前端图表中
1 ProductController 中,加入代码:
    @RequestMapping("/barVO")
    @ResponseBody
    public BarVO getBarVO(){
        return productService.getBarVO();
    }

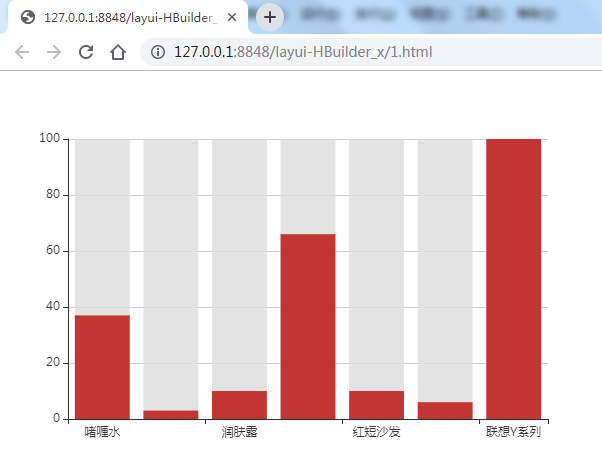
启动 LayuiSpringbootApplication,进入 http://localhost:8080/barVO

数据正确
2 jquery-3.5.1.min.js 粘贴进 layui-HBuilder_x
在 1.html 中,加入代码:
<script src="jquery-3.5.1.min.js"></script>

		$(function(){
			$.ajax({
				"url":"http://localhost:8080/barVO",
				"type":"POST",
				"success":function(data){

				}
			});
		})
$.ajax 的点很容易漏掉
下图,下边的红框处代码,要修改,再移进上边的红框

整合进 springboot
1 把 1.html 改名成 bar.html,在粘贴进springboot 的 resources/templates 中
2 echarts.min.js、jquery-3.5.1.min.js 粘贴进 resources/ static/ layui 中
3 springboot 中的 bar.html 中,url 改成 /barVO

4 重启 LayuiApplication,进入 http://localhost:8080/bar:

饼状图
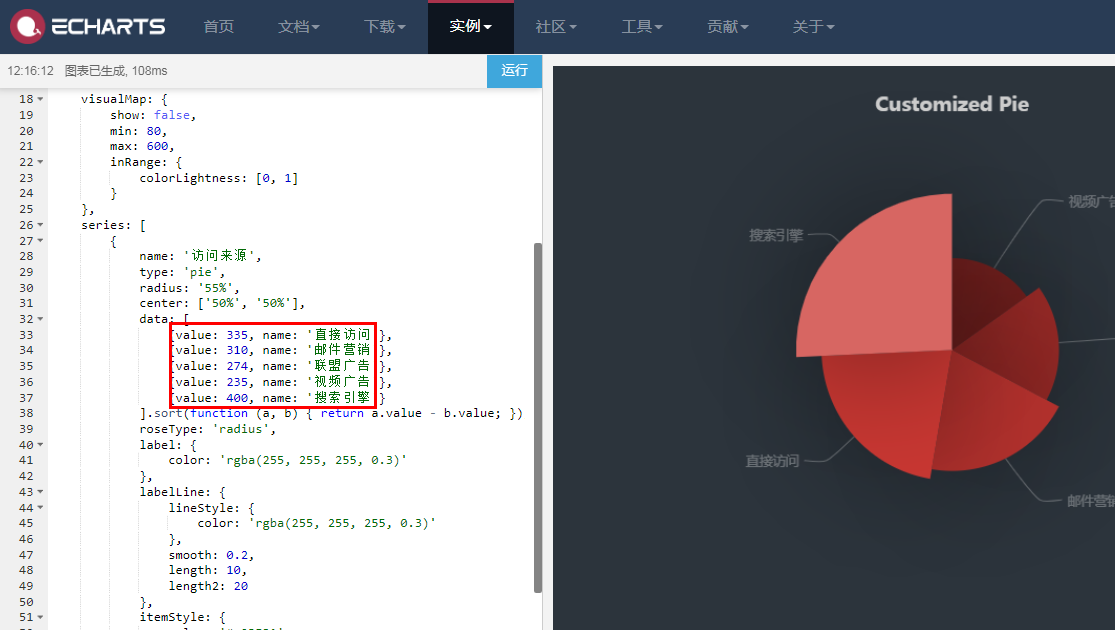
其数据类型是 value、name
和 ProductBarVO 很像,数据类型一样,数据名不一致
若 数据类型不一致 就不行了,要另写实体类了
现在不用 新写 vo 实体类
后端数据 改成 前端数据图表标准
1 在 ProductBarVO 中,加上 @JsonProperty("value"):

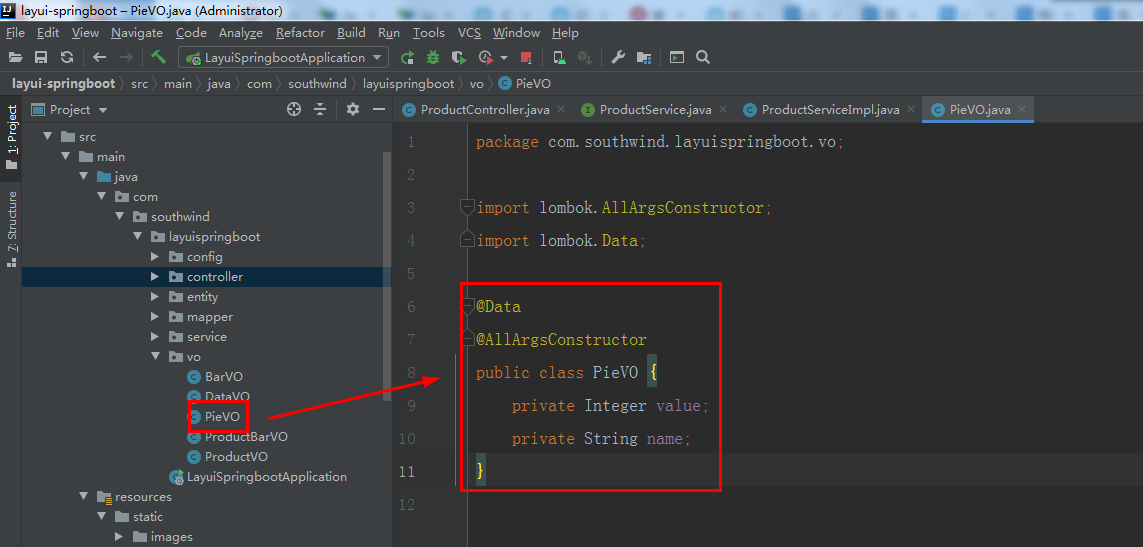
2 另写 1 个 vo 实体类 也行!
在 vo 中,新建 实体类 PieVO,加入代码:
package com.southwind.layuispringboot.vo;

import lombok.Data;

@Data
@AllArgsConstructor
public class PieVO {
    private Integer value;
    private String name;
}
3 ProductService 中,加上 public List<PieVO> getPieVO();:

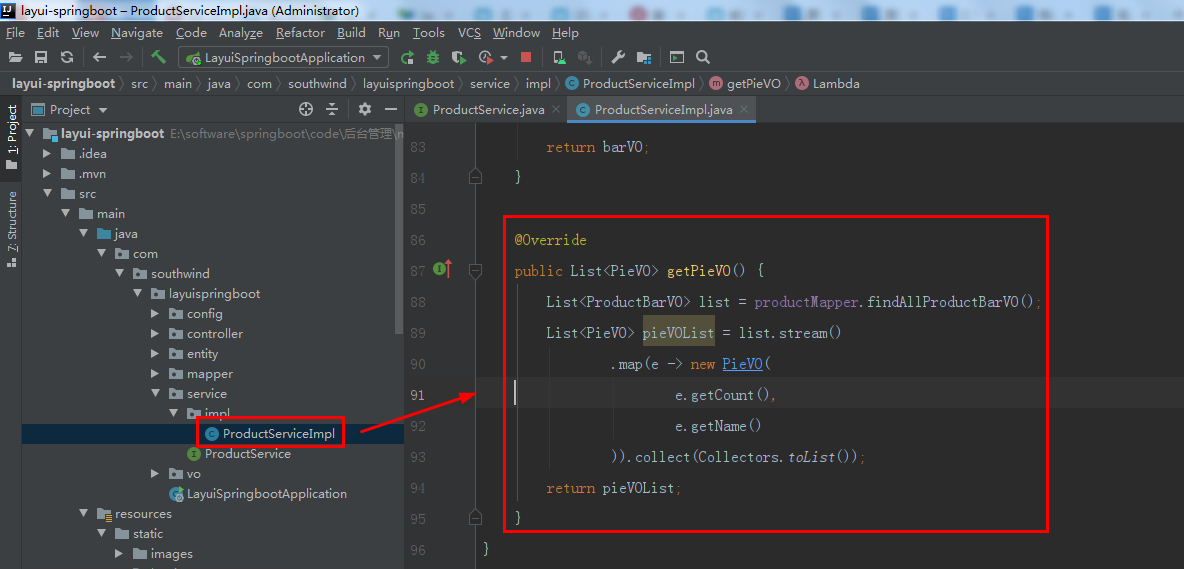
4 ProductServiceImpl 中,加入代码:
    @Override
    public List<PieVO> getPieVO() {
        List<ProductBarVO> list = productMapper.findAllProductBarVO();
        List<PieVO> pieVOList = list.stream()
                .map(e -> new PieVO(
                        e.getCount(),
                        e.getName()
                )).collect(Collectors.toList());
        return pieVOList;
    }
后台数据传到 前端图表中
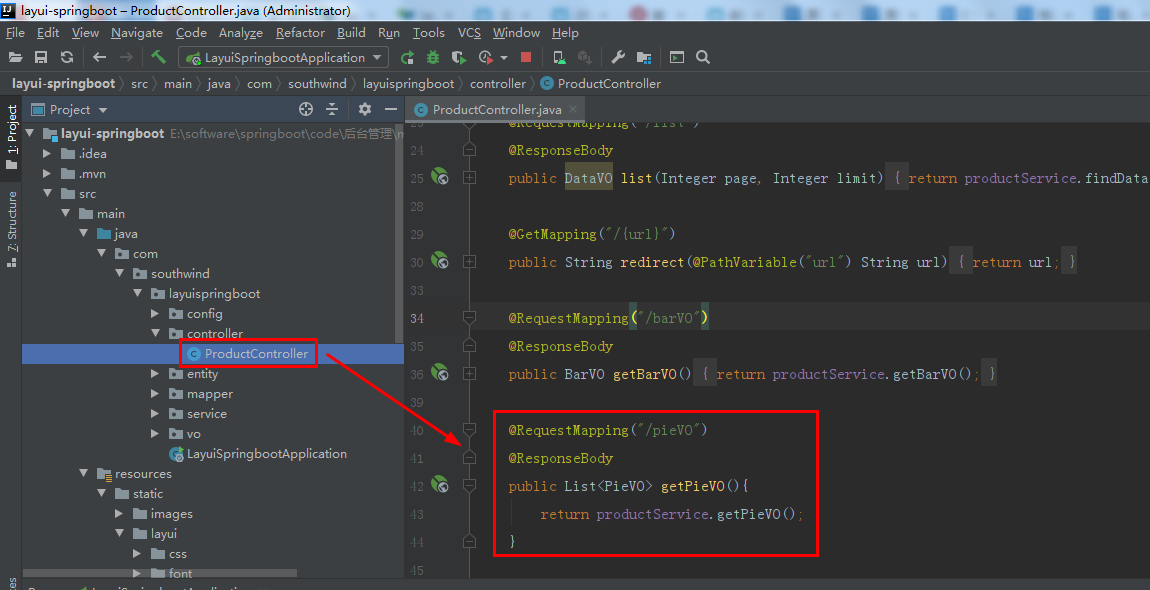
5 ProductController 中,加入代码:
    @RequestMapping("/pieVO")
    @ResponseBody
    public List<PieVO> getPieVO(){
        return productService.getPieVO();
    }
6 重启 LayuiSpringbootApplication,进入 http://localhost:8080/pieVO:

是预期数据形式
7 在 layui-HBuilder_x 中,复制粘贴 1 份 bar.html,改名为 pie.html,下图代码 红框处 改为 饼状图代码

下图 2 处 红框处代码要改

改为:

运行到浏览器:http://127.0.0.1:8848/layui-HBuilder_x/pie.html

视频中,是红色的,我本地运行是黑色的
因为数据较小就偏黑色,数据较大就偏白


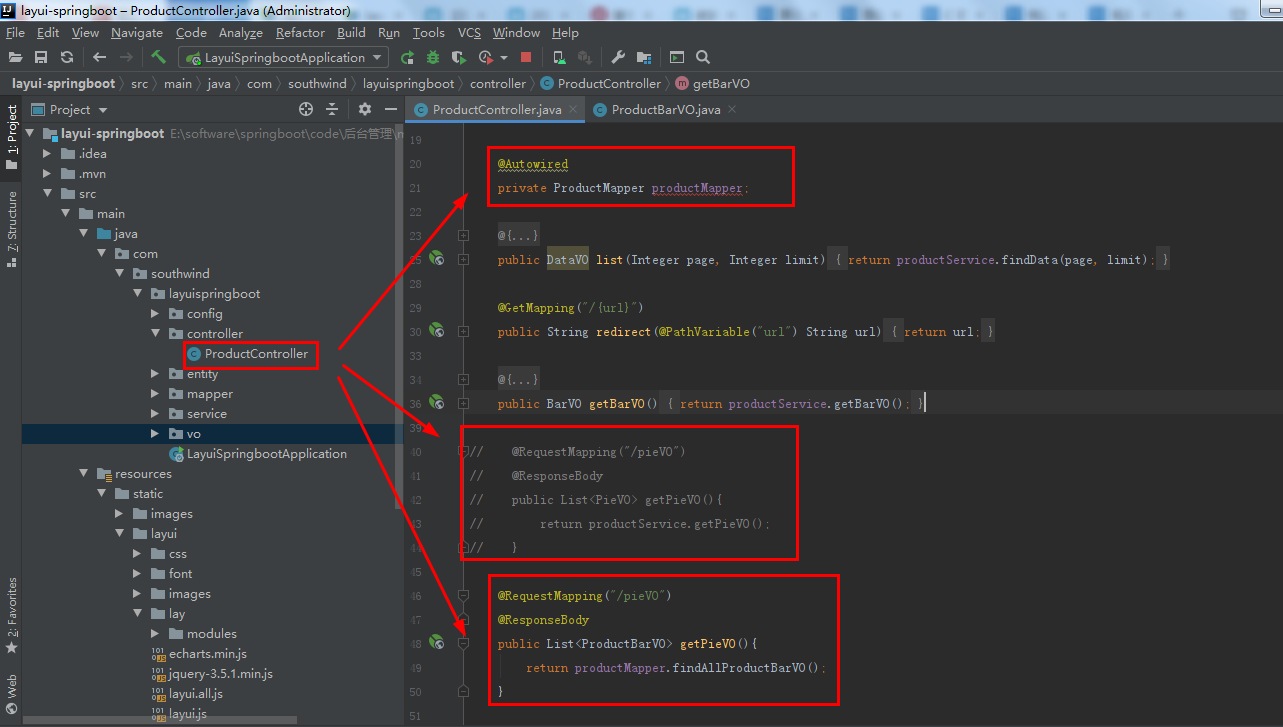
8 之前数据用的是 PieVO 的实体来,现在用 ProductBarVO
在 ProductController 中,注释掉 之前的 getPieVO() 方法,加入:
    @Autowired
    private ProductMapper productMapper;
    @RequestMapping("/pieVO")
    @ResponseBody
    public List<ProductBarVO> getPieVO(){
        return productMapper.findAllProductBarVO();
    }
9 重启 LayuiSpringbootApplication,进入 http://localhost:8080/pieVO:

是预期数据形式
10 在 layui-HBuilder_x 中运行:

整合进 springboot
1 layui-HBuilder_x 中,pie.html 粘贴进 springboot/ resources/ templates 中,修改成:

2 重启 LayuiSpringbootApplication,进入 http://localhost:8080/pieVO:

上一节链接:https://blog.csdn.net/qq_40893824/article/details/106996441
下一节链接:https://blog.csdn.net/qq_40893824/article/details/107034720


 2262
2262

 被折叠的 条评论
为什么被折叠?
被折叠的 条评论
为什么被折叠?
 到【灌水乐园】发言


