


安装存储库RPM:
yum install https://download.postgresql.org/pub/repos/yum/reporpms/EL-7-x86_64/pgdg-redhat-repo-latest.noarch.rpm
安装客户端包:
yum install postgresql96
可以选择安装服务器包:
yum install postgresql96-server
可以选择初始化数据库并启用自动启动:
usr/pgsql-9.6/bin/postgresql96-setup initdb
systemctl enable postgresql-9.6
systemctl start postgresql-9.6

查看是否安装成功

修改用户密码
#yum安装postgresql,默认会建一个名为”postgres”的系统账号,用于执行PostgreSQL;
[root@psql_master ~]# su - postgres

#切换用户后,提示符变更为“-bash-4.2$”;
#同时数据库中也会生成一个名为”postgres”的数据库用户,且密码已自动生成;
#PostgreSQL在数据库用户同名的系统账号下登录免密;
-bash-4.2$ psql -U postgres

#进入数据库后修改密码;
postgres=# alter user postgres with password 'postgres@123'
或者
同构执行进入 psql 进入postgresql命令行环境。
[root@localhost ~]# sudo -i -u postgres
-bash-4.2$ psql
psql (9.6.1)
Type "help" for help.
postgres=#

允许远程访问
#配置文件中,默认只能本机访问postgresql;
#修改listen_addresses = 'localhost'为listen_addresses = '*',允许所有远程访问;
#修改配置文件需要重启服务。
[root@psql_master ~]# sed -i "s|#listen_addresses = 'localhost'|listen_addresses = '*'|g" /var/lib/pgsql/9.6/data/postgresql.conf

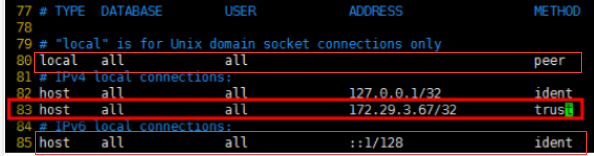
主机认证
注意 :
#peer(不可信),trust(可信),md5(加密) Ident(认证)
#在第82行之后,”IPv4 local connections”下新增允许的客户端;
#“host” 代表主机类型,第一个“all”代表db ,第二个“all”代表user ,“172.29.3.67/32” 代表client ip,“trust”代表认证方式;
#认证方式除“trust”外,还有“peer”, “ident”, “md5”, “password”等,具体可参考pg-hba文件: https://www.postgresql.org/docs/current/static/auth-pg-hba-conf.html
#修改pg.hba文件需要重启服务。
[root@psql_master ~]# vim /var/lib/pgsql/9.6/data/pg_hba.conf
修改文件:
# "local" is for Unix domain socket connections only
local   all             all                                     Peer
# IPv4 local connections:
host    all             all             127.0.0.1/32            Ident
# IPv6 local connections:
host    all             all             ::1/128                 Ident
新文件为:
# "local" is for Unix domain socket connections only
local   all             all                                     md5
# IPv4 local connections:
host    all             all             127.0.0.1/32            md5
# IPv6 local connections:
host    all             all             ::1/128                 md5

[root@psql_master ~]# vim /var/lib/pgsql/9.6/data/postgresql.conf
listen_addresses = '*'
max_connections = 100
shared_buffers = 128MB
dynamic_shared_memory_type = posix
wal_level = hot_standby
#archive_mode = on
archive_command = ''
log_timezone = 'US/Pacific'                     #日志时区
timezone = 'US/Pacific'
打开防火墙
CentOS 防火墙中内置了PostgreSQL服务,配置文件位置在/usr/lib/firewalld/services/postgresql.xml,只需以服务方式将PostgreSQL服务开放即可。
firewall-cmd --add-service=postgresql --permanent    #开放postgresql服务
firewall-cmd --reload            # 重载防火墙

使用
1)创建用户
postgres=# create user postuser1 with password 'user1@123';
2)创建数据库
#同时指定数据库的所有者
postgres=# create database postdb1 owner postuser1;
3)数据库赋权
#未赋权则账户只能登录控制台
postgres=# grant all privileges on database postdb1 to postuser1;
4)登录新建数据库
#在操作系统层使用新建的账号登录新建的数据库,登录后提示符为“postdb1=>”;
#如果在postgres账户下直接使用“postgres=# \c postdb1;”登录,则登录用户依然是postgres,
-bash-4.2$ psql -U postuser1 -d postdb1 -h 127.0.0.1 -p 5432

5)创建表
postdb1=> create table tb1(
          id int primary key,
          name VARCHAR(20),
          salary real
          );
6)插入数据
postdb1=> insert into tb1(
          id, name, salary)
          values(
          101, 'Mike', 5000.00
          );
7)查询
postdb1=>select * from tb1;

常见问题 :
1、启动postgresql数据库,报错端口被占用
su postgres -c “/usr/pgsql-9.6/bin/pg_ctl start -D /data/pg/data”

ps -ef|grep postgres #查看相关进程
解决办法 :
停止数据库
systemctl stop postgresql-9.6
查看报错原因
journalctl -xe
杀死占用端口的进程id号
kill -9 16191
重启数据库
systemctl restart postgresql-9.6
2、
源码安装postgresql96
扩展
卸载PostgreSQL
yum erase postgresql96
参考链接 :
CentOS7安装并配置PostgreSQL :https://www.cnblogs.com/Paul-watermelon/p/10654303.html
CentOS 7 安装PostgreSQL 9.6-完整笔记 : https://www.jianshu.com/p/cc5bc168e5e1
CentOS7安装配置PostgreSQL9.6 : https://www.cnblogs.com/netonline/p/7657810.html
CentOS7安装配置PostgreSQL9.6 :https://www.linuxidc.com/Linux/2017-10/147536.htm
CentOS 7下安装PostgreSQL 9.6的教程分享 :https://www.jb51.net/article/104829.htm
https://www.postgresql.org/download/linux/redhat/


 938
938


 被折叠的 条评论
为什么被折叠?
被折叠的 条评论
为什么被折叠?
 到【灌水乐园】发言


