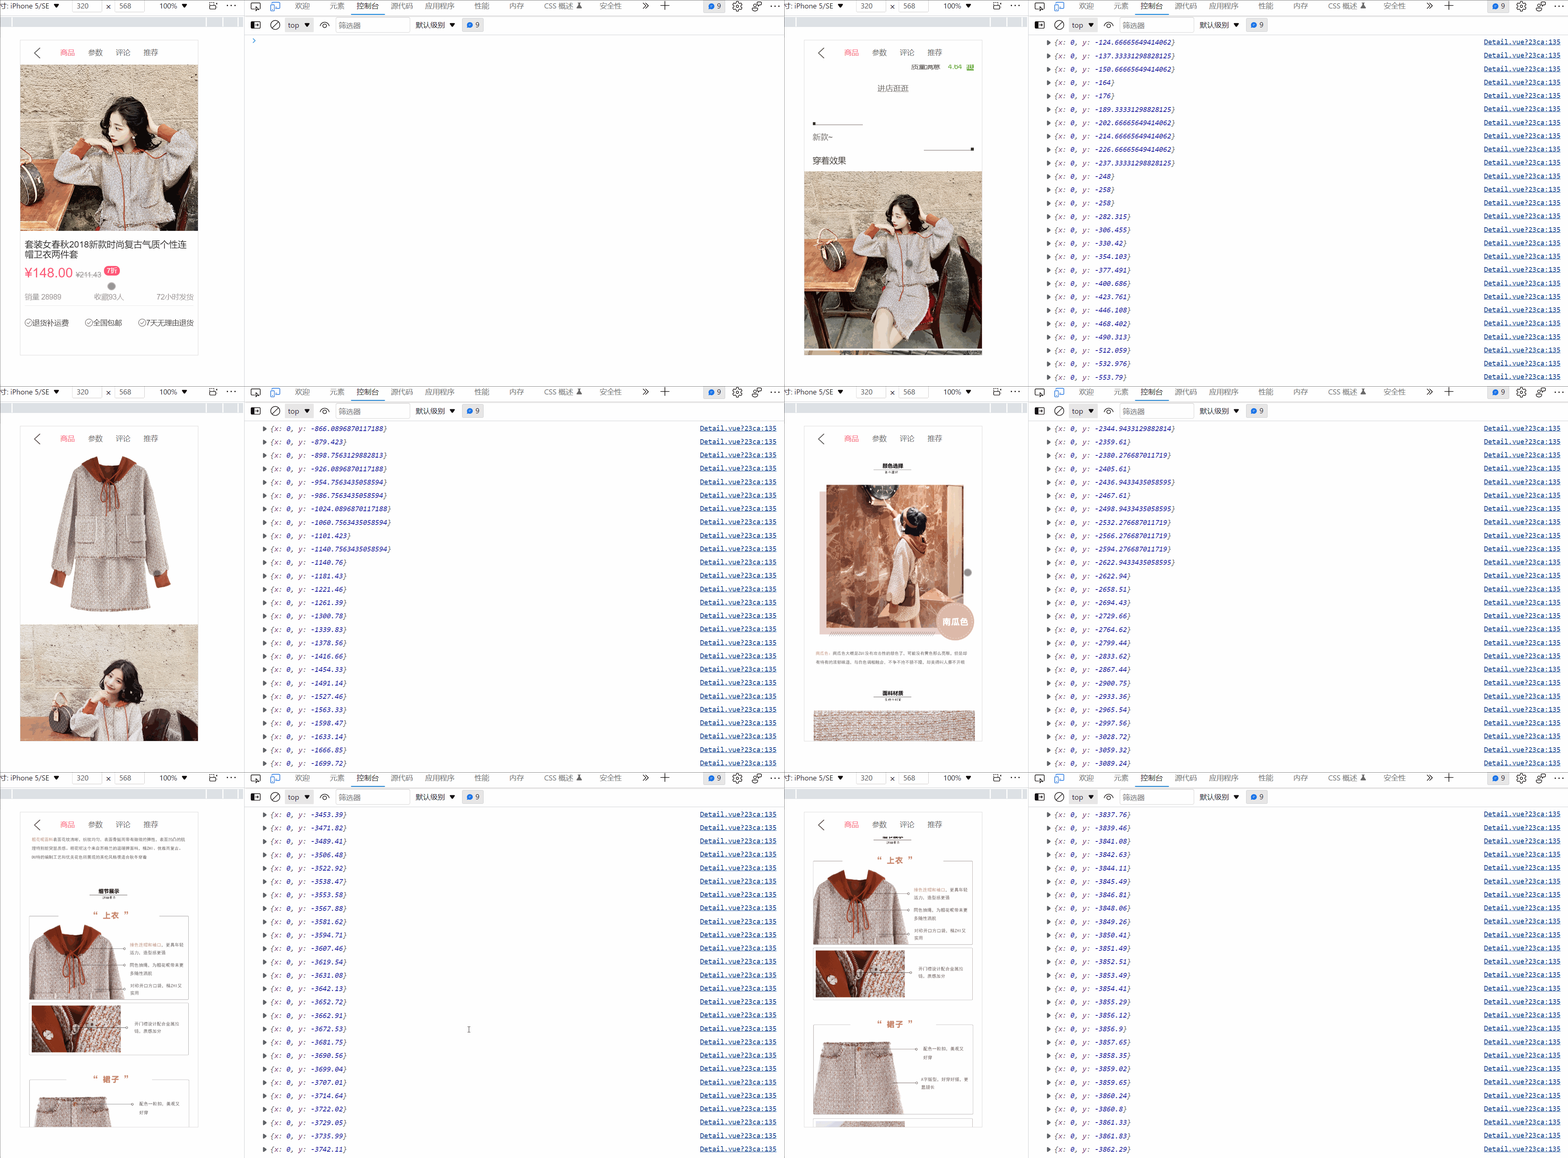
这个功能就是点击了商品就跳到商品对应的位置,点击了参数就跳到参数对应的位置等。以及上下内容的联动效果。
点击标题,滚动到对应的主题
第一步是要监听DetailNavBar的点击
  methods:{
    titleClick(index){
      this.currentIndex=index;
      this.$emit('titleClick',index)
      },
    }
将这个点击事件发出去,在Detail中
<detail-nav-bar class="detail-nav" @titleClick="titleClick"></detail-nav-bar>
在methods中
  titleClick(index){
      this.$refs.scroll.scroll.scrollTo(0, y, 200);
    },
主要是这里的y值的获取;
先在data()里增加一个变量
themeTopYs:[],
这个变量里面有4个值,分别对应小标题的滚动位置。那滚动到多少呢?
就需要获取对应的offsetTop,那怎么动态的获取对应的offsetTop呢?
我们先看mouted()里面是否可以拿到值
  mounted() {
    this.themeTopYs.push(0);
    this.themeTopYs.push(参数的OffsetTop);
    this.themeTopYs.push(评论的OffsetTop);
    this.themeTopYs.push(推荐的OffsetTop);
  },
那么参数还有其他的offsetTop怎么获取呢?
要添加对应的ref
<detail-param-info  ref="param" :param-info="paramInfo" ></detail-param-info>
    <detail-comment-info ref="comment" :comment-info="commentInfo" ></detail-comment-info>
    <goods-list  ref="recommend"  :goods="recommends"></goods-list>
分别为其添加对应的ref,上面的代码就变成
mounted() {
    this.themeTopYs.push(0);
    this.themeTopYs.push(this.$refs.param.$el.OffsetTop);
    this.themeTopYs.push(this.$refs.comment.$el.OffsetTop);
    this.themeTopYs.push(this.$refs.recommend.$el.OffsetTop);
  },
我们打印输出一下会发现:

拿到的东西有3个都是undefined,意味着上面的el里面没有东西,因为我们之前在DetailParamInfo还有其他两个组将上面都做了一个判断
<div class="param-info" v-if="Object.keys(paramInfo).length !== 0">
只有我们paramInfo里面有值才会渲染页面,意味着它还没有请求数据,不能保证在mouted里面数据就能请求下来,这个不一定。因为在created里面才开始请求,在mouted里面数据不一定到。$el去拿组件的根组件,我们又做了一个判断,没有数据之前,根组件也不会渲染。
我们将其放到created()的getDetail函数里
this.themeTopYs=[];
      this.themeTopYs.push(0);
      this.themeTopYs.push(this.$refs.param.$el.OffsetTop);
      this.themeTopYs.push(this.$refs.comment.$el.OffsetTop);
      this.themeTopYs.push(this.$refs.recommend.$el.OffsetTop);
我们会发现其打印输出仍然没有值,因为要等我们把数据赋值过去以后,稍微等一会儿,等它把页面渲染完以后,才能保证它有值。那该怎么做呢?
有一个叫做this.$nextTick(),它就可以等到页面渲染完以后,回调一次后面的箭头函数。就可以保证他们都有值。
   this.$nextTick(()=>{
        this.themeTopYs=[];
        this.themeTopYs.push(0);
        this.themeTopYs.push(this.$refs.param.$el.OffsetTop);
        this.themeTopYs.push(this.$refs.comment.$el.OffsetTop);
        this.themeTopYs.push(this.$refs.recommend.$el.OffsetTop);
      })
    }),
打印输出

原因如下:
    // 第一次获取,值不对
    // 原因是:this.$refs.param.$el压根没有渲染
    this.themeTopYs=[];
    this.themeTopYs.push(0);
    this.themeTopYs.push(this.$refs.param.$el.OffsetTop);
    this.themeTopYs.push(this.$refs.comment.$el.OffsetTop);
    this.themeTopYs.push(this.$refs.recommend.$el.OffsetTop);
    console.log(this.themeTopYs);

   this.$nextTick(()=>{
        //第二次获取:值不对
        //值不对的原因是图片没有计算在内
        //根据最新的数据,对应的DOM是已经被渲染出来了
        //但是图片依然没有加载完(目前获取到的offsetTop不包含其中的图片)
        //offsetTop值不对的时候,都是因为图片的问题
        this.themeTopYs=[];

        this.themeTopYs.push(0);
        this.themeTopYs.push(this.$refs.param.$el.OffsetTop);
        this.themeTopYs.push(this.$refs.comment.$el.OffsetTop);
        this.themeTopYs.push(this.$refs.recommend.$el.OffsetTop);
      })
这两次获取均没有值,我们可以用如下办法:
详页的图片加载完以后可以在methods中的imageLoad()方法里面做一个回调,然后我们在回调里面每次都来获取一次
imageLoad(){
      this.$refs.scroll.scroll.refresh()

      this.themeTopYs=[];
      this.themeTopYs.push(0);
      this.themeTopYs.push(this.$refs.param.$el.OffsetTop);
      this.themeTopYs.push(this.$refs.comment.$el.OffsetTop);
      this.themeTopYs.push(this.$refs.recommend.$el.OffsetTop);
    },
这个时候,这里面的值肯定会调用很频繁,但是结果一定是对的
对于此时调用特别频繁我们可以用防抖函数
先在data()里面增加一个变量:
getThemeTopY:null,
在created()里面
   //4.给getThemeTopY赋值
        this.getThemeTopY = debounce(() => {
          this.themeTopYs = [];
          this.themeTopYs.push(0);
          this.themeTopYs.push(this.$refs.param.$el.offsetTop);
          this.themeTopYs.push(this.$refs.comment.$el.offsetTop);
          this.themeTopYs.push(this.$refs.recommend.$el.offsetTop);
          // console.log(this.themeTopYs);
        }, 100);
最后在methods中的imageLoad()里
  imageLoad(){
      this.$refs.scroll.scroll.refresh()
      this.getThemeTopY()
    },
最终结果是:

总结:
点击标题,滚动到对应的主题
●在detail中监听标题的点击,获取index
●滚动到对应的主题:
- 获取所有主题的offsetTop
- 问题:在哪里才能获取到正确的offsetTop
- 1.created肯定不行,压根不能获取元素
- 2.mounted也不行, 数据还没有获取到
- 3.获取到数据的回调中也不行, DOM还没有渲染完
- 4.$nextTick也不行,因为图片的高度没有被计算在内
- 5.在图片加载完成后,获取的高度才是正确
滚动内容显示对应的标题
获取滚动位置,这就需要监听滚动。也就是监听scroll事件,它又发出过一个事件
  // 2.监听滚动的位置
    this.scroll.on('scroll', (position) => {
      // console.log(position);
      this.$emit('scroll', position)
    })
所以我们要做的就是在Detail终接收这个事件
<scroll class="content" ref="scroll" @scroll="contentScroll">
在methods中
   contentScroll(position){
      console.log(position);
        }
此时控制台并没有打印内容,原因是在我们的scroll里面,默认情况下我们的0,0的时候就默认不派发这个事件
 probeType: {
      type: Number,
      default: 0
    },
为了能让它派发事件,我们需要传入一个probe-type的值
<scroll class="content" ref="scroll" :probe-type="3" @scroll="contentScroll" >
此时

我们主要是想要获取y值
positoinY和主题中值进行对比 比如说我们的四个参数的值分别为[0, 7938, 9120, 9452 ]
positoinY在0和7938之间,index=0
positoinY在7938和9120 之间,index = 1
positoinY 在9120和9452之间,index = 2
positoinY 超过9120 值,index = 3
我们先在data()里新增一个变量:
currentIndex:0,
然后在methods中
   contentScroll(position){
      // console.log(position);
      // 1、获取y值
      const positionY=-position.y
      //2、positionY和主题中值进行对比
      //  [0, 7938, 9120, 9452 ]
      //positoinY在0和7938之间,index=0
       // positoinY在7938和9120 之间,index = 1
       // positoinY 在9120和9452之间,index = 2
      // positoinY 超过9120 值,index = 3

      let length=this.themeTopYs.length
      for(let i=0;i<length-1;i++){
        // if(this.currentIndex!==i && ((i<length-1 && positionY >= this.themeTopYs[i] &&
        //   positionY< this.themeTopYs[i+1]) || (i===length-1 && positionY >= this.themeTopYs[i]))){
        if(this.currentIndex!==i && (positionY>=this.themeTopYs[i] && positionY<=this.themeTopYs[i+1])){
          this.currentIndex=i;
          this.$refs.nav.currentIndex=this.currentIndex
        }
      }
其中要给我们的头部导航栏一个nav,让其对应的currentIndex一致。
我们的判断条件其中的条件一:
条件一:this.currentIndex! == i 目的是防止赋值的过程过于频繁
条件二: ((i<length-1 && positionY >= this.themeTopYs[i] &&
positionY< this.themeTopYs[i+1]) || (i== =length-1 && positionY >= this.themeTopYs[i])))
条件1:(i<length-1 && positionY >= this.themeTopYs[i] &&
positionY< this.themeTopYs[i+1])
条件2: ( i = = = length-1 && positionY >= this.themeTopYs[i])
其中条件1是用来判断区间:在0和某个数字之间((i ===length-1 )
条件2是用来判断大于等于: i = = = length-1
我们下面来做一个优化(hack做法):
我们最后在加上一个非常大的值,让其简化我们的判断条件
在created里面push五个值,其中一个就是最大值
this.themeTopYs.push(Number.MAX_VALUE);
然后我们的判断条件就可以简化的写成
positionY>=this.themeTopYs[i] && positionY<=this.themeTopYs[i+1]
考虑到越界的问题,我们将循环里面的length-1。
多占了一些空间,但是提高了性能。
最终的结果:


 12万+
12万+


 被折叠的 条评论
为什么被折叠?


