


本文以pytorch1.10进行解读:torch — PyTorch 1.10 documentation
文本的操作在github上都有Shirley-Xie/pytorch_exercise · GitHub,且有运行结果。
nn.functional 和 nn.Module介绍
利用张量的API我们可以构建出神经网络相关的组件(如激活函数,模型层,损失函数)。
Pytorch和神经网络相关的功能组件大多都封装在 torch.nn模块下。
1. 组件的函数实现
组件的绝大部分既有函数形式实现,也有类形式实现。nn.functional(一般引入后改名为F)有各种功能组件的函数实现。 比如:
激活函数系列(F.relu, F.sigmoid, F.tanh, F.softmax)
模型层系列(F.linear, F.conv2d, F.max_pool2d, F.dropout2d, F.embedding)
损失函数系列(F.binary_cross_entropy, F.mse_loss, F.cross_entropy)
为了便于对参数进行管理, 一般通过继承nn.Module转换为类的实现形式, 并直接封装在nn模块下:
激活函数变成(nn.ReLu, nn.Sigmoid, nn.Tanh, nn.Softmax)
模型层(nn.Linear, nn.Conv2d, nn.MaxPool2d, nn.Embedding)
损失函数(nn.BCELoss, nn.MSELoss, nn.CrossEntorpyLoss)
此处只对激活函数举例,模型层和损失函数会单独出。
import torch
from torch import nn
import torch.nn.functional  as F

torch.relu(torch.tensor(-1.0))
F.relu(torch.tensor(-1.0))
2. nn.Module管理各种参数(配合nn.Parameter使用)
在Pytorch中,模型的参数是需要被优化器训练的,因此,通常要设置参数为 requires_grad = True 的张量。同时,在一个模型中,往往有许多的参数,要手动管理这些参数并不是一件容易的事情。Pytorch一般将参数用nn.Parameter来表示,并且用nn.Module来管理其结构下的所有参数。
# nn.Parameter 具有 requires_grad = True 属性
w = nn.Parameter(torch.randn(2,2))
print(w)
print(w.requires_grad)
“”“
结果
Parameter containing:
tensor([[-0.5537, -0.9276],
        [-1.8377,  0.5404]], requires_grad=True)
True
”“”
2.1 Parameter的设置
nn.ParameterList 可以将多个nn.Parameter组成一个列表。nn.ParameterDict 可以将多个nn.Parameter组成一个字典。
# nn.ParameterList 可以将多个nn.Parameter组成一个列表
params_list = nn.ParameterList([nn.Parameter(torch.rand(8,i)) for i in range(1,3)])
print(params_list)
print(params_list[0].requires_grad)

“”“结果:
ParameterList(
    (0): Parameter containing: [torch.FloatTensor of size 8x1]
    (1): Parameter containing: [torch.FloatTensor of size 8x2]
)
True
“”“

# nn.ParameterDict 可以将多个nn.Parameter组成一个字典
params_dict = nn.ParameterDict({"a":nn.Parameter(torch.rand(2,2)),
                               "b":nn.Parameter(torch.zeros(2))})
print(params_dict)
print(params_dict["a"].requires_grad)
“”“结果
ParameterDict(
    (a): Parameter containing: [torch.FloatTensor of size 2x2]
    (b): Parameter containing: [torch.FloatTensor of size 2]
)
True

”“”
2.2 Parameter的管理
可以用Module将它们管理起来, module.parameters()返回一个生成器,包括其结构下的所有parameters。
module = nn.Module()
module.w = nn.Parameter(torch.randn(2,2))
module.params_list = nn.ParameterList([nn.Parameter(torch.rand(8,i)) for i in range(1,3)])
module.params_dict = nn.ParameterDict({"a":nn.Parameter(torch.rand(2,2)),
                               "b":nn.Parameter(torch.zeros(2))})

num_param = 0
for param in module.named_parameters():
    print(param,"\n")
    num_param = num_param + 1
print("number of Parameters =",num_param)
结果:
('w', Parameter containing:
tensor([[-1.5608, -1.6907],
        [-0.8354, -0.4948]], requires_grad=True))

('params_list.0', Parameter containing:
tensor([[0.8162],
        [0.3292],
        [0.1848],
        [0.1778],
        [0.3434],
        [0.8407],
        [0.8832],
        [0.4504]], requires_grad=True))

('params_list.1', Parameter containing:
tensor([[0.6327, 0.5066],
        [0.8139, 0.3508],
        [0.6665, 0.2572],
        [0.1408, 0.3224],
        [0.6954, 0.9119],
        [0.2995, 0.8585],
        [0.9467, 0.5715],
        [0.6016, 0.3498]], requires_grad=True))

('params_dict.a', Parameter containing:
tensor([[0.5146, 0.4849],
        [0.4747, 0.2041]], requires_grad=True))

('params_dict.b', Parameter containing:
tensor([0., 0.], requires_grad=True))

number of Parameters = 5
2.3 nn.Linear范例
实践当中,一般通过继承nn.Module来构建模块类,并将所有含有需要学习的参数的部分放在构造函数中。
#以下范例为Pytorch中nn.Linear的源码的简化版本
#可以看到它将需要学习的参数放在了__init__构造函数中,并在forward中调用F.linear函数来实现计算逻辑。

class Linear(nn.Module):
    __constants__ = ['in_features', 'out_features']

    def __init__(self, in_features, out_features, bias=True):
        super(Linear, self).__init__()
        self.in_features = in_features
        self.out_features = out_features
        self.weight = nn.Parameter(torch.Tensor(out_features, in_features))
        if bias:
            self.bias = nn.Parameter(torch.Tensor(out_features))
        else:
            self.register_parameter('bias', None)

    def forward(self, input):
        return F.linear(input, self.weight, self.bias)
3. nn.Module管理其引用的子模块
一般情况下,我们都很少直接使用 nn.Parameter来定义参数构建模型,而是通过一些拼装一些常用的模型层来构造模型。在nn.Module中,有8个重要的属性, 用于管理整个模型,他们都是以有序字典的形式存在着:

- _parameters: 存储管理属于nn.Parameter类的属性,例如权值,偏置这些参数
- __modules: 存储管理nn.Module类, 比如LeNet中,会构建子模块,卷积层,池化层,就会存储在_modules中
这些模型层也是继承自nn.Module的对象,本身也包括参数,属于我们要定义的模块的子模块。nn.Module提供了一些方法可以管理这些子模块。
- children() 方法: 返回生成器,包括模块下的所有子模块。
- named_children()方法:返回一个生成器,包括模块下的所有子模块,以及它们的名字。
- modules()方法:返回一个生成器,包括模块下的所有各个层级的模块,包括模块本身。
- named_modules()方法:返回一个生成器,包括模块下的所有各个层级的模块以及它们的名字,包括模块本身。
3.1 chidren()和named_children()
其中chidren()方法和named_children()方法较多使用。modules()方法和named_modules()方法较少使用,其功能可以通过多个named_children()的嵌套使用实现。
class Net(nn.Module):

    def __init__(self):
        super(Net, self).__init__()

        self.embedding = nn.Embedding(num_embeddings = 10000,embedding_dim = 3,padding_idx = 1)
        self.conv = nn.Sequential()
        self.conv.add_module("conv_1",nn.Conv1d(in_channels = 3,out_channels = 16,kernel_size = 5))
        self.conv.add_module("pool_1",nn.MaxPool1d(kernel_size = 2))
        self.conv.add_module("relu_1",nn.ReLU())
        self.conv.add_module("conv_2",nn.Conv1d(in_channels = 16,out_channels = 128,kernel_size = 2))
        self.conv.add_module("pool_2",nn.MaxPool1d(kernel_size = 2))
        self.conv.add_module("relu_2",nn.ReLU())

        self.dense = nn.Sequential()
        self.dense.add_module("flatten",nn.Flatten())
        self.dense.add_module("linear",nn.Linear(6144,1))

    def forward(self,x):
        x = self.embedding(x).transpose(1,2)
        x = self.conv(x)
        y = self.dense(x)
        return y

net = Net()

i = 0
for child in net.children():
    i+=1
    print(child,"\n——————\n")
print("child number",i)
结果:
Embedding(10000, 3, padding_idx=1)
——————

Sequential(
  (conv_1): Conv1d(3, 16, kernel_size=(5,), stride=(1,))
  (pool_1): MaxPool1d(kernel_size=2, stride=2, padding=0, dilation=1, ceil_mode=False)
  (relu_1): ReLU()
  (conv_2): Conv1d(16, 128, kernel_size=(2,), stride=(1,))
  (pool_2): MaxPool1d(kernel_size=2, stride=2, padding=0, dilation=1, ceil_mode=False)
  (relu_2): ReLU()
)
——————

Sequential(
  (flatten): Flatten()
  (linear): Linear(in_features=6144, out_features=1, bias=True)
)
——————

child number 3
1
name_childeren():
i = 0
for name,child in net.named_children():
    i+=1
    print(name,":::",child,"\n——————\n")
print("child number",i)
结果:
embedding ::: Embedding(10000, 3, padding_idx=1)
——————

conv ::: Sequential(
  (conv_1): Conv1d(3, 16, kernel_size=(5,), stride=(1,))
  (pool_1): MaxPool1d(kernel_size=2, stride=2, padding=0, dilation=1, ceil_mode=False)
  (relu_1): ReLU()
  (conv_2): Conv1d(16, 128, kernel_size=(2,), stride=(1,))
  (pool_2): MaxPool1d(kernel_size=2, stride=2, padding=0, dilation=1, ceil_mode=False)
  (relu_2): ReLU()
)
——————

dense ::: Sequential(
  (flatten): Flatten()
  (linear): Linear(in_features=6144, out_features=1, bias=True)
)
——————

child number 3
更多内容可以在github上看。
3.2 用参数设置为不可训练
下面可以通过named_children方法找到embedding层,并将其参数设置为不可训练(相当于冻结embedding层)。
children_dict = {name:module for name,module in net.named_children()}
print(children_dict)
embedding = children_dict["embedding"]
embedding.requires_grad_(False) #冻结其参数
4. 模型容器Containers

Net网络的构建,都是各种网络的堆叠,然后用sequential包装起来。 然后它的forward函数也比较简单, 只需要features处理输出,然后形状变换,然后classifier就搞定。 其中Sequential就是模型容器。Containers这个容器里面包含3个子模块,分别是nn.Sequential, nn.ModuleList, nn.ModuleDict。
4.1 nn.Sequential 顺序性
这是nn.module的容器,用于按顺序包装一组网络层。nn.Sequential是nn.module的容器, 用于按顺序包装一组网络层。各网络层之间严格按照顺序构建,这时候一定要注意前后层数据的关系自带forward(): 自带的forward里,通过for循环依次执行前向传播运算。
class LeNetSequential(nn.Module):
    def __init__(self, classes):
        super(LeNetSequential, self).__init__()
        self.features = nn.Sequential(
            nn.Conv2d(3, 6, 5),
            nn.ReLU(),
            nn.MaxPool2d(kernel_size=2, stride=2),
            nn.Conv2d(6, 16, 5),
            nn.ReLU(),
            nn.MaxPool2d(kernel_size=2, stride=2),)

        self.classifier = nn.Sequential(
            nn.Linear(16*5*5, 120),
            nn.ReLU(),
            nn.Linear(120, 84),
            nn.ReLU(),
            nn.Linear(84, classes),)

    def forward(self, x):
        x = self.features(x)
        x = x.view(x.size()[0], -1)
        x = self.classifier(x)
        return x
对网络层进行一个命名,加上OrderedDict({'name':nn.Conv2d(3, 6, 5),……})
class LeNetSequentialOrderDict(nn.Module):
    def __init__(self, classes):
        super(LeNetSequentialOrderDict, self).__init__()

        self.features = nn.Sequential(OrderedDict({
            'conv1': nn.Conv2d(3, 6, 5),
            'relu1': nn.ReLU(inplace=True),
            'pool1': nn.MaxPool2d(kernel_size=2, stride=2),

            'conv2': nn.Conv2d(6, 16, 5),
            'relu2': nn.ReLU(inplace=True),
            'pool2': nn.MaxPool2d(kernel_size=2, stride=2),
        }))

        self.classifier = nn.Sequential(OrderedDict({
            'fc1': nn.Linear(16*5*5, 120),
            'relu3': nn.ReLU(),

            'fc2': nn.Linear(120, 84),
            'relu4': nn.ReLU(inplace=True),

            'fc3': nn.Linear(84, classes),
        }))

    def forward(self, x):
        x = self.features(x)
        x = x.view(x.size()[0], -1)
        x = self.classifier(x)
        return x
4.2 nn.ModuleList 迭代性
nn.ModuleList是nn.module的容器, 用于包装一组网络层, 以迭代方式调用网络层, 主要方法:
- append(): 在ModuleList后面添加网络层
- extend(): 拼接两个ModuleList
- insert(): 指定在ModuleList中位置插入网络层
我们可以发现,这个方法的作用其实类似于我们的列表,只不过元素换成网络层而已,下面我们学习ModuleList的使用,我们使用ModuleList来循环迭代的实现一个5个全连接层的网络的构建。
class ListNet(nn.Module):
    def __init__(self):
        super(ListNet, self).__init__()
        self.linears = nn.ModuleList([nn.Linear(10, 10) for i in range(5)])

    def forward(self, x):
        for i, linear in enumerate(self.linears):
            x = linear(x)
        return x

lnet=ListNet()
4.3 nn.ModuleDict 索引性
nn.ModuleDict是nn.module的容器, 用于包装一组网络层, 以索引方式调用网络层,实现网络层的选取. 主要方法:
- clear(): 清空ModuleDict
- items(): 返回可迭代的键值对(key-value pairs)
- keys(): 返回字典的键(key)
- values(): 返回字典的值(value)
- pop(): 返回一对键值对, 并从字典中删除
class ModuleDict(nn.Module):
    def __init__(self):
        super(ModuleDict, self).__init__()
        self.choices = nn.ModuleDict({
            'conv': nn.Conv2d(10, 10, 3),
            'pool': nn.MaxPool2d(3)
        })

        self.activations = nn.ModuleDict({
            'relu': nn.ReLU(),
            'prelu': nn.PReLU()
        })

    # 这个东西在选择网络层的时候挺实用,比如要做时间序列预测的时候,我们往往会用到GRU或者LSTM,通过这种方式来对比哪种网络的效果好
    def forward(self, x, choice, act):
        x = self.choices[choice](x) # 可以选择卷积或者池化
        x = self.activations[act](x) # 可以选取是用哪个激活函数
        return x

net = ModuleDict()
fake_img = torch.randn((4, 10, 32, 32))
output = net(fake_img, 'conv', 'relu')    # 在这里可以选择我们的层进行组合
print(output.shape)
5. AlexNet的构建
这是一个划时代的卷积神经网络,2012年在ImageNet分类任务中获得了冠军,开创了卷积神经网络的新时代。 AlexNet的特点如下:
- 采用ReLu: 替换饱和激活函数, 减轻梯度消失
- 采用LRN(Local Response Normalization): 对数据归一化,减轻梯度消失(后面被Batch归一化取代了)
- Dropout: 提高全连接层的鲁棒性,增加网络的泛化能力
- Data Augmentation: TenCrop, 色彩修改
AlexNet图如下:
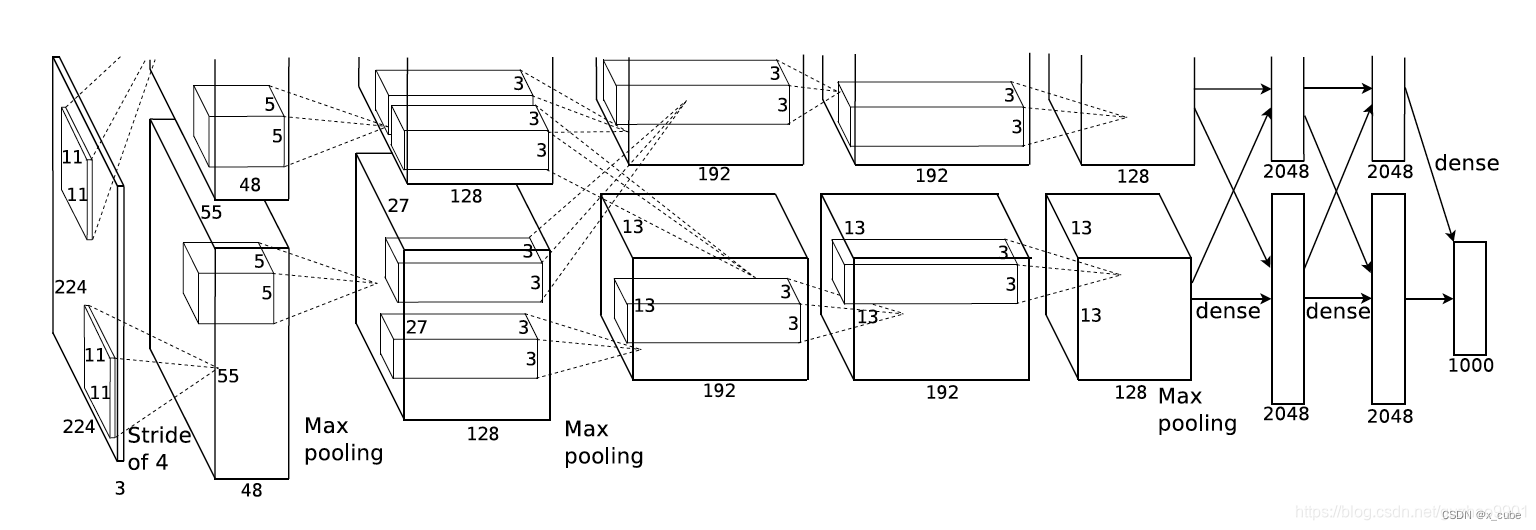
下面就看看AlexNet的结构:
class AlexNet(nn.Module):

    def __init__(self, num_classes=1000):
        super(AlexNet, self).__init__()
        self.features = nn.Sequential(
            nn.Conv2d(3, 64, kernel_size=11, stride=4, padding=2),
            nn.ReLU(inplace=True),
            nn.MaxPool2d(kernel_size=3, stride=2),
            nn.Conv2d(64, 192, kernel_size=5, padding=2),
            nn.ReLU(inplace=True),
            nn.MaxPool2d(kernel_size=3, stride=2),
            nn.Conv2d(192, 384, kernel_size=3, padding=1),
            nn.ReLU(inplace=True),
            nn.Conv2d(384, 256, kernel_size=3, padding=1),
            nn.ReLU(inplace=True),
            nn.Conv2d(256, 256, kernel_size=3, padding=1),
            nn.ReLU(inplace=True),
            nn.MaxPool2d(kernel_size=3, stride=2),
        )
        self.avgpool = nn.AdaptiveAvgPool2d((6, 6))
        self.classifier = nn.Sequential(
            nn.Dropout(),
            nn.Linear(256 * 6 * 6, 4096),
            nn.ReLU(inplace=True),
            nn.Dropout(),
            nn.Linear(4096, 4096),
            nn.ReLU(inplace=True),
            nn.Linear(4096, num_classes),
        )

    def forward(self, x):
        x = self.features(x)
        x = self.avgpool(x)
        x = torch.flatten(x, 1)
        x = self.classifier(x)
        return x
文章参考:
Module — PyTorch 1.10 documentation
系统学习Pytorch笔记四:模型创建Module、模型容器Containers及AlexNet网络搭建__convnd-CSDN博客
GitHub - lyhue1991/eat_pytorch_in_20_days: Pytorch🍊🍉 is delicious, just eat it! 😋😋AlexNet网络结构详解(含各层维度大小计算过程)与PyTorch实现-CSDN博客


 1142
1142


 被折叠的 条评论
为什么被折叠?
被折叠的 条评论
为什么被折叠?
 到【灌水乐园】发言


