


【说明】文章内容来自《机器学习——基于sklearn》,用于学习记录。若有争议联系删除。
1、分类与回归
决策树描述的是通过一系列规则对数据进行分类的过程。决策树分为分类树和回树两种,分类树的对离散变量进行决策,回归树用于对连续变量进行决策。
1.1 分类问题
Sklearn 提供了 Decision TreeClassifier函数用于分类变量,语法如下:
DecisionTreeClassifier(criterio, splitter, max_depth, min_samples_split)【参数说明】
- criterion:内置标准为gini(基尼系数)或者entropy(信息熵)。
- splitter:切割方法,如 splitter= 'best'。
- max_depth:决策树最大深度。
- min_samples_split:划分样本的最小数量。
1.2 回归问题
回归树在选择不同特征作为分裂节点的策略上与分类树相似。两者的不同之处在于,回归树的叶节点的数据类型不是离散型,而是连续型。回归树的叶节点是具体的值,从预测值连续这个意义上严格地讲,回归树不能称为回归算法。因为回归树的叶节点返回的是“一团”训练数据的均值,而不是具体的、连续的预测值。
Sklearn 提供了 Decision TreeRegressor函数用于连续变量,语法如下:12
DecisionTreeRegressor (criterion, max_depth)【参数说明】
- criterion:使用'mse'(均方差)或者'mae'(平均绝对误差)。默认为'mse'
- max_depth:决策树深度。
1.3 max_depth参数调优
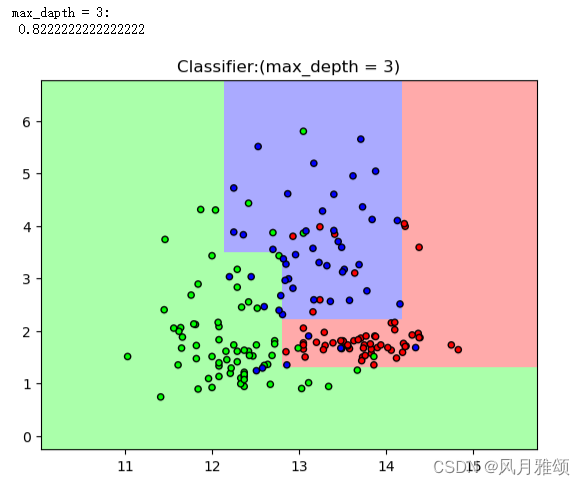
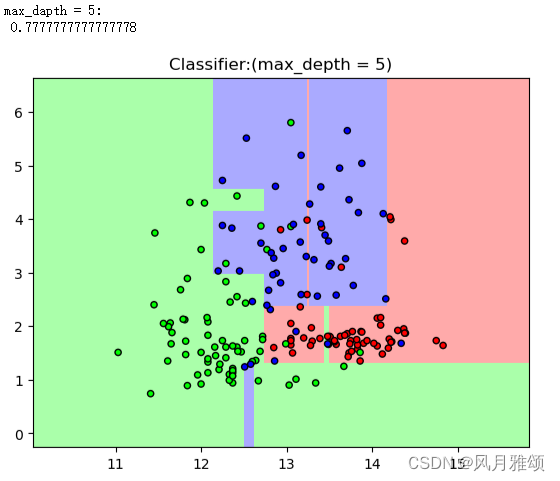
决策树的最大深度(max depth)用于停止运算。当max_depth的取值不同时,分类的效果差距较大。
示例:
import numpy as np
import matplotlib.pyplot as plt
from matplotlib.colors import ListedColormap
from sklearn import tree, datasets
from sklearn.model_selection import train_test_split

wine = datasets.load_wine()
x = wine.data[:,:2]
y = wine.target
x_train, x_test, y_train, y_test = train_test_split(x, y)
# clf = tree.DecisionTreeClassifier(max_depth = 1)
# clf = tree.DecisionTreeClassifier(max_depth = 3)
clf = tree.DecisionTreeClassifier(max_depth = 5)
clf.fit(x_train, y_train)
# print('max_dapth = 1:\n', clf.score(x_test, y_test))
# print('max_dapth = 3:\n', clf.score(x_test, y_test))
print('max_dapth = 5:\n', clf.score(x_test, y_test))
#定义图像中分区的颜色和散点的颜色
cmap_light = ListedColormap(['#FFAAAA','#AAFFAA','#AAAAFF'])
cmap_bold = ListedColormap(['#FF0000','#00FF00','#0000FF'])
#分贝用样本的两个特征值创建图像的横轴和纵轴
x_min, x_max = x_train[:,0].min() - 1, x_train[:,0].max() + 1
y_min, y_max = x_train[:,1].min() - 1, x_train[:,1].max() + 1
xx, yy = np.meshgrid(np.arange(x_min, x_max, .02), np.arange(y_min, y_max, .02))
z = clf.predict(np.c_[xx.ravel(), yy.ravel()])
#给每个分类中的样本分配不同的颜色
z = z.reshape(xx.shape)
plt.figure()
plt.pcolormesh(xx, yy, z, cmap = cmap_light)
#用散点图表示样本
plt.scatter(x[:,0], x[:,1], c = y, cmap = cmap_bold, edgecolor = 'k',s = 20)
plt.xlim(xx.min(), xx.max())
plt.ylim(yy.min(), yy.max())
# plt.title('Classifier:(max_depth = 1)')
# plt.title('Classifier:(max_depth = 3)')
plt.title('Classifier:(max_depth = 5)')
plt.show()
【运行结果】

【结果分析】
当max_depth=1时,分类器只能识别两类;当max_depth=3时,分类器能够进行3类的识别,而且大部分数据点进入了正确的分类;当max_depth=5时,分类器能够将每二个数据点放到正确的分类中。
决策树可视化一:
tree.plot_tree(clf)#决策树可视化【运行结果】

2、集成分类模型
集成分类模型通过综合多个分类器的预测结果作出决策,可分为投票式和顺序式两种模型,
投票式模型是指平行训练多个机器学习模型,以对每个模型的输出进行投票的方式,按少数服从多数的原则作出最终的分类决策。投票式模型的代表是随机森林,顺序式模型是按顺序搭建多个模型,模型之间存在依赖关系,最终整合模型。梯度上升决策树就是顺序式模型的代表。
2.1 随机森林
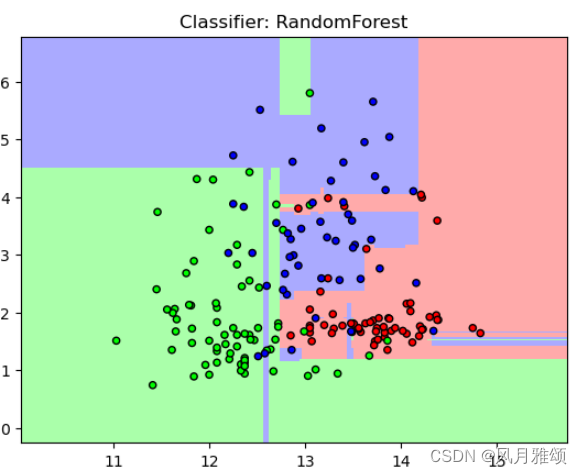
随机森林(random forest)用于解决决策树出现的过拟合问题,该模型将多棵决策树集成起来,对所有决策树的预测结果进行平均。随机森林不但具有决策树的效率,而且可以降低过拟合的风险。
Sklearn.ensemble 模块提供了 RandomForestClassifier函数实现随机森林,语法如下:
RandomForestClassifier (n_estimators, max_features, bootstrap, max_depth,random_state)【参数说明】
- n_estimators:控制随机森林中决策树的棵数。
- max_features:控制选择的特征数量的最大值。
- bootstrap:有放回的抽样。
- max_depth:树的最大深度。
- random_state:确定模型的随机状态相同与否。
随机森林示例:
from sklearn.ensemble import RandomForestClassifier
from sklearn import datasets
from sklearn.model_selection import train_test_split
import numpy as np
import matplotlib.pyplot as plt
from matplotlib.colors import ListedColormap

wine = datasets.load_wine()
x = wine.data[:,:2]
y = wine.target
x_train, x_test, y_train, y_test = train_test_split(x,y)
forest = RandomForestClassifier(n_estimators = 6, max_features = None,
                               bootstrap = True, random_state = 3)
forest.fit(x_train, y_train)
#定义图像中区分的颜色和散点的颜色
cmap_light = ListedColormap(['#FFAAAA','#AAFFAA','#AAAAFF'])
cmap_bold = ListedColormap(['#FF0000','#00FF00','#0000FF'])
#分别用样本的两个特征值创建图像的横轴和纵轴
x_min, x_max = x_train[:,0].min() - 1, x_train[:,0].max() + 1
y_min, y_max = x_train[:,1].min() - 1, x_train[:,1].max() + 1
xx, yy = np.meshgrid(np.arange(x_min, x_max, .02), np.arange(y_min, y_max, .02))
z = forest.predict(np.c_[xx.ravel(), yy.ravel()])
#给每个分类中的样本分配不同的颜色
z = z.reshape(xx.shape)
plt.figure()
plt.pcolormesh(xx, yy, z, cmap = cmap_light)
#用散点图表示样本
plt.scatter(x[:,0], x[:,1], c = y, cmap = cmap_bold, edgecolor = 'k', s= 20)
plt.xlim(xx.min(), xx.max())
plt.ylim(yy.min(), yy.max())
plt.title('Classifier: RandomForest')
plt.show()
【运行结果】
2.2 梯度提升决策树
梯度提升决策树(gradient tree boosting)是指按照一定次序搭建多个分类模型,各模型相互依赖,构建出分类能力更强的模型。与构建随机森林分类器模型不同,梯度提升决策树在生成的过程中会尽可能降低集成模型在训练集上的拟合误差。
Sklearn提供了GradientBoostingClassifier函数用于梯度提升决策树,语法如下:
GradientBoostingClassifier(n_estimators, max_features, random state)【参数说明】
- n_estimators:控制梯度提升决策树中分类模型的个数。
- max_features:控制选择的特征数量的最大值。
- random_state:确定模型的随机状态相同与否。
决策树示例:
泰坦尼号数据链接:https://pan.baidu.com/s/1incSzcvegxh0UzEl2WdmNw
提取码:q49e
#导入泰坦尼克号遇难者数据集
import pandas as pd
titan=pd.read_csv('titanic.csv')
print(titan)
【运行结果】

#以下进行数据预处理
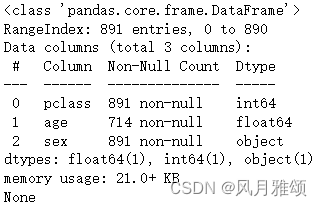
# (1)选取特征
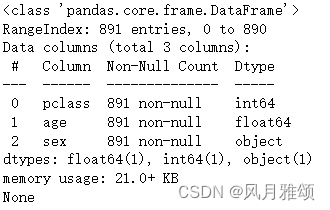
x = titan[['pclass','age','sex']]
y = titan['survived']
print(x.info())【运行结果】
#(2)缺失数据处理
x.fillna(x['age'].mean(), inplace = True)
print(x.info())
【运行结果】
#(3)划分数据集
x1 = x[['pclass','age','sex']]
from sklearn.model_selection import train_test_split
x_train, x_test, y_train, y_test = train_test_split(x1, y, test_size = 0.25,
                                                    random_state = 1)
print(x_train.shape, x_test.shape)
【运行结果】
![]()
#(4)特征向量化
from sklearn.feature_extraction import DictVectorizer
vec = DictVectorizer(sparse = False)
x_train = vec.fit_transform(x_train.to_dict(orient = 'record'))
x_test = vec.transform(x_test.to_dict(orient = 'record'))
print(vec.feature_names_)
【运行结果】
![]()
——————说明——第一次运行的时候没有出错,但是二次运行该段代码会出错,可以将x_train以及x_test修改为x_train1和x_test1再运行。
#随机森林算法模型
from sklearn.ensemble import RandomForestClassifier
rfc = RandomForestClassifier()
rfc.fit(x_train, y_train)
# RandomForestClassifier(bootstrap = True, class_weight = None, criterion = 'gini',max_depth = None,
#                       max_features = 'auto', max_leaf_nodes = None, min_impurity_decrease = 0.0,
#                       min_impurity_split = None,min_samples_leaf = 1, min_samples_split = 2,
#                       min_weight_fraction_leaf = 0.0, n_estimators = 10, n_jobs = 1,
#                       oob_score = False, random_state = None, verbose = 0, warm_start = False)
print(rfc.score(x_test, y_test))
from sklearn.metrics import classification_report
rfc_pre = rfc.predict(x_test)
print(classification_report(rfc_pre, y_test))
【运行结果】

#梯度提升决策树模型
from sklearn.ensemble import GradientBoostingClassifier
gbc = GradientBoostingClassifier()
gbc.fit(x_train, y_train)
print(gbc.score(x_test, y_test))
from sklearn.metrics import classification_report
print(classification_report(gbc.predict(x_test), y_test))
【运行结果】


 4557
4557


 被折叠的 条评论
为什么被折叠?
被折叠的 条评论
为什么被折叠?
 到【灌水乐园】发言


