


论文实验中经典方法Bicubic的Python实现
使用时更改文件夹、保存路径、重建倍数即可
import os
import argparse
import cv2

# parse args
parser = argparse.ArgumentParser(description='Upsize images using bicubic interpolation')
parser.add_argument("-k", "--keepdims", help="keep original image dimensions in downsampled images",
                    action="store_true")
##############################需要修改的部分#############################
parser.add_argument('--lr_img_dir', type=str, default=r'D:\PythonUtils\RCAN_TestCode\LR\LRBI\B100\x4',
                    help='path to low resolution image dir')  # 待上采样图片文件夹
parser.add_argument('--hr_img_dir', type=str, default=r'D:\PythonUtils\RCAN_TestCode\LR\LRBI\B100',
                    help='path to desired output path for Upsampled images')  # 结果保存路径,会自动生成存储结果的文件夹,如  X2result
parser.add_argument('--scale', type=int, default=4,
                    help='path to desired output dir for Upsampled images')  # 上采样倍率
##########################################################
args = parser.parse_args()

lr_image_dir = args.lr_img_dir
hr_image_dir = args.hr_img_dir

print(args.hr_img_dir)
print(args.lr_img_dir)

# create LR image dirs
os.makedirs(hr_image_dir + f"\Bicubic-x{args.scale}-result", exist_ok=True)  # 创建保存结果的文件夹

supported_img_formats = (".bmp", ".dib", ".jpeg", ".jpg", ".jpe", ".jp2",
                         ".png", ".pbm", ".pgm", ".ppm", ".sr", ".ras", ".tif",
                         ".tiff")

# Upsample LR images
for filename in os.listdir(lr_image_dir):
    if not filename.endswith(supported_img_formats):
        continue

    name, ext = os.path.splitext(filename)
    # Read LR image
    lr_img = cv2.imread(os.path.join(lr_image_dir, filename))
    hr_img_dims = (lr_img.shape[1], lr_img.shape[0])

    # Upsample image
    lr_image = cv2.resize(lr_img, (0, 0), fx=int(f"{args.scale}"), fy=int(f"{args.scale}"),
                          interpolation=cv2.INTER_CUBIC)
    if args.keepdims:
        lr_image = cv2.resize(lr_image, hr_img_dims, interpolation=cv2.INTER_CUBIC)

    cv2.imwrite(os.path.join(hr_image_dir + f"\Bicubic-x{args.scale}", f"x{args.scale}_" + filename.split('.')[0] + ext),
                lr_image)  # 保存高分辨率图像
4x下的重建效果
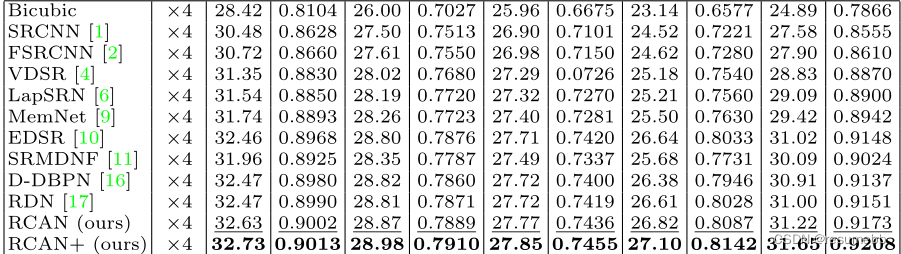
Bicubic

RCAN

Bicubic

RCAN

Bicubic

RCAN

和现在的方法相比,Bicubic确实效果太差,不过实验中会经常用到进行对比


 1366
1366

 被折叠的 条评论
为什么被折叠?
被折叠的 条评论
为什么被折叠?
 到【灌水乐园】发言


