


首先来欣赏温庭筠的**《梦江南·千万恨》**里面的一句诗
山月不知心里事,水风空落眼前花,摇曳碧云斜。
- 今天的目标就是,将这篇blog写的像诗一样优雅🥇

一、.pth保存格式
众所周知,.pth有两种保存方式
我采用的是下面这种保存方式,该方式保存需要提供网络结构文件。
torch.save(model.state_dict(), "./weights/model-{}.pth".format(epoch))
import torch
import matplotlib.pyplot as plt
from PIL import Image
import numpy as np
import cv2
from model import efficientnetv2_s as create_model
device = "cpu"
## START CODE HERE ##
#my_image = "my_image.jpg" # change this to the name of your image file
#my_label_y = [1] # the true class of your image (1 -> cat, 0 -> non-cat)
## END CODE HERE ##


fname = "bmkg (1).jpg"
image = cv2.imread(fname)
image = cv2.resize(image, (130, 130))
# print(image)
print(image.shape)
#plt.subplot(2,2,1),plt.imshow(image),plt.title("原图")
#plt.show()
#print ("y = " + str(np.squeeze(my_predicted_image)) + ", your L-layer model predicts a \"" + classes[int(np.squeeze(my_predicted_image)),].decode("utf-8") +  "\" picture.")
image = image[..., ::-1] # (130, 130, 3)
print(image.shape)

image = (image/255.0).astype(np.float32) # (130, 130, 3)
print(image.shape)
image = image.transpose(2, 0, 1)[None]  # (1, 3, 130, 130)
print(image.shape)
print(image.dtype) # float64
image = torch.from_numpy(image).to(device) # torch.Size([1, 3, 130, 130])
print(image.shape)
print(image.dtype)  # torch.float64
# print(image)
# pytorch默认的数据类型是float,numpy默认是float64或者叫double
model = create_model(num_classes=28).to(device)
# load model weights
model_weight_path = "weights/bmkg_a_b_dio_cap_sw_TN_260epo_s.pth"
model.load_state_dict(torch.load(model_weight_path, map_location=device))
model.eval()
with torch.no_grad():
    # predict class
    output = torch.squeeze(model(image.to(device))).cpu()

    torch.onnx.export(
        model,(image,),"efficient.onnx",
        input_names=["input"],output_names=["output"],
        # 如果将下面这句话注释掉,就可以导出静态batch的onnx,否则是动态batch的onnx
        opset_version=11,dynamic_axes={"input":{0:"batch"},"output":{0:"batch"}}
    )

# print("output:",output)
predict_cla = torch.argmax(output).numpy()
#if (predict_cla != 0):
print("predict_cla",predict_cla)
二、将softmax的操作通过代码的方式加入到onnx文件中(后面无需在onnx_modifier里面进行操作)
先看一下没有softmax操作,输出的数据是什么样
output = torch.squeeze(model(img.to(device))).cpu()
print(output)
# 下面是output的打印结果,正负都有
# tensor([1.0796, -1.6632, -1.5101, -2.6390, 1.0127, -2.5966, -1.9973, -3.5015,
#         -0.4632, -0.5762, -2.8027, -0.5190, 16.8529, 2.7344, 1.8548, 1.0051,
#         1.5623, 0.8217, -0.2642, -3.3093, -0.6230, -0.9389, -0.1666, -0.7078,
#         -0.8487, 0.5165, -2.7984, -1.2201])
对上面的output加入softmax之后的数据格式
predict = torch.softmax(output, dim=0)
print(predict)
# 下面是predict的打印结果,概率相加为1
# tensor([1.4117e-07, 9.0905e-09, 1.0593e-08, 3.4259e-09, 1.3204e-07, 3.5745e-09,
#         6.5085e-09, 1.4461e-09, 3.0181e-08, 2.6956e-08, 2.9086e-09, 2.8543e-08,
#         1.0000e+00, 7.3859e-07, 3.0650e-07, 1.3104e-07, 2.2876e-07, 1.0908e-07,
#         3.6827e-08, 1.7526e-09, 2.5723e-08, 1.8756e-08, 4.0602e-08, 2.3632e-08,
#         2.0525e-08, 8.0389e-08, 2.9213e-09, 1.4159e-08])
如何操作可以在导出onnx之后就带有softmax功能呢
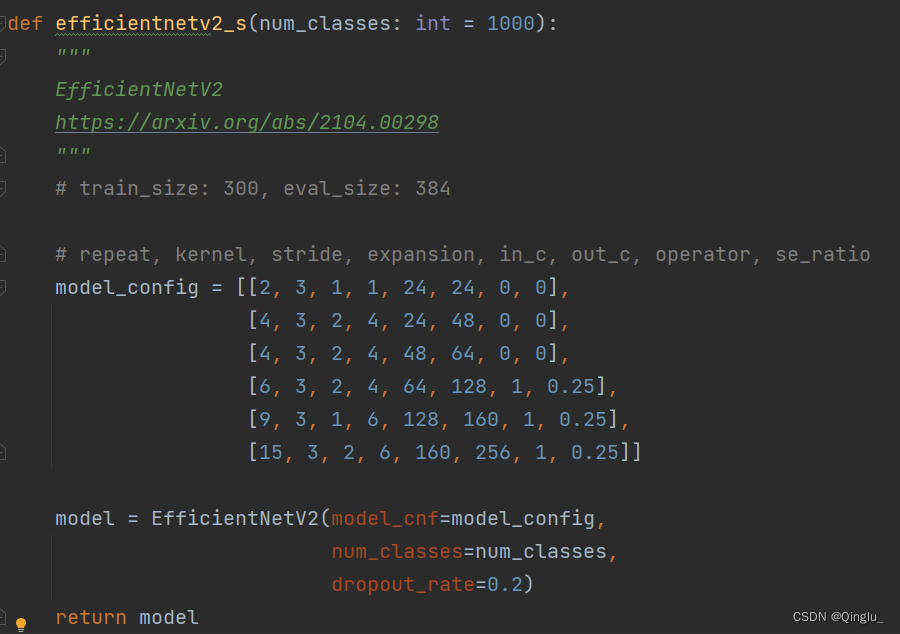
以efficientnetV2的代码举例
①跳转到定义模型的地方
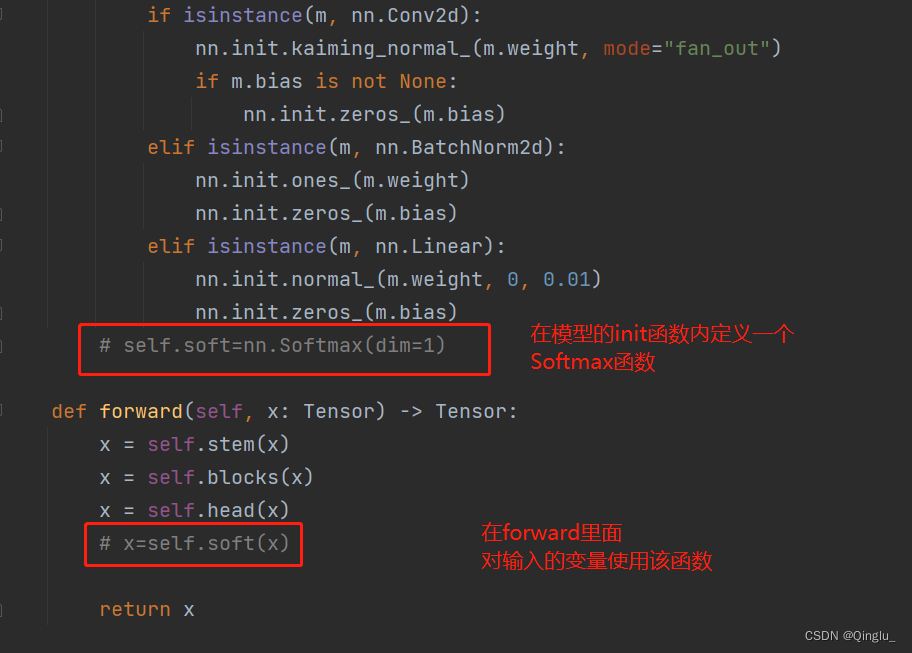
②这样就可以在导出的onnx文件里面增加softmax功能了

efficientnetV2代码来自霹雳吧啦_Wz
EfficientNetV2网络详解
你学废了吗^_^


 1421
1421


 被折叠的 条评论
为什么被折叠?
被折叠的 条评论
为什么被折叠?
 到【灌水乐园】发言


