


目录
论文:SEMI-SUPERVISED CLASSIFICATION WITH GRAPH CONVOLUTIONAL NETWORKS
前言:学习图卷积刚入门,看了一篇GNN开山之作,而后看了最开始的四代GCN,每一代都在上代上有所更新,大致明白了GCN的发展以及原理,这篇论文是这个系列最后一篇,也是这篇论文中出现了现在GCN的逐层传播公式,后续最新的图网络都是在这个基础上进行更新,个人觉得这四篇论文对图网络感兴趣的朋友入门还是很有帮助的。
这篇文章主要是针对最终得出来的公式进行翻译,简单测试。
1.引入
先通过简单的叙述进入一个公式,
通过之前一些大佬的研究,得出了现在图卷积的思路:
思路一
将当前节点的特征向量与其一阶节点的特征向量【加和平均】的方式进行聚合来表征当前节点的上下文表征向量
但时候,这种方法只考虑了当前节点,没有考虑其一阶节点的连接情况,容易造成节点的度越大,参与的节点特征聚合次数越多,而这种度越大的节点本身特殊性应该越弱,影响应该进行削弱
于是,进行改进
思路二
每个节点的聚合权重除了和自身的连接数相关,也和一阶节点的连接数【度】相关,度越大的节点,说明普遍性越强,重要度反而越低
于是得出了一个公式:
公式具体意思看下面
2 环境配置
主要是安装Pytorch Geometric,注意后面看根据自己torch版本下载
pip install --no-index torch-scatter -f https://pytorch-geometric.com/whl/torch-${TORCH}+${CUDA}.html
pip install --no-index torch-sparse -f https://pytorch-geometric.com/whl/torch-${TORCH}+${CUDA}.html
pip install --no-index torch-cluster -f https://pytorch-geometric.com/whl/torch-${TORCH}+${CUDA}.html
pip install --no-index torch-spline-conv -f https://pytorch-geometric.com/whl/torch-${TORCH}+${CUDA}.html
pip install torch-geometric
3 代码分析
先看官方代码:
import torch
from torch_geometric.nn import MessagePassing
from torch_geometric.utils import add_self_loops, degree

class GCNConv(MessagePassing):
    def __init__(self, in_channels, out_channels):
        super(GCNConv, self).__init__(aggr='add')  # "Add" aggregation (Step 5).
        self.lin = torch.nn.Linear(in_channels, out_channels)

    def forward(self, x, edge_index):
        # x has shape [N, in_channels]
        # edge_index has shape [2, E]

        # Step 1: Add self-loops to the adjacency matrix.
        edge_index, _ = add_self_loops(edge_index, num_nodes=x.size(0))

        # Step 2: Linearly transform node feature matrix.
        x = self.lin(x)

        # Step 3: Compute normalization.
        row, col = edge_index
        deg = degree(col, x.size(0), dtype=x.dtype)
        deg_inv_sqrt = deg.pow(-0.5)
        norm = deg_inv_sqrt[row] * deg_inv_sqrt[col]

        # Step 4-5: Start propagating messages.
        return self.propagate(edge_index, x=x, norm=norm)

    def message(self, x_j, norm):
        # x_j has shape [E, out_channels]

        # Step 4: Normalize node features.
        return norm.view(-1, 1) * x_j
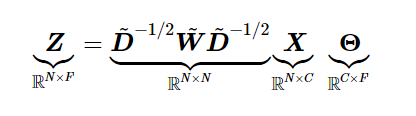
以及之前的公式:
Z:卷积层的输出,X:输入(每个顶点的feature),Θ就是我们要训练的参数,D~是一个对角矩阵,其值为每个节点的度,W~ = A + I(A是邻接矩阵,I是单位矩阵)。
第一步
 # Step 1: Add self-loops to the adjacency matrix.
 edge_index, _ = add_self_loops(edge_index, num_nodes=x.size(0))
为邻接矩阵添加自环,即W = A + I。
但是edge_index不是邻接矩阵,是表征图中边的向量,先来解释一下这个向量

如图可以将这个图表示为:
[
[1, 2, 2, 2],
[2, 3, 3, 1]
]
也就是1-2,2-3。。这样连接,如果加了自环

[
[1, 2, 2, 2,1,2,3],
[2, 3, 3, 1,1,2,3]
]
第二步
 # Step 2: Linearly transform node feature matrix.
 x = self.lin(x)
第三步
# Step 3: Compute normalization.
row, col = edge_index
deg = degree(col, x.size(0), dtype=x.dtype)
deg_inv_sqrt = deg.pow(-0.5)
norm = deg_inv_sqrt[row] * deg_inv_sqrt[col]

# Step 4: Normalize node features.
return norm.view(-1, 1) * x_j
分别为:
- 获得了row,col,即源节点和目的节点的tensor
- 根据col来计算度向量
- 求度向量的-1/2次方
- 用上一步的结果经过处理后计算norm
- 求norm*x_j(x_j就是x[col])
这里很显然不是按照公式一次算W,D,然后算Z,这里用的是一种等价的方式,避免了矩阵相乘,降低了时间复杂度。
可以不用看上面步骤,看下面手算过程,用特例来证明这种方式的正确性:

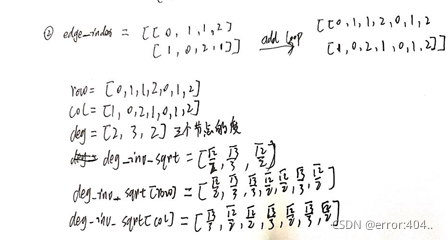

可以看出这两种计算方式是结果一样,并且代码中采用向量的计算方法避免了稀疏矩阵带来的空间浪费和无效计算,从而大大缩短了训练的时间。
证明的话就是将刚才的例子一般化。
4 模型搭建
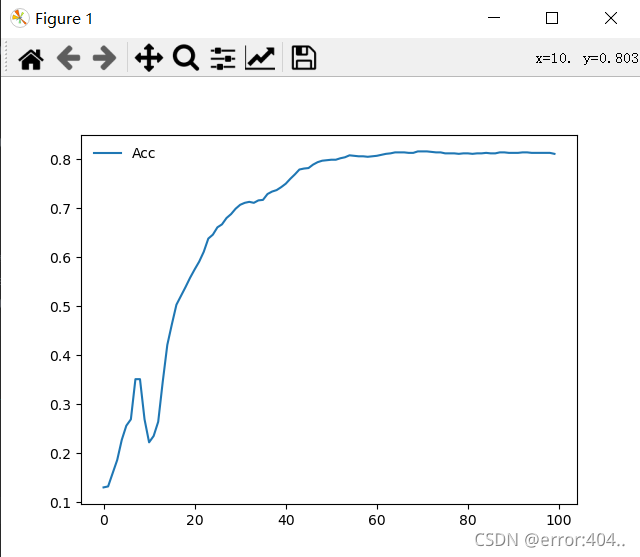
模型可以根据自己需求搭建,图卷积层一般来说1-2层就够了,测试了一下
1层ACC:0.66
2层ACC:0.80(√)
3层ACC:0.76
class Net(torch.nn.Module):
# torch.nn.Module 是所有神经网络单元的基类
def __init__(self,use_bias=True):
super(Net, self).__init__() ###复制并使用Net的父类的初始化方法,即先运行nn.Module的初始化函数
self.use_bias = use_bias
self.weight = nn.Parameter(torch.Tensor(dataset.num_node_features, dataset.num_classes))
if self.use_bias:
self.bias = nn.Parameter(torch.Tensor(dataset.num_classes))
else:
self.register_parameter('bias', None)
self.reset_parameters()
self.conv1 = GCNConv(dataset.num_node_features, 16)
self.conv2 = GCNConv(16, dataset.num_classes)
def reset_parameters(self):
nn.init.kaiming_uniform_(self.weight)
if self.use_bias:
nn.init.zeros_(self.bias)
def forward(self, data):
x, edge_index = data.x, data.edge_index
x = self.conv1(x, edge_index)
x = F.relu(x)
x = F.dropout(x, training=self.training)
x = self.conv2(x, edge_index)
# if self.use_bias:
# x += self.bias
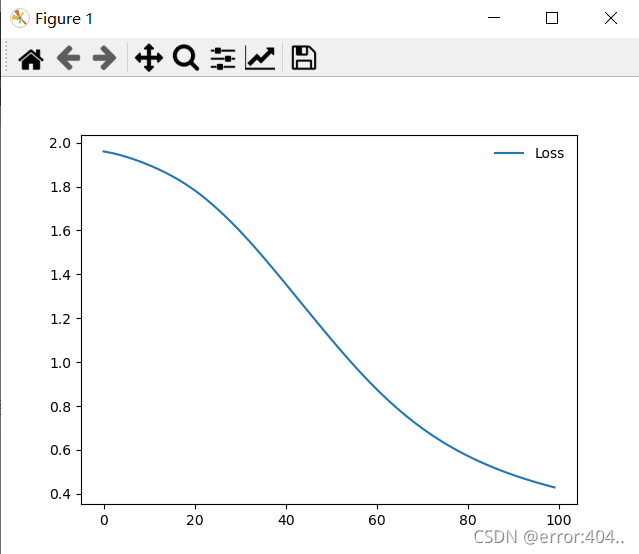
return F.log_softmax(x, dim=1)没啥可说的,一些参数自己调整可能效果会更好,下面是loss和acc曲线


 5416
5416


 被折叠的 条评论
为什么被折叠?
被折叠的 条评论
为什么被折叠?
 到【灌水乐园】发言


