


前几天解决了 TFT_eSPI-master 库 图片取模问题,但尽管是ESP32的 flash 也无法存储太多图片的数组,因此我找到了ESP32从SD卡读取图片并显示在LCD屏幕上的方法,SD卡可以轻松的存储大量图片,后期可以做一个电子相册,甚至播放个视频都是可以的。
- 所用到的Arduino库:
1.jpeg图片解码库:JPEGDecoder
2.1.14寸IPS屏幕驱动库:TFT_eSPI
注意修改 TFT_eSPI 库的 User_Setup_Select.h 文件:

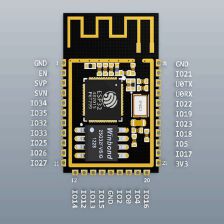
- 硬件连线方式:
1.SD卡(采用SPI方式连接,SD卡内的图片请改为240*135像素,这样在1.14寸屏幕上显示会更加出色)

#define SD_MISO     13
#define SD_MOSI     15
#define SD_SCLK     17
#define SD_CS       14
2.1.14寸IPS彩屏(ST7789驱动芯片)
#define TFT_MOSI            19
#define TFT_SCLK            18
#define TFT_CS              5
#define TFT_DC              16
#define TFT_RST             23

#define TFT_BL          -1  //灯光控制引脚不接
可在 TFT_eSPI 库的 Setup25_TTGO_T_Display.h 文件中进行修改~
- 程序代码:
/*
*@功能:ESP32读取SD卡图片显示在1.14IPS屏幕上
*@作者:刘泽文
*@时间:2020/3/27
*/

//引用相关库
#include <SD.h>
#include <FS.h>
#include <SPI.h>
#include <TFT_eSPI.h>
#include <JPEGDecoder.h>


#define DEBUG

#ifdef DEBUG
#define DebugPrintln(message) Serial.println(message)
#else
#define DebugPrintln(message)
#endif

#ifdef DEBUG
#define DebugPrint(message) Serial.print(message)
#else
#define DebugPrint(message)
#endif

TFT_eSPI tft = TFT_eSPI(135, 240); // Invoke custom library
SPIClass sdSPI(VSPI);
#define SD_MISO     13
#define SD_MOSI     15
#define SD_SCLK     17
#define SD_CS       14

void drawSdJpeg(const char *filename, int xpos, int ypos);
void jpegRender(int xpos, int ypos);
void jpegInfo();
void showTime(uint32_t msTime);
void SD_read_Time(uint32_t msTime);

void setup()
{
  Serial.begin(9600);
  DebugPrintln();

  tft.init();
  tft.setRotation(1);
  tft.fillScreen(TFT_WHITE);
  tft.setTextSize(1);
  tft.setTextColor(TFT_MAGENTA);
  tft.setCursor(0, 0);
  tft.setTextDatum(MC_DATUM);
  tft.setTextSize(1);
  tft.setSwapBytes(true);
  delay(500);

  if (TFT_BL > 0) { // TFT_BL has been set in the TFT_eSPI library in the User Setup file TTGO_T_Display.h
     pinMode(TFT_BL, OUTPUT); // Set backlight pin to output mode
     digitalWrite(TFT_BL, TFT_BACKLIGHT_ON); // Turn backlight on. TFT_BACKLIGHT_ON has been set in the TFT_eSPI library in the User Setup file TTGO_T_Display.h
   }

  //挂载文件系统
  sdSPI.begin(SD_SCLK, SD_MISO, SD_MOSI, SD_CS);
  if (!SD.begin(SD_CS, sdSPI))
  {
    DebugPrintln("存储卡挂载失败");
    return;
  }
  uint8_t cardType = SD.cardType();

  if (cardType == CARD_NONE)
  {
    DebugPrintln("未连接存储卡");
    return;
  }
  else if (cardType == CARD_MMC)
  {
    DebugPrintln("挂载了MMC卡");
  }
  else if (cardType == CARD_SD)
  {
    DebugPrintln("挂载了SDSC卡");
  }
  else if (cardType == CARD_SDHC)
  {
    DebugPrintln("挂载了SDHC卡");
  }
  else
  {
    DebugPrintln("挂载了未知存储卡");
  }

  //打印存储卡信息
  Serial.printf("存储卡总大小是: %lluMB \n", SD.cardSize() / (1024 * 1024)); // "/ (1024 * 1024)"可以换成">> 20"
  Serial.printf("文件系统总大小是: %lluB \n", SD.totalBytes());
  Serial.printf("文件系统已用大小是: %lluB \n", SD.usedBytes());
}

void loop() {

  //测试壁纸
  for(int image_num = 1;image_num<=6;image_num++){
    char FileName[10];
    sprintf(FileName,"/Data/%d.jpg",image_num);
    drawSdJpeg(FileName, 0, 0);     // This draws a jpeg pulled off the SD Card
    delay(500);
  }

  //播放badapple,共6540帧,每秒30帧
  for(int image_num = 1;image_num<=(6540-3);image_num+=2){
    char FileName[10];
    sprintf(FileName,"/apple/%d.jpg",image_num);
    drawSdJpeg(FileName, 0, 0);     // This draws a jpeg pulled off the SD Card
  }

}

void drawSdJpeg(const char *filename, int xpos, int ypos) {
  uint32_t readTime = millis();
  // Open the named file (the Jpeg decoder library will close it)
  File jpegFile = SD.open( filename, FILE_READ);  // or, file handle reference for SD library

  if ( !jpegFile ) {
    DebugPrint("ERROR: File \"");
    DebugPrint(filename);
    DebugPrintln ("\" not found!");
    return;
  }

  DebugPrintln("===========================");
  DebugPrint("Drawing file: "); DebugPrintln(filename);
  DebugPrintln("===========================");

  // Use one of the following methods to initialise the decoder:
  boolean decoded = JpegDec.decodeSdFile(jpegFile);  // Pass the SD file handle to the decoder,
  //boolean decoded = JpegDec.decodeSdFile(filename);  // or pass the filename (String or character array)
  SD_read_Time(millis() - readTime);

  if (decoded) {
    // print information about the image to the serial port
    jpegInfo();
    // render the image onto the screen at given coordinates
    jpegRender(xpos, ypos);
  }
  else {
    DebugPrintln("Jpeg file format not supported!");
  }
}

//####################################################################################################
// Draw a JPEG on the TFT, images will be cropped on the right/bottom sides if they do not fit
//####################################################################################################
// This function assumes xpos,ypos is a valid screen coordinate. For convenience images that do not
// fit totally on the screen are cropped to the nearest MCU size and may leave right/bottom borders.
void jpegRender(int xpos, int ypos) {
  // record the current time so we can measure how long it takes to draw an image
  uint32_t drawTime = millis();

  //jpegInfo(); // Print information from the JPEG file (could comment this line out)

  uint16_t *pImg;
  uint16_t mcu_w = JpegDec.MCUWidth;
  uint16_t mcu_h = JpegDec.MCUHeight;
  uint32_t max_x = JpegDec.width;
  uint32_t max_y = JpegDec.height;

  bool swapBytes = tft.getSwapBytes();
  tft.setSwapBytes(true);

  // Jpeg images are draw as a set of image block (tiles) called Minimum Coding Units (MCUs)
  // Typically these MCUs are 16x16 pixel blocks
  // Determine the width and height of the right and bottom edge image blocks
  uint32_t min_w = (mcu_w<(max_x % mcu_w)?mcu_w:(max_x % mcu_w));
  uint32_t min_h = (mcu_h<(max_y % mcu_h)?mcu_h:(max_y % mcu_h));

  // save the current image block size
  uint32_t win_w = mcu_w;
  uint32_t win_h = mcu_h;

  // save the coordinate of the right and bottom edges to assist image cropping
  // to the screen size
  max_x += xpos;
  max_y += ypos;

  // Fetch data from the file, decode and display
  while (JpegDec.read()) {    // While there is more data in the file
    pImg = JpegDec.pImage ;   // Decode a MCU (Minimum Coding Unit, typically a 8x8 or 16x16 pixel block)

    // Calculate coordinates of top left corner of current MCU
    int mcu_x = JpegDec.MCUx * mcu_w + xpos;
    int mcu_y = JpegDec.MCUy * mcu_h + ypos;

    // check if the image block size needs to be changed for the right edge
    if (mcu_x + mcu_w <= max_x) win_w = mcu_w;
    else win_w = min_w;

    // check if the image block size needs to be changed for the bottom edge
    if (mcu_y + mcu_h <= max_y) win_h = mcu_h;
    else win_h = min_h;

    // copy pixels into a contiguous block
    if (win_w != mcu_w)
    {
      uint16_t *cImg;
      int p = 0;
      cImg = pImg + win_w;
      for (int h = 1; h < win_h; h++)
      {
        p += mcu_w;
        for (int w = 0; w < win_w; w++)
        {
          *cImg = *(pImg + w + p);
          cImg++;
        }
      }
    }

    // calculate how many pixels must be drawn
    uint32_t mcu_pixels = win_w * win_h;

    // draw image MCU block only if it will fit on the screen
    if (( mcu_x + win_w ) <= tft.width() && ( mcu_y + win_h ) <= tft.height())
      tft.pushImage(mcu_x, mcu_y, win_w, win_h, pImg);
    else if ( (mcu_y + win_h) >= tft.height())
      JpegDec.abort(); // Image has run off bottom of screen so abort decoding
  }

  tft.setSwapBytes(swapBytes);

  showTime(millis() - drawTime); //将图片显示到屏幕所用的时间(ms)
}

void jpegInfo() {
  DebugPrintln("JPEG image info");
  DebugPrintln("===============");
  DebugPrint("Width      :");
  DebugPrintln(JpegDec.width);
  DebugPrint("Height     :");
  DebugPrintln(JpegDec.height);
  DebugPrint("Components :");
  DebugPrintln(JpegDec.comps);
  DebugPrint("MCU / row  :");
  DebugPrintln(JpegDec.MCUSPerRow);
  DebugPrint("MCU / col  :");
  DebugPrintln(JpegDec.MCUSPerCol);
  DebugPrint("Scan type  :");
  DebugPrintln(JpegDec.scanType);
  DebugPrint("MCU width  :");
  DebugPrintln(JpegDec.MCUWidth);
  DebugPrint("MCU height :");
  DebugPrintln(JpegDec.MCUHeight);
  DebugPrintln("===============");
  DebugPrintln("");
}

void showTime(uint32_t msTime) {
  DebugPrint(F(" JPEG drawn in "));
  DebugPrint(msTime);
  DebugPrintln(F(" ms "));
}

void SD_read_Time(uint32_t msTime) {
  Serial.print(F(" SD JPEG read in "));
  Serial.print(msTime);
  Serial.println(F(" ms "));
}
- 程序效果:


- 程序中尝试播放了badapple,也是将视频转为图片,具体参照另一篇博文:《MATLAB》应用 之 用 MATLAB 将 badapple 视频转换为128*64分辨率图片
- 存在的问题:在播放badapple时,只有10帧,无法做到树莓派那样的帧率,SD(10年前的256M内存卡)卡和SPI速度可能不够,有解决方案的小伙伴欢迎下方留言!


 3867
3867

 被折叠的 条评论
为什么被折叠?
被折叠的 条评论
为什么被折叠?
 到【灌水乐园】发言


