


Android仿支付宝支付密码框
前言
由于一些需求,需要完成一个类似于支付一样的密码框功能,这个时候我就决定是说不从网上去找开源项目,而是决定自己参考别人的做法自己来做一个这样类似的功能来实现。
目的是为了在写项目的同时学到知识,所以本文我会解析一下我具体代码的作用(自我分析),而不是简单介绍项目。
1. 设计思路
整体的内容很简单,就是一个Dialog,然后其中有一个支付宝输入框一样的密码输入内容。
我将整体内容分成三个模块分开来写,Dialog,Layout和专门负责数字按键的gridView。
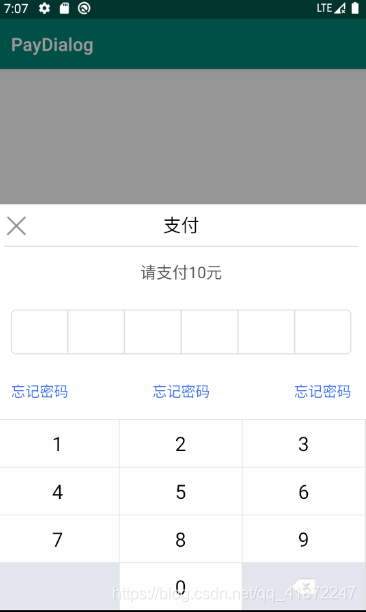
其中,最上面的X按钮是关闭用,这个是固定的
然后中间的密码框是重写了editText后完成的,并不是像其他人用的那种6个EditText或者是说6个TextView这样。
下面的三个忘记密码是分成了三个不同的区域,其中也设置了点击事件。
最下面是用GridView来实现了按钮的排列不同的按钮。
2. 项目地址和implementation使用方法
项目地址:https://github.com/wodongx123/PayDialogUtil
Implementation使用方法(前提是你项目是使用AndroidX而不是Android Support的):
- 在Project的build.gradle中,添加
maven { url ‘https://jitpack.io’ }
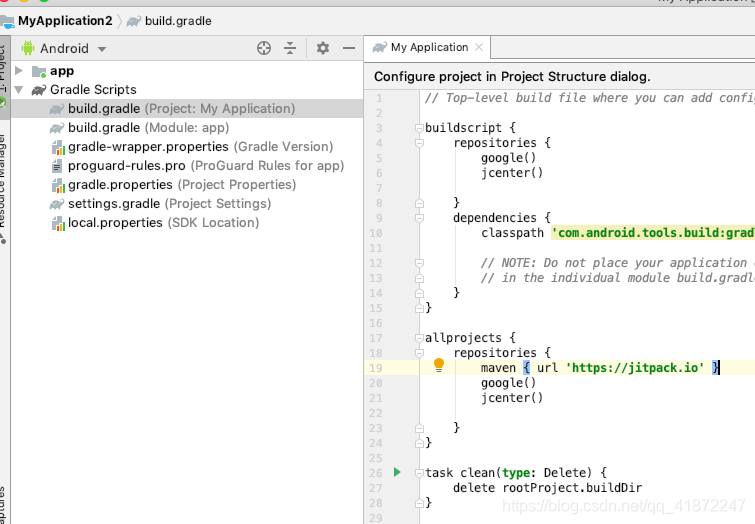
- 在需要引用的包的build.gradle中,添加
implementation ‘com.github.wodongx123:PayDialogUtil:1.1’(相比1.0修复了bug)。

- 使用例:
final PayDialog payDialog = new PayDialog(MainActivity.this);
//为了方便,五个参数合成一个方法
//从左到右依次是标题title,内容Content,左可点击文本,中可点击文本,右可点击文本
//如果不需要其中的某项,就传""或者null,会自动隐藏
//四个接口中fillContent代表实时已输入的密码(界面显示最多六位),后面三个对应着可点击文本的对应点击事件。
payDialog.setText("支付", "请支付10元", "忘记密码", "忘记密码", "忘记密码")
        .setListener(new PayDialog.DialogListener() {
            @Override
            public void fillContent(String content) {
                if (content.length() == 6){
                    payDialog.dismiss();
                    Toast.makeText(MainActivity.this, content, Toast.LENGTH_SHORT).show();
                }
            }

            @Override
            public void leftBtn() {
                Toast.makeText(MainActivity.this, "left button", Toast.LENGTH_SHORT).show();
            }

            @Override
            public void centerBtn() {
                Toast.makeText(MainActivity.this, "center button", Toast.LENGTH_SHORT).show();
            }

            @Override
            public void rightBtn() {
                Toast.makeText(MainActivity.this, "right button", Toast.LENGTH_SHORT).show();
            }
        });
//本身是继承Dialog的,直接调用show就可以显示。
payDialog.show();
3. 涉及到的内容
- GridView基础。
- 自定义View。
- 自定义Dialog。
- 基本绘图Paint和Canvas。
- 补间动画。
4. 设计流程
4.1 Layout
-
创建一个layout(我取名叫layout_pay.xml),把整个的布局都在xml中画好,然后最下面是一个GridView,现在还没写上实际的按键。
-
其中我把除了Title以外的TextView都Visibility="gone"了,因为是打算到时候根据创建时传入的内容决定显示不显示。
-
然后创建一个PayLayout类继承LinearLayout,然后加载我们刚刚写好的layout_pay.xml。
public class PayLayout extends LinearLayout { private Context mContext; private View mView; ImageView ivClose; //中间省略若干控件 ...... GridView gvBtn; //下面三个是继承LinearLayout后必须添加的三个重载方法 public PayLayout(Context context) { super(context); initLayout(context); } public PayLayout(Context context, @Nullable AttributeSet attrs) { super(context, attrs); initLayout(context); } public PayLayout(Context context, @Nullable AttributeSet attrs, int defStyleAttr) { super(context, attrs, defStyleAttr); initLayout(context); } public void initLayout(Context context){ mContext = context; //下面这一行重要 mView = LayoutInflater.from(mContext).inflate(R.layout.layout_pay, this); //绑定控件 { ivClose = mView.findViewById(R.id.iv_close); ...... gvBtn = mView.findViewById(R.id.gv_btn); } } }这里我简单说一下mView = LayoutInflater.from(mContext).inflate(R.layout.layout_pay, this)
这一行,这个是自定义Layout中最重要的一个内容。
LayoutInflater.inflate()这个方法就做三件事- 加载一个xml布局作为子布局。
- 将这个布局放到父布局内部。
- 如果有return(像我们用mView来接收),return的是子布局的实例。
.
然后看我们传入的两个参数R.layout.layout_pay就是加载的子布局,this指的就是PayLayout(是继承自LinearLayout)。
这个放入的关系,你可以想像成,PayLayout就是一张桌子,然后R.layout.layout_pay就是一个杯子,我们拿出了这个杯子,并且将他放在了桌子上,这就是infalte这个方法做的事了。
4.2 GridView和Adapter
-
接下来用GridView来加载我们的键盘,为此我们需要先定义键盘中每个按钮的样子,创建一个item的Layout(这里我取名item_button.xml)。
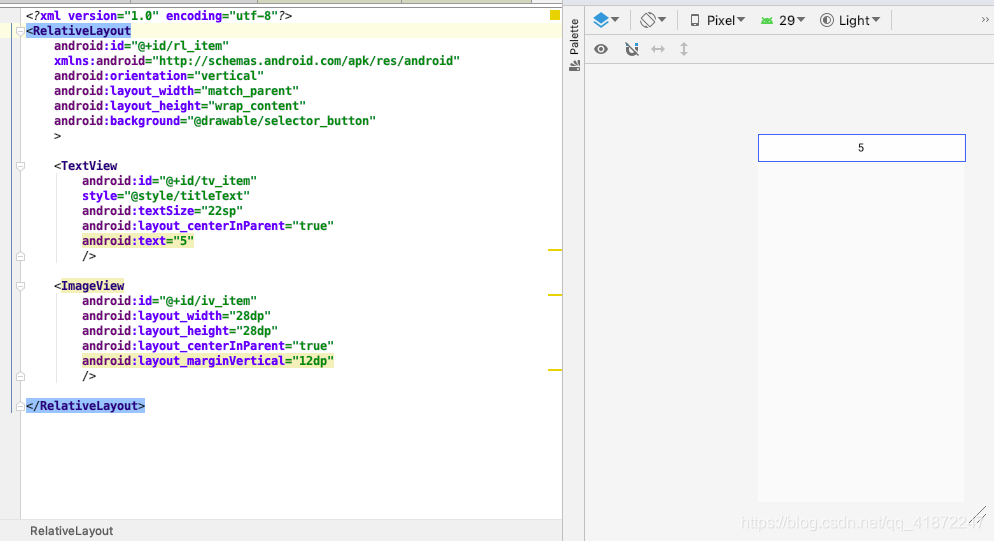
画的很简单,一个重叠摆放的TextView和ImageView,ImageView在用于存放删除键图标的同时还负责撑开整个Layout的大小。 -
GridView和ListView,RecyclerView一样都需要适配器Adapter来加载内部的多个子布局,这里创建一个ButtonAdapter,并且重写内部的几个方法。
public class ButtonAdapter extends BaseAdapter {
    private static final String TAG = "ButtonAdapter";

    private Context mContext;
    private char[] mList;

    public ButtonAdapter(Context context, char[] list){
        mContext = context;
        mList = list;
    }

    @Override
    public int getCount() {
        return mList.length;
    }

    @Override
    public Object getItem(int position) {
        return mList[position];
    }

    @Override
    public long getItemId(int position) {
        return 0;
    }

    @Override
    public View getView(final int position, View convertView, ViewGroup parent) {
        ViewHolder viewHolder = null;
        if (convertView == null) {
            convertView = LayoutInflater.from(mContext).inflate(R.layout.item_button, null);
            viewHolder = new ViewHolder();

            viewHolder.relativeLayout = convertView.findViewById(R.id.rl_item);
            viewHolder.textView = convertView.findViewById(R.id.tv_item);
            viewHolder.imageView = convertView.findViewById(R.id.iv_item);

            convertView.setTag(viewHolder);
        } else {
            viewHolder = (ViewHolder) convertView.getTag();
        }


        switch (mList[position]){
            case '1':
            case '2':
            case '3':
            case '4':
            case '5':
            case '6':
            case '7':
            case '8':
            case '9':
            case '0':
                viewHolder.textView.setText(String.valueOf(mList[position]));
                break;
            case ' ':
                viewHolder.relativeLayout.setEnabled(false);
                break;
            case '/': ;
                viewHolder.relativeLayout.setBackgroundResource(R.drawable.selector_del);
                viewHolder.imageView.setImageResource(R.drawable.ic_paykeyborddelete);
                break;
        }
        viewHolder.relativeLayout.setOnClickListener(new View.OnClickListener() {
            @Override
            public void onClick(View v) {
                if (mListener != null)  mListener.getContent(mList[position]);
            }
        });


        return convertView;
    }

    class ViewHolder{
        RelativeLayout relativeLayout;
        TextView textView;
        ImageView imageView;
    }

}
别的方法都不说,这里主要简单讲一下getView这个方法,这个方法是Adapter的核心
我们都知道,如果用重复使用多个大体相同的布局的时候(比如说此处我们大家都是按钮但是只有按钮上的字不同),就会需要用到ListView或者RecyclerView这样的东西,那么,到底是怎么决定ListView中内部每个item的差距呢?答案就在这个getView方法中。
getView()这个方法就做一件事:告诉父布局(这里是GridView),在一排的item中,第X(positon)个子布局长什么样。
然后convertView这个参数就是当前该子布局的内容,但是由于每个item的getView会调用多次,所以要先判断是否为空,当为空的时候,就再用LayoutInflater.inflate()方法创建一个view,并且在getView 的最后return它。
要注意的是,这里我们inflate方法第二个参数是为null,这就表示这个方法只加载了一个布局,但是并没有把它放到父布局内部,而这个放到父布局内部(此处是我们的GridView,这里你可以想象成桌子是GridView,杯子是item)会在return之后自动完成。接下来是setTag和getTag这个方法,这个方法一般用于区分不同的View,我们这里干脆就自定义一个内部类,再把控件都塞进去用于区分不同的item。
-
Adapter写完了,接下来是按键的回馈,这里我们存储按钮主要的区分是通过一个char数组,那么要怎么区分不同的按钮呢,这里我自定义了一个接口interface供外部使用。
public class ButtonAdapter extends BaseAdapter {
    private static final String TAG = "ButtonAdapter";

    private ButtonListener mListener;

    public void setmListener(ButtonListener mListener) {
        this.mListener = mListener;
    }

	.......//省略了刚刚出现过的代码

    @Override
    public View getView(final int position, View convertView, ViewGroup parent) {

		.......//省略了刚刚出现过的代码

        viewHolder.relativeLayout.setOnClickListener(new View.OnClickListener() {
            @Override
            public void onClick(View v) {
                if (mListener != null)  mListener.getContent(mList[position]);
            }
        });

        return convertView;
    }

    class ViewHolder{
        RelativeLayout relativeLayout;
        TextView textView;
        ImageView imageView;
    }


    public interface ButtonListener{
        void getContent(char c);
    }

}
然后外部Layout是这么调用的。
public class PayLayout extends LinearLayout { ......//省略代码 private void setGridView() { gvBtn.setNumColumns(3); //设成三列 char[] list = new char[12]; { list[0] = '1'; list[1] = '2'; list[2] = '3'; list[3] = '4'; list[4] = '5'; list[5] = '6'; list[6] = '7'; list[7] = '8'; list[8] = '9'; list[9] = ' '; list[10] = '0'; list[11] = '/'; } ButtonAdapter buttonAdapter = new ButtonAdapter(mContext, list); buttonAdapter.setmListener(new ButtonAdapter.ButtonListener() { @Override public void getContent(char c) { editPwd(c); } }); gvBtn.setAdapter(buttonAdapter); } //点击按钮后内容的变化 private void editPwd(char c) { switch (c){ case '1': case '2': case '3': case '4': case '5': case '6': case '7': case '8': case '9': case '0': etPassword.setText(etPassword.getText().toString() + c); break; case '/': int length = etPassword.getText().toString().length(); if (length > 0) etPassword.setText(etPassword.getText().toString().substring(0, length-1)); break; } } } -
由于写接口这一招很好用,我就又故技重施的将Layout中的各种点击事件还有保存密码内容的edittext做了同样的操作用于将来Dialog写继承事件,代码差不多同上。
4.3 自定义密码框(自定义EditText)
我们的密码框不能直接使用EditText,因为输入完后显示的是实心圆,所以需要自己画一个界面来。

- 首先我们实际上的密码框外面的那一圈,我是用xml写的…并不是代码实现。
shape是图形,corners是弧度,stroke是边框,这些不多说了,然后在EditView中android:background引用。<shape xmlns:android="http://schemas.android.com/apk/res/android" android:shape="rectangle" > <stroke android:color="@color/divideLine" android:width="1dp"/> <corners android:radius="5dp"/> </shape> - 创建一个类继承EditView,然后再xml中引用就完成。
public class PwdView extends EditText {
    private static final String TAG = "PwdView";


    int width = getWidth();
    int height = getHeight();

    Paint linePaint;
    Paint circlePaint;

    public PwdView(Context context) {
        super(context);
        init();
    }

    public PwdView(Context context, AttributeSet attrs) {
        super(context, attrs);
        init();
    }

    public PwdView(Context context, AttributeSet attrs, int defStyleAttr) {
        super(context, attrs, defStyleAttr);
        init();
    }

    private void init() {
        initPaints();
    }


    private void initPaints() {
        linePaint = new Paint();
        linePaint.setAntiAlias(true);
        linePaint.setColor(Color.parseColor("#dfdddf"));
        linePaint.setStyle(Paint.Style.FILL_AND_STROKE);
        linePaint.setStrokeWidth(4);

        circlePaint = new Paint();
        circlePaint.setAntiAlias(true);
        circlePaint.setColor(Color.parseColor("#000000"));
        circlePaint.setStyle(Paint.Style.FILL_AND_STROKE);
        circlePaint.setStrokeWidth(1);
    }

    @Override
    protected void onDraw(Canvas canvas) {
        width = getWidth();
        height = getHeight();

        for (int i=1; i<6; i++) //画五条竖线
            canvas.drawLine(width/6*i, 0, width/6*i, height, linePaint);

        int mid = width/6/2;

        for (int i=0; i<getText().toString().length(); i++){ //写了几个字符就画几个实心圆!
            canvas.drawCircle(width/6*i + mid, height/2, height/14+10, circlePaint);
        }

    }

    @Override
    public boolean isEnabled() {
        return false;
    }
}
这里我先讲一下onDraw这个方法,它一开始是这样的。
@Override
protected void onDraw(Canvas canvas) {
    super.onDraw(canvas);
}
这个super.onDraw(canvas)这个方法是做什么的呢,我们回忆一下平时EditText是怎么用的,点击EditText,我们往键盘上敲字符,敲一个然后editText就显示一个,而这个onDraw就是负责显示用的。
可以来做一个测试(请自行测试):把super.onDraw()这一行删掉,再往editText内敲字符,你就会发现EditText中什么都不会显示。
那么我们现在不需要它显示原本的打一个字符敲一个字符,而是显示分割线和实心圆,那么就要先删掉super.onDraw(),再根据我们的需求来自行绘画。
有关怎么使用Paint和Canvas进行自定义画View,详细参考这篇,我也是看这篇学的:https://blog.csdn.net/moira33/article/details/79111343(无图)
https://www.jianshu.com/p/76603b122fb4(有图)
这里简单做一个介绍,想要进行画图,就需要纸和笔,而在Android中,Paint就是笔,而Canvas就是纸,但是这个纸是无限大的,而我们只能看到控件显示的纸的那一部分(你可以理解成外面的风景是无限大的,而我们只能透过窗户来看到其中一部分,而这个窗户的大小就是控件的大小)。
我们主要是需要用笔来画分割线,和我们分割线的实心圆而怎么画我也是这个五行代码就搞定了,请自行理解,涉及到一点点数学。
4.4 Dialog
-
最后来写Dialog,首先需要创建一个xml(这里取名dialog_pay.xml)文件来用上我们刚刚写的PayLayout,代码是最简单的了
<?xml version="1.0" encoding="utf-8"?> <LinearLayout xmlns:android="http://schemas.android.com/apk/res/android" android:orientation="vertical" android:layout_width="match_parent" android:layout_height="match_parent"> <com.example.paydialogutil.PayLayout android:id="@+id/layout_pay" android:layout_width="match_parent" android:layout_height="match_parent" /> </LinearLayout> -
接下来,写一个类继承Dialog类,重写内部方法和完成初始化。
public class PayDialog extends Dialog {

    private Context mContext;  //环境
    private View mView;   //视图
    PayLayout mLayout;   // 布局
    private Window mWindow;

    private DialogListener mListener;

    public PayDialog(@NonNull Context context) {
        super(context, R.style.dialog_pay_theme);
        initDialog(context);
    }


    private void initDialog(Context context) {
        mContext = context;
        mView = LayoutInflater.from(mContext).inflate(R.layout.dialog_pay, null);//设置好view
        mLayout = mView.findViewById(R.id.layout_pay);


        mWindow = getWindow();
        mWindow.setContentView(mView);//将view投到window(也就是Dialog上)
        WindowManager.LayoutParams lp = getWindow().getAttributes();
        lp.width = WindowManager.LayoutParams.MATCH_PARENT;
        lp.height = WindowManager.LayoutParams.WRAP_CONTENT;
        lp.gravity = Gravity.BOTTOM;
        mWindow.setAttributes(lp);

        mWindow.setWindowAnimations(R.style.dialog_anim); //设置窗口的进入退出动画(补间动画)
    }

}
这里几个要点,我一个一个分析。
-
mView = LayoutInflater.from(mContext).inflate(R.layout.dialog_pay, null):这里加载了我们刚刚写的xml文件,然后呢这个代码也是第三次出现了,加载我们的子布局,但是这里要注意的是,Dialog本身,不是一个布局,所以第二个参数暂时先填null。
Dialog是通过其内部的一个Window类来显示布局内容,所以获取Window的实例,再将加载的布局mView放上去。(Dialog放上Layout,Layout放上控件,GridView放上item,差不多就这种感觉)。 -
super(context, R.style.dialog_pay_theme):这里简单介绍一下Dialog的构造函数,简单来说,Dialog有一个默认的Style类型,当你的构造函数没有传自定义的Style的时候,他就会用上这个默认的Style,而如果一旦内部调用了默认的style,那么你的对话框就会带上一个自带的padding值,无法铺满屏幕。
当然还有一种解决办法就是调用mWindow.getDecorView().setPadding(),只是这里我没有用。
<resources xmlns:tools="http://schemas.android.com/tools"> <!--主题样式--> <style name="dialog_pay_theme" parent="@style/Theme.AppCompat.Dialog"> <!--边框--> <item name="android:windowFrame">@null</item> <item name="android:windowNoTitle">true</item> <item name="android:windowBackground">@android:color/transparent</item> <item name="android:backgroundDimAmount">0.4</item><!--弹框背景灰度--> </style> </resources> -
setWindowAnimation()在Dialog中,无论是补间动画还是属性动画都难以实现理想的对话框从下弹出的效果,前者动画还在跳转的时候你就已经可以点按钮了(控件实际位置不变),后者不好设置参数(嫌麻烦)。这里有关Window可以专门的通过style中设置相关的动画达到效果,动画的xml文件就是补间动画的写法。
<resources xmlns:tools="http://schemas.android.com/tools">

    <style name="dialog_anim" parent="android:Animation">
        <item name="android:windowEnterAnimation">@anim/anim_dialog_in</item>
        <item name="android:windowExitAnimation">@anim/anim_dialog_out</item>
    </style>

</resources>
-
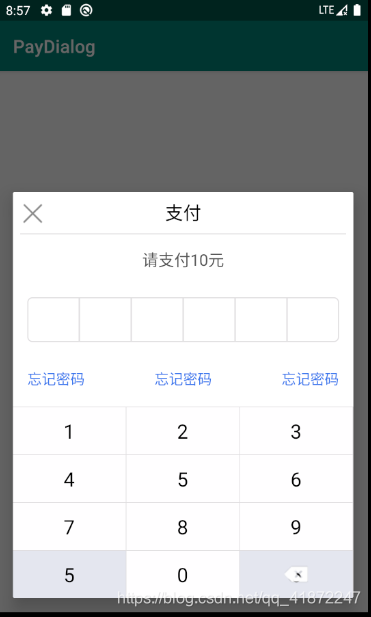
最后写上对外的操作接口,就大功告成,就是setText和setListener的方法,代码不难。
-
最后来看看具体的调用,三行代码加四个接口方法就能完成调用!
final PayDialog payDialog = new PayDialog(MainActivity.this);
payDialog.setText("支付", "请支付10元", "忘记密码", "忘记密码", "忘记密码")
        .setListener(new PayDialog.DialogListener() {
            @Override
            public void fillContent(String content) {
                if (content.length() == 6){
                    payDialog.dismiss();
                    Toast.makeText(MainActivity.this, content, Toast.LENGTH_SHORT).show();
                }
            }

            @Override
            public void leftBtn() {
                Toast.makeText(MainActivity.this, "left button", Toast.LENGTH_SHORT).show();
            }

            @Override
            public void centerBtn() {
                Toast.makeText(MainActivity.this, "center button", Toast.LENGTH_SHORT).show();
            }

            @Override
            public void rightBtn() {
                Toast.makeText(MainActivity.this, "right button", Toast.LENGTH_SHORT).show();
            }
        });
payDialog.show();
参考材料
Android仿支付宝密码输入框(自定义数字键盘) - 落雨敏 - CSDN博客
https://blog.csdn.net/lin857/article/details/84111930
LayoutInflater.from(this).inflate()方法参数解析 - Sacredness的博客 - CSDN博客
https://blog.csdn.net/Sacredness/article/details/88684527
Android自定义Dialog的Match_parent无效问题解决 - 一座小楼的专栏 - CSDN博客
https://blog.csdn.net/czhpxl007/article/details/50519056?utm_source=blogxgwz1
Android 自定义View之绘图 - CSDN/简书(我觉得两文的作者为同一人)
https://blog.csdn.net/moira33/article/details/79111343(无图有目录)
https://www.jianshu.com/p/76603b122fb4(有图无目录)


 304
304

 被折叠的 条评论
为什么被折叠?
被折叠的 条评论
为什么被折叠?
 到【灌水乐园】发言


