


一、pytest测试用例的默认规则
1.模块名必须以test_开头或者以_test结尾
2.测试类必须以Test开头,并且不能有init方法
3.测试方法以test开头
二、pytest运行方式
1.主函数
a、运行所有用例:pytest.main()
import pytest


def test_case1():
    print("\n")  # 换行方便看执行输出结果
    print("需要登录")


def test_case2():
    print("\n")
    print("不需要登录")
    pass


if __name__ == '__main__':
    pytest.main()

    # 输出调试信息
    # pytest.main(['-s'])
如果有多个用例文件可以只写一个main方法执行所有用例文件
Test_demo1.py
class TestDemo1:
    def test_case1(self):
        print('向云端')
Test_demo2.py
class TestDemo2:
    def test_01_xinyao(self):
        print('山那边')
all.py
import pytest

if __name__ == '__main__':
    # 输出方式一:
    pytest.main()
    # 输出方式二(显示调试信息:-s):
    pytest.main(['-s'])
pytest.main()运行结果:
============================= test session starts =============================
platform win32 -- Python 3.10.4, pytest-7.3.2, pluggy-1.1.0
rootdir: E:\python\pycharm\pythonProject\pytestdemo\alldemo
plugins: html-3.2.0, metadata-3.0.0, xdist-3.3.1
collected 2 items

test_demo1.py .                                                          [ 50%]
test_demo2.py .                                                          [100%]

============================== 2 passed in 0.01s ==============================

Process finished with exit code 0
输出调试信息:-s
pytest.main(['-s'])运行结果:
============================= test session starts =============================
platform win32 -- Python 3.10.4, pytest-7.3.2, pluggy-1.1.0
rootdir: E:\python\pycharm\pythonProject\pytestdemo\alldemo
plugins: html-3.2.0, metadata-3.0.0, xdist-3.3.1
collected 2 items

test_demo1.py 向云端
.
test_demo2.py 山那边
.

============================== 2 passed in 0.02s ==============================

Process finished with exit code 0
b、运行指定(test_case1.py)模块用例
import pytest

if __name__ == '__main__':
    pytest.main(['-s', 'test_demo1.py'])
运行结果:
============================= test session starts =============================
platform win32 -- Python 3.10.4, pytest-7.3.2, pluggy-1.1.0
rootdir: E:\python\pycharm\pythonProject\pytestdemo\alldemo
plugins: html-3.2.0, metadata-3.0.0, xdist-3.3.1
collected 1 item

test_demo1.py 向云端
.

============================== 1 passed in 0.01s ==============================

Process finished with exit code 0
2、命令行模式
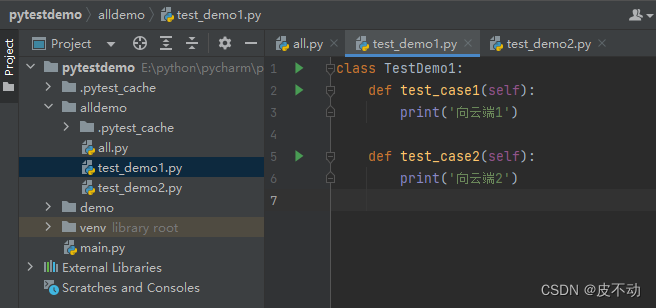
目录结构:
a、pytest运行所有用例:略
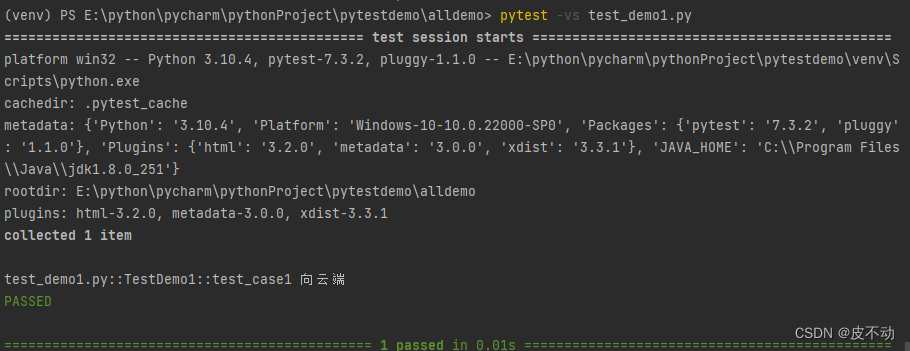
b、指定模块(用例)运行
pytest -vs test_demo1.py
运行结果:
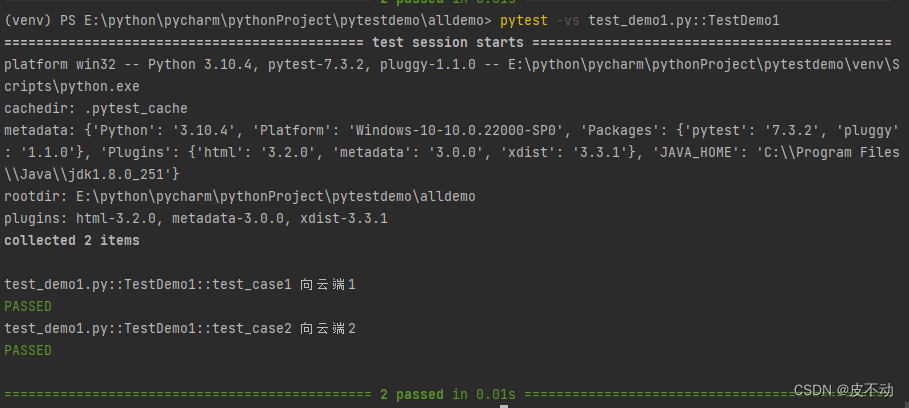
c、指定函数运行
pytest -vs test_demo1.py::TestDemo1 运行结果:
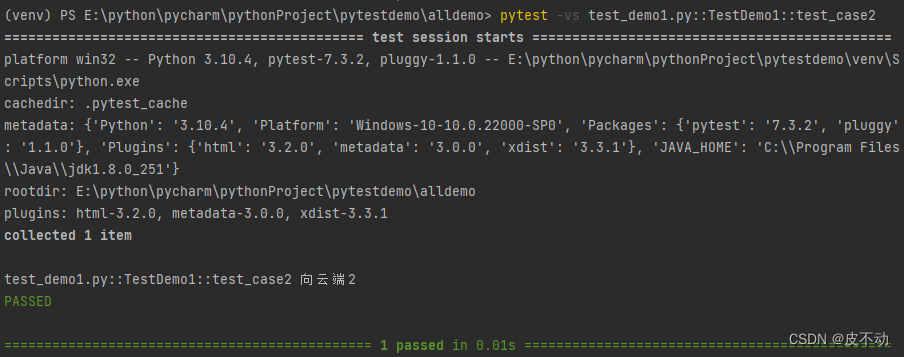
d、指定方法运行
pytest -vs test_demo1.py::TestDemo1::test_case2执行结果:
3、读取pytest.ini配置文件运行(常用、方便)
略
三、测试用例执行顺序
@pytest.mark.run(order=1)
安装pytest-ordering
pip install pytest-ordering
import pytest
class TestDemo1:
def test_case1(self):
print('向云端1')
def test_case2(self):
print('向云端2')
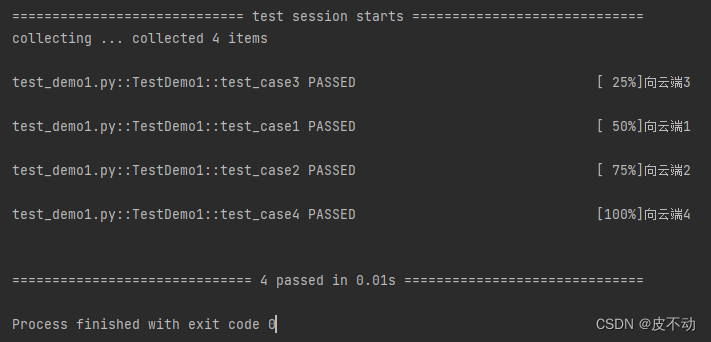
@pytest.mark.run(order=1)
def test_case3(self):
print('向云端3')
def test_case4(self):
print('向云端4')
if __name__ == '__main__':
pytest.main()
运行结果:
注解
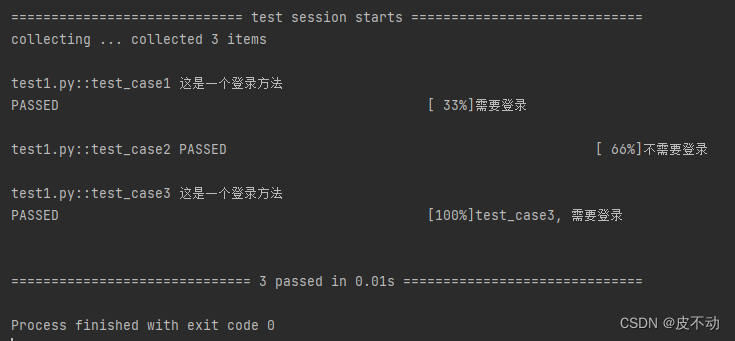
@pytest.fixture()参数传递
import pytest


@pytest.fixture()
def login():
    print("这是一个登录方法")


def test_case1(login):
    print("需要登录")


def test_case2():
    print("不需要登录")
    pass


def test_case3(login):
    print("test_case3, 需要登录")
    pass


if __name__ == '__main__':
    # 输出调试信息
    # pytest.main()
    pytest.main(['-s'])
执行结果:
conftest.py 包 数据共享
conftest.py (必须保持这个名字)
框架定义好的文件名 全局配置和前期数据准备可以放在这
用法执行后的效果与上面一样
conftest.py 文件
import pytest


@pytest.fixture()
def login():
    print("这是一个登录方法")
test_cast.py文件
import pytest


def test_case1(login):
    print("需要登录")


def test_case2():
    print("不需要登录")
    pass


def test_case3(login):
    print("test_case3, 需要登录")
    pass


if __name__ == '__main__':
    # 输出调试信息
    # pytest.main()
    pytest.main(['-s'])
执行结果:
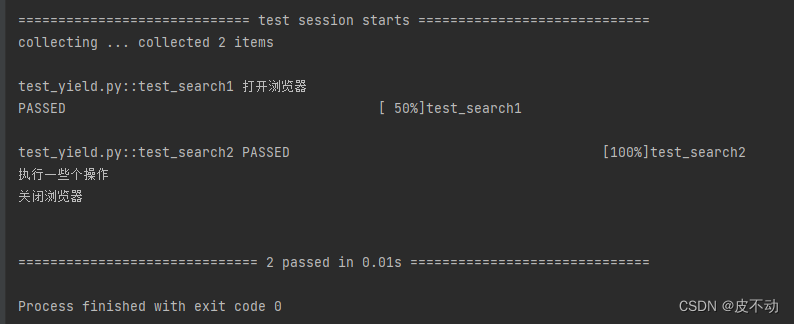
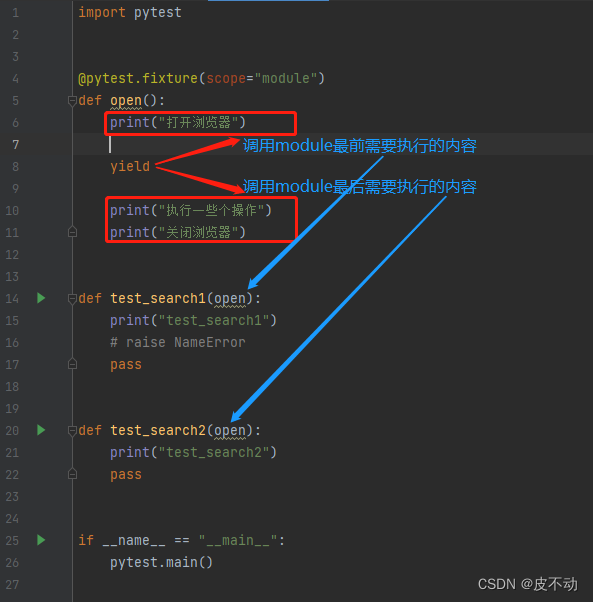
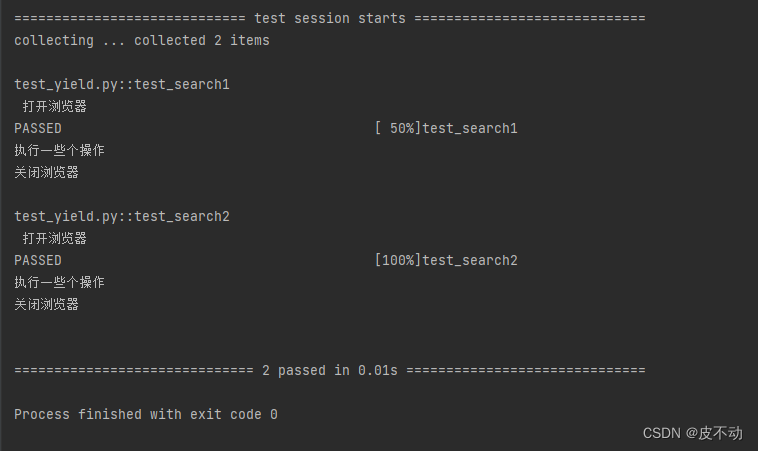
@yield
使用场景:数据销毁
import pytest


@pytest.fixture(scope="module")
def open():
    print("打开浏览器")

    yield

    print("执行一些个操作")
    print("关闭浏览器")


def test_search1(open):
    print("test_search1")
    # raise NameError
    pass


def test_search2(open):
    print("test_search2")
    pass


if __name__ == "__main__":
    pytest.main()
执行结果:
测试执行流程:
autouse
@pytest.fixture(autouse=True)
使用场景:每次都需要执行的内容
import pytest


@pytest.fixture(autouse=True)
def open():
    print("\n 打开浏览器")

    yield

    print("执行一些个操作")
    print("关闭浏览器")


def test_search1(open):
    print("test_search1")
    # raise NameError
    pass


def test_search2(open):
    print("test_search2")
    pass


if __name__ == "__main__":
    pytest.main()
执行结果:
@pytest.mark.parametrize参数
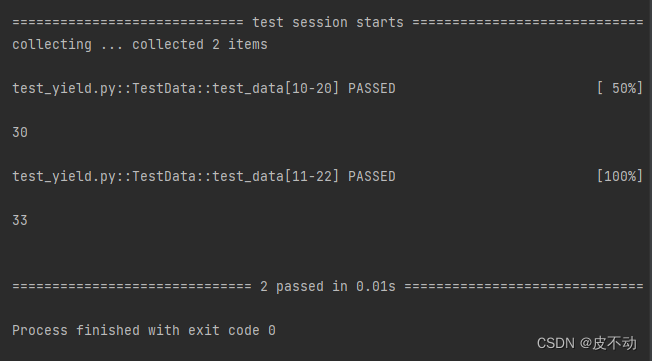
案例一:
import pytest


class TestData:
    @pytest.mark.parametrize("a,b", [(10, 20), (11, 22)])
    def test_data(self, a, b):
        print("\n")
        print(a + b)
执行结果:
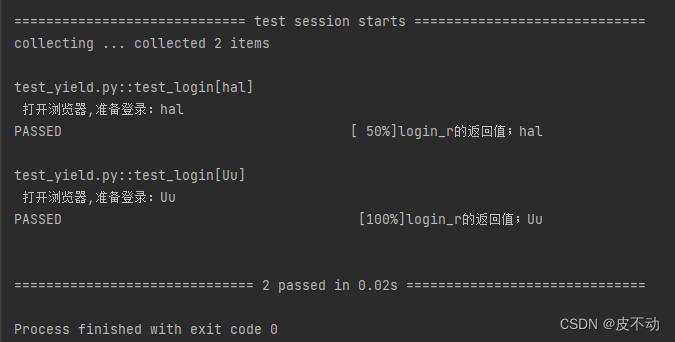
案例二:
import pytest

# 方法名作为参数
test_user_data = ['hal', 'Uu']


@pytest.fixture(scope='module')
def login_r(request):
    # 接收并传入参数
    user = request.param
    print(f"\n 打开浏览器,准备登录:{user}")
    return user


# indirect=True,可以把传过来的参数当函数执行
@pytest.mark.parametrize("login_r", test_user_data, indirect=True)
def test_login(login_r):
    a = login_r
    print(f"login_r的返回值;{a}")
    assert a != ''


if __name__ == "__main__":
    pytest.main()
执行结果:
@pytest.mark.xfail()
xfial可能失败

@pytest.mark.xpass()
xpass可能通过

@pytest.mark.skip
跳过
多线程分布式执行
安装:
pip install pytest-xdist
多个CPU并行执行用例(用-n,3 是并行数量):pytest -n 3

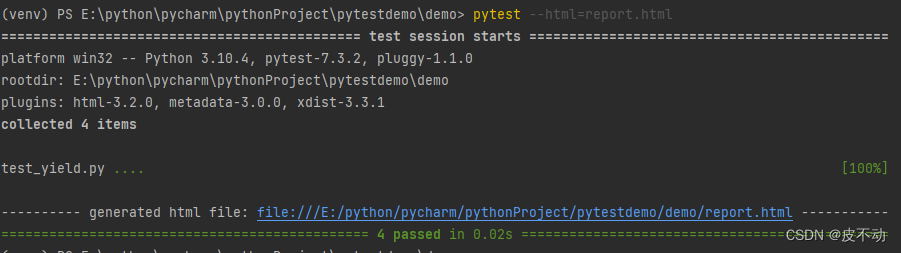
pytest-html生成测试报告
安装:
pip install pytest-html
生成html报告:
pytest --html=report.html
执行效果:
生成html报告(指定路径):
pytest --html=./report/report.html创建一个独立的报告(合并css样式)
pytest --html=report.html --self-contained-html这条不知道干啥用的:
pytest -v -s --html=report.html -- self-contained-html
加载yaml数据yaml.safe_load
@pytest.mark.parametrize((params), yaml.safe_load(open(path)))
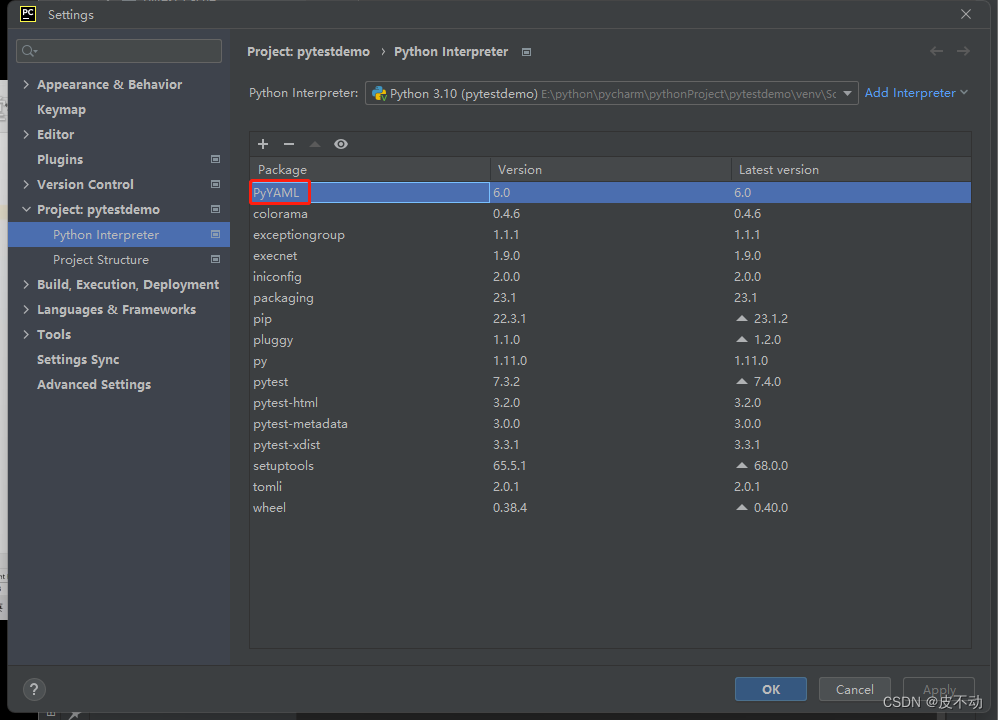
安装PyYaml插件:
案例一:
import pytest
import yaml


class TestData:
    @pytest.mark.parametrize(("a", "b"), yaml.safe_load(open("./data.yaml")))
    def test_yaml(self, a, b):
        print("\n")
        print(a + b)
data.yaml
-
  - 10
  - 20
-
  - 11
  - 22
-
  - 10000
  - 10086
执行结果:

案例二:
import pytest
import yaml
class TestData:
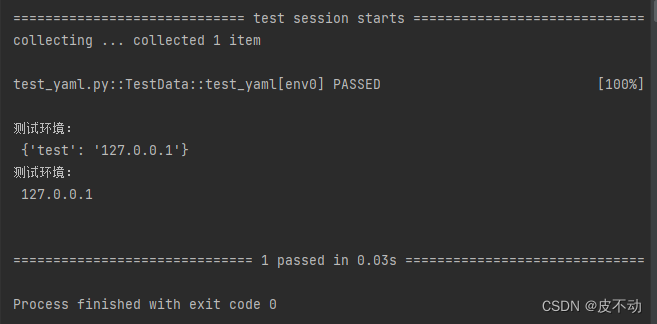
@pytest.mark.parametrize("env", yaml.safe_load(open("./env.yaml")))
def test_yaml(self, env):
if "test" in env:
print("\n")
print("测试环境:\n", env)
print("测试环境:\n", env["test"]) # 只打印value
elif "dev" in env:
print("开发环境:\n", env)
# 打印load到的内容
def test_yaml2(self):
print("\n")
print(yaml.safe_load(open("./env.yaml")))
env.yaml
-
  test: 127.0.0.1
执行结果:


 2144
2144


 被折叠的 条评论
为什么被折叠?
被折叠的 条评论
为什么被折叠?
 到【灌水乐园】发言


