


介绍
学习视频来源
SpringBoot微信小程序电商实战项目课程 Vue3.2 Element Plus后台管理 ( 火爆连载更新中… )_哔哩哔哩_bilibili
技术栈介绍
-
本套课程采用主流技术栈实现,Mysql数据库,SpringBoot2+Mybatis Plus后端,微信小程序原生实现,Vue3.2+Element Plus实现后台管理。基于JWT技术实现前后端分离。
-
微信小程序端涵盖了axios异步请求,Promise应用,swiper组件,自定义组件,应用了微信小程序提供的登录,支付,地址管理,包括下拉滑动分页,less应用,以及结合SpringBoot后端实现了企业级微信小程序支付功能,为了方便教学,采用ngrok实现映射本机IP,开发环境演示真实支付功能。
-
电商的后台管理采用了主流的Vue3.2+Element Plus组件 实现,涵盖了axios+Promise工具类封装,自定义icon,vuex应用,router路由,路由守卫,使用了大量的Element Plus组件,如表格,分页,图片上传,下拉框,二级联动,Form表单,rules验证框架,dialog以及第三方vue-quil富文本组件等。
一:基础工作
1. 创建微信小程序项目
准备工作
3_下载微信开发者工具以及安装_哔哩哔哩_bilibili 前几P会介绍微信开发者的注册以及开发工具的下载与使用
创建
- 创建时选择不使用云服务,选择javaScript模板
创建后
搭建空项目
- 删除app.wxss中的内容(里面是一些样式)
- 删除pages下的logs日志文件夹(app.json中要选出他的一条相关内容)
- 删除utils工具包文件夹(暂时不用)
- 删除index(首页)文件夹下的index.wxml,index.wxss,index.js中内容
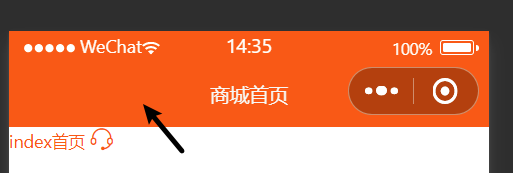
index.json
{
"usingComponents": {},
//正常json中不能注释,这里目的是为了说明
//程序主名字
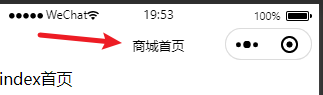
"navigationBarTitleText": "商城首页"
}
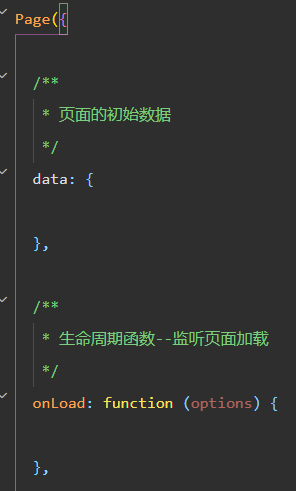
index.js
清空后输入Page, 生成一个模板
2. iconfont矢量图引入
网站使用方法
将图标添加到库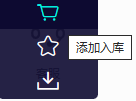
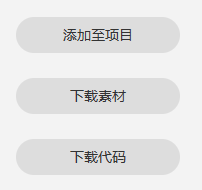
将库中图标添加到项目
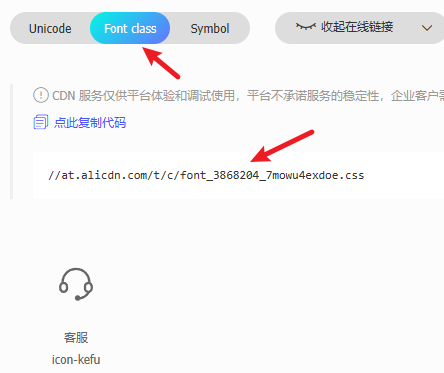
进入连接后里面的内容就是我们需要的远程图标和样式
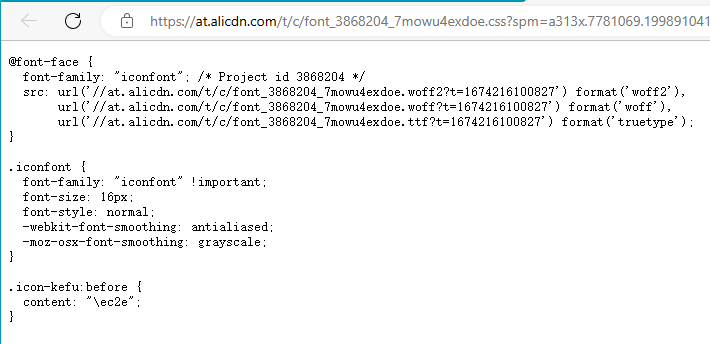
开发工具中使用
-
在pages同级列表下创建styles文件夹,里面创建iconfont.wxss文件,将上面内容复制进去-
-
在app.wxss中进行全局引入
@import "./styles/iconfont.wxss" -
以在首页使用为例:
<text class="iconfont icon-kefu">
</text>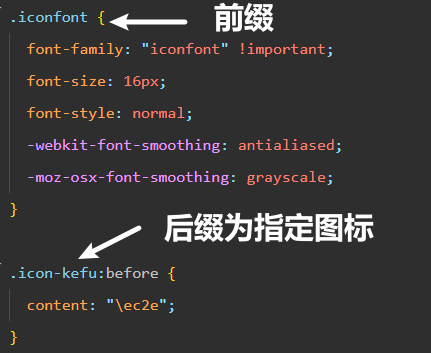
3.底部菜单tabbar
该项目创建了icons文件夹并放置了一些本地图标

接下来对app.json进行处理,下面只写出改动部分
"pages":[
    //底部菜单的四个内容
    "pages/index/index",
    "pages/category/index",
    "pages/cart/index",
    "pages/my/index"
  ],
"tabBar": {
    //正常颜色
    "color": "#999",
    //选中后的颜色
    "selectedColor": "#FF5700",
    //底色
    "backgroundColor": "#fafafa",

    //四个菜单元素
    "list": [{
        //选中后前往的地址
      "pagePath": "pages/index/index",
        //文本信息
      "text": "首页",
        //图标
      "iconPath": "icons/_home.png",
        //选中后的图标
      "selectedIconPath": "icons/home.png"
    },
    {
      "pagePath": "pages/category/index",
      "text": "分类",
      "iconPath": "icons/_category.png",
      "selectedIconPath": "icons/category.png"
    },{
      "pagePath": "pages/cart/index",
      "text": "购物车",
      "iconPath": "icons/_cart.png",
      "selectedIconPath": "icons/cart.png"
    },{
      "pagePath": "pages/my/index",
      "text": "我的",
      "iconPath": "icons/_my.png",
      "selectedIconPath": "icons/my.png"
    }]
  },
4.初始化全局样式
- 在app.wxss中进行全局样式的设置
/* 初始化全局样式,该代码会报错,但是程序正常运行,原因未知 */
page,view,text,swiper,swiper-item,image,navigator{
    /* css中经典的盒式模型*/
  padding:0;
  margin:0;
  box-sizing:border-box;
}

/* 全局变量定义,设置主题颜色,字体大小等 */
page{
  /* 主题颜色 */
  --themeColor:#FF5700;
  /* 字体大小 rpx自适应大小,根据设备不同会自动适应屏幕大小 */
  font-size:28rpx;
}
-
使用上述全局样式
-
我们曾在index.wxml中写入了view标签包含的代码
-
现在我们在index.wxss中使用全局样式
/* 对view标签内容设置颜色,这里使用变量要使用var,--themeColor是我们上面设置的全局样式变量 */ view{ color:var(--themeColor); } -
效果如下:
-

-
-
设置app.json中导航栏的颜色:
"window":{
    "backgroundTextStyle":"light",
    //设置导航栏的颜色
    "navigationBarBackgroundColor": "#FF5700",
    "navigationBarTitleText": "Weixin",
    "navigationBarTextStyle":"white"
  },
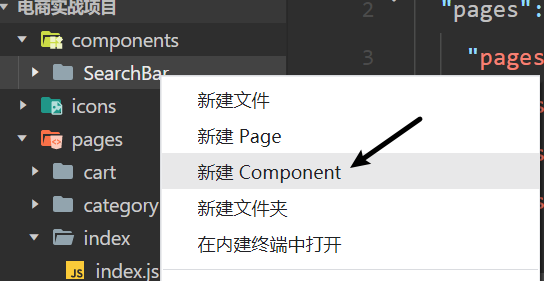
5.搜索框自定义组件实现
预备
- 为了提高复用性,我们将搜索框设计为自定义组件,这样我们任何页面下都可以调用
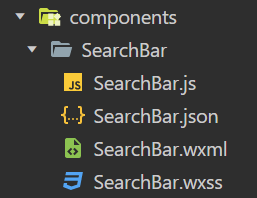
- 我们将所有自定义组件都放在一个自己创建的components文件夹下
- 任何一个组件我们都要在components文件夹下创建新的文件夹存储,文件夹中需要像其他内容一样有js,json,wxml,wxss四个文件。快速创建四个文件方式如下:
创建与使用
- 以在首页使用为例,在index.json中引入
"usingComponents": {
    //组件名称为:前的SearchBar
    //components文件夹下的SearchBar文件夹内的SearchBar组件
    "SearchBar":"/components/SearchBar/SearchBar"
  },
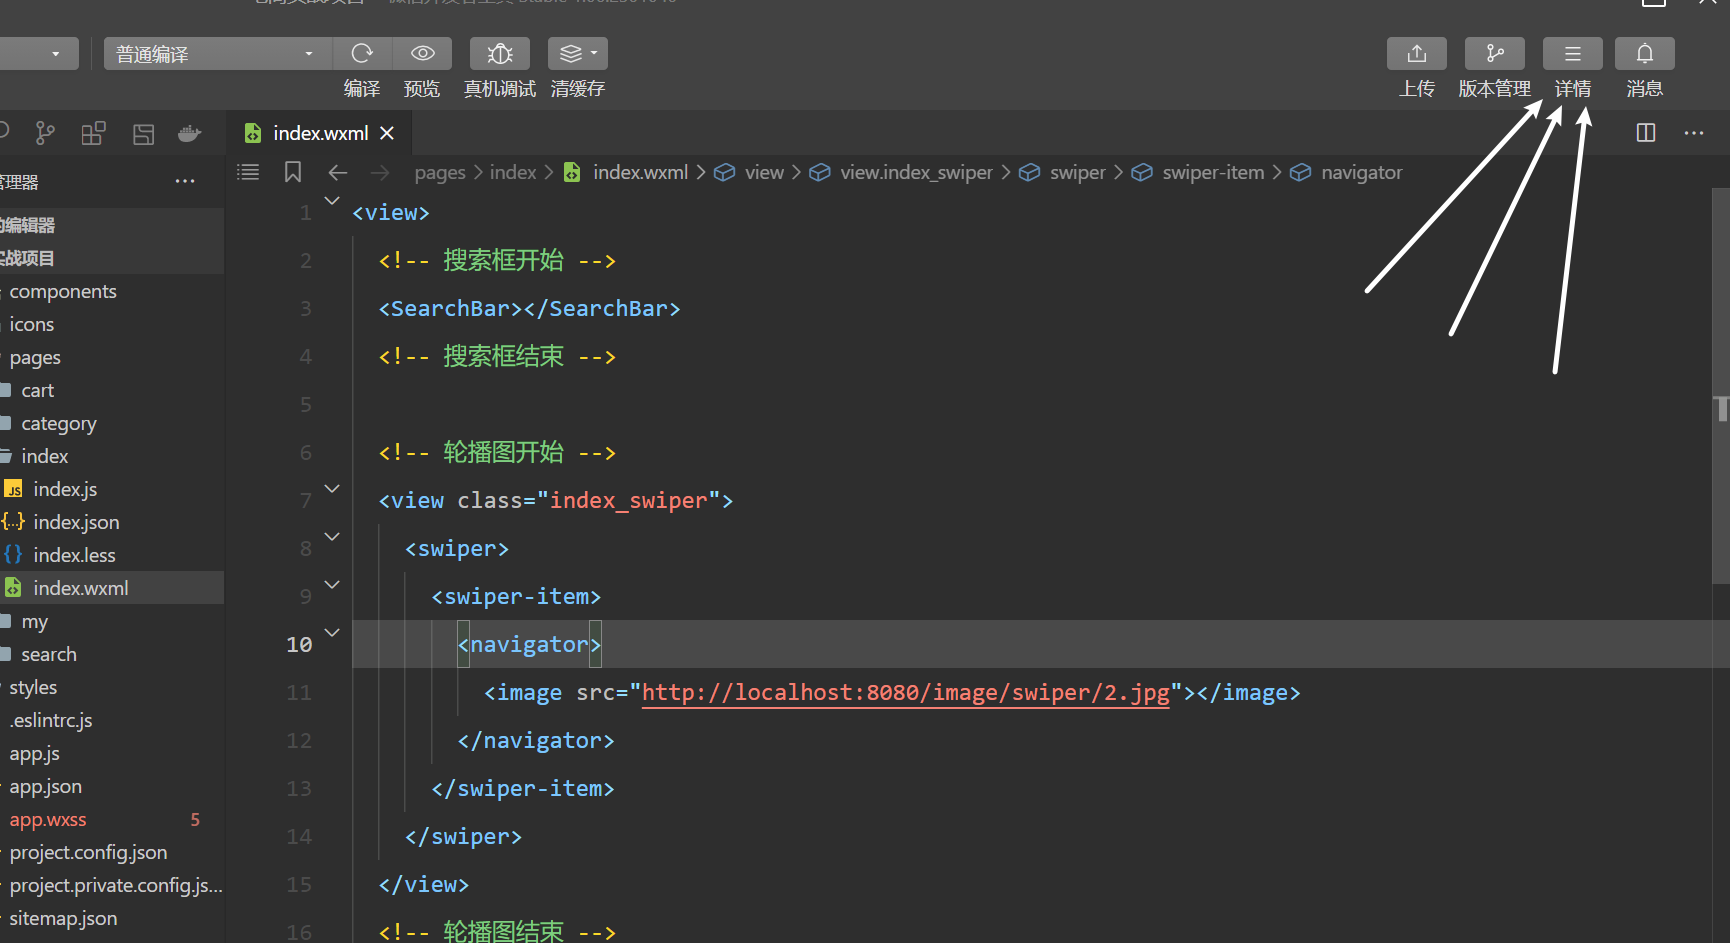
- 在index.wxml中使用
<view>
    //将上面:前的内容作为标签名
  <SearchBar></SearchBar>
</view>
此时使用成功,只是没有样式、
-
写样式,目前没有引入less,使用正常写法
- 在SearchBar.wxml中写入基本元素,open-type意义可以参考【微信小程序】页面导航-阿里云开发者社区 (aliyun.com)
<view class="search_bar">
<!-- 设置跳转页面(在app.json的pages中注册) -->
  <navigator url="/pages/search/index" open-type="navigate">
    <icon type="search" size="16"></icon>搜索
  </navigator>
</view>
- 在SearchBar.wxss中写入详细样式,由于没有导入less,样式代码极其复杂,要一层一层写
/* 设置搜索栏的高度,边距,背景色 */
.search_bar{
  height: 90rpx;
  padding: 10rpx;
  background-color: var(--themeColor);
}

/* 设置搜索栏文本样式 */
.search_bar navigator{
  /* 100%继承上层的高度 */
  height: 100%;
  /* 使用伸缩盒子 */
  display: flex;
  /* 文字居中,快捷:jcc */
  justify-content: center;
  /* 垂直居中,快捷键:alc */
  align-items: center;
  /* 这个白色是搜索框的那个白色 */
  background-color: #fff;
  /* 文字颜色 */
  color: #666;
  /* 圆角 */
  border-radius: 15rpx;
}

.search_bar navigator icon{
  /* 设置右边距,让他离“搜索”文本远一些 */
  padding-right: 5rpx;
}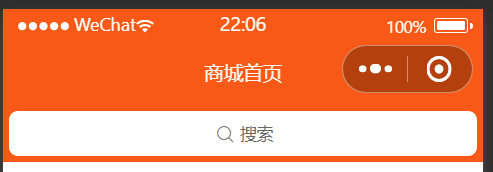
6.使用less插件
Less是一门css预处理语言,让css更容易维护,方便制作主题、扩充
安装配置方法参考:微信开发者工具配置支持less_Java开源博客系统-Powered by java1234
2022后版本先去上面链接里下载插件,安装看这个:(13条消息) 2022版本微信开发者工具引入less插件_周怼怼的博客的博客-CSDN博客_微信开发者工具如何安装less插件
-
使用后就在.less中写代码,保存后会自动生成.wxss内容。对上文搜索框样式内容进行修改
.search_bar{
  height: 90rpx;
  padding: 10rpx;
  background-color: var(--themeColor);
  navigator{
    height: 100%;
  display: flex;
  justify-content: center;
  align-items: center;
  background-color: #fff;
  color: #666;
  border-radius: 15rpx;
    icon{
      padding-right: 5rpx;
    }
  }
}
7.SpringBoot后端项目架构搭建
创建
创建时导入的依赖:lomBok,Spring Web,Spring Boot DevTools
导入依赖
<dependencies>
    <!--  web依赖  -->
    <dependency>
        <groupId>org.springframework.boot</groupId>
        <artifactId>spring-boot-starter-web</artifactId>
    </dependency>
    <!--  devtools可以提高开发者的工作效率,最方便的地方莫过于热部署  -->
    <dependency>
        <groupId>org.springframework.boot</groupId>
        <artifactId>spring-boot-devtools</artifactId>
    </dependency>
    <!--  lombok省去构造器,getter,setter等实体类的代码  -->
    <dependency>
        <groupId>org.projectlombok</groupId>
        <artifactId>lombok</artifactId>
        <optional>true</optional>
    </dependency>
    <!--  mysql驱动  -->
    <dependency>
        <groupId>mysql</groupId>
        <artifactId>mysql-connector-java</artifactId>
        <scope>runtime</scope>
    </dependency>
    <!--  德鲁伊连接池  -->
    <dependency>
        <groupId>com.alibaba</groupId>
        <artifactId>druid</artifactId>
        <version>1.1.10</version>
    </dependency>
    <!--  mybatis-plus  -->
    <dependency>
        <groupId>com.baomidou</groupId>
        <artifactId>mybatis-plus-boot-starter</artifactId>
        <version>3.3.2</version>
    </dependency>
    <!--  添加Httpclient支持  -->
    <dependency>
        <groupId>org.apache.httpcomponents</groupId>
        <artifactId>httpclient</artifactId>
        <version>4.5.2</version>
    </dependency>
    <!--  fastjson,用来转化json  -->
    <dependency>
        <groupId>com.alibaba</groupId>
        <artifactId>fastjson</artifactId>
        <version>1.2.40</version>
    </dependency>
    <!--  JWT  -->
    <dependency>
        <groupId>com.auth0</groupId>
        <artifactId>java-jwt</artifactId>
        <version>3.2.0</version>
    </dependency>
    <!--  JJWT  -->
    <dependency>
        <groupId>io.jsonwebtoken</groupId>
        <artifactId>jjwt</artifactId>
        <version>0.7.0</version>
    </dependency>
    <!--  JDOM  -->
    <dependency>
        <groupId>jdom</groupId>
        <artifactId>jdom</artifactId>
        <version>1.1</version>
    </dependency>
    <!--  dom4j  -->
    <dependency>
        <groupId>dom4j</groupId>
        <artifactId>dom4j</artifactId>
        <version>1.6.1</version>
    </dependency>
    <!--  commons-io流包  -->
    <dependency>
        <groupId>commons-io</groupId>
        <artifactId>commons-io</artifactId>
        <version>2.5</version>
    </dependency>
</dependencies>
处理SpringBoot配置文件
我们一般配置文件用yml,所以把自动生成的application.properties改为yml文件
进行如下配置:
server:
  port: 8080
  servlet:
    context-path:

spring:
  datasource:
    type: com.alibaba.druid.pool.DruidDataSource
    driver-class-name: com.mysql.cj.jdbc.Driver
    # 有些数据库版本需要加上&useSSL=false
    url: jdbc:mysql://localhost:3306/mall-system?serverTimezone=Asia/Hongkong&useSSL=false
    username: root
    password: 123456
建包
- config 配置包
- controller 控制类包
- mapper mybatis的mapper类包
- pojo 实体类包(也可以叫做entity)
- service 服务层包
- impl 服务层接口实现类包
- util 工具类包
导入(编写)一个前后端分离常用实体类
package com.zaughter.pojo;

import java.util.HashMap;
import java.util.Map;

/**
 * 页面响应entity
 */
public class R extends HashMap<String, Object> {

    private static final long serialVersionUID = 1L;

    //无参构造器
    public R() {
        put("code", 0);
    }

    //error方法的重载
    public static R error() {
        return error(500, "未知异常,请联系管理员");
    }
    //带异常信息
    public static R error(String msg) {
        return error(500, msg);
    }
    //带异常代码与信息
    public static R error(int code, String msg) {
        R r = new R();
        r.put("code", code);
        r.put("msg", msg);
        return r;
    }

    //ok方法的重载
    public static R ok(String msg) {
        R r = new R();
        r.put("msg", msg);
        return r;
    }
    public static R ok(Map<String, Object> map) {
        R r = new R();
        r.putAll(map);
        return r;
    }
    public static R ok() {
        return new R();
    }

    //由于R是一个HashMap,所以可以通过键值对存入数据,这里是put的重载
    public R put(String key, Object value) {
        //调用父类(HashMap)的put方法
        super.put(key, value);
        return this;
    }
}
8.Swiper轮播图后端接口实现
几个特殊操作
- 在application.yml中配置mybatis-plus
mybatis-plus:
  global-config:
    db-config:
      id-type: auto # id生成规律:数据库id自增
  configuration:
    map-underscore-to-camel-case: false # 开启驼峰功能
    auto-mapping-behavior: full # 自动映射任何复杂的结果
    log-impl: org.apache.ibatis.logging.stdout.StdOutImpl # 日志
  mapper-locations: classpath:mybatis/mapper/*.xml # mapper路径
-
由于是前后端分离,所以所有的日期都要有前后端分离操作
- 实体类中关于日期的属性
//json序列化,由于是前后端分离,所以所有的日期都要有前后端分离操作 @JsonSerialize(using=CustomDateTimeSerializer.class) private Date hotDateTime; // 设置热门推荐日期时间- 写一个json序列化的实体类
package com.zaughter.pojo;

import com.fasterxml.jackson.core.JsonGenerator;
import com.fasterxml.jackson.databind.JsonSerializer;
import com.fasterxml.jackson.databind.SerializerProvider;

import java.io.IOException;
import java.text.SimpleDateFormat;
import java.util.Date;
import java.util.TimeZone;

/**
 * 自定义返回JSON 数据格式中日期格式化处理
 */
public class CustomDateTimeSerializer extends JsonSerializer<Date>{

	@Override
	public void serialize(Date value, JsonGenerator gen, SerializerProvider serializers)
			throws IOException {
		SimpleDateFormat sdf = new SimpleDateFormat("yyyy-MM-dd HH:mm:ss");
		sdf.setTimeZone(TimeZone.getTimeZone("Asia/Shanghai"));
		gen.writeString(sdf.format(value));
	}

}
二:首页基本处理
9.首页Swiper轮播图静态实现
微信swiper官方文档:swiper | 微信开放文档 (qq.com)
给本地图片进行虚拟路径映射
//web项目配置类
@Configuration
public class WebAppConfigure implements WebMvcConfigurer {
    @Override
    //资源处理,给图片文件夹虚拟映射
    public void addResourceHandlers(ResourceHandlerRegistry registry) {
        //访问xx路径会映射到本地路径,注意本地路径开头要加file:最后要再加一次\\
        registry.addResourceHandler("/image/swiper/**").addResourceLocations("file:D:\\study files\\java files\\微信小程序-电商实战项目\\swiperImgs\\");
    }
}
对首页使用swiper轮播图
代码写在index.wxml中
<!-- 轮播图开始 -->
  <view class="index_swiper">
    <swiper>
      <swiper-item>
        <navigator>
          <image src="http://localhost:8080/image/swiper/2.jpg"></image>
        </navigator>
      </swiper-item>
    </swiper>
  </view>
<!-- 轮播图结束 -->
重要设置1
目前开发阶段使用的都是本地域名,所以要进行如下设置防止出现问题
重要设置2
发布小程序时,要设置服务器域名白名单
小程序后台管理->开发管理->开发设置->服务器域名
图片适配屏幕
index.xml
在image标签中添加mode
<swiper-item>
    <navigator>
        <!-- 宽度自适应,这样防止由于下面less将尺寸写死导致部分机型显示有问题 -->
      <image mode="widthFix" src="http://localhost:8080/image/swiper/1.jpg"></image>
    </navigator>
</swiper-item>
index.less
.index_swiper{
  swiper{
      //图片大小是2:1,所以这里也是2:1的比例
    width: 750rpx;
    height: 375rpx;
    swiper-item{
      image{
          //宽度100%继承
        width: 100%;
      }
    }
  }
}
装修
内容都可以从swiper官方文档中获取
指示点
在swiper标签下添加indicator-dots

自动滑动
在swiper标签下添加autoplay
但是此时无法循环,当滑动到最后一张图片后便不会再发生滑动
添加circular,设置为循环滑动
10.首页swiper轮播图ajax异步请求数据动态渲染实现
请求数据
思路:在index.js中设置。
- 先定义轮播图数组
data: {
    // 轮播图数组
    swiperList:[]
  },
- 请求后端。这里我们使用微信提供的wx.request这个api,官方文档:RequestTask | 微信开放文档 (qq.com)
onLoad: function (options) {
    // 发送异步请求获取后端数据
    wx.request({
      url: 'http://localhost:8080/product/findSwiper',
      method:"GET",
      success:(result)=>{
        this.setData({
          swiperList:result.data.message
        })
      }
    })
}
- 遍历。原来我们通过写死swiper-item的url来引入图片(一个图片就要写一组),现在我们改用动态的。
目前url是通过拼接实现的,这种实现方式并不好,后面我们要进行封装
 <!-- 对已经含有后端数据的数组进行遍历,并将遍历出来的元素命名为swiper(如果不命名) -->
      <swiper-item
        wx:for="{{swiperList}}"
        wx:for-item="swiper"
        wx:key="id"
      >
        <navigator>
          <image mode="widthFix" src="{{'http://localhost:8080/image/swiper/'+swiper.swiperPic}}"></image>
        </navigator>
      </swiper-item>
11.Promise方式的请求工具类封装
上面我们在没有封装的情况下请求后端,但是如果我们现在需要依赖于得到的请求结果进行进一步的请求,我们就要再续上一次wx.request。那么如果有很多层呢?就会形成“回调地狱”
在es6中提出了异步依赖回调的解决方案,同一up主的相关课程:es6视频教程-Java1234课堂
创建一个utils工具包,里面新建我们的requestUtil工具类
//后端请求工具类
//到时候requestUtil会传入一系列参数
export const requestUtil=(params)=>{
    //如果请求成功就走resolve,失败就走reject
  return new Promise((resolve,reject)=>{
    wx.request({
        //解析那些参数
      ...params,
      success:(result)=>{
          //这个.data的目的是为了在使用时少打一个.data
        resolve(result.data)
      },
      fail:(err)=>{
        reject(err)
      }
    })
  })
}
使用工具类要先导入
//导入requestUtil请求工具类
import {requestUtil} from '../../utils/requestUtil.js'
Page({
使用
requestUtil({url: 'http://localhost:8080/product/findSwiper',method:"GET"})
  .then(result=>{
    this.setData({
      swiperList:result.message
      })
  })
}
跟原先版本进行对比
wx.request({
    //url和method都作为参数传入工具类中,后面...params解构
   url: 'http://localhost:8080/product/findSwiper',
   method:"GET",
   success:(result)=>{
     this.setData({
         //这里就是那个.data
       swiperList:result.data.message
     })
   }
 })
规范
在企业开发中,我们最好不要将业务代码整个写到js文件的onload中。
将其抽取出来变成一个方法,然后onload中只有一行调用这个方法即可
错误示范: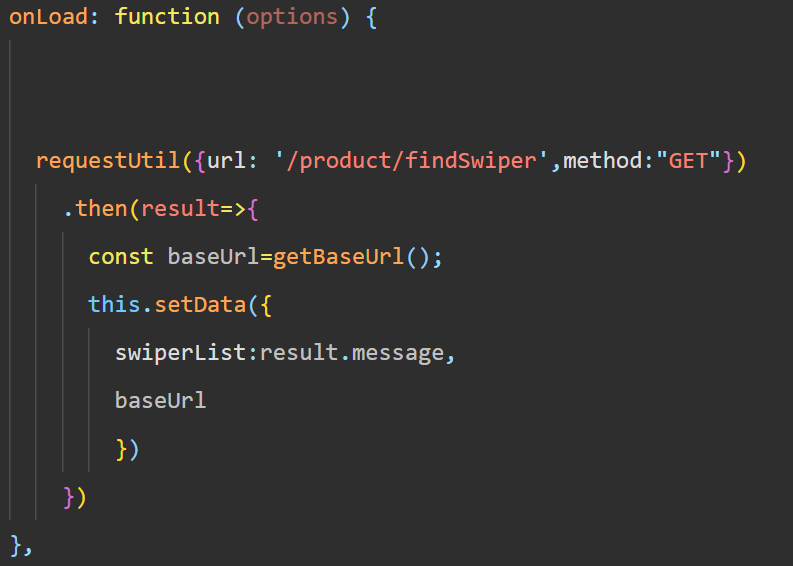
正确规范: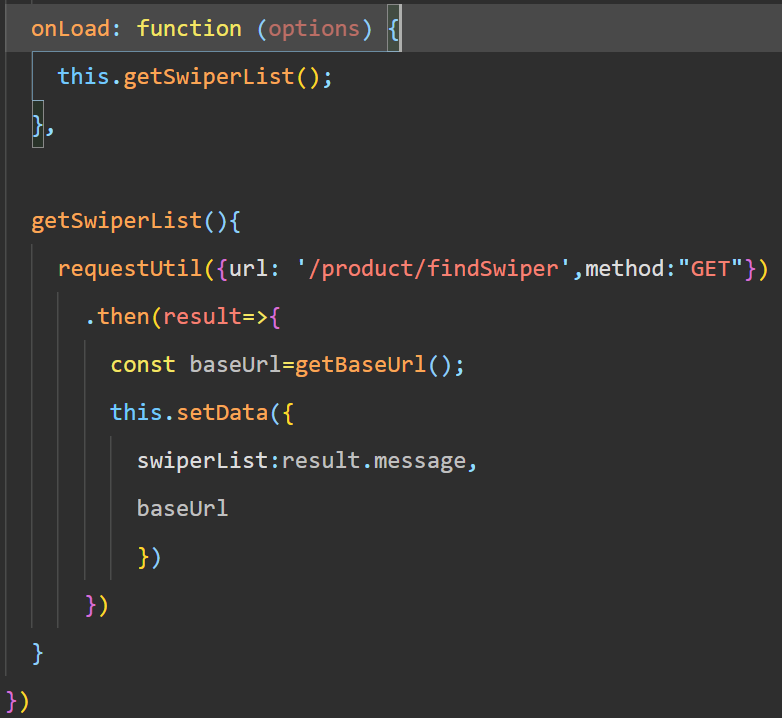
12.请求根路径baseUrl封装
上面通过Promise方式优化后其实还有不足
requestUtil传参时requestUtil({url: 'http://localhost:8080/product/findSwiper',method:"GET"})将url写死了,那么假如使用了很多次这个工具类,当域名发生改变时就需要修改很多次(swiper中图片的读取也存在这个问题),所以要把根路径进行封装
requestUtil.js
//定义请求跟路径baseUrl,8080后面的/我们用的时候另外加,防止错乱
const baseUrl="http://localhost:8080";
//返回请求根路径baseUrl
export const getBaseUrl=()=>{
  return baseUrl;
}
在index.js中导入getBaseUrl,在data(所有页面数据的初始化都在这里,比如 上面的swiperList)中初始化baseUrl:baseUrl:"
wxml中swiper图片的导入
正常拼接即可
<image mode="widthFix" src="{{baseUrl+'/image/swiper/'+swiper.swiperPic}}"></image>
Promise方式请求后端数据
requestUtil方式中传入根路径后面的剩余部分/product/findSwiper,根路径放在setData中
requestUtil使用
requestUtil({url: '/product/findSwiper',method:"GET"})
  .then(result=>{
    //通过导入的getBaseUrl方法得到Url
    const baseUrl=getBaseUrl();
    this.setData({
      swiperList:result.message,
      //将得到的Url通过setDate传入
      baseUrl
      })
  })
requestUtil定义
export const requestUtil=(params)=>{
  return new Promise((resolve,reject)=>{
    wx.request({
      ...params,
        //解析处参数中的Url后与已经set好的baseUrl拼接
      url:baseUrl+params.url,
      success:(result)=>{
        resolve(result.data)
      },
      fail:(err)=>{
        reject(err)
      }
    })
  })
}
13.请求高级封装es7 async await语法支持
终极封装,可以让异步请求更加优雅,易于维护;
配置方式:
- 在小程序开发工具中勾选(默认已勾上)

-
下载facebook的regenerator库中的runtime.js
-
在小程序目录下新建文件夹
lib/runtime/runtime.js -
在每一个需要使用async语法的页面js文件中都引入(不能全局引入),只需要引入,不需要调用
import regeneratorRuntime from '../../lib/runtime/runtime'
然后就可以正常的使用async,await语法处理异步请求了
改进后的代码:
// 外层使用async声明这是一个异步方法,这样它不会阻碍到后面方法的执行
async getSwiperList(){
    //await声明这里需要同步,这就是等requestUtil这个方法执行完毕,返回给result后再进行后续的代码
    const result=await requestUtil({url: '/product/findSwiper',method:"GET"});
    const baseUrl=getBaseUrl();
    this.setData({
      swiperList:result.message,
     baseUrl
    })
  }
14.后端查询所有商品大类接口实现
自己看视频P14,就是cv大法加查找替换。LJ2022版本ctrl+f为查询,替换需要用ctrl+R。注意替换前要开启大小写敏感
15.首页商品大类显示axious异步请求数据动态渲染实现
-
首先先给本地的商品大类图片在WebAppConfigure.java中进行映射
registry.addResourceHandler("/image/bigType/**").addResourceLocations("file:D:\\study files\\java files\\微信小程序-电商实战项目\\bigTypeImgs\\"); -
前端初始化数据
data: { // 轮播图数组 swiperList:[], // 根路径 baseUrl:'', // 储存所有商品大类图片的大数组、 bigTypeList:[], // 储存相应行上的商品大类图片的小数组 bigTypeList_row1:[], bigTypeList_row2:[] }, -
前端设置获取数据的方法
<!-- 商品大类图片开始 --> <view class="index_bigType"> <view class="bigTypeRow"> <navigator wx:for="{{bigTypeList_row1}}" wx:for-item="bigType" wx:key="id" > <image mode="widthFix" src="{{baseUrl+'/image/bigType/'+bigType.image}}"></image> </navigator> </view> <view class="bigTypeRow"> <navigator wx:for="{{bigTypeList_row2}}" wx:for-item="bigType" wx:key="id" > <image mode="widthFix" src="{{baseUrl+'/image/bigType/'+bigType.image}}"></image> </navigator> </view> </view> <!-- 商品大类图片结束 --> -
设置less样式
// 商品大类图片样式
.index_bigType{
  padding-top: 20rpx;
  background-color: #F7F7F7;
  .bigTypeRow{
    display: flex;
    navigator{
      flex: 1;
      image{
        width: 150rpx;
      }
    }
  }
}
16.后端热门推荐商品接口实现
//查询前八个热门推荐商品
@GetMapping("/findHot")
public R findHot(){
    Page<Product> page = new Page<>(0,8);
    Page<Product> pageProduct = productService.page(page, new QueryWrapper<Product>().eq("isHot", true).orderByAsc("hotDateTime"));
    List<Product> hotProductList = pageProduct.getRecords();
    Map<String,Object> map=new HashMap<>();
    map.put("message",hotProductList);
    return R.ok(map);
}
这里面用到了mybatis-plus给我们提供的Page分页对象,所以需要写mybatis-plus的配置才能正常分页
package com.zaughter.config;

import com.baomidou.mybatisplus.extension.plugins.PaginationInterceptor;
import org.springframework.context.annotation.Bean;
import org.springframework.context.annotation.Configuration;

/**
 * MybatisPlus配置类
 */
@Configuration
public class MybatisPlusConfig {

    @Bean
    public PaginationInterceptor paginationInterceptor(){
        return new PaginationInterceptor();
    }
}
17.首页热卖推荐商品显示axious异步请求数据动态渲染实现
搞到现在,对于图片展示的流程基本摸清了:后端设置路径,这个路径会调用方法返回相关数据=>WebAppConfigure.java映射=>js文件中通过数据映射路径将数据导入到数组中=>在wxml中通过图片映射路径展示图片=>去less中调整图片样式
-
映射本地虚拟路径
registry.addResourceHandler("/image/product/**").addResourceLocations("file:D:\\study files\\java files\\微信小程序-电商实战项目\\Imgs\\productImgs\\"); -
// 获得推荐热卖商品列表 async getHotProductList(){ const result=await requestUtil({url: '/product/findHot',method:"GET"}); this.setData({ hotProductList:result.message, }) }, -
<!-- 推荐商品图片开始 --> <view class="index_hotProduct"> <view class="product_title">热卖推荐</view> <view class="product_list"> <view class="product_detail" wx:for="{{hotProductList}}" wx:for-item="hotProduct" wx:key="id" > <navigator> <image mode="widthFix" src="{{baseUrl+'/image/product/'+hotProduct.proPic}}"></image> <view class="product_name">{{hotProduct.name}}</view> <view class="product_price"> ¥ {{hotProduct.price}}</view> <button size="mini" type="warn">立即购买</button> </navigator> </view> </view> </view> <!-- 推荐商品图片结束 --> -
.index_hotProduct{
  .product_title{
    font-size: 32rpx;
    font-weight: 600;
    padding: 20rpx;
    color: var(--themeColor);
    background-color: #E0E0E0;
  }
  .product_list{
    display: flex;
    //里面元素只要满足条件就会自动换行
    flex-wrap: wrap;
    .product_detail{
      margin: 15rpx;
      //这样就能自动换行了
      width: 46%;
      text-align: center;
      navigator{
        image{
          width: 100%;
          background-color: #F5F5F5;
        }
        .product_name{
          //正常情况下如果商品名字过长需要显示多行
          //通过下面三行代码可以让名字只在一行显示,多余的内容通过...省略
          white-space: nowrap;
          overflow: hidden;
          text-overflow: ellipsis;
        }
        .product_price{
          color: var(--themeColor);
        }
        // button{}
      }
    }
  }
}
18.后端商品分类显示接口实现
主要还是那些cv大法,看视频即可,没什么新知识
19.获取后端商品分类接口数据
添加编译模式
默认编译模式下我们都是在首页开始,那么如果在写其他页面前端代码,每次测试还要手动点击去跳转到那个页面比较麻烦,这时候可以添加编译模式设置启动页面,还可以携带参数
剩下还是老知识
三:商品分类基本处理
20.商品分类显示scroll-view布局显示
左右两侧都是纵向的scroll-view,在wxml中使用scroll-view标签即可
<view class="cates_container">
<!-- 左侧菜单开始 -->
  <scroll-view scroll-y class="left_menu">

  </scroll-view>
<!-- 左侧菜单结束 -->
<!-- 右侧商品数据开始 -->
  <scroll-view scroll-y class="right_context">

  </scroll-view>
<!-- 右侧商品数据结束 -->
</view>
21.商品分类动态数据显示实现
开始丰富我们上面写的scroll-view布局
左侧:
<scroll-view scroll-y class="left_menu">
<view class="menu_item"
  wx:for="{{leftMenuList}}"
  wx:key="*this"
>{{item}}
</view>
</scroll-view>
分析:
- 这个视图标签叫menu_item
- 我们使用wx:for遍历存放数据的数组leftMenuList
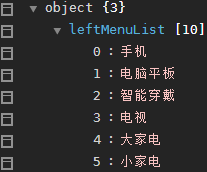
- 我们要获取value值,但是由于数据没有key值,所以这里使用*this,代表获取数据本身
- 然后在view标签中通过{{item}}显示遍历出来的数据
右侧:
<scroll-view scroll-y class="right_context">
<view class="productType"
wx:for="{{rightContext}}"
wx:for-item="productType"
wx:key="id"
>
<view class="productType_title">
  {{productType.name}}
  <view class="product_list"
  wx:for="{{productType.productList}}"
  wx:for-item="product"
  wx:key="id"
  >
  <navigator>
    <image mode="widthFix" src="{{baseUrl+'/image/product/'+product.proPic}}"></image>
    <view class="product_name">{{product.name}}</view>
    <view class="product_price"> ¥ {{product.price}}</view>
  </navigator>
  </view>
</view>
</view>
</scroll-view>
分析:

- 首先遍历外层rightContext,将遍历得到的元素命名为productType。并且在页面上显示出productType元素的name属性
- 第二层遍历productType元素下面的productList数组,将遍历元素命名为product。
- 显示图片同样使用navigator(这个代表链接),其中的内容与之前轮播图的类似。注意在js中初始化baseUrl
具体样式直接看视频,这种没啥可记录的
22.左侧菜单点击切换实现
我们先增加左侧菜单的wxml内容
<scroll-view scroll-y class="left_menu">
<view class="menu_item {{index==currentIndex ? 'active':''}}"
  wx:for="{{leftMenuList}}"
  wx:key="*this"
  data-index="{{index}}"
  bindtap="handleMenuItemChange"
>{{item}}
</view>
</scroll-view>
分析:
- data-index=“{{index}}”:程序遍历的时候,后面的index相当于当前索引的下标。我们利用data-xxx来创建一组数据,这里起名为index。
- bindtap=“handleMenuItemChange”:创建一个点击事件方法
- {{index==currentIndex ? ‘active’:‘’}}:判断当前用户选中的页面索引是不是遍历到的页面的索引,如果是的话就加一个我们设定好的名为active的样式
 ,如果不是则样式为空(三元表达式)
然后去js文件中写点击事件的内容:
  //左侧菜单点击切换事件
  handleMenuItemChange(e){
    const {index}=e.currentTarget.dataset;
    let rightContext=this.Cates[index].smallTypeList;
    this.setData({
      currentIndex:index,
      rightContext,
    })
  },
分析:
- 点击事件返回的日志如下:
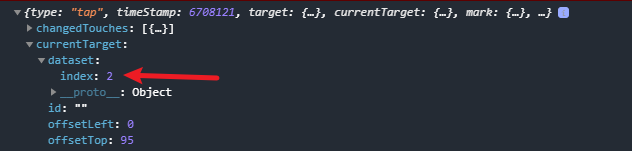
- 箭头指向的index就是我们利用data-index创建的数据,现在我们把它的值赋给遍历index
- 这里运用了解析的方法(加了{}),如果不用解析,正常应该写为const index=e.currentTarget.dataset.index;,解析可以针对只有单一数据的情况,这里dataset数组下只有index一种数据
- 我们让rightContext数组的内容为当店index指向的小商品类型数组,这样就可以改变页面右侧商品内容
- 最后将点击事件指向的index作为currentIndex传入数据集中,一并传入的还有更新的rightContext
- 这样wxml中的
{{index==currentIndex ? 'active':''}}判断语句便可以生效
23.竖向滚动条初始化
现在当点击左侧切换分区时,右边滚动条位置不会重置,而是跟原来位置一样,所以每次需要初始化为0
在index.wxml中对scroll-view标签添加内容
<scroll-view scroll-y class="right_context" scroll-top="{{scrollTop}}">
让scroll-top属性作为一个变量,变量为scrollTop
增加了新的数据,就去index.js的data区增加
data: {
  baseUrl:'',
  currentIndex:0,    // 当前选中左侧菜单的索引
  scrollTop:0,       // 设置竖向滚动条位置
  leftMenuList:[],    // 左侧大类数据
  rightContext:[],    // 右侧小类数据
},
然后对点击事件handleMenuItemChange增加初始化内容
handleMenuItemChange(e){
  const {index}=e.currentTarget.dataset;
  let rightContext=this.Cates[index].smallTypeList;
  this.setData({
    currentIndex:index,
    rightContext,
    scrollTop:0
  })
},
首页商品大类跳转
使用switchTab方法实现跳转,跳转的时候我们应该携带参数,但是这个方法不能携带。所以我们使用全局参数设置的方法来间接传参
首先去全局的app.js中设置全局变量index
// app.js
App({
  onLaunch() {

  },
  globalData: {
    index:-1
  }
})
接着对首页大类的参数进行增加
<view class="index_bigType">
  <view class="bigTypeRow">
    <navigator
      bindtap="handleTypeJump" // 设置新的点击事件
      data-index="{{index}}" // 第一行的index,从0开始
      wx:for="{{bigTypeList_row1}}"
      wx:for-item="bigType"
      wx:key="id"
    >
      <image mode="widthFix" src="{{baseUrl+'/image/bigType/'+bigType.image}}"></image>
    </navigator>
  </view>
  <view class="bigTypeRow">
    <navigator
      bindtap="handleTypeJump" // 设置新的点击事件
      data-index="{{index+5}}" // 首页第二行的index,由于也是从0开始,但是实际是5开始,所以加5
      wx:for="{{bigTypeList_row2}}"
      wx:for-item="bigType"
      wx:key="id"
    >
      <image mode="widthFix" src="{{baseUrl+'/image/bigType/'+bigType.image}}"></image>
    </navigator>
  </view>
</view>
接着有了数据,就去index.js中增加点击事件具体内容
// 大类点击事件 跳转 商品分类页面
handleTypeJump(e){
  const {index}=e.currentTarget.dataset; // 结构传来参数中的index参数
  const app=getApp(); // 使用自带的类
  app.globalData.index=index; // 将这个点击得到的参数赋值给全局参数
  wx.switchTab({ // 跳转
    url: '/pages/category/index'
  })
},
使用生命周期函数中的onShow,每次跳转都会执行,而onLoad只有第一次加载的时候执行
注意这里面有一个异步问题,onLoad里执行了getCates这个方法去获得数据,但是在数据还没有得到时,就会执行onShow,导致onShow是得不到数据的,所以这时我们再写一个新的,同时再增加一些其他的初始化
// 获得商品分类数据(从首页过来)
async getCates2(index){
  const result=await requestUtil({url: '/bigType/findCategories',method:"GET"});
  this.Cates=result.message;
  let leftMenuList=this.Cates.map((v)=>{
    return v.name
  })
  let rightContext=this.Cates[index].smallTypeList;
  this.setData({
    leftMenuList,
    rightContext,
    currentIndex:index,// 其他的初始化
    scrollTop:0,
  })
},

/**
 * 生命周期函数--监听页面显示
 */
onShow: function() {
    const app=getApp();
    const {index}=app.globalData;
    console.log("index="+index)
    if(index!=-1){ // 从首页跳转过来
      this.getCates2(index); // 使用这个方法,能拿到数据
      app.globalData.index=-1; // 重置index
    }
},


 1573
1573


 被折叠的 条评论
为什么被折叠?
被折叠的 条评论
为什么被折叠?
 到【灌水乐园】发言


