electron+vue3全家桶+vite项目搭建【三】按需引入element-plus图标

引入

视频讲解
demo项目地址
既然element-plus我们已经配置好了按需引入,那么图标咱们也走按需引入,让打出的包尽可能的小。
官网图标配置

1.安装依赖

npm install @element-plus/icons-vue
npm i -D unplugin-icons

2.配置自动导入

然后我们参考element提供的配置模板

请添加图片描述

调整vite.config.ts

// ...
import Icons from 'unplugin-icons/vite'
import IconsResolver from 'unplugin-icons/resolver'

plugins: [
// 自动导入里面添加一个图标组件的导入
 AutoImport({
     resolvers: [
      //...
      // 自动导入图标组件 
      IconsResolver({
        prefix: 'Icon',
      }),
    ],
 }),
    // 组件里面补充图标的注册
    Components({
        resolvers: [
              // ....
              // 自动注册图标组件
              IconsResolver({
                enabledCollections: ['ep'],
              }),
          ],
      }),
  //补充一个图标的导入配置
  Icons({
    autoInstall: true,
  }),
]

3.接着我们测试一下代码

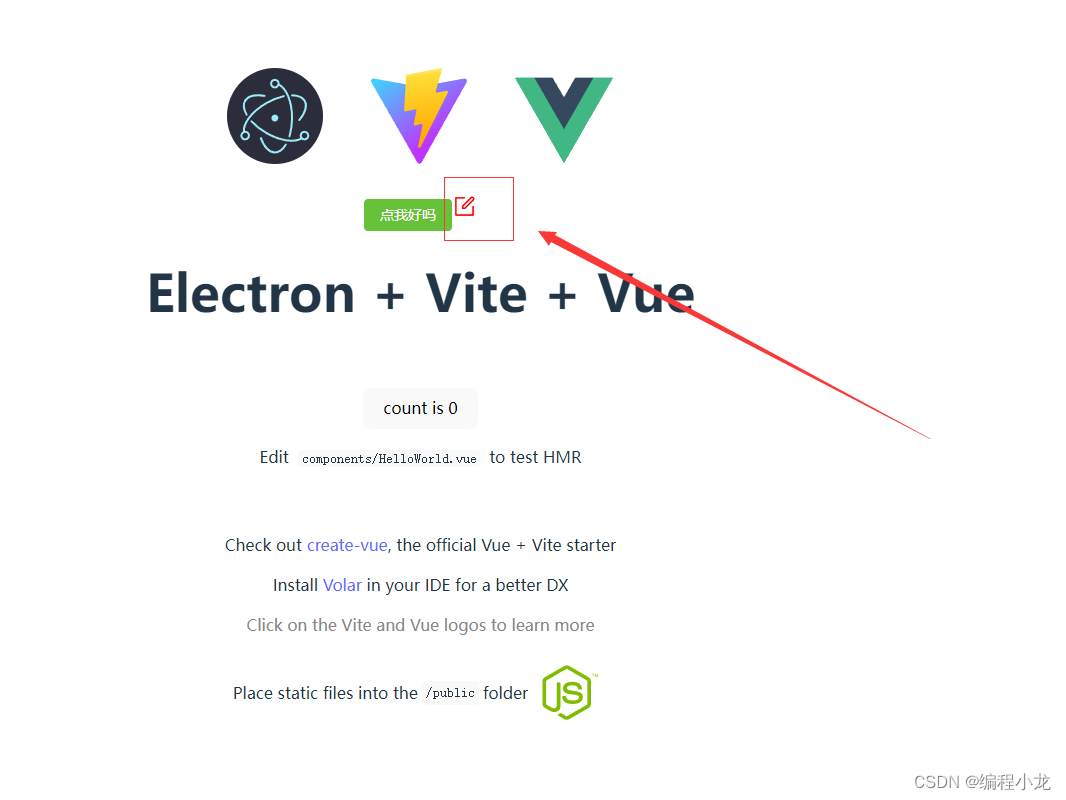
我们直接在HelloWorld.vue文件中添加图标相关代码:

  • 注意这里图标的前缀必须是i-ep-xxx 【官网没有给出明确说明,百度得知】
<el-icon size="25" color="red">
	<i-ep-edit />
</el-icon>

运行 dev脚本,显示如下图:

请添加图片描述

4.运行报错@iconify-json/ep安装不上

运行时会自用安装@iconify -json/ep,如果安装报错,可以通过手动安装图标库来解决:

cnpm install -D @iconify-json/ep
  • 0
    点赞
  • 1
    收藏
    觉得还不错? 一键收藏
  • 0
    评论
首先,你要安装 Node.js 和 npm。然后,可以按照以下步骤构建你的项目: 1. 创建项目文件夹并进入该文件夹: ``` mkdir my-project cd my-project ``` 2. 初始化项目: ``` npm init -y ``` 3. 安装 Vite: ``` npm install vite --save-dev ``` 4. 安装 Vue.js: ``` npm install vue@next --save ``` 5. 安装 TypeScript: ``` npm install typescript --save-dev ``` 6. 安装 Electron: ``` npm install electron --save-dev ``` 7. 安装 Element Plus: ``` npm install element-plus --save ``` 8. 安装 Vuex: ``` npm install vuex --save ``` 9. 创建 TypeScript 配置文件: ``` npx tsc --init ``` 10. 创建主进程和渲染进程的 Electron 入口文件: ``` // 主进程入口文件 main.js const { app, BrowserWindow } = require('electron') function createWindow () { const win = new BrowserWindow({ width: 800, height: 600, webPreferences: { nodeIntegration: true } }) win.loadFile('index.html') } app.whenReady().then(() => { createWindow() app.on('activate', () => { if (BrowserWindow.getAllWindows().length === 0) { createWindow() } }) }) app.on('window-all-closed', () => { if (process.platform !== 'darwin') { app.quit() } }) ``` ``` // 渲染进程入口文件 src/renderer/main.ts import { createApp } from 'vue' import App from './App.vue' import router from './router' import store from './store' import ElementPlus from 'element-plus' import 'element-plus/dist/index.css' createApp(App).use(router).use(store).use(ElementPlus).mount('#app') ``` 11. 创建 Vue 组件,例如 App.vue: ``` <template> <div id="app"> <router-view /> </div> </template> <script lang="ts"> import { defineComponent } from 'vue' export default defineComponent({ name: 'App' }) </script> ``` 12. 创建 Vuex store,例如 store/index.ts: ``` import { createStore } from 'vuex' export default createStore({ state: { count: 0 }, mutations: { increment (state) { state.count++ } } }) ``` 13. 创建路由器,例如 router/index.ts: ``` import { createRouter, createWebHashHistory } from 'vue-router' import Home from '../views/Home.vue' const routes = [ { path: '/', name: 'Home', component: Home } ] const router = createRouter({ history: createWebHashHistory(), routes }) export default router ``` 14. 创建主页面组件,例如 views/Home.vue: ``` <template> <div> <h1>{{ message }}</h1> <button @click="increment">Increment</button> </div> </template> <script lang="ts"> import { defineComponent } from 'vue' import { useStore } from 'vuex' export default defineComponent({ name: 'Home', setup () { const store = useStore() return { message: 'Hello, World!', increment () { store.commit('increment') } } } }) </script> ``` 15. 运行项目: ``` npm run dev ``` 以上就是使用 ViteVue.js、TypeScript、ElectronElement Plus 和 Vuex 构建项目的基本步骤。

“相关推荐”对你有帮助么?

  • 非常没帮助
  • 没帮助
  • 一般
  • 有帮助
  • 非常有帮助
提交
评论
添加红包

请填写红包祝福语或标题

红包个数最小为10个

红包金额最低5元

当前余额3.43前往充值 >
需支付:10.00
成就一亿技术人!
领取后你会自动成为博主和红包主的粉丝 规则
hope_wisdom
发出的红包
实付
使用余额支付
点击重新获取
扫码支付
钱包余额 0

抵扣说明:

1.余额是钱包充值的虚拟货币,按照1:1的比例进行支付金额的抵扣。
2.余额无法直接购买下载,可以购买VIP、付费专栏及课程。

余额充值