


中文网帮助文档:http://www.jeasyui.net/plugins/152.html
Draggable 与 Droppable 插件: 配合一起使用
一、EasyUI Draggable 可拖动
属性
| 名称 | 类型 | 描述 | 默认值 |
|---|---|---|---|
| proxy | string,function | 拖动时要使用的代理元素,设置为 'clone' 时,克隆元素将被用作代理。如果指定一个函数,它必须返回一个 jQuery 对象。 下面的实例演示了如何创建简单的代理对象。
| null |
| revert | boolean | 如果设置为 true,拖动结束后元素将返回它的开始位置。 | false |
| cursor | string | 拖动时的 css 光标(cursor)。 | move |
| deltaX | number | 拖动的元素相对于当前光标的 X 轴位置。 | null |
| deltaY | number | 拖动的元素相对于当前光标的 Y 轴位置。 | null |
| handle | selector | 启动可拖动(draggable)的处理(handle)。 | null |
| disabled | boolean | 如果设置为 true,则停止可拖动(draggable)。 | false |
| edge | number | 能够在其中开始可拖动(draggable)的拖动宽度。 | 0 |
| axis | string | 定义拖动元素可在其上移动的轴,可用的值是 'v' 或 'h',当设为 null,将会沿着 'v' 和 'h' 的方向移动。 | null |
事件
| 名称 | 参数 | 描述 |
|---|---|---|
| onBeforeDrag | e | 拖动前触发,返回 false 就取消拖动。 |
| onStartDrag | e | 目标对象开始拖动时触发。 |
| onDrag | e | 拖动期间触发。返回 false 将不进行实际的拖动。 |
| onStopDrag | e | 拖动停止时触发。 |
方法
| 名称 | 参数 | 描述 |
|---|---|---|
| options | none | 返回选项(options)属性(property)。 |
| proxy | none | 如果设置了代理(proxy)属性就返回拖动代理(proxy)。 |
| enable | none | 启用拖动动作。 |
| disable | none | 禁用拖动动作。 |
使用 JS 创建可拖动(draggable)元素。
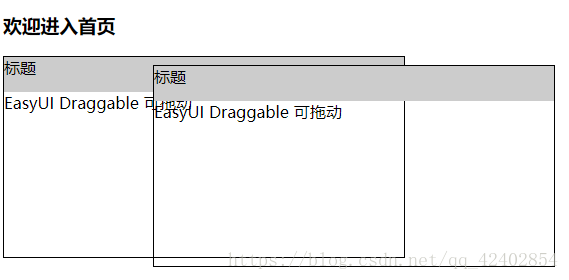
1、基本拖动:拖拽标题实现可拖动
	<h3>欢迎进入首页</h3>
	<div id="dg">
		<div id="title">标题</div>
		EasyUI Draggable 可拖动
	</div>

---index.css--
@charset "UTF-8";
#dg{
	width: 400px;
	height: 200px;
	border: 1px solid #000;
}
#title{
	width: 100%;
	height: 35px;
	background-color: #ccc;
}

---index.js--
$(function(){
	$("#dg").draggable({
		proxy: "clone",
		handle: "#title",
		cursor: "move",//pointer
	});
});
2、约束拖动:一个子div只能在其父div里拖拽
	<div id="context">
		<div id="dg">Draggable 可拖动div</div>
		父div
	</div>

--index.css--
@charset "UTF-8";
#context{
	width: 400px;
	height: 200px;
	border: 5px solid #abc;
	margin-left: 50px;
	position:relative; //父div必须为相对定位
}
#dg{
	width: 80px;
	height: 80px;
	border: 3px solid red;
	background-color: #ccc;
}
--index.js--
$(function(){
	$("#dg").draggable({
		onDrag: function(event){ //拖动期间触发事件
			var e = event.data;
			if(e.left < 0){
				e.left = 0;
			}
			if(e.top < 0){
				e.top = 0;
			}
			if (e.left + $(e.target).outerWidth() > $(e.parent).width()){
				e.left = $(e.parent).width() - $(e.target).outerWidth();
			}
			if (e.top + $(e.target).outerHeight() > $(e.parent).height()){
				e.top = $(e.parent).height() - $(e.target).outerHeight();
			}
		}
	});
});
二、EasyUI Droppable 可放置
属性
| 名称 | 类型 | 描述 | 默认值 |
|---|---|---|---|
| accept | selector | 确定将被接受的可拖动元素。 | null |
| disabled | boolean | 如果设置为 true,则停止可放置(droppable)。 | false |
事件
| 名称 | 参数 | 描述 |
|---|---|---|
| onDragEnter | e,source | 当可拖动元素被拖进来时触发。source 参数指被拖动的 DOM 元素。 |
| onDragOver | e,source | 当可拖动元素被拖过时触发。source 参数指被拖动的 DOM 元素。 |
| onDragLeave | e,source | 当可拖动元素被拖离开时触发。source 参数指被拖动的 DOM 元素。 |
| onDrop | e,source | 当可拖动元素被放下时触发。source 参数指被拖动的 DOM 元素。 |
方法
| 名称 | 参数 | 描述 |
|---|---|---|
| options | none | 返回选项(options)对象。 |
| enable | none | 启用可放置功能。 |
| disable | none | 禁用可放置功能。 |
使用 javascript 创建可放置(droppable)区域。
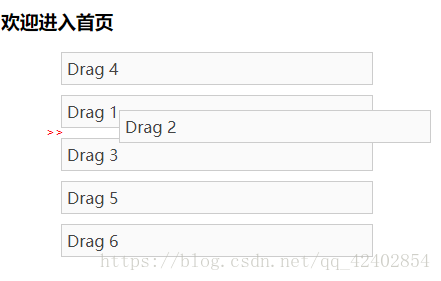
1、基本拖拽放置:改变项目排序
insertAfter() 方法在被选元素之后插入 HTML 标记或已有的元素。
<ul>
<li class="drag-item">Drag 1</li>
<li class="drag-item">Drag 2</li>
<li class="drag-item">Drag 3</li>
<li class="drag-item">Drag 4</li>
<li class="drag-item">Drag 5</li>
<li class="drag-item">Drag 6</li>
</ul>
---index.css--
@charset "UTF-8";
ul {
margin-left: 10px;
}
.drag-item {
list-style-type: none; /* 设置列表项标记的类型: 无标记。 */
display: block;
margin: 10px;
padding: 5px;
border: 1px solid #ccc;
width: 300px;
background: #fafafa;
color: #444;
border: 1px solid #ccc;
padding: 5px;
}
.arrows {
display: none; /* 通过display来控制箭头元素生成的显示框类型 */
position: absolute;
font-size: 9px;
width: 10px;
height: 10px;
color: red;
}
---index.js--
$(function(){
var arrows = $("<div class='arrows'>>></div>").appendTo("body");
$(".drag-item").draggable({
revert: true
});
$(".drag-item").droppable({
onDragOver: function(e,source){
arrows.css({
display: "block",
left: $(this).offset().left - 15,
top: $(this).offset().top + $(this).outerHeight()-5
});
},
onDragLeave: function(e,source){
arrows.hide();
},
onDrop: function(e,source){
$(source).insertAfter(this);
arrows.hide();
}
});
});
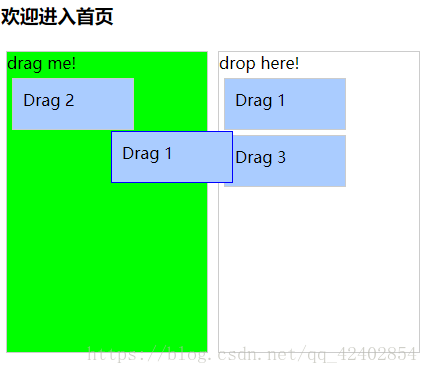
2、基本拖拽放置:可互相接收一个拖拽
拖过去,也可以拖回来,
	<div id="source">
		drag me!
		<div id="dg1" class="drag">Drag 1</div>
		<div id="dg2" class="drag">Drag 2</div>
		<div id="dg3" class="drag">Drag 3</div>
	</div>
	<div id="target">
		drop here!
	</div>

--index.css--
@charset "UTF-8";
#source {
	border: 1px solid #ccc;
	width: 200px;
	height: 300px;
	float: left;
	margin: 5px;
}

#target {
	width: 200px;
	height: 300px;
	float: left;
	margin: 5px;
	border: 1px solid #ccc;
}

.drag {
	width: 100px;
	height: 30px;
	padding: 10px;
	margin: 5px;
	border: 1px solid #ccc;
	background: #AACCFF;
}

.over {
	background: #FBEC88;
}
.overs {
	background: #00ff00;
}
#dg{
	width: 80px;
	height: 80px;
	border: 3px solid red;
	background-color: #ccc;
}

--index.js--
$(function(){
	$(".drag").draggable({
		proxy: 'clone',
		revert: true,
		cursor: 'auto',
		onStartDrag: function(){ //目标对象开始拖动时触发
			$(this).draggable('options').cursor='move';
		},
		onStopDrag:function(){ //拖动停止时触发
			$(this).draggable('options').cursor='auto';
		}
	});
	$('#target').droppable({
		accept:'#dg1,#dg3',
		onDragEnter:function(e,source){ //当可拖动元素被拖进来时触发
			$(source).draggable('options').cursor='pointer';
			$(source).draggable('proxy').css('border','1px solid red');
			$(this).addClass('over');
		},
		onDragLeave:function(e,source){ //当可拖动元素被拖离开时触发
			$(source).draggable('options').cursor='not-allowed';
			$(source).draggable('proxy').css('border','1px solid #ccc');
			$(this).removeClass('over');
		},
		onDrop:function(e,source){ //当可拖动元素被放下时触发
			$(this).append(source)
			$(this).removeClass('over');
		}
	});
	$('#source').droppable({
		accept:'#dg1,#dg2,#dg3',
		onDragEnter:function(e,source){ //当可拖动元素被拖进来时触发
			$(source).draggable('options').cursor='pointer';
			$(source).draggable('proxy').css('border','1px solid blue');
			$(this).addClass('overs');
		},
		onDragLeave:function(e,source){ //当可拖动元素被拖离开时触发
			$(source).draggable('options').cursor='not-allowed';
			$(source).draggable('proxy').css('border','1px solid #ccc');
			$(this).removeClass('overs');
		},
		onDrop:function(e,source){ //当可拖动元素被放下时触发
			$(this).append(source)
			$(this).removeClass('overs');
		}
	});
});


 747
747


 被折叠的 条评论
为什么被折叠?
被折叠的 条评论
为什么被折叠?
 到【灌水乐园】发言


