


今日任务
- 链表理论基础
- 203.移除链表元素
- 707.设计链表
- 206.反转链表
链表理论基础
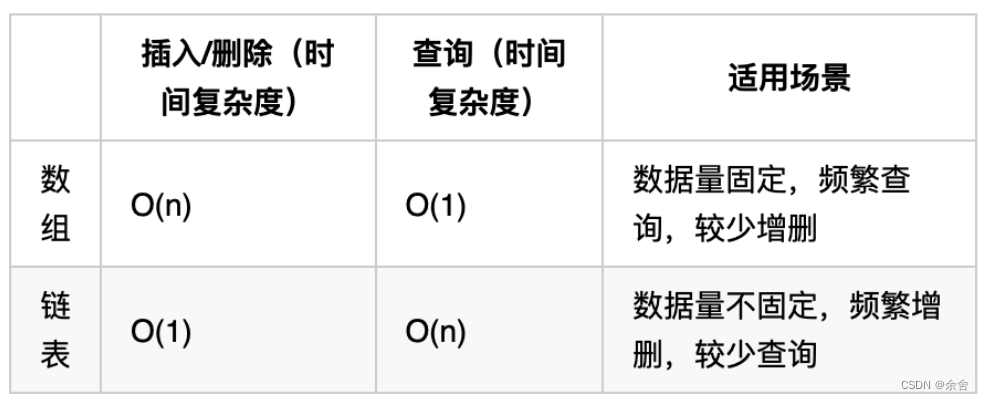
建议:了解一下链接基础,以及链表和数组的区别
文章链接:https://programmercarl.com/%E9%93%BE%E8%A1%A8%E7%90%86%E8%AE%BA%E5%9F%BA%E7%A1%80.html
- 定义
- 线性结构
- 通过指针串联在一起
- 节点
- 每个节点包含:数据域和指针域(存放指向下一个节点的指针)
- 入口节点:链表的头节点,head
- 最后一个节点:指针域NULL(单链表)
- 类型
- 单链表
- 双链表
- 循环链表
- 存储方式
- 不是连续分布的,而是散乱分布,分配机制取决于操作系统的内存管理
- 通过指针串联在一起
- 所以,要查询的时候只能遍历!!!遍历的时候要定义指针
- 使用python定义链表
class ListNode:
    def __init__(self, val, next=None):
        self.val = val
        self.next = next
- 重点:删除节点,添加节点
203.移除链表元素
建议: 本题最关键是要理解 虚拟头结点的使用技巧,这个对链表题目很重要。
题目链接/文章讲解/视频讲解::https://programmercarl.com/0203.%E7%A7%BB%E9%99%A4%E9%93%BE%E8%A1%A8%E5%85%83%E7%B4%A0.html
- 关键:头节点的移除
- 两种方法
- 头节点
- 非头节点
- 统一的方式:虚拟头节点
# Definition for singly-linked list.
# class ListNode:
#     def __init__(self, val=0, next=None):
#         self.val = val
#         self.next = next
class Solution:
    def removeElements(self, head: Optional[ListNode], val: int) -> Optional[ListNode]:
        dummy_head = ListNode(next=head)

        current = dummy_head
        while current.next:
            if current.next.val == val:
                current.next = current.next.next
            else:
                current = current.next

        return dummy_head.next
707.设计链表
建议: 这是一道考察 链表综合操作的题目,不算容易,可以练一练 使用虚拟头结点
题目链接/文章讲解/视频讲解:https://programmercarl.com/0707.%E8%AE%BE%E8%AE%A1%E9%93%BE%E8%A1%A8.html
-
暂时只完成了单链表的设计
-
理解方面:
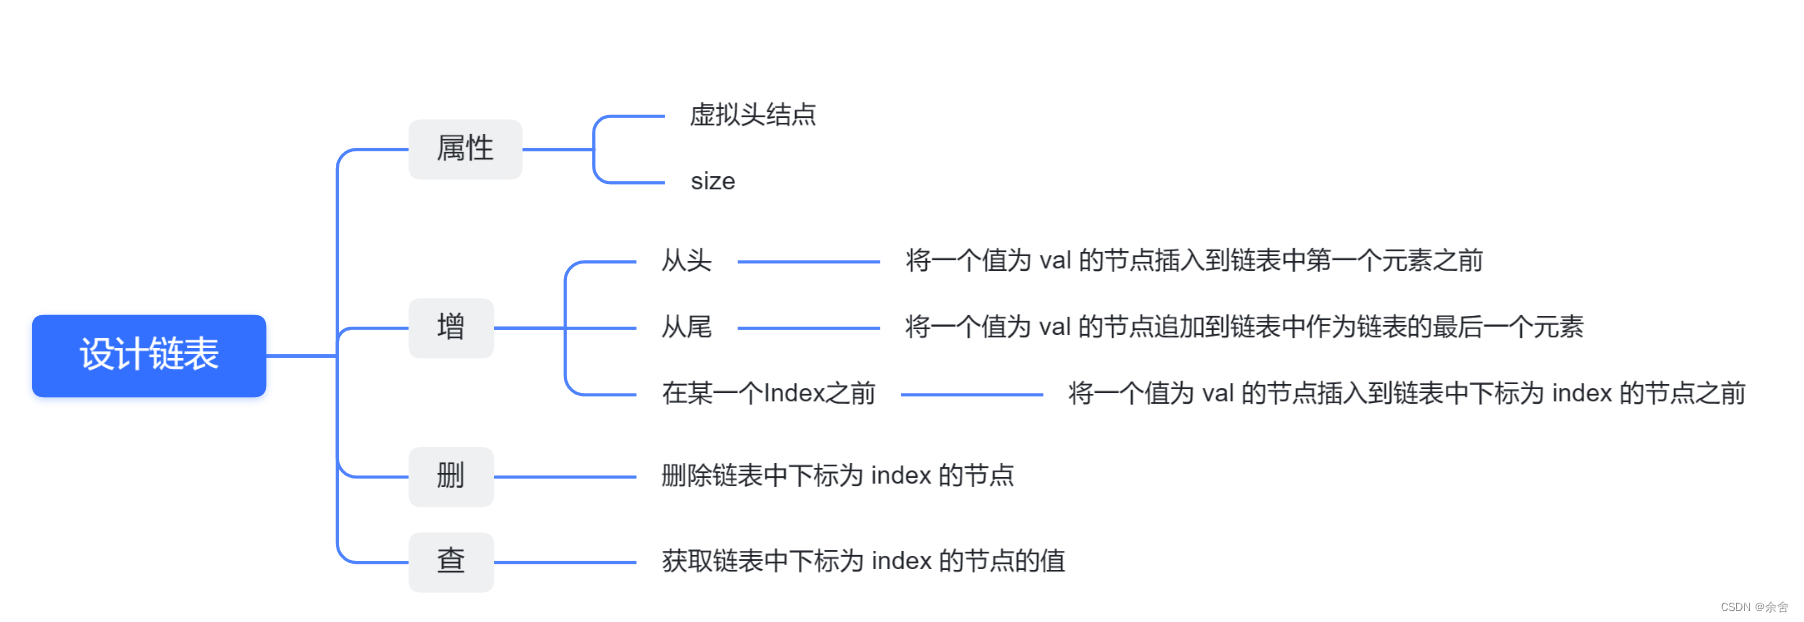
- 要明白这里是设计链表,链表从无到有,包含了增删查改,因此,size初始为0,每次增减会更改这个全局变量
- 链表的遍历:基于指针和next
-
涉及三个index的问题,查找、删除和增加
- 查找的时候,要查找第index个结点,range的时候遍历index次,从头结点开始到index位置,需要index次,因此cur初始化为头结点
- 删除和查找同理
- 增加的时候,要找的是index前一个就好,同理的话,curr就只需要初始化为虚拟头节点
- 同时,也要理解链表中current指向的是节点,而数据域的赋值只能通过current.next,不能通过current(这里还没有理解透彻!TO DO)
class ListNode:
    def __init__(self, val=0, next=None):
        self.val = val
        self.next = next

class MyLinkedList:
    def __init__(self):
        self.dummy_head = ListNode()
        self.size = 0

    def get(self, index: int) -> int:
        if index < 0  or index >= self.size:
            return -1

        current = self.dummy_head.next # current从头结点开始,因为range(index)的次数是index次,正好就可以指向实际的位置
        for _ in range(index):
            current = current.next
        return current.val

    def addAtHead(self, val: int) -> None:
        self.dummy_head.next = ListNode(val,self.dummy_head.next)
        self.size += 1

    def addAtTail(self, val: int) -> None:
        current = self.dummy_head
        while current.next:
            current = current.next
        current.next = ListNode(val)
        self.size += 1

    def addAtIndex(self, index: int, val: int) -> None:
        if index < 0 or index > self.size: # 只有大于,没有大于等于
            return

        current = self.dummy_head   #和上面同理,但是这里不是要找index对应的位置,还是index前一个位置,所以不用从真实的头节点开始
        for _ in range(index):
            current = current.next
        current.next = ListNode(val,next=current.next)
        self.size += 1

    def deleteAtIndex(self, index: int) -> None:
        if index < 0 or index >= self.size:
            return

        current = self.dummy_head
        for _ in range(index):
            current = current.next
        current.next = current.next.next
        self.size -= 1
206.反转链表
建议先看我的视频讲解,视频讲解中对 反转链表需要注意的点讲的很清晰了,看完之后大家的疑惑基本都解决了。
题目链接/文章讲解/视频讲解:https://programmercarl.com/0206.%E7%BF%BB%E8%BD%AC%E9%93%BE%E8%A1%A8.html
双指针法
# Definition for singly-linked list.
# class ListNode:
#     def __init__(self, val=0, next=None):
#         self.val = val
#         self.next = next
class Solution:
    def reverseList(self, head: Optional[ListNode]) -> Optional[ListNode]:
        cur = head
        pre = None

        while cur:
            temp = cur.next
            cur.next = pre
            pre = cur
            cur = temp
        return pre


 1382
1382


 被折叠的 条评论
为什么被折叠?
被折叠的 条评论
为什么被折叠?
 到【灌水乐园】发言


