文章目录
1.Redis远程连接
1.1 Redis远程连接配置
修改redis配置文件
vim /home/redis-6.2.9/redis.conf
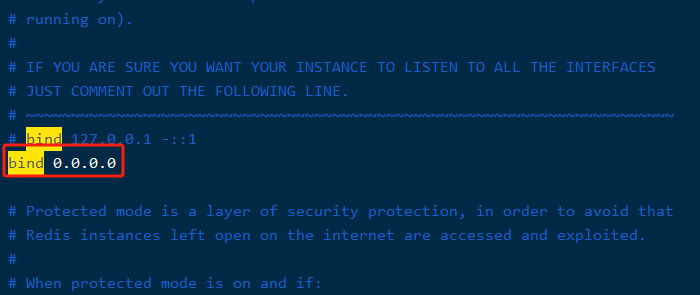

重启服务
./redis-cli -a 123456 shutdown
./redis-server /home/redis-6.2.9/redis.conf

如果开启防火墙,需要通过执行以下命令,开放6379端口
firewall-cmd --zone=public --add-port=6379/tcp --permanent

systemctl restart firewalld.service

firewall-cmd --reload
1.2 通过桌面版图形化界面连接Redis
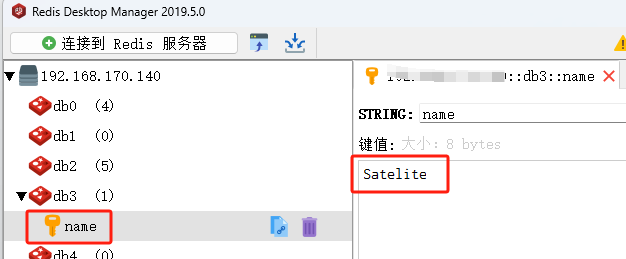
使用2019.5版的redis-desktop-manager,因为这个是免费版本,最新的版本需要收费
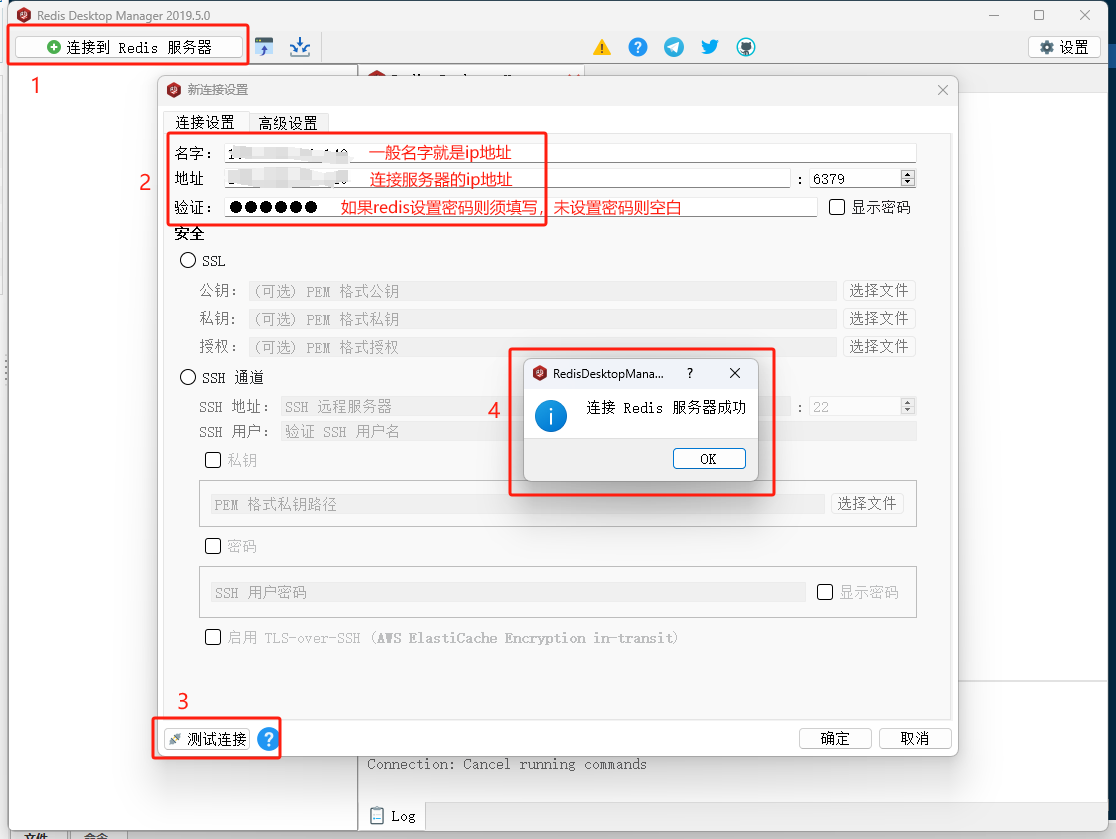
select id:切换到No.id的库
1.3 通过IDEA中的插件连接Redis
有收费的和免费的。遵循性价比原则,优先选择免费的使用,毕竟现在还在学习阶段。如果后期有需求的话,再做考虑。(当然免费的插件相比于收费的插件,功能会有所欠缺)
如果不想使用插件,完全可以使用redis-desktop-manager桌面版图形化工具
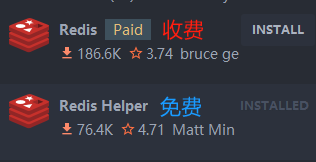
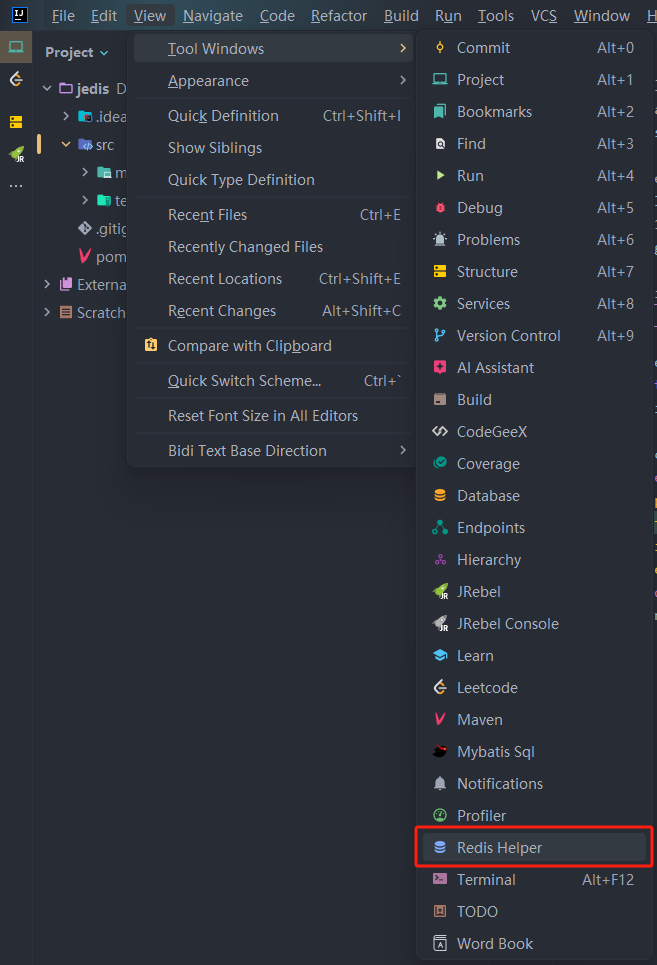
安装完成之后,会在右侧工具栏显示工具图标
如果没有显示的话,可以选择View -> Tool Windows -> Redis Helper进行显示
将所有信息填写好之后,点击TEST CONNECTION,收到Succeeded表示连接成功后,再点击OK
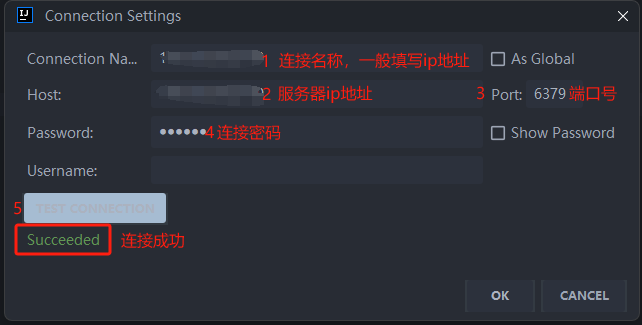
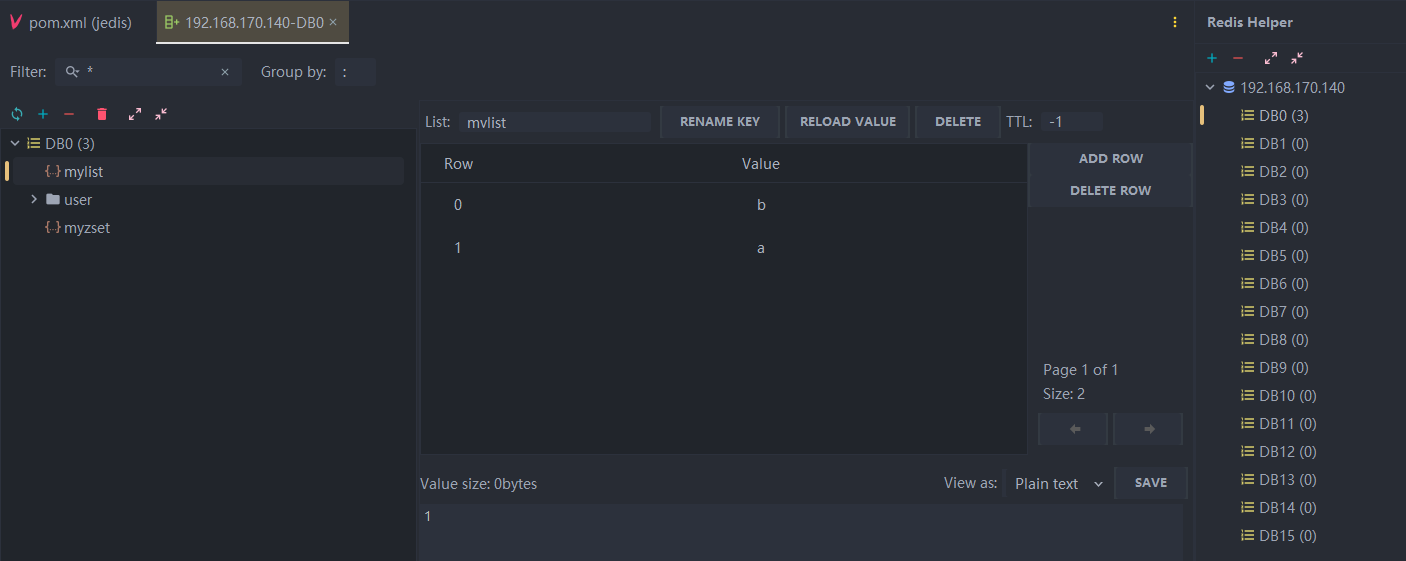
2.Jedis的基本使用
2.1 jedis概述
Redis不仅是使用命令来操作,现在基本上主流的语言都有客户端支持,比如java、C、C#、C++、php、Node.js、Go等。 在官方网站里列一些Java的客户端,有Jedis、Redisson、Jredis、JDBC-Redis、等其中官方推荐使用Jedis和Redisson。java操作redis的第三方类库:jedis、
2.2 jedis的基本操作
引入依赖
<dependencies>
    <dependency>
        <groupId>junit</groupId>
        <artifactId>junit</artifactId>
        <version>4.12</version>
        <scope>test</scope>
    </dependency>

    <!-- jedis相关依赖 -->
    <dependency>
        <groupId>redis.clients</groupId>
        <artifactId>jedis</artifactId>
        <version>2.9.0</version>
    </dependency>

</dependencies>
| 方法 | 解释 |
|---|---|
| new Jedis(host, port) | 创建jedis对象,参数host是redis服务器地址,参数port是redis服务端口 |
| set(key, value) | 设置字符串类型的数据 |
| get(key) | 获得字符串类型的数据 |
| hset(key, filed, value) | 设置哈希类型的数据 |
| hget(key, filed) | 获得哈希类型的数据 |
| lpush(key, values) | 设置列表类型的数据 |
| lpop(key) | 列表左面弹栈 |
| rpop(key) | 列表右面弹栈 |
| del(key) | 删除指定的key |
/**
 * jedis中的方法名和redis中的命令是对应的
 */
public class JedisDemo01 {
    private Jedis jedis;

    @Before
    public void init() {
        // 1.通过jedis的构造方法设置连接参数
        jedis = new Jedis("192.168.x.x", 6379);
        // 2.设置连接密码
        jedis.auth("123456");
        // 3.选择索引为2的数据库,默认操作索引为0的数据库
        jedis.select(2);
    }

    /**
     * 存取set类型
     */
    @Test
    public void test01() {

        // 4.存入String类型的数据
        jedis.set("name", "Satellite");
        // 5.取出key为name的value
        System.out.println(jedis.get("name"));


    }

    /**
     * 存取hash类型
     */
    @Test
    public void test02() {

        // 4.存入hash类型的数据
        jedis.hset("1班", "20101515131", "张三");
        jedis.hset("1班", "20101515142", "李四");
        jedis.hset("2班", "20101515241", "王五");

        // 5.取出key为1班的value
        System.out.println(jedis.hget("2班", "20101515241"));
        jedis.hgetAll("1班").forEach((k, v) -> System.out.println(k + " " + v));


    }

    /**
     * 存取list类型
     */
    @Test
    public void test03() {

        // 4.存入hash类型的数据
        jedis.lpush("myList", "a", "b", "c", "d");

        // 5.取出key为myList的value
        jedis.lrange("myList", 0, -1).forEach(System.out::println);

    }

    /**
     * 存取去重set类型
     */
    @Test
    public void test04() {
        // jedis.del("mySet");
        jedis.sadd("mySet", "Satellite", "Planet", "Wang", "Wang");
        jedis.smembers("mySet").forEach(System.out::println);
    }

    @After
    public void release() {
        // 6.释放资源
        jedis.close();
    }
}
2.3 jedis连接池
jedis连接资源的创建与销毁是很消耗程序性能,所以jedis为我们提供了jedis的池化技术,jedisPool在创建时初始化一些连接资源存储到连接池中,使用jedis连接资源时不需要创建,而是从连接池中获取一个资源进行redis的操作,使用完毕后,不需要销毁该jedis连接资源,而是将该资源归还给连接池,供其他请求使用
| 参数名 | 含义 |
|---|---|
| blockWhenExhausted | 连接耗尽时是否阻塞, false报异常,ture阻塞直到超时, 默认true |
| evictionPolicyClassName | 设置的逐出策略类名, 默认DefaultEvictionPolicy(当连接超过最大 空闲时间,或连接数超过最大空闲连接数) |
| lifo | 是否启用后进先出, 默认true |
| maxIdle | 最大空闲连接数, 默认8个 |
| maxTotal | 最大连接数, 默认8个 |
| maxWaitMillis | 获取连接时的最大等待毫秒数(如果设置为阻塞时 BlockWhenExhausted),如果超时就抛异常, 小于零:阻塞不确定的时间, 默认-1 |
| minEvictableIdleTimeMillis | 逐出连接的最小空闲时间 默认1800000毫秒(30分钟) |
| minIdle | 最小空闲连接数, 默认0 |
| testOnBorrow | 在获取连接的时候检查有效性, 默认false |
package jedis;

import org.junit.Test;
import redis.clients.jedis.Jedis;
import redis.clients.jedis.JedisPool;
import redis.clients.jedis.JedisPoolConfig;

/**
 * 通过JedisPool连接redis,提高连接效率
 */
public class JedisPoolDemo02 {

    @Test
    public void test01() {
        // 1.初始化连接池相关配置
        JedisPoolConfig jedisPoolConfig = new JedisPoolConfig();
        jedisPoolConfig.setMaxTotal(20);
        jedisPoolConfig.setMaxIdle(5);

        // 2.使用连接池的配置,初始化连接池
        JedisPool jedisPool = new JedisPool(jedisPoolConfig, "192.168.170.140", 6379, 1000, "123456");
        // 3.获取jedis对象,来操作redis
        Jedis jedisPoolResource = jedisPool.getResource();
        // 4.通过jedis对象操作redis
        jedisPoolResource.set("gender", "female");
        System.out.println(jedisPoolResource.get("gender"));
        // 5.释放资源
        jedisPoolResource.close();
        jedisPool.close();
    }
}
3.Spring整合Redis
3.1 新建maven工程,引入相关依赖
    <dependencies>
        <dependency>
            <groupId>org.junit.jupiter</groupId>
            <artifactId>junit-jupiter-api</artifactId>
            <version>5.8.2</version>
            <scope>test</scope>
        </dependency>

        <!-- 引入spring相关依赖 -->
        <dependency>
            <groupId>org.springframework</groupId>
            <artifactId>spring-tx</artifactId>
            <version>5.3.20</version>
        </dependency>

        <dependency>
            <groupId>org.springframework</groupId>
            <artifactId>spring-test</artifactId>
            <version>5.3.20</version>
        </dependency>

        <!-- 引入jedis相关依赖 -->
        <dependency>
            <groupId>redis.clients</groupId>
            <artifactId>jedis</artifactId>
            <version>2.9.0</version>
        </dependency>

        <!-- 引入spring-data-redis相关依赖 -->
        <dependency>
            <groupId>org.springframework.data</groupId>
            <artifactId>spring-data-redis</artifactId>
            <version>1.8.14.RELEASE</version>
        </dependency>

        <!-- 日志相关的依赖 -->
        <dependency>
            <groupId>org.slf4j</groupId>
            <artifactId>slf4j-api</artifactId>
            <version>1.7.36</version>
        </dependency>
        <dependency>
            <groupId>org.slf4j</groupId>
            <artifactId>slf4j-simple</artifactId>
            <version>1.7.36</version>
        </dependency>
    </dependencies>
3.2 redis.properties
# redis连接参数
redis.host=192.168.x.x
redis.port=6379
redis.password=123456
redis.dbIndex=3
# jedisPool相关参数
redis.maxTotal=20
redis.maxIdle=5
redis.timeout=10000
3.3 spring-redis.xml
<?xml version="1.0" encoding="UTF-8"?>
<beans xmlns="http://www.springframework.org/schema/beans"
       xmlns:xsi="http://www.w3.org/2001/XMLSchema-instance" xmlns:context="http://www.springframework.org/schema/context"
       xsi:schemaLocation="http://www.springframework.org/schema/beans http://www.springframework.org/schema/beans/spring-beans.xsd http://www.springframework.org/schema/context http://www.springframework.org/schema/context/spring-context.xsd">
    <!-- 配置注解扫描器 -->
    <context:component-scan base-package="io.redis"/>

    <!-- 加载redis.properties配置文件 -->
    <context:property-placeholder location="classpath:redis.properties"/>

    <!-- 配置JedisPoolConfig -->
    <bean id="jedisPoolConfig" class="redis.clients.jedis.JedisPoolConfig">
        <property name="maxTotal" value="${redis.maxTotal}"/>
        <property name="maxIdle" value="${redis.maxIdle}"/>
    </bean>

    <!-- 配置JedisConnectionFactory -->
    <bean id="jedisConnectionFactory" class="org.springframework.data.redis.connection.jedis.JedisConnectionFactory">
        <!-- 注入redis相关配置 -->
        <property name="hostName" value="${redis.host}"/>
        <property name="port" value="${redis.port}"/>
        <property name="password" value="${redis.password}"/>
        <property name="database" value="${redis.dbIndex}"/>
        <property name="timeout" value="${redis.timeout}"/>
        <!-- 注入连接池配置 -->
        <property name="poolConfig" ref="jedisPoolConfig"/>
    </bean>

    <!-- 配置redis操作模板RedisTemplate,通过这个模板操作redis数据库 -->
    <bean id="stringRedisSerializer" class="org.springframework.data.redis.serializer.StringRedisSerializer"/>
    <bean id="redisTemplate" class="org.springframework.data.redis.core.RedisTemplate">
        <property name="connectionFactory" ref="jedisConnectionFactory"/>

        <!-- 指定序列化器,解决redis中key乱码问题 -->
        <property name="keySerializer" ref="stringRedisSerializer"/>
        <property name="valueSerializer" ref="stringRedisSerializer"/>
        <property name="hashKeySerializer" ref="stringRedisSerializer"/>
        <property name="hashValueSerializer" ref="stringRedisSerializer"/>
    </bean>

</beans>
3.4 Redis工具类Redisutils
package io.redis.utils;

import org.springframework.beans.factory.annotation.Autowired;
import org.springframework.data.redis.core.RedisTemplate;
import org.springframework.stereotype.Component;
import org.springframework.util.StringUtils;

import java.util.concurrent.TimeUnit;

/**
 * Redis工具类,为了方便操作redis
 */
@Component
public class RedisUtils {

    @Autowired
    RedisTemplate<String, Object> redisTemplate;

    /**
     * 向redis中存入string类型数据
     *
     * @param key
     * @param value
     * @return
     */
    public boolean set(String key, Object value) {
        try {
            redisTemplate.opsForValue().set(key, value);

        } catch (Exception e) {
            e.printStackTrace();
            return false;
        }
        return true;
    }

    /**
     * 根据key取出redis中的string数据
     *
     * @param key
     * @return
     */
    public Object get(String key) {
        return StringUtils.isEmpty(key) ? null : redisTemplate.opsForValue().get(key);
    }

    /**
     * 向redis中存入hash类型数据
     *
     * @param key
     * @param field
     * @param value
     * @return
     */
    public boolean hset(String key, Object field, Object value) {
        try {
            redisTemplate.opsForHash().put(key, field, value);
        } catch (Exception e) {
            e.printStackTrace();
            return false;
        }
        return true;
    }

    /**
     * 根据key和filed取出redis中的hash数据
     *
     * @param key
     * @return
     */
    public Object hget(String key, Object filed) {
        return StringUtils.isEmpty(key) ? null : redisTemplate.opsForHash().get(key, filed);
    }

    /**
     * 通用方法:根据key删除redis中对应的数据
     *
     * @param key
     * @return
     */
    public boolean del(String key) {
        try {
            redisTemplate.delete(key);
        } catch (Exception e) {
            e.printStackTrace();
            return false;
        }
        return true;
    }

    /**
     * 通用方法:判断key是否存在
     *
     * @param key
     * @return
     */
    public boolean exist(String key) {
        try {
            return redisTemplate.hasKey(key);
        } catch (Exception e) {
            e.printStackTrace();
            return false;
        }

    }

    /**
     * 为某个key设置过期时间
     *
     * @param key
     * @param timeout
     * @return
     */
    public boolean expire(String key, long timeout) {
        try {

            return redisTemplate.expire(key, timeout, TimeUnit.SECONDS);


        } catch (Exception e) {
            e.printStackTrace();
            return false;
        }
    }

    /**
     * 查看key的剩余存活时间
     *
     * @return
     */
    public long ttl(String key) {
        return redisTemplate.getExpire(key, TimeUnit.SECONDS);
    }

}
3.5 测试RedisUtils
package io.redis.utils;

import org.junit.jupiter.api.Test;
import org.springframework.beans.factory.annotation.Autowired;
import org.springframework.test.context.junit.jupiter.SpringJUnitConfig;

import static org.junit.jupiter.api.Assertions.*;

@SpringJUnitConfig(locations = "classpath:spring-redis.xml")
class RedisUtilsTest {
    @Autowired
    RedisUtils redisUtils;

    @Test
    void set() {
        redisUtils.set("name", "Satelite");
    }

    @Test
    void get() {
        System.out.println(redisUtils.get("name"));
    }

}


 2万+
2万+

 被折叠的 条评论
为什么被折叠?


