


学习地址:Home · ssloy/tinyrenderer Wiki · GitHub
https://gitcode.net/mirrors/ssloy/tinyrenderer
整体说明:tinyrenderer是一个不借助任何其他图形接口来实现三维渲染的一个学习项目。里面所以的代码和相应的库都是自己封装的,能够帮助我们很好地理解整个渲染的底层原理。
接下来以tinyrenderer里的lesson为模块进行总结。
Lesson1:Bresenham’s Line Drawing Algorithm
这一节感觉主要是为了让我们熟悉像素点那么一个概念,让我们知道如何在像素呈现图形有一个概念。一个很重要的点就是要时刻牢记像素点是整数值。
1.第一次绘线尝试
void line(int x0, int y0, int x1, int y1, TGAImage &image, TGAColor color) {
    for (float t=0.; t<1.; t+=.01) {
        int x = x0 + (x1-x0)*t;
        int y = y0 + (y1-y0)*t;
        image.set(x, y, color);
    }
}
这个算法使用了参数方程的思想。
过(h, k),斜率为m的直线可表示为:
但是这种算法会造成性能浪费或是绘线有漏孔。因为实际的像素是整数点,而这里是在用浮点数进行步进的,如果在(x0,y0)与(x1,y1)距离较短的情况下,t的步进太小会性能浪费。在(x0,y0)与(x1,y1)距离较长的情况下,t的步进太大则会造成漏孔。这种算法对t的步进很不好控制。
2.第二次绘线尝试
void line(int x0, int y0, int x1, int y1, TGAImage &image, TGAColor color) {
for (int x=x0; x<=x1; x++) {
float t = (x-x0)/(float)(x1-x0);
int y = y0*(1.-t) + y1*t;
image.set(x, y, color);
}
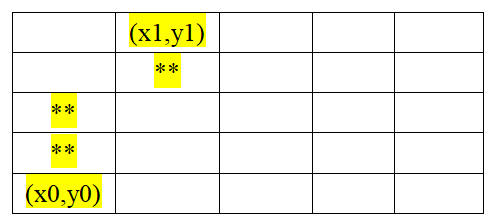
}这种算法同样会造成漏孔,漏孔会出现在直线斜率大于1的情况。可参考下图,黄色为实际屏幕中的着色情况。
会漏孔的情况:斜率大,两个点(x0,y0)与(x1,y1)距离较远却只有两个着色点。

不会漏孔的情况:两个点(x0,y0)与(x1,y1)距离较远但却有五个着色点。

3.第三次绘线尝试
void line(int x0, int y0, int x1, int y1, TGAImage &image, TGAColor color) {
    bool steep = false;
    if (std::abs(x0-x1)<std::abs(y0-y1)) { // if the line is steep, we transpose the image
        std::swap(x0, y0);
        std::swap(x1, y1);
        steep = true;
    }
    if (x0>x1) { // make it left−to−right
        std::swap(x0, x1);
        std::swap(y0, y1);
    }
    for (int x=x0; x<=x1; x++) {
        float t = (x-x0)/(float)(x1-x0);
        int y = y0*(1.-t) + y1*t;
        if (steep) {
            image.set(y, x, color); // if transposed, de−transpose
        } else {
            image.set(x, y, color);
        }
    }
}
这次绘线尝试就是为了解决第二次尝试中的漏孔问题。通过判断斜率来选择步进值。即斜率较大时采用y进行步进扫描,这样可以有效解决漏孔问题。如下图,在斜率较大的情况下仍然能保持有五个绘制点。
达到这一步我们的绘线算法基本就没问题了,后面的其他优化主要是减少float运算进行优化,这个就不讲了。
而关于Bresenham更进一步的算法推导可参考,里面详细介绍了推导过程:Bresenham直线生成算法详解_bresenham算法画直线-CSDN博客
4.线框绘制
for (int i=0; i<model->nfaces(); i++) {
    std::vector<int> face = model->face(i);
    for (int j=0; j<3; j++) {
        Vec3f v0 = model->vert(face[j]);
        Vec3f v1 = model->vert(face[(j+1)%3]);
        int x0 = (v0.x+1.)*width/2.;
        int y0 = (v0.y+1.)*height/2.;
        int x1 = (v1.x+1.)*width/2.;
        int y1 = (v1.y+1.)*height/2.;
        line(x0, y0, x1, y1, image, white);
    }
}
知道前面咋绘线了,绘制线框也没啥难度了,主要难点在于要读取.obj模型文件中的顶点数据。将这些顶点数据读出再依次绘线最后就可以看出模型的网格图了。

Lesson2:Triangle rasterization and back face culling
首先光栅化的概念:光栅化就是把顶点数据转换为片元的过程。片元中的每一个元素对应于帧缓冲区中的一个像素。一般来说三维模型文件中的数据给的都是顶点数据,我们现在要想着怎么把这些顶点数据转化为2D屏幕中的三角形面片。
1.三角形填充算法1:Line sweeping(扫描线)
void triangle(Vec2i t0, Vec2i t1, Vec2i t2, TGAImage &image, TGAColor color) {
    // sort the vertices, t0, t1, t2 lower−to−upper (bubblesort yay!)
    if (t0.y>t1.y) std::swap(t0, t1);
    if (t0.y>t2.y) std::swap(t0, t2);
    if (t1.y>t2.y) std::swap(t1, t2);
    int total_height = t2.y-t0.y;
    for (int y=t0.y; y<=t1.y; y++) {
        int segment_height = t1.y-t0.y+1;
        float alpha = (float)(y-t0.y)/total_height;
        float beta  = (float)(y-t0.y)/segment_height; // be careful with divisions by zero
        Vec2i A = t0 + (t2-t0)*alpha;
        Vec2i B = t0 + (t1-t0)*beta;
        if (A.x>B.x) std::swap(A, B);
        for (int j=A.x; j<=B.x; j++) {
            image.set(j, y, color); // attention, due to int casts t0.y+i != A.y
        }
    }
    for (int y=t1.y; y<=t2.y; y++) {
        int segment_height =  t2.y-t1.y+1;
        float alpha = (float)(y-t0.y)/total_height;
        float beta  = (float)(y-t1.y)/segment_height; // be careful with divisions by zero
        Vec2i A = t0 + (t2-t0)*alpha;
        Vec2i B = t1 + (t2-t1)*beta;
        if (A.x>B.x) std::swap(A, B);
        for (int j=A.x; j<=B.x; j++) {
            image.set(j, y, color); // attention, due to int casts t0.y+i != A.y
        }
    }
}
讲讲上面代码的思路。首先是根据三个顶点的y值进行排序。从低到高为t0、t1、t2。
然后取y=t1.y对这个三角形进行切割,将三角形分成两半。
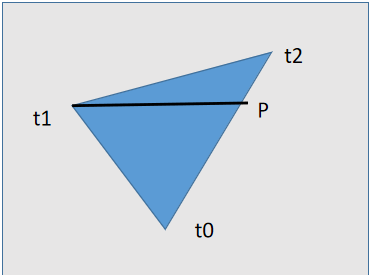
然后以t1t2为左边界t2P为右边界对上半部分的三角形进行扫描填充。
然后再以t1t0为左边界,Pt0为右边界对下半部分的三角形进行填充。
扫描线算法在绘制多边形的时候比较管用,在绘制普通三角形面片的话用的其实是比较少的。
2.三角形填充算法2:包围盒+重心坐标
重心坐标在光栅化和着色过程中的作用是相当重要的,其良好的插值效果能极大减少关键信息的存储量,仅需要给定三角形三个顶点的信息便可以计算出整个三角形面片中的信息。而在这一节当中最重要的是可以使用重心坐标判断点是否在三角形面片内。
关于如何利用叉积推导重心坐标可参考:三角形重心坐标 - 知乎
【十天自制软渲染器】DAY 03:画一个三角形(向量叉乘算法 & 重心坐标算法) - 腾讯云开发者社区-腾讯云
#include <vector>
#include <iostream>
#include "geometry.h"
#include "tgaimage.h"

const int width  = 200;
const int height = 200;

Vec3f barycentric(Vec2i *pts, Vec2i P) {
    Vec3f u = Vec3f(pts[2][0]-pts[0][0], pts[1][0]-pts[0][0], pts[0][0]-P[0])^Vec3f(pts[2][1]-pts[0][1], pts[1][1]-pts[0][1], pts[0][1]-P[1]);
    /* `pts` and `P` has integer value as coordinates
       so `abs(u[2])` < 1 means `u[2]` is 0, that means
       triangle is degenerate, in this case return something with negative coordinates */
//因为传入叉积的点都是整数,因此叉积后也是整数。如果u.z的abs小于1,那么只能是0,即三角形退化为直线
    if (std::abs(u.z)<1) return Vec3f(-1,1,1);
    return Vec3f(1.f-(u.x+u.y)/u.z, u.y/u.z, u.x/u.z);
}
//u.z要么为1,要么为0,小于1说明为0
void triangle(Vec2i *pts, TGAImage &image, TGAColor color) {
    Vec2i bboxmin(image.get_width()-1,  image.get_height()-1);
    Vec2i bboxmax(0, 0);
    Vec2i clamp(image.get_width()-1, image.get_height()-1);
    for (int i=0; i<3; i++) { //寻找包围盒边界
        bboxmin.x = std::max(0, std::min(bboxmin.x, pts[i].x));
	bboxmin.y = std::max(0, std::min(bboxmin.y, pts[i].y));

	bboxmax.x = std::min(clamp.x, std::max(bboxmax.x, pts[i].x));
	bboxmax.y = std::min(clamp.y, std::max(bboxmax.y, pts[i].y));
    }
    Vec2i P;
    for (P.x=bboxmin.x; P.x<=bboxmax.x; P.x++) {
        for (P.y=bboxmin.y; P.y<=bboxmax.y; P.y++) {
            Vec3f bc_screen  = barycentric(pts, P); //重心坐标判断
//为什么只需要判断重心坐标的三个值小于0 就能判断出点不在三角形内?这需要结合三角形边坐标系进行理解
            if (bc_screen.x<0 || bc_screen.y<0 || bc_screen.z<0) continue;
            image.set(P.x, P.y, color);
        }
    }
}

int main(int argc, char** argv) {
    TGAImage frame(200, 200, TGAImage::RGB);
    Vec2i pts[3] = {Vec2i(10,10), Vec2i(100, 30), Vec2i(190, 160)};
    triangle(pts, frame, TGAColor(255, 0, 0));
    frame.flip_vertically(); // to place the origin in the bottom left corner of the image
    frame.write_tga_file("framebuffer.tga");
    return 0;
}
这里采用的是包围盒+重心坐标的思想。
先确定由三角形的最小包围盒,然后扫描这个包围盒,在通过重心坐标判断这个点在不在三角形内。要注意的是重心坐标中任何一个值小于0就说明不在三角形内。
3.背面剔除
背面剔除可参考:19.3 背面剔除 - 知乎
OpenGL学习脚印:背面剔除(Face Culling)_The fool的博客-CSDN博客_背面剔除
即一般来说法线背对相机或光线方向的平面可认为是没用的,可以不用绘制将其剔除以减少运算量。当然背面剔除需要根据模型的情况,比如正方块这种,但是相对背面较少的那种模型可以不用剔除。
Vec3f light_dir(0,0,-1); // define light_dir

for (int i=0; i<model->nfaces(); i++) {
    std::vector<int> face = model->face(i);
    Vec2i screen_coords[3];
    Vec3f world_coords[3];
    for (int j=0; j<3; j++) {
        Vec3f v = model->vert(face[j]);
        screen_coords[j] = Vec2i((v.x+1.)*width/2., (v.y+1.)*height/2.);
        world_coords[j]  = v;
    }
    Vec3f n = (world_coords[2]-world_coords[0])^(world_coords[1]-world_coords[0]);
    n.normalize();
    float intensity = n*light_dir;
    if (intensity>0) { //进行剔除判断
        triangle(screen_coords[0], screen_coords[1], screen_coords[2], image, TGAColor(intensity*255, intensity*255, intensity*255, 255));
    }
}
在这的话用的是光线与法向量的点积进行背面剔除的,如果某个面的法向量与光线的点积小于0说明这个面是背对着光线的,直接剔除不进行光栅化。


 379
379


 被折叠的 条评论
为什么被折叠?
被折叠的 条评论
为什么被折叠?
 到【灌水乐园】发言


