


来源 | Natural Language Processing with PyTorch
作者 | Rao,McMahan
译者 | Liangchu
校对 | gongyouliu
编辑 | auroral-L
全文共8629字,预计阅读时间45分钟。
第七章 自然语言处理的进阶序列模型
7.1 Vanilla RNN(或Elman RNNs)的问题
7.2 门控——Vanilla RNN的挑战的解决方案
7.3 示例:用于生成姓氏的字符RNN
7.3.1 SurnamesDataset 类
7.3.2 向量化数据结构
7.3.2.1 SURNAMEVECTORIZER和END-OF-SEQUENCE
7.3.3 从ElmanRNN到 GRU
7.3.4 模型 1:无条件的SurnameGenerationModel
7.3.5 模型 2:有条件的SurnameGenerationModel
7.3.6 训练例程和结果
7.4 训练序列模型的提示和技巧
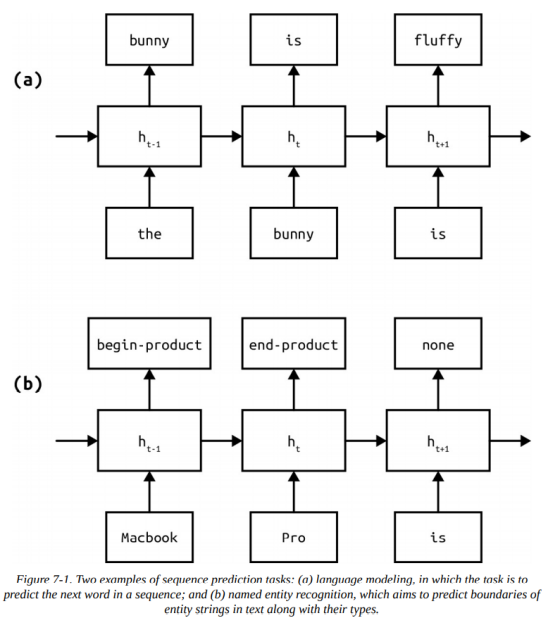
本章介绍序列预测(sequence prediction)。序列预测任务要求我们标注序列中的每个项,这类任务在自然语言处理(NLP)中很常见,例子有:语言建模(language modeling),见下图(7-1),在语言建模中,我们在每一步根据给定单词序列预测下一个单词;词性标注(part-of-speech tagging)预测每个词的语法词性;命名实体识别(named entity recognition,NER)预测每个词是否属于某个命名实体,如人、位置、产品、组织。在NLP文献中,序列预测任务有时也被称为序列标注(sequence labeling)。
理论上讲,虽然我们可以使用第六章中介绍的 Elman RNN处理序列预测任务,但是在实际应用中,它们并不能很好地捕捉长期依赖关系,而且往往表现不佳。在本章中,我们将研究为什么会这样,并学习一种新的 RNN 架构,称为门控网络(gated network)。
我们还会介绍自然语言生成(natural language generation)任务,它是序列预测的应用。我们还会研究以某种方式约束输出序列的条件生成。
7.1 Vanilla RNN(或Elman RNNs)的问题
尽管在第六章中讨论的Vanilla/Elman RNN非常适合于给序列建模,但它存在使其不适用于许多任务的两个问题:无法保留用于长期预测的信息,以及梯度稳定性。为了理解这两个问题,回想一下,RNN在每个时间步上使用前一个时间步的隐藏状态向量和当前时间步上的输入向量计算一个隐藏状态向量。正是这种核心计算使得 RNN 如此强大,但也产生了大量的数值问题。
Elman RNN的第一个问题是很难保持长期信息。例如,在第六章学习的RNN中,我们在每个时间步都更新了隐藏的状态向量,根本没管它是否有意义。因此,RNN 无法控制隐藏状态中保留的值和丢弃的值——它们完全由输入决定。直觉告诉我们这没什么意义,我们希望RNN通过某种方式来决定更新是否可选,或者更新是否发生,以及状态向量的多少和哪些部分,等等。
Elman RNN的第二个问题是,它们会导致梯度螺旋地失去控制到零或无穷大。根据梯度绝对值收缩/增长的方向,可能失控的不稳定渐变称为梯度消失(vanishing gradients)或者梯度爆炸(exploding gradients)。梯度绝对值太大或太小(小于 1)都会使优化过程不稳定(Hochreiter等人,2001;Pascanu等人,2013)。
在一般的RNN中存在解决这些梯度问题的方法,比如使用ReLU、梯度裁剪(gradient clipping)和小心初始化(careful initialization),然而没有一种解决方案能像门控(gating)技术那样可靠地工作。
7.2 门控——Vanilla RNN的挑战的解决方案
为了直观地理解门控,假设你要将a和b两个量相加,但你想控制b计入总和的程度。数学上,你可以将a+b改写为a+λb,其中λ是一个在0和1之间的值。当λ = 0的时候b起不到什么作用,当λ = 1的时候b完全参与了运算。这样一来,你可以把λ当成控制b参与总和程度的一个“开关”或“门”,这就是门控机制背后的直觉。现在再看Elman RNN,看看如何将门控与普通的RNN结合以进行有条件的更新。倘若前面的隐藏状态为 且当前输入为
 ,Elman RNN中反复出现的更新看起来就像:
其中F是 RNN 的递归计算。显而易见,这是一个无条件的和,并且有上一节中描述的缺点。现在想一下,如果之前例子的λ是先前隐藏状态向量 和当前输入的函数
 ,并作出门控行为,也就是一个0到1之间的值,通过这个门控函数,RNN更新方程将如下所示:
现在你知道函数λ控制当前输入的多少可以更新状态 。再进一步讲,函数λ是上下文相关的,这也是所有门控网络的基本直觉。函数λ通常是sigmoid函数——我们在第三章中学过,它产生一个0到1之间的值。
在长短期记忆(long short-term memory)网络中(LSTM;Hochreiter和Schmidhuber,1997),这个基本的直觉扩展到:不仅进行有条件的更新,而且会故意遗忘先前隐藏状态 的值。这种“遗忘”是通过将先前的隐藏状态值
 乘以另一个函数μ来实现的,该函数也会产生介于0和1之间的值,并且取决于当前输入:

你可能已经猜到:μ是另一个门控函数。在实际的LSTM描述中,这变得很复杂,因为门控函数是参数化的,所以导致某种复杂的(未初始化的)操作序列。掌握了本节知识之后,如果你想要深入了解LSTM的更新机制,那么现在就可以开始了,我们推荐Christopher Olah的经典文章,但是在本书中,我们不会涉及这些内容,因为这些细节对于NLP中LSTM的应用和使用并不是不可或缺的。
LSTM 只是RNN许多门控的变体之一,另一种越来越流行的门控变体是门控循环单元(gated recurrent unit,GRU;Chung等人,2015)。幸运的是,在PyTorch中,只用替换nn.RNN或nn.RNNCell为nn.LSTM或nn.LSTMCell即可将普通RNN网络转为LSTM网络,根本不需要修改其他代码(然而对GRU需要有修改)。
门控机制是上一节中列举问题的有效解决方案,它不仅可以控制更新,同时也能控制梯度问题,使训练相对容易。废话少说,接下来我们将用两个例子展示这些门控体系的实际应用。
7.3 示例:用于生成姓氏的字符RNN
在本例中,我们将完成一个简单的序列预测任务:使用RNN生成姓氏。在实践中,这意味着对于每个时间步,RNN 都在计算姓氏中可能字符集的概率分布。使用这些概率分布,我们可以优化网络以改进其预测(假设我们知道应该预测哪些字符),也可以生成全新的姓氏。
虽然我们在前面的例子中使用过这个任务的数据集,并且很熟悉它了,但是为序列预测构造每个数据样本的方式存在一些差异。描述了数据集和任务后,我们会概述通过系统簿记实现序列预测的支持数据结构。
然后我们会介绍用于生成姓氏的两个模型:无条件的SurnameGenerationModel和有条件的SurnameGenerationModel。无条件模型在不知道任何国籍的情况下预测姓氏字符序列,相反,条件模型利用特定的国籍嵌入作为RNN的初始隐藏状态,以允许模型对其序列预测产生偏差。
7.3.1 SurnamesDataset 类
我们在“示例:使用多层感知器对姓氏进行分类”一节中介绍过,姓氏数据集是姓氏及其来源国的集合。到目前为止,该数据集已经被用于一个分类任务——给定一个新的姓氏,准确给姓氏分类其起源国。然而在本例中,我们将展示如何使用数据集来训练一个可以为字符序列分配概率并生成新序列的模型。
SurnamesDataset类与前几章基本一样:我们使用Pandas DataFrame加载数据集,并构造了一个向量化器,它封装了当前模型和任务所需的标记到整数的映射。为了适应任务的不同,我们修改了SurnamesDataset.__getitem__()方法,以输出预测目标的整数序列,如下例(7-1)所示。该方法引用Vectorizer来计算作为输入的整数序列(from_vector)和作为输出(to_vector)的整数序列。下一小节将描述vectorize()的实现。
示例 7-1:用于序列预测任务的SurnamesDataset.__getitem__()方法
class SurnameDataset(Dataset):
    @classmethod
    def load_dataset_and_make_vectorizer(cls, surname_csv):
        """Load dataset and make a new vectorizer from scratch


        Args:
            surname_csv (str): location of the dataset
        Returns:
            an instance of SurnameDataset
        """


        surname_df = pd.read_csv(surname_csv)
        return cls(surname_df, SurnameVectorizer.from_dataframe(surname_df))


    def __getitem__(self, index):
        """the primary entry point method for PyTorch datasets


        Args:
            index (int): the index to the data point
        Returns:
            a dictionary holding the data point: (x_data, y_target, class_index)
        """
        row = self._target_df.iloc[index]


        from_vector, to_vector = \
            self._vectorizer.vectorize(row.surname, self._max_seq_length)


        nationality_index = \
            self._vectorizer.nationality_vocab.lookup_token(row.nationality)


        return {'x_data': from_vector,
                'y_target': to_vector,
                'class_index': nationality_index}
7.3.2 向量化数据结构
与前面的示例一样,有三种主要的数据结构将每个姓氏的字符序列转换为其向量化形式:SequenceVocabulary将单个标记映射到整数,SurnameVectorizer协调整数映射,DataLoader将SurnameVectorizer的结果分组为minibatch。由于在本例中,DataLoader实现及其使用保持不变,因此我们将跳过其实现细节。
7.3.2.1 SURNAMEVECTORIZER和END-OF-SEQUENCE
对于序列预测任务,训练例程被编写为期望两个整数序列,这两个整数序列表示每个时间步的标记观测值和标记目标。通常,我们只想预测我们正在训练的序列,比如本例中的姓氏,这意味着我们只有一个标记序列可以使用,并通过错开单个序列来构建观察和目标。
为了将其转化为序列预测任务,使用SequenceVocabulary将每个标记映射到其适当的索引。然后,BEGIN-OF-SEQUENCE标记索引也就是begin_seq_index被添加为序列前缀,而END-OF-SEQUENCE标记索引也即end_seq_index被追加到了序列的结尾。此时,每个数据点都是一系列索引,并且具有相同的首尾索引。要创建训练例程所需的输入和输出序列,我们只需使用索引序列的两个切片:第一个切片包含除最后一个之外的所有标记索引,第二个切片包含除第一个之外的所有标记索引。当对齐和配对在一起时,序列就是正确的输入-输出索引。
为了更明确地说明这一点,我们在下例(7-2)中展示了SurnameVectorizer.vectorize()的代码。第一步是将surname(字符串)映射到indices(表示这些字符的整数列表)。然后,用序列索引的开始和结束来包装indices:具体而言,begin_seq_index在indices之前,end_seq_index在indices之后。接下来测试vector_length,它通常在运行时提供(但是代码的编写允许任何长度的向量)。在训练期间,提供vector_length是很重要的,因为minibatch是由堆叠的向量表示构造的,如果向量长度不一,那么它们不能堆放在一个矩阵中。测试vector_length之后,创建两个向量:from_vector和to_vector。不包含最后一个索引的索引片放在from_vector中,不包含第一个索引的索引片放在to_vector中,每个向量的剩余位置都填充了mask_index。将序列填充(或padded)到右边是很重要的,因为空位置将改变输出向量,我们希望这些变化发生在看到序列之后。
示例 7-2:序列预测任务中SurnameVectorizer.vectorize()的代码
class SurnameVectorizer(object):
    """ The Vectorizer which coordinates the Vocabularies and puts them to use"""
    def vectorize(self, surname, vector_length=-1):
        """Vectorize a surname into a vector of observations and targets

        Args:
            surname (str): the surname to be vectorized
            vector_length (int): an argument for forcing the length of index vector
        Returns:
            a tuple: (from_vector, to_vector)
                from_vector (numpy.ndarray): the observation vector
                to_vector (numpy.ndarray): the target prediction vector
        """
        indices = [self.char_vocab.begin_seq_index]
        indices.extend(self.char_vocab.lookup_token(token) for token in surname)
        indices.append(self.char_vocab.end_seq_index)

        if vector_length < 0:
            vector_length = len(indices) - 1

        from_vector = np.zeros(vector_length, dtype=np.int64)
        from_indices = indices[:-1]
        from_vector[:len(from_indices)] = from_indices
        from_vector[len(from_indices):] = self.char_vocab.mask_index

        to_vector = np.empty(vector_length, dtype=np.int64)
        to_indices = indices[1:]
        to_vector[:len(to_indices)] = to_indices
        to_vector[len(to_indices):] = self.char_vocab.mask_index

        return from_vector, to_vector

    @classmethod
    def from_dataframe(cls, surname_df):
        """Instantiate the vectorizer from the dataset dataframe

        Args:
            surname_df (pandas.DataFrame): the surname dataset
        Returns:
            an instance of the SurnameVectorizer
        """
        char_vocab = SequenceVocabulary()
        nationality_vocab = Vocabulary()

        for index, row in surname_df.iterrows():
            for char in row.surname:
                char_vocab.add_token(char)
            nationality_vocab.add_token(row.nationality)

        return cls(char_vocab, nationality_vocab)
7.3.3 从ElmanRNN到 GRU
在实践中,从vanilla RNN转换到门控RNN是非常容易的。在下面的模型中,虽然我们使用GRU代替vanilla RNN,但是使用LSTM也很容易。为了使用 GRU,我们使用与第六章ElmanRNN相同的参数实例化了torch.nn.GRU模块。
7.3.4 模型 1:无条件的SurnameGenerationModel
第一个模型是无条件的:它在生成姓氏之前不观察国籍。在实践中,无条件意味着GRU的计算不偏向任何国籍。在下一个例子(7-4)中,通过初始隐藏向量引入计算偏差。在本例中,我们使用一个全零向量,如此一来,初始的隐藏状态向量就不会影响计算了。
通常,SurnameGenerationModel(下例7-3)嵌入字符索引,使用GRU计算其顺序状态,并使用Linear层计算标记预测的概率。更明确地说,无条件SurnameGenerationModel从初始化Embedding层、GRU 和Linear层开始。与第六章的序列模型相似,一个整数矩阵是该模型的输入。我们使用一个PyTorch Embedding实例char_embed将整数转换为一个三维张量(每个batch项的向量序列)。这个张量传递给GRU,GRU计算每个序列中每个位置的状态向量。
示例 7-3:无条件化的姓氏生成模型
class SurnameGenerationModel(nn.Module):
    def __init__(self, char_embedding_size, char_vocab_size, rnn_hidden_size,
                 batch_first=True, padding_idx=0, dropout_p=0.5):
        """
        Args:
            char_embedding_size (int): The size of the character embeddings
            char_vocab_size (int): The number of characters to embed
            rnn_hidden_size (int): The size of the RNN's hidden state
            batch_first (bool): Informs whether the input tensors will
                have batch or the sequence on the 0th dimension
            padding_idx (int): The index for the tensor padding;
                see torch.nn.Embedding
            dropout_p (float): the probability of zeroing activations using
                the dropout method.
        """
        super(SurnameGenerationModel, self).__init__()


        self.char_emb = nn.Embedding(num_embeddings=char_vocab_size,
                                     embedding_dim=char_embedding_size,
                                     padding_idx=padding_idx)
        self.rnn = nn.GRU(input_size=char_embedding_size,
                          hidden_size=rnn_hidden_size,
                          batch_first=batch_first)
        self.fc = nn.Linear(in_features=rnn_hidden_size,
                            out_features=char_vocab_size)
        self._dropout_p = dropout_p


    def forward(self, x_in, apply_softmax=False):
        """The forward pass of the model


        Args:
            x_in (torch.Tensor): an input data tensor.
                x_in.shape should be (batch, input_dim)
            apply_softmax (bool): a flag for the softmax activation
                should be False during training
        Returns:
            the resulting tensor. tensor.shape should be (batch, output_dim)
        """
        x_embedded = self.char_emb(x_in)


        y_out, _ = self.rnn(x_embedded)


        batch_size, seq_size, feat_size = y_out.shape
        y_out = y_out.contiguous().view(batch_size * seq_size, feat_size)


        y_out = self.fc(F.dropout(y_out, p=self._dropout_p))


        if apply_softmax:
            y_out = F.softmax(y_out, dim=1)


        new_feat_size = y_out.shape[-1]
        y_out = y_out.view(batch_size, seq_size, new_feat_size)


        return y_out
第六章的序列分类任务与本章序列预测任务的主要区别在于如何处理由RNN计算得到的状态向量。在第六章中,我们为每个批索引检索一个向量,并使用这些向量执行预测。在本例中,我们将三维张量重塑为一个二维张量(一个矩阵),以便行维度表示每个样本(batch和序列索引)。利用这个矩阵和Linear层,我们为每个样本计算预测向量。我们通过将矩阵重塑为一个三维张量来完成计算。由于通过重塑操作保留了排序信息,所以每个批和序列索引仍处于相同的位置。我们需要重塑的原因是:Linear层需要一个矩阵作为输入。
7.3.5 模型 2:有条件的SurnameGenerationModel
第二个模型考虑了要生成姓氏的国籍。在实践中,这意味着存在某种机制允许模型相对于特定姓氏有行为上的偏向。在本例中,我们通过将每个国籍嵌入为隐藏状态大小的向量来参数化RNN的初始隐藏状态。这意味着模型当模型调整其参数时,它也会调整嵌入矩阵中的值,从而使预测对特定国籍和姓氏的规律性更加敏感。例如,爱尔兰国籍向量偏向于起始序列Mc和O。
下例(7-4)显示了有条件模型之间的差异。具体而言,引入额外的Embedding来将国籍索引映射到与RNN的隐藏层相同大小的向量。然后在forward()函数中嵌入国籍索引,它简单地作为RNN的初始隐含层而传入。虽然对于第一个模型只进行了非常简单的修改,但是它在让RNN根据所产生姓氏的国籍改变其行为方面有着深远的影响。
示例 7-4:有条件的姓氏生成模型
class SurnameGenerationModel(nn.Module):
    def __init__(self, char_embedding_size, char_vocab_size, num_nationalities,
                 rnn_hidden_size, batch_first=True, padding_idx=0, dropout_p=0.5):
        # ...
        self.nation_embedding = nn.Embedding(embedding_dim=rnn_hidden_size,
                                             num_embeddings=num_nationalities)


    def forward(self, x_in, nationality_index, apply_softmax=False):
        # ...
        x_embedded = self.char_embedding(x_in)
        # hidden_size: (num_layers * num_directions, batch_size, rnn_hidden_size)
        nationality_embedded = self.nation_emb(nationality_index).unsqueeze(0)
        y_out, _ = self.rnn(x_embedded, nationality_embedded)
        # ...
7.3.6 训练例程和结果
在本例中,我们介绍了用于生成姓氏的字符序列预测任务。尽管实现细节和训练例程在很多方面都与第六章中的例子相似,但还是有些微区别的。本节中,我们会重点关注这些区别、使用的超参数以及结果。
与前面的例子相比,因为我们在序列中的每个时间步都要进行预测,所以本例中计算损失需要作两个改动:首先,我们将三维张量重塑为二维张量(矩阵)以满足计算约束;其次,我们协调masking索引,它允许可变长度序列与损失函数,这样损失就不会在计算中使用被遮蔽的位置了。
通过使用下例(7-5)中所示的代码片段,我们能处理三维张量和可变长度序列的问题。首先,预测和目标被标准化为损失函数期望的大小(预测是二维的,目标是一维的)。现在每行代表一个样本:一个序列一个时间步。然后使用交叉熵将ignore_index设置为mask_index,因此损失函数忽略目标中与ignore_index匹配的任何位置。
示例 7-5:处理三维张量和序列级损失计算
def normalize_sizes(y_pred, y_true):
    """Normalize tensor sizes


    Args:
        y_pred (torch.Tensor): the output of the model
            If a 3-dimensional tensor, reshapes to a matrix
        y_true (torch.Tensor): the target predictions
            If a matrix, reshapes to be a vector
    """
    if len(y_pred.size()) == 3:
        y_pred = y_pred.contiguous().view(-1, y_pred.size(2))
    if len(y_true.size()) == 2:
        y_true = y_true.contiguous().view(-1)
    return y_pred, y_true


def sequence_loss(y_pred, y_true, mask_index):
    y_pred, y_true = normalize_sizes(y_pred, y_true)
    return F.cross_entropy(y_pred, y_true, ignore_index=mask_index)
使用这种修正过的损失计算,我们构造了一个与本书任一例子相似的训练例程。它首先迭代训练数据集,每次只处理一小批数据(一个minibatch)。对于每个minibatch,模型的输出是由输入计算而得。因为我们在每个时间步上执行预测,所以模型的输出是一个三维张量。使用前面描述的sequence_loss()和优化器,可以计算模型预测的错误信号,并用于更新模型参数。
大多模型超参数是由字符词汇表的大小决定的,这个大小是可以观察到的作为模型输入的离散标记的数量,以及每次步骤输出分类中的类的数量。剩下的模型超参数是字符嵌入的大小和内部RNN隐藏状态的大小。下例(7-6)给出了这些超参数和训练选项。
示例 7-6:用于生成姓氏的超参数
args = Namespace(
    # Data and Path information
    surname_csv="data/surnames/surnames_with_splits.csv",
    vectorizer_file="vectorizer.json",
    model_state_file="model.pth",
    save_dir="model_storage/ch7/model1_unconditioned_surname_generation",
    # or: save_dir="model_storage/ch7/model2_conditioned_surname_generation",
    # Model hyper parameters
    char_embedding_size=32,
    rnn_hidden_size=32,
    # Training hyper parameters
    seed=1337,
    learning_rate=0.001,
    batch_size=128,
    num_epochs=100,
    early_stopping_criteria=5,
    # Runtime options omitted for space
)
尽管预测的每个字符的准确性是模型性能的度量,但是在本例中,最好是通过检查模型将生成的姓氏类型来进行定性评估。为此,我们在forward()方法中步骤的修改版本上编写一个新的循环,以计算每个时间步骤的预测,并将这些预测用作下一个时间步的输入。代码见下例(7-7)。模型在每个时间步上的输出是一个预测向量,它使用softmax函数将预测向量转换为概率分布。有了概率分布,我们利用torch.multinomial()抽样函数,它是与指数概率成比例的速率选择指数。抽样是一个每次都产生不同输出的随机过程。
示例 7-7:从无条件的生成模型采样
def sample_from_model(model, vectorizer, num_samples=1, sample_size=20,
                      temperature=1.0):
    """Sample a sequence of indices from the model


    Args:
        model (SurnameGenerationModel): the trained model
        vectorizer (SurnameVectorizer): the corresponding vectorizer
        num_samples (int): the number of samples
        sample_size (int): the max length of the samples
        temperature (float): accentuates or flattens
            the distribution.
            0.0 < temperature < 1.0 will make it peakier.
            temperature > 1.0 will make it more uniform
    Returns:
        indices (torch.Tensor): the matrix of indices;
        shape = (num_samples, sample_size)
    """
    begin_seq_index = [vectorizer.char_vocab.begin_seq_index
                       for _ in range(num_samples)]
    begin_seq_index = torch.tensor(begin_seq_index,
                                   dtype=torch.int64).unsqueeze(dim=1)
    indices = [begin_seq_index]
    h_t = None


    for time_step in range(sample_size):
        x_t = indices[time_step]
        x_emb_t = model.char_emb(x_t)
        rnn_out_t, h_t = model.rnn(x_emb_t, h_t)
        prediction_vector = model.fc(rnn_out_t.squeeze(dim=1))
        probability_vector = F.softmax(prediction_vector / temperature, dim=1)
        indices.append(torch.multinomial(probability_vector, num_samples=1))
    indices = torch.stack(indices).squeeze().permute(1, 0)
    return indices
我们需要将采样的索引从sample_from_model()函数转换为人类可读的 输出的字符串。如下例(7-8)所示,要做到这一点,我们要使用用于向量化姓氏的SequenceVocabulary。在创建字符串时,我们只使用END-OF-SEQUENCE索引之前的索引。这假设模型能够了解姓氏应该在何时结束。
示例 7-8:将采样的索引映射为姓氏字符串
def decode_samples(sampled_indices, vectorizer):
    """Transform indices into the string form of a surname


    Args:
        sampled_indices (torch.Tensor): the inidces from `sample_from_model`
        vectorizer (SurnameVectorizer): the corresponding vectorizer
    """
    decoded_surnames = []
    vocab = vectorizer.char_vocab


    for sample_index in range(sampled_indices.shape[0]):
        surname = ""
        for time_step in range(sampled_indices.shape[1]):
            sample_item = sampled_indices[sample_index, time_step].item()
            if sample_item == vocab.begin_seq_index:
                continue
            elif sample_item == vocab.end_seq_index:
                break
            else:
                surname += vocab.lookup_index(sample_item)
        decoded_surnames.append(surname)
    return decoded_surnames
如下例(7-9)所示,使用这些函数可以检查模型的输出,以知道模型是否正在学习生成合理的姓氏。根据输出,我们能学到什么?可以看到,尽管姓氏似乎遵循几种形态模式,但它们显然不来自一个国家。一种可能是:学习姓氏的一般模型会混淆不同民族之间的字符分布。有条件的SurnameGenerationModel就是为了处理这种情况的。
示例 7-9:从无条件的模型采样
Input[0]
samples = sample_from_model(unconditioned_model, vectorizer,
                            num_samples=10)
decode_samples(samples, vectorizer)
Output[0]
['Aqtaliby',
 'Yomaghev',
 'Mauasheev',
 'Unander',
 'Virrovo',
 'NInev',
 'Bukhumohe',
 'Burken',
 'Rati',
 'Jzirmar']
对于有条件的SurnameGenerationModel,我们修改sample_from_model()函数来接受国籍索引列表,而不是指定数量的样本。在下例(7-10)中,修改后的函数使用带有国籍嵌入的国籍索引来构造GRU的初始隐藏状态。修改之后,采样过程就与非条件模型完全相同了。
示例 7-10:从序列模型采样
def sample_from_model(model, vectorizer, nationalities, sample_size=20,
                      temperature=1.0):
    """Sample a sequence of indices from the model


    Args:
        model (SurnameGenerationModel): the trained model
        vectorizer (SurnameVectorizer): the corresponding vectorizer
        nationalities (list): a list of integers representing nationalities
        sample_size (int): the max length of the samples
        temperature (float): accentuates or flattens
            the distribution.
            0.0 < temperature < 1.0 will make it peakier.
            temperature > 1.0 will make it more uniform
    Returns:
        indices (torch.Tensor): the matrix of indices;
        shape = (num_samples, sample_size)
    """
    num_samples = len(nationalities)
    begin_seq_index = [vectorizer.char_vocab.begin_seq_index
                       for _ in range(num_samples)]
    begin_seq_index = torch.tensor(begin_seq_index,
                                   dtype=torch.int64).unsqueeze(dim=1)
    indices = [begin_seq_index]
    nationality_indices = torch.tensor(nationalities,
                                       dtype=torch.int64).unsqueeze(dim=0)
    h_t = model.nation_emb(nationality_indices)


    for time_step in range(sample_size):
        x_t = indices[time_step]
        x_emb_t = model.char_emb(x_t)
        rnn_out_t, h_t = model.rnn(x_emb_t, h_t)
        prediction_vector = model.fc(rnn_out_t.squeeze(dim=1))
        probability_vector = F.softmax(prediction_vector / temperature, dim=1)
        indices.append(torch.multinomial(probability_vector, num_samples=1))
    indices = torch.stack(indices).squeeze().permute(1, 0)
    return indices
用条件向量采样的有效性意味着我们能对生成的输出产生影响。在下例(7-11)中,我们迭代国籍索引并从每个索引中取样。为了节省空间,我们只显示一些输出。从这些输出中可以看到,该模型确实采用了姓氏拼写的一些模式。
示例 7-11:从有条件的SurnameGenerationModel采样(仅展示部分输出)
Input[0]
for index in range(len(vectorizer.nationality_vocab)):
    nationality = vectorizer.nationality_vocab.lookup_index(index)


    print("Sampled for {}: ".format(nationality))


    sampled_indices = sample_from_model(model=conditioned_model,
                                        vectorizer=vectorizer,
                                        nationalities=[index] * 3,
                                        temperature=0.7)


    for sampled_surname in decode_samples(sampled_indices,
                                          vectorizer):
        print("-  " + sampled_surname)

Output[0]
Sampled for Arabic:
-  Khatso
-  Salbwa
-  Gadi
Sampled for Chinese:
-  Lie
-  Puh
-  Pian
Sampled for German:
-  Lenger
-  Schanger
-  Schumper
Sampled for Irish:
-  Mcochin
-  Corran
-  O'Baintin
Sampled for Russian:
-  Mahghatsunkov
-  Juhin
-  Karkovin
Sampled for Vietnamese:
-  Lo
-  Tham
-  Tou
7.4 训练序列模型的提示和技巧
序列模型的训练具有一定挑战性,而且训练过程中也会出现很多问题。我们在这里总结了工作和文献中一些有用的提示和技巧:
• 如果可能,使用门控变体
门控体系通过解决非门控变体的许多数值稳定性问题,简化了训练。
• 如果可能,选择GRU而非LSTM
GRU在使用更少的参数和计算的情况下提供与LSTM几乎相同的性能。幸运的是,从PyTorch的角度来看,使用GRU与使用LSTM相比只是需要使用一个不同的Module类。
• 使用Adam作为优化器
在第六、七、八章中,我们都使用Adam作为优化器,理由如下:它很可靠并且收敛速度更快,对于序列模型尤其如此。如果出于某些原因,你的模型用 Adam不收敛,那么使用随机梯度下降可能会有所帮助。
• 梯度剪裁
如果你在应用这些章节中学习的概念时注意到了数值错误,那么请在训练过程中用代码绘制梯度值。知道了范围之后,去除所有的异常值,以确保训练更顺利地进行,在PyTorch中有个很有用的实用程序clip_grad_norm()可以完成这项工作,如下例(7-12)所示。一般来说,你应该养成梯度裁剪的习惯。
示例 7-12:在PyTorch中应用梯度剪裁
# define your sequence model
model = ..
# define loss function
loss_function = ..


# training loop
for _ in ...:
   ...
   model.zero_grad()
   output, hidden = model(data, hidden)
   loss = loss_function(output, targets)
   loss.backward()
   torch.nn.utils.clip_grad_norm(model.parameters(), 0.25)
   ...
• 早停法
序列模型很容易出现过拟合的情况。我们建议在评估错误(在开发集上测量的)开始出现时尽早停止训练过程。
在第八章中,我们还会接着讨论序列模型,研究如何使用序列到序列(sequence-to-sequence)来预测和生成与输入长度不同的序列,并讨论序列模型的其他变体。


 2424
2424


 被折叠的 条评论
为什么被折叠?
被折叠的 条评论
为什么被折叠?
 到【灌水乐园】发言


