


文章目录
- 1.SpringMVC-概念引入
- 2.SpringMVC-创建并运行war项目
- 3.SpringMVC-框架搭建
- 4.SpringMVC-执行流程和三大组件
- 5.SpringMVC-静态资源放行
- 6.SpringMVC-控制请求方式
- 7.SpringMVC-控制请求参数和请求头
- 8.SpringMVC-@PathVariable注解
- 9.SpringMVC-RESTful风格
- 10.SpringMVC-参数注入引入
- 11.SpringMVC-注入POJO类型参数
- 12.SpringMVC-注入Date类型参数
- 13.SpringMVC-注入List类型参数
- 14.SpringMVC-注入Map类型参数
- 15.SpringMVC-请求参数乱码
- 16.SpringMVC-常见注解
- 17.SpringMVC-响应void
- 18.SpringMVC-请求转发和重定向
- 19.SpringMVC-View视图
- 20.SpringMVC-ModelAndView
- 21.SpringMVC-响应JSON
- 21.SpringMVC-SSM整合
- 22.作用域传递数据
- 23.SpringMVC-文件上传
1.SpringMVC-概念引入
SpringMVC属于SpringFrameWork的后续产品,已经融合在Spring Web Flow里面,Spring框架提供了构建Web应用程序的全功能MVC模块,使用Spring可插入的MVC框架,可以在使用Spring进行Web开发时,选择使用Spring提供的SpringMVC框架或者集成其他MVC框架,比如Struts(现在一般不用),Struts 2(一般老项目使用)等等。
SpringMVC是Spring为展现层提供的基于MVC设计理念的优秀的WEB框架,是目前最主流的MVC框架之一
SpringMVC给我们提供了一套注解可以让普通的JAVA类成为Controller控制器,无需继承Servlet,实现了控制层和Servlet之间的解耦。
SpringMVC支持Restful风格的URL写法,提高URL安全性 减少参数暴露
SpringMVC采用了松耦合,可查办的主键结构,比其他的框架更具扩展性和灵活性
SpringMVC对view层进行封装,不能单独使用,需要依赖Spring
SpringFrameWork体系:
M:model 模型层 DAO封装 >>> Mybatis
V:view 视图层 html css js jsp >>> 前端框架
C:controller 控制层 Servlet 控制前后端交互逻辑 >>> 对Servlet的封装:SpringMVC
2.SpringMVC-创建并运行war项目
3.SpringMVC-框架搭建
SpringMVC可以帮我们简化Controller层,简化我们自己创建Servlet,自己req.getParameter获得参数的过程。
1.在pom.xml中导入依赖
<project xmlns="http://maven.apache.org/POM/4.0.0" xmlns:xsi="http://www.w3.org/2001/XMLSchema-instance"
  xsi:schemaLocation="http://maven.apache.org/POM/4.0.0 http://maven.apache.org/maven-v4_0_0.xsd">
  <modelVersion>4.0.0</modelVersion>
  <groupId>org.example</groupId>
  <artifactId>springmvc</artifactId>
  <version>1.0-SNAPSHOT</version>
  <name>Archetype - springmvc</name>
  <url>http://maven.apache.org</url>

  <dependencies>
    <!--spring核心容器包-->
    <dependency>
      <groupId>org.springframework</groupId>
      <artifactId>spring-context</artifactId>
      <version>5.3.5</version>
    </dependency>
    <!--spring切面包-->
    <dependency>
      <groupId>org.springframework</groupId>
      <artifactId>spring-aspects</artifactId>
      <version>5.3.5</version>
    </dependency>
    <!--aop联盟包-->
    <dependency>
      <groupId>aopalliance</groupId>
      <artifactId>aopalliance</artifactId>
      <version>1.0</version>
    </dependency>
    <!--德鲁伊连接池-->
    <dependency>
      <groupId>com.alibaba</groupId>
      <artifactId>druid</artifactId>
      <version>1.1.10</version>
    </dependency>
    <!--mysql驱动-->
    <dependency>
      <groupId>mysql</groupId>
      <artifactId>mysql-connector-java</artifactId>
      <version>8.0.22</version>
    </dependency>
    <!--springJDBC包-->
    <dependency>
      <groupId>org.springframework</groupId>
      <artifactId>spring-jdbc</artifactId>
      <version>5.3.5</version>
    </dependency>
    <!--spring事务控制包-->
    <dependency>
      <groupId>org.springframework</groupId>
      <artifactId>spring-tx</artifactId>
      <version>5.3.5</version>
    </dependency>
    <!--spring orm 映射依赖-->
    <dependency>
      <groupId>org.springframework</groupId>
      <artifactId>spring-orm</artifactId>
      <version>5.3.5</version>
    </dependency>
    <!--Apache Commons日志包-->
    <dependency>
      <groupId>commons-logging</groupId>
      <artifactId>commons-logging</artifactId>
      <version>1.2</version>
    </dependency>

    <!--log4j2 日志-->
    <dependency>
      <groupId>org.apache.logging.log4j</groupId>
      <artifactId>log4j-slf4j-impl</artifactId>
      <version>2.14.0</version>
      <scope>test</scope>
    </dependency>

    <!--lombok -->
    <dependency>
      <groupId>org.projectlombok</groupId>
      <artifactId>lombok</artifactId>
      <version>1.18.12</version>
      <scope>provided</scope>
    </dependency>

    <!--spring test测试支持包-->
    <dependency>
      <groupId>org.springframework</groupId>
      <artifactId>spring-test</artifactId>
      <version>5.3.5</version>
      <scope>test</scope>
    </dependency>

    <!--junit5单元测试-->
    <dependency>
      <groupId>org.junit.jupiter</groupId>
      <artifactId>junit-jupiter-api</artifactId>
      <version>5.7.0</version>
      <scope>test</scope>
    </dependency>


    <!--springMVC支持包-->
    <dependency>
      <groupId>org.springframework</groupId>
      <artifactId>spring-web</artifactId>
      <version>5.3.5</version>
    </dependency>

    <dependency>
      <groupId>org.springframework</groupId>
      <artifactId>spring-webmvc</artifactId>
      <version>5.3.5</version>
    </dependency>
    <!--jsp 和Servlet  可选-->
    <dependency>
      <groupId>javax.servlet</groupId>
      <artifactId>javax.servlet-api</artifactId>
      <version>4.0.1</version>
      <scope>provided</scope>
    </dependency>

    <dependency>
      <groupId>javax.servlet.jsp</groupId>
      <artifactId>javax.servlet.jsp-api</artifactId>
      <version>2.3.3</version>
      <scope>provided</scope>
    </dependency>
  </dependencies>


</project>
2.在web.xml中配置DispatcherServlet(前端控制器)
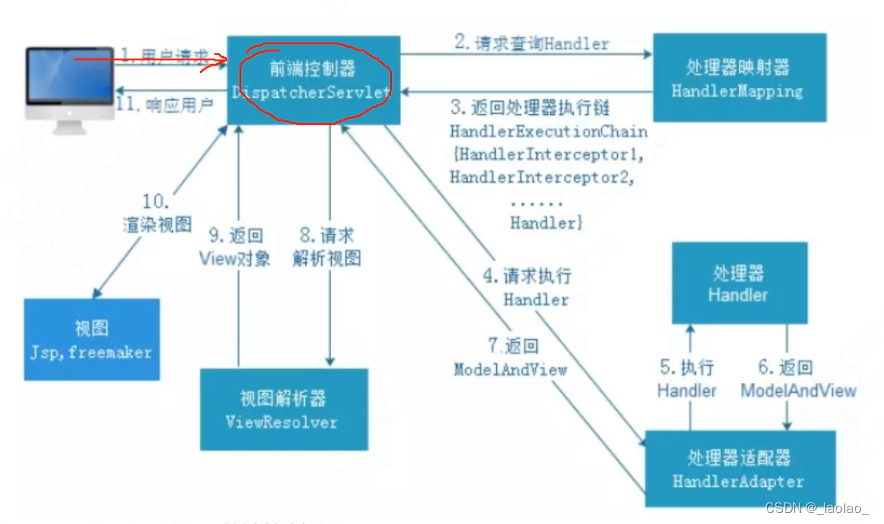
SpringMVC的核心:前端控制器。根据下图可以知道SpringMVC的三大组件:处理器映射器、处理器适配器、视图解析器。但是我们需要做的工作其实只有处理器和view。
web.xml:
<?xml version="1.0" encoding="UTF-8"?>
<web-app xmlns="http://xmlns.jcp.org/xml/ns/javaee"
         xmlns:xsi="http://www.w3.org/2001/XMLSchema-instance"
         xsi:schemaLocation="http://xmlns.jcp.org/xml/ns/javaee http://xmlns.jcp.org/xml/ns/javaee/web-app_4_0.xsd"
         version="4.0">

    <!--配置前端控制器dispatcherServelt-->
    <servlet>
        <servlet-name>dispatcherServelt</servlet-name>
        <servlet-class>org.springframework.web.servlet.DispatcherServlet</servlet-class>
        <!--利用前端控制器dispatcherServelt的初始化参数指明springmvc.xml的路径-->
        <!--如果不用init-param指定springmvc.xml的路径,springmvc会默认到WEB-INF下查找名字为${servlet-name}-servlet.xml(dispatcherServelt-servlet.xml)-->
        <init-param>
            <param-name>contextConfigLocation</param-name>
            <param-value>classpath:springmvc.xml</param-value>
        </init-param>
        <!--tomcat启动时即初始化参数(否则servlet第一次被请求时才初始化)-->
        <load-on-startup>1</load-on-startup>
    </servlet>
    <servlet-mapping>
        <servlet-name>dispatcherServelt</servlet-name>
        <!--拦截所有请求(不包含jsp,/*包含所有请求包括jsp)-->
        <url-pattern>/</url-pattern>
    </servlet-mapping>
</web-app>
3.在resources中配置springmvc.xml
springmvc.xml:
<?xml version="1.0" encoding="UTF-8"?>
<beans xmlns="http://www.springframework.org/schema/beans"
       xmlns:xsi="http://www.w3.org/2001/XMLSchema-instance"
       xmlns:p="http://www.springframework.org/schema/p"
       xmlns:c="http://www.springframework.org/schema/c"
       xmlns:util="http://www.springframework.org/schema/util"
       xmlns:context="http://www.springframework.org/schema/context"
       xsi:schemaLocation="http://www.springframework.org/schema/beans
       http://www.springframework.org/schema/beans/spring-beans.xsd
       http://www.springframework.org/schema/util
       http://www.springframework.org/schema/util/spring-util.xsd http://www.springframework.org/schema/context https://www.springframework.org/schema/context/spring-context.xsd">
    <!--扫描包 springmvc依赖spring-->
    <context:component-scan base-package="com.zy.controller"></context:component-scan>

</beans>
4.第一个Controller类:
package com.zy.controller;/**
* @Author:zhoayu
* @Date:2023/11/14 23:29
* @Description:com.zy.controller
* @version:1.0
*/
import org.springframework.stereotype.Controller;
import org.springframework.web.bind.annotation.RequestMapping;
/**
* @ClassName MyFirstController
* @Description //TODO
* @Author zhaoyu
* @Date 2023/11/14
*/
//@Component的三个子注解:@Controller,@Service,@Repository
@Controller
public class MyFirstController {
//在springmvc下我们不需要再继承HttpServlet了
//定义一个处理请求的方法,返回值定义为String,其实是用来表明要跳转的页面的路径
//@RequestMapping注解声明前端的访问路径,类似@WebServlet(urlPatterns = )
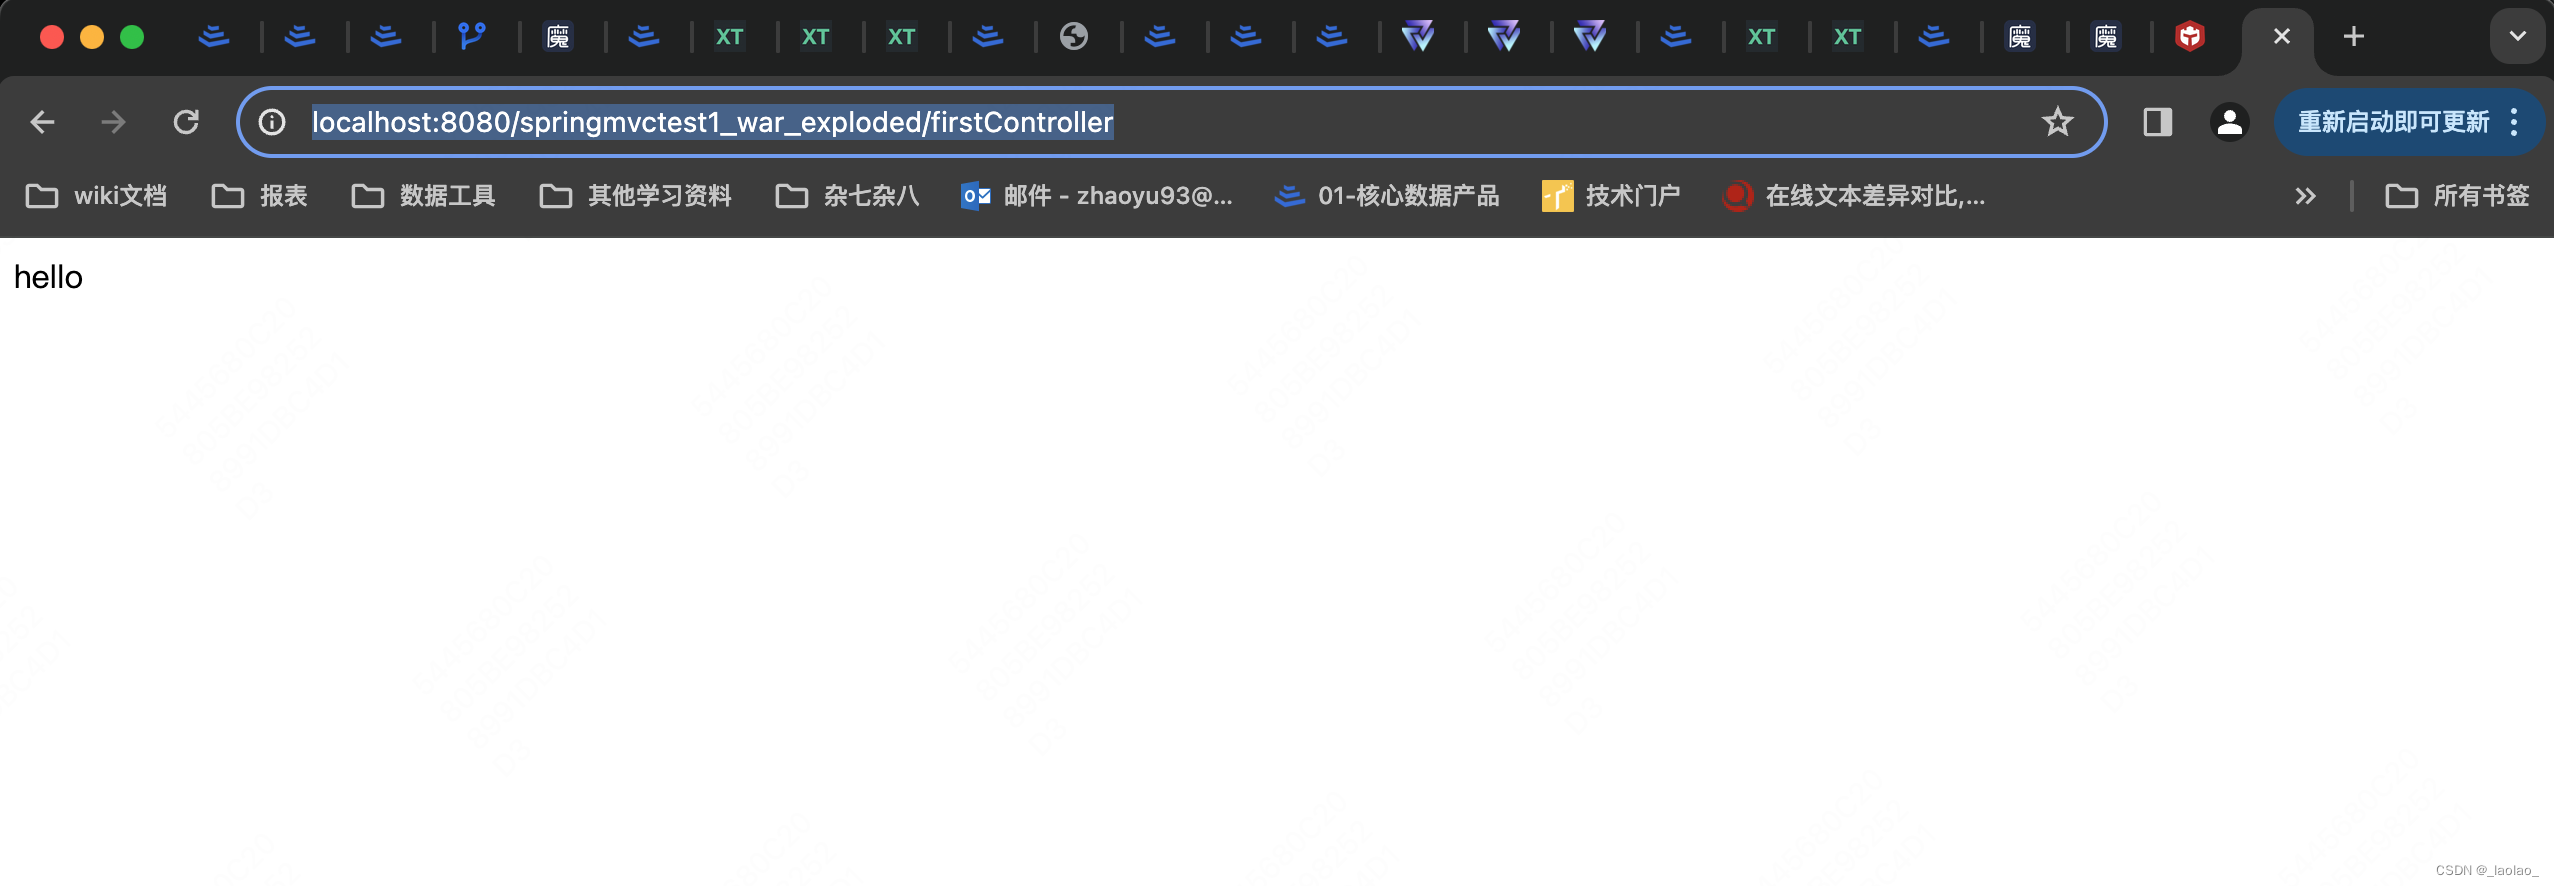
@RequestMapping("/firstController")
public String firstController(){
System.out.println("firstController");
//跳转到test.jsp
return "test.jsp";
}
//我们可以在一个类里定义多个映射路径不同的方法了
//之前的映射路径的粒度是类,现在是方法,变得更灵活了
@RequestMapping("/firstController2")
public String firstController2(){
System.out.println("firstController2");
return "test.jsp";
}
}
test.jsp:
<%--
  Created by IntelliJ IDEA.
  User: zhaoyu
  Date: 2023/11/14
  Time: 00:01
  To change this template use File | Settings | File Templates.
--%>
<%@ page contentType="text/html;charset=UTF-8" language="java" %>
<html>
<head>
    <title>Hello</title>
</head>
<body>
hello
</body>
</html>
请求MyFirstController成功,并按照我们的逻辑成功跳转到了test.jsp:
1.@RequestMapping注解既可以放在类上,也可以放在方法上。如果类上和方法上都放了@RequestMapping,比如类上加@RequestMapping(“/a”),方法上加@RequestMapping(“/b”),那么我们想请求到方法就要请求/a/b
2.如果我们的静态资源在WEB-INF下(出于安全考虑),我们请求转发跳转静态资源应该这样写:
    @RequestMapping("/firstController")
    public String firstController(){
        System.out.println("firstController");
        //跳转到WEB-INF下的test.jsp
        return "/WEB-INF/test.jsp";
    }
我们也可以在springmvc.xml中配置视图解析器(视图解析器解析处理器返回的资源路径)来达到简化书写处理器返回静态资源的路径的效果:
springmvc.xml中配置视图解析器:
<?xml version="1.0" encoding="UTF-8"?>
<beans xmlns="http://www.springframework.org/schema/beans"
       xmlns:xsi="http://www.w3.org/2001/XMLSchema-instance"
       xmlns:p="http://www.springframework.org/schema/p"
       xmlns:c="http://www.springframework.org/schema/c"
       xmlns:util="http://www.springframework.org/schema/util"
       xmlns:context="http://www.springframework.org/schema/context"
       xsi:schemaLocation="http://www.springframework.org/schema/beans
       http://www.springframework.org/schema/beans/spring-beans.xsd
       http://www.springframework.org/schema/util
       http://www.springframework.org/schema/util/spring-util.xsd http://www.springframework.org/schema/context https://www.springframework.org/schema/context/spring-context.xsd">
    <!--扫描包 springmvc依赖spring-->
    <context:component-scan base-package="com.zy.controller"></context:component-scan>

    <!--配置视图解析器(视图解析器解析处理器返回的资源路径)-->
    <bean class="org.springframework.web.servlet.view.InternalResourceViewResolver">
    <!--指定路径的前缀和后缀 自动在处理器返回的资源路径上拼前缀和后缀-->
        <property name="prefix" value="/WEB-INF"></property>
        <property name="suffix" value=".jsp"></property>
    </bean>

</beans>
此时我们刚才的处理器代码的返回路径就可以简化为:
    @RequestMapping("/firstController")
    public String firstController(){
        System.out.println("firstController");
        //跳转到WEB-INF下的test.jsp 因为在springmvc.xml中配过了视图解析器,这里可以简化
        return "test";
    }
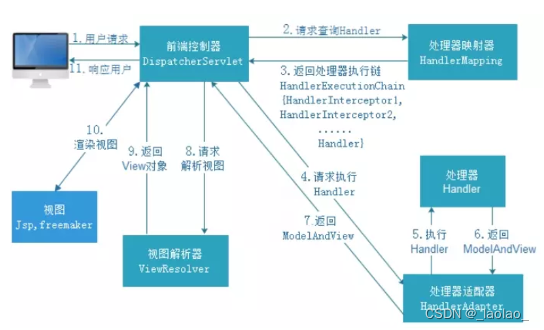
4.SpringMVC-执行流程和三大组件
SpringMVC执行流程(从一次请求到响应完成):
从上到下:时间推进
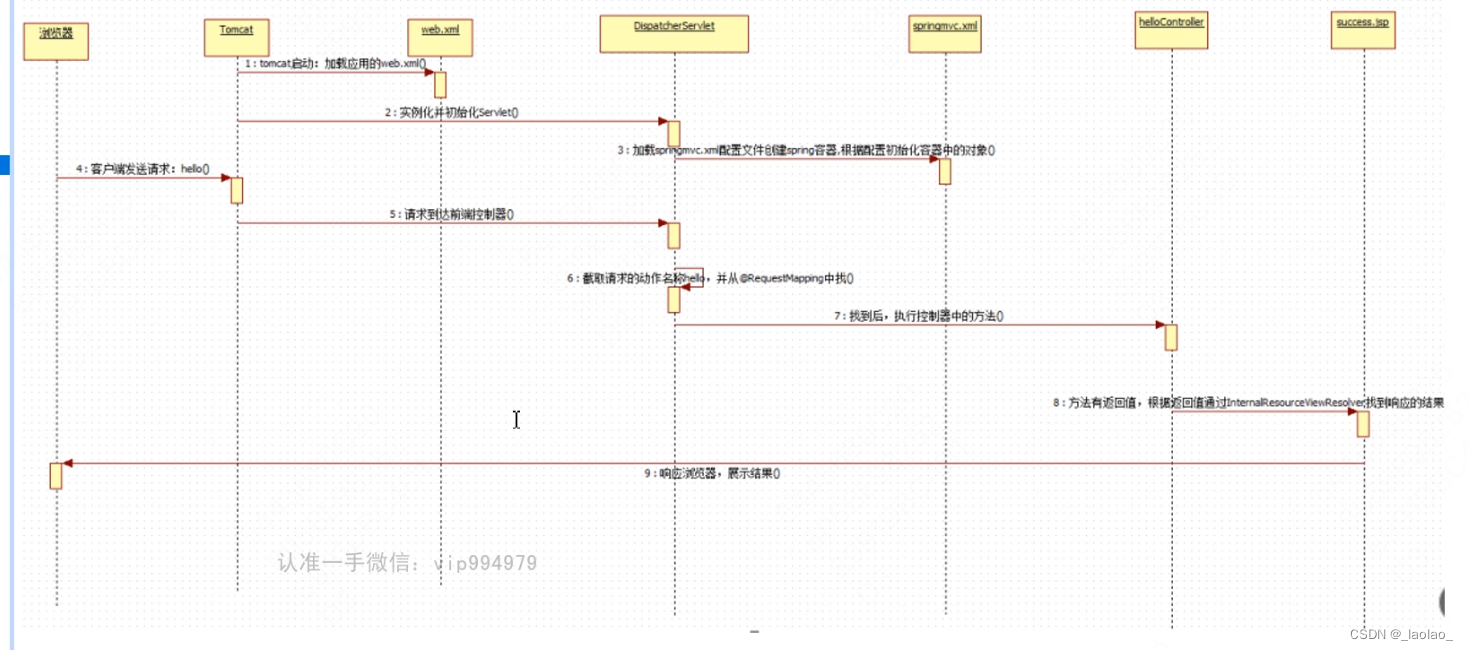
SpringMVC执行原理及三大组件:
DispatcherServlet(前端控制器 负责调度命令各个组件):
用户请求到达前端控制器,它相当于是mvc模式中的c,dispatcherServlet是整个流程控制的中心,由它调用其他组件处理用户的请求,dispatcherServlet的存在降低了组件之间的耦合性。
HandlerMapping(处理器映射器 负责根据请求找到Handler的位置):
HandlerMapping负责根据用户请求找到Handler(处理器,处理器是由我们实现的),SpringMVC提供了不同的映射器实现不同的映射方式。如:配置文件方式,实现接口方式,注解方式。HandlerMapping会把找到的处理器信息返回给前端控制器。
Handler(处理器,自己定义的Controller处理单元 负责执行逻辑):
Handler是我们开发中要编写的具体业务控制器。由DispatcherServlet把用户请求转发给->HandlerAdapter->Handler,由Handler对具体的用户请求进行处理。
HandlerAdapter(处理器适配器 负责调用对应的Handler):
适配器设计模式,通过HandlerAdapter对处理器进行执行,它解析请求中的参数调用对应的Handler,并把返回值放到ModelAndVeiw中返回给DispatcherServlet。ModelAndVeiw中有包括页面信息,跳转页面时要传的参数等信息。它主要负责对接适配DispatcherServlet和Handler(统一DispatcherServlet的不同参数和Handler的不同返回值)
ViewResolver(视图解析器 负责访问页面资源):
ViewResolver负责将处理结果生成View视图,ViewResolver首先根据逻辑视图名解析成物理视图名,即页面的物理地址。然后再生成View视图对象,最后交给视图层通过jsp技术(静态资源+java代码的servlet)或者freemaker技术把要响应给浏览器的内容渲染出来 返回给浏览器。
View(视图):
SpringMVC提供了很多的View视图类型的支持,包括:jstlView、freemakerView、pdfView等。我们最常用的视图就是jsp。
DispatcherServlet(前端控制器)是SpringMVC的核心组件,作为主要的控制中心存在,它下面有三个组件
SpringMVC的三大组件:HandlerMapping(处理器映射器),HandlerAdapter(处理器适配器)、ViewResolver(视图解析器)
目前我们只在springmvc.xml中配置了ViewResolver,正常来说我们应该在springmvc.xml中配置三大组件:
<?xml version="1.0" encoding="UTF-8"?>
<beans xmlns="http://www.springframework.org/schema/beans"
       xmlns:xsi="http://www.w3.org/2001/XMLSchema-instance"
       xmlns:p="http://www.springframework.org/schema/p"
       xmlns:c="http://www.springframework.org/schema/c"
       xmlns:util="http://www.springframework.org/schema/util"
       xmlns:context="http://www.springframework.org/schema/context"
       xsi:schemaLocation="http://www.springframework.org/schema/beans
       http://www.springframework.org/schema/beans/spring-beans.xsd
       http://www.springframework.org/schema/util
       http://www.springframework.org/schema/util/spring-util.xsd http://www.springframework.org/schema/context https://www.springframework.org/schema/context/spring-context.xsd
       http://www.springframework.org/schema/mvc
       http://www.springframework.org/schema/mvc/spring-mvc.xsd"
       xmlns:mvc="http://www.springframework.org/schema/mvc"

>


    <!--扫描包 springmvc依赖spring-->
    <context:component-scan base-package="com.zy.controller"></context:component-scan>

    <!--配置处理器映射器-->
    <!--springmvc默认创建的映射器和适配器的实现类对象没这两个好-->
<!--
    <bean class="org.springframework.web.servlet.mvc.method.annotation.RequestMappingHandlerMapping"/>
 -->
    <!--使用annotation-driven来简化映射器/适配器对象的创建-->
    <!--使用annotation-driven注解需要修改命名空间"  -->

    <!--开启mvc的注解驱动 自动给我们配置好映射器和适配器 效果等同于我们自己写的那两个映射器和适配器的bean-->
    <mvc:annotation-driven/>

    <!--配置处理器适配器-->
<!--
    <bean class="org.springframework.web.servlet.mvc.method.annotation.RequestMappingHandlerAdapter"/>
 -->

    <!--配置视图解析器(视图解析器解析处理器返回的资源路径)-->
    <bean class="org.springframework.web.servlet.view.InternalResourceViewResolver">
    <!--指定路径的前缀和后缀 自动在处理器返回的资源路径上拼前缀和后缀-->
        <property name="prefix" value="/WEB-INF"/>
        <property name="suffix" value=".jsp"/>
    </bean>

</beans>
HandlerMapping的实现类的作用:
实现类RequestMappingHandlerMapping,它会处理@RequestMapping注解,并将其注册到请求映射表中。
HandlerApater的实现类的作用:
实现类RequestMappingHandlerAdapter,它是处理请求的适配器,确定调用哪个类的哪个方法,并且构造方法参数、返回值。
当配置了mvc:annotation-driver/后(即创建了RequestMappingHandlerMapping对象和RequestMappingHandlerAdapter对象后),Spring就知道了我们启动了SpringMVC的注解驱动。然后Spring会通过<context:component-scan />标签的配置,自动为我们将扫描到的@Component,@Controller,@Service,@Repository等注解标记的组件注册到工厂中准备处理请求。这也是后续实现接收返回json数据、参数验证、统一异常等功能的前置条件。
5.SpringMVC-静态资源放行
index.jsp:
<%--
Created by IntelliJ IDEA.
User: zhaoyu
Date: 2023/11/16
Time: 22:39
To change this template use File | Settings | File Templates.
--%>
<%@ page contentType="text/html;charset=UTF-8" language="java" %>
<html>
<head>
<title>Title</title>
<link rel="stylesheet" type="text/css" href="css/aaa.css"/>
<script src="js/bbb.js"></script>
</head>
<body>
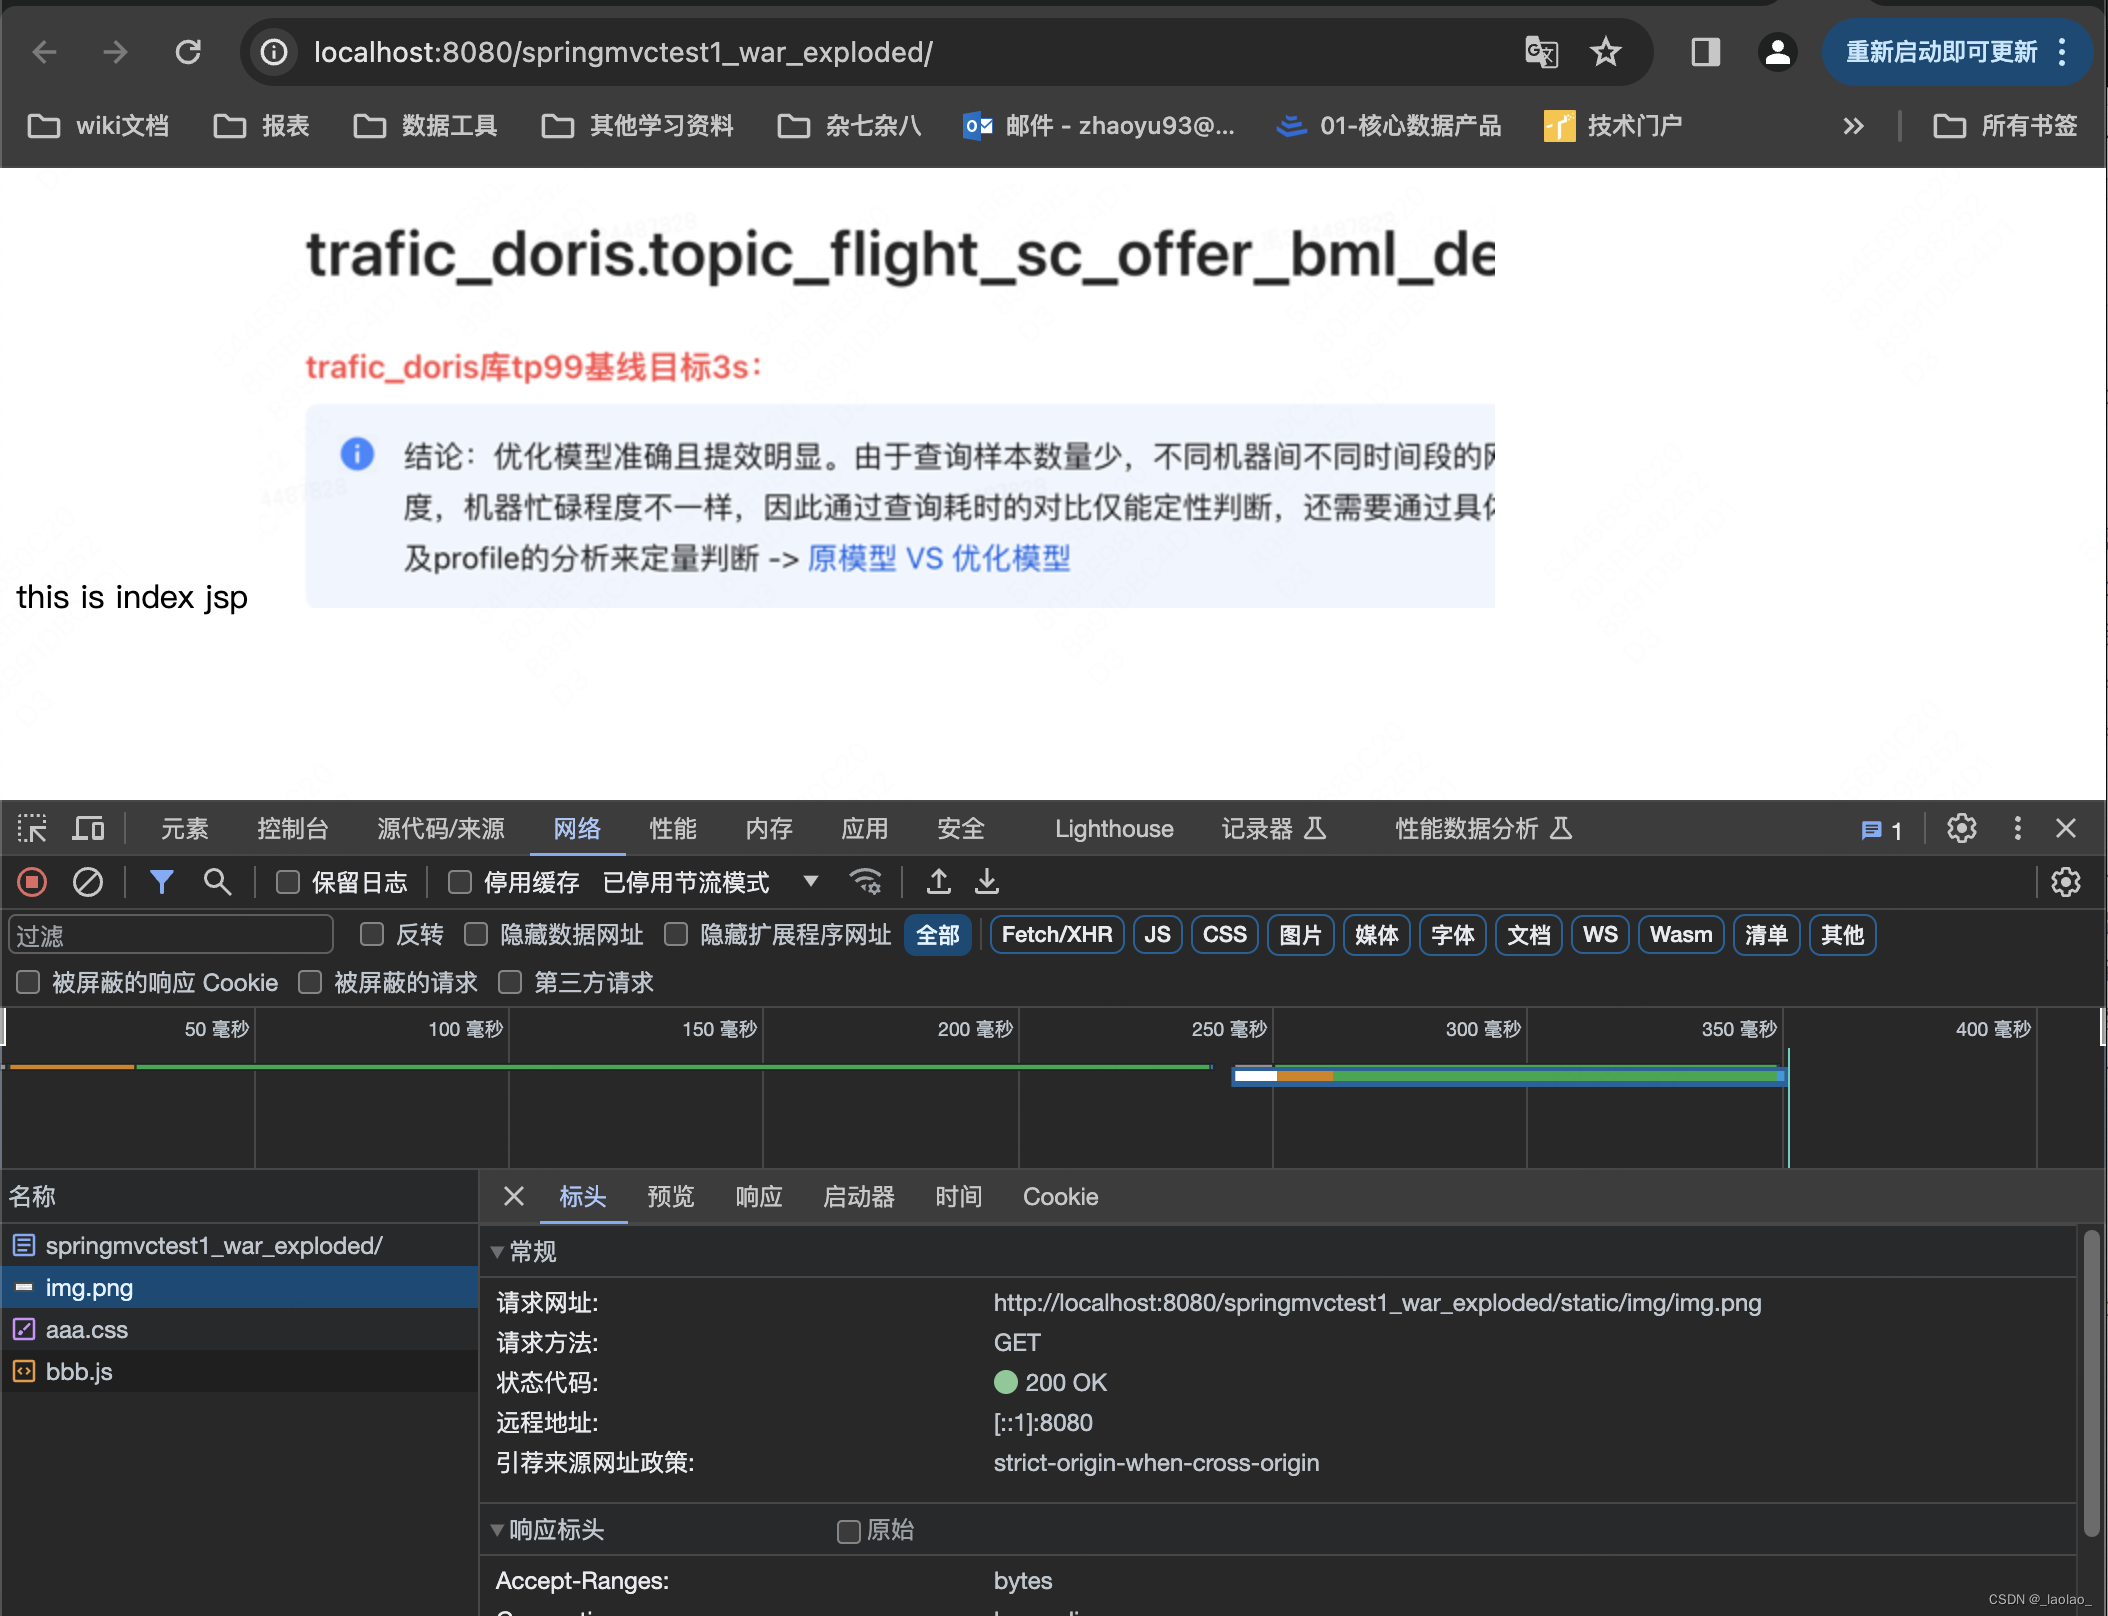
this is index jsp
<img src="img/img.png"/>
</body>
</html>
这里我们请求index.jsp,发现在index.jsp中引入的资源都是404 没找到。
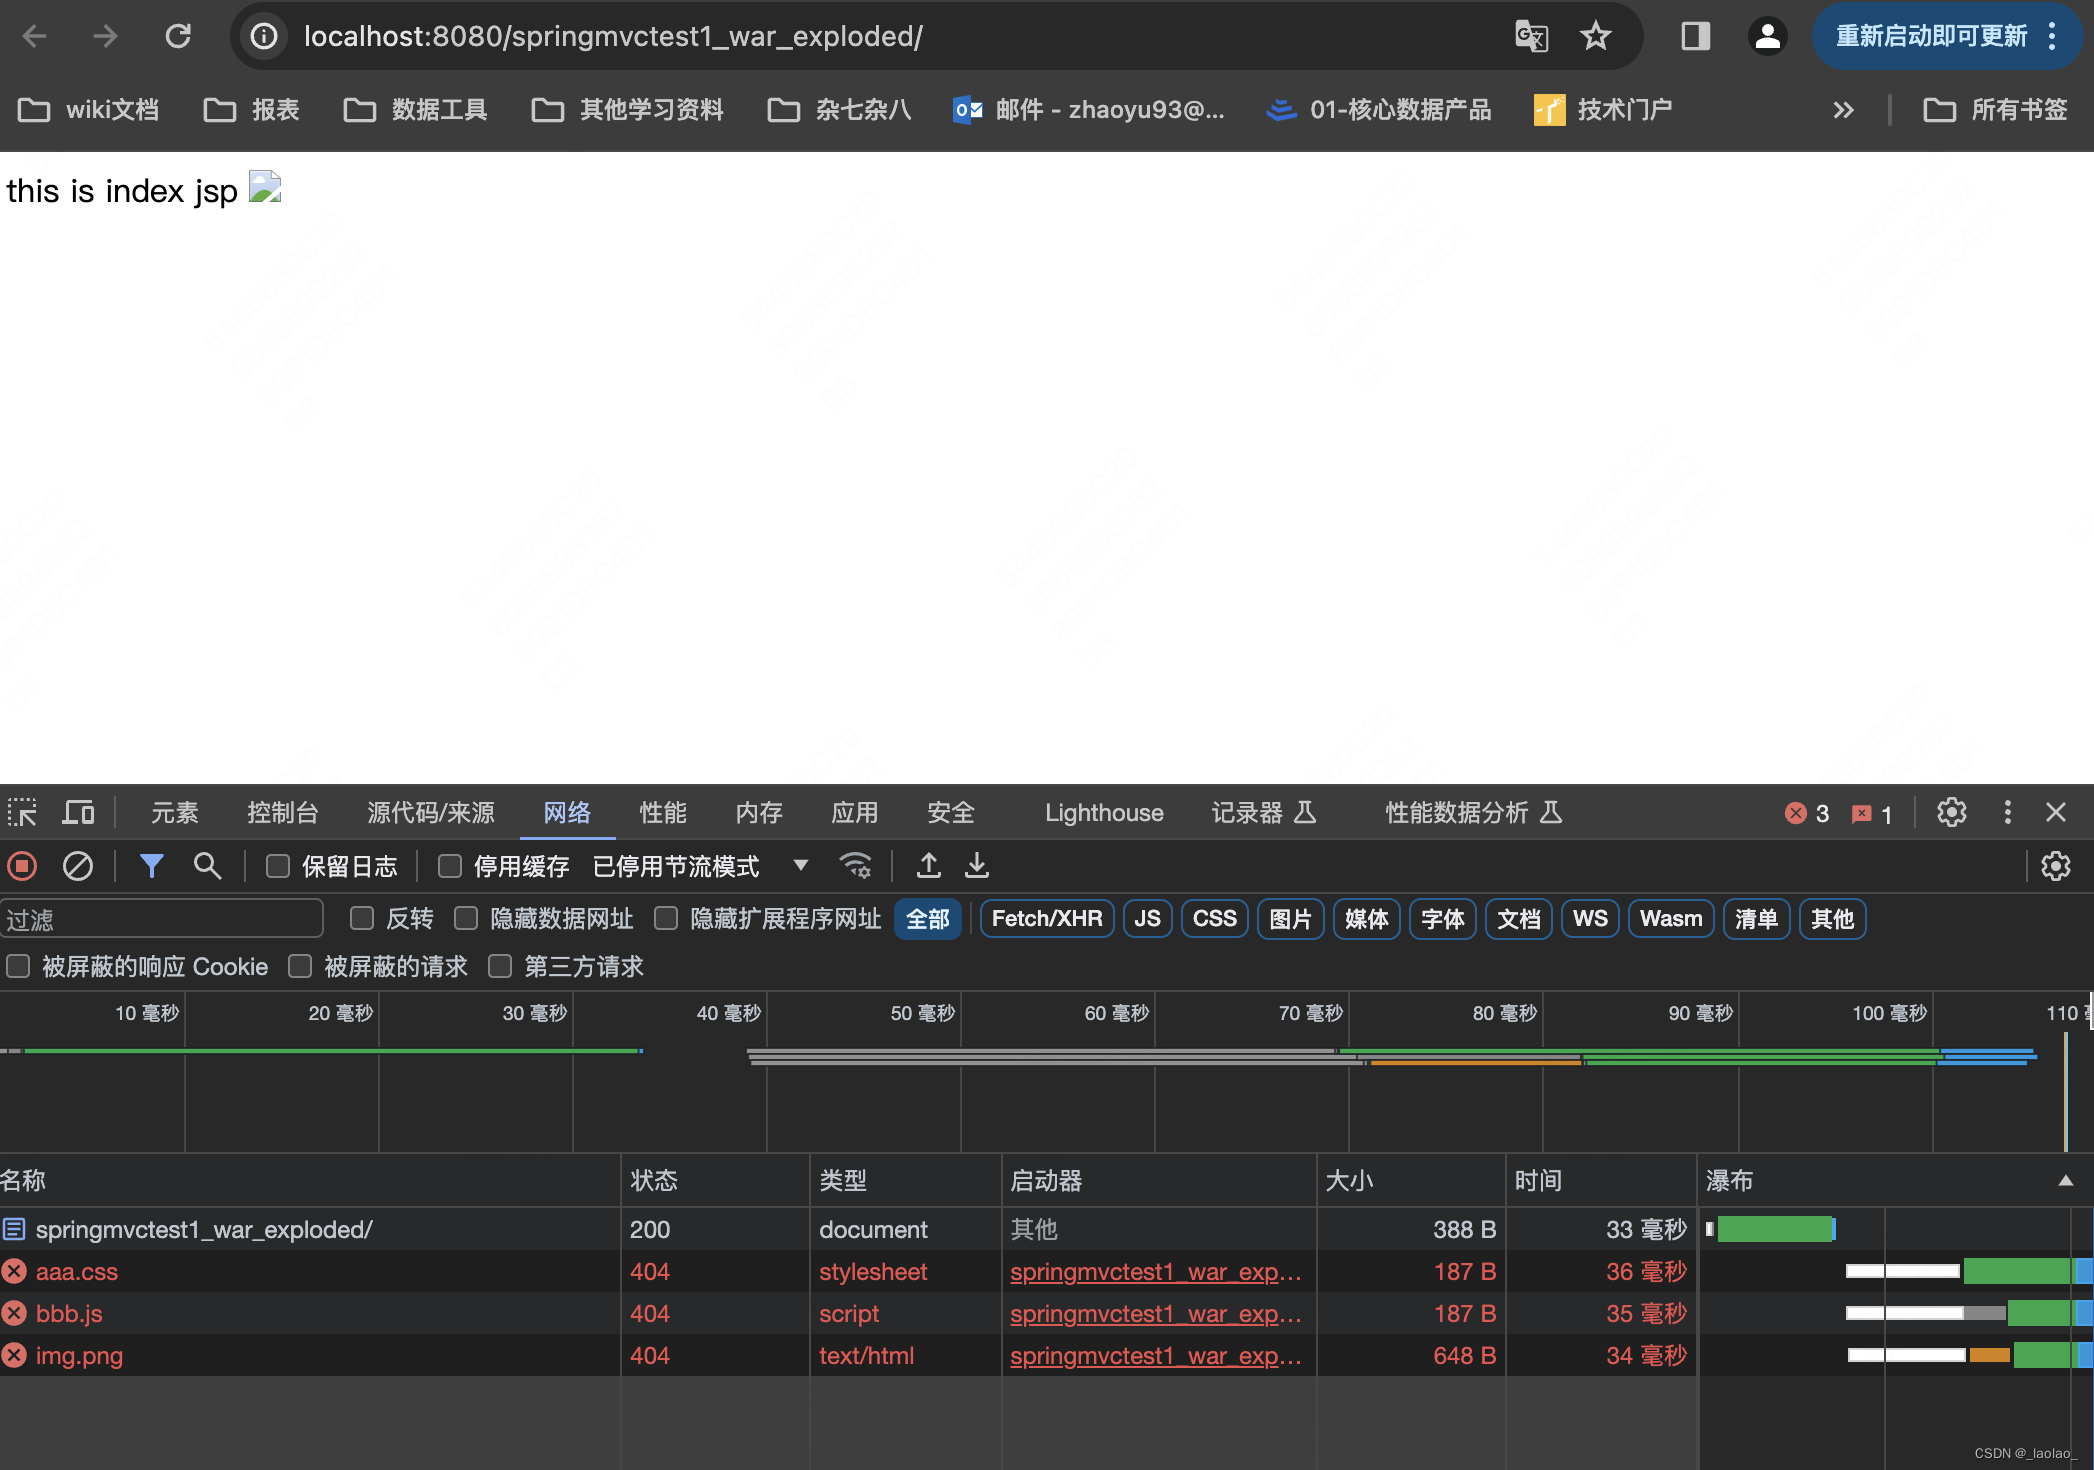
请求index.jsp时发生了什么:
1.浏览器向服务器发起请求,请求index.jsp资源
2.由于我们在web.xml中的配置,dispatcherServlet不会拦截这个对于jsp资源的请求,tomcat接收到请求后向浏览器返回index.jsp文件
    <servlet-mapping>
        <servlet-name>dispatcherServelt</servlet-name>
        <!--拦截所有请求(不包含jsp,/*包含所有请求包括jsp)-->
        <url-pattern>/</url-pattern>
    </servlet-mapping>
3.浏览器解析index.jsp文件,发现里面还有3个资源:aaa.css,bbb.js,img.png,于是又向服务器发起这三个资源的请求
4.这三次请求会被dispatcherServlet拦截到,由于它是专门找controller的,我们限制了包扫描范围,所以他只会到controller包下去找带controller注解的处理器,不会到web目录下去找静态资源,因此就向浏览器响应3个静态资源的404
    <!--扫描包 springmvc依赖spring-->
    <context:component-scan base-package="com.zy.controller"></context:component-scan>
怎样让dispatcherServlet对静态资源放行?
在springmvc.xml中进行配置:
<?xml version="1.0" encoding="UTF-8"?>
<beans xmlns="http://www.springframework.org/schema/beans"
xmlns:xsi="http://www.w3.org/2001/XMLSchema-instance"
xmlns:p="http://www.springframework.org/schema/p"
xmlns:c="http://www.springframework.org/schema/c"
xmlns:util="http://www.springframework.org/schema/util"
xmlns:context="http://www.springframework.org/schema/context"
xsi:schemaLocation="http://www.springframework.org/schema/beans
http://www.springframework.org/schema/beans/spring-beans.xsd
http://www.springframework.org/schema/util
http://www.springframework.org/schema/util/spring-util.xsd http://www.springframework.org/schema/context https://www.springframework.org/schema/context/spring-context.xsd
http://www.springframework.org/schema/mvc
http://www.springframework.org/schema/mvc/spring-mvc.xsd"
xmlns:mvc="http://www.springframework.org/schema/mvc"
>
<!--扫描包 springmvc依赖spring-->
<context:component-scan base-package="com.zy.controller"></context:component-scan>
<!--配置处理器映射器-->
<!--springmvc默认创建的映射器和适配器的实现类对象没这两个好-->
<!--
<bean class="org.springframework.web.servlet.mvc.method.annotation.RequestMappingHandlerMapping"/>
-->
<!--使用annotation-driven来简化映射器/适配器对象的创建-->
<!--使用annotation-driven注解需要修改命名空间" -->
<!--开启mvc的注解驱动 自动给我们配置好映射器和适配器 效果等同于我们自己写的那两个映射器和适配器的bean-->
<mvc:annotation-driven/>
<!--配置处理器适配器-->
<!--
<bean class="org.springframework.web.servlet.mvc.method.annotation.RequestMappingHandlerAdapter"/>
-->
<!--配置视图解析器(视图解析器解析处理器返回的资源路径)-->
<bean class="org.springframework.web.servlet.view.InternalResourceViewResolver">
<!--指定路径的前缀和后缀 自动在处理器返回的资源路径上拼前缀和后缀-->
<property name="prefix" value="/WEB-INF"/>
<property name="suffix" value=".jsp"/>
</bean>
<!--配置静态资源放行-->
<!--mapping:url中的路径-->
<!--location:对应的路径到项目中哪个目录中去找对应的静态资源-->
<!--如果请求的资源路径是 当前项目下/js/若干层目录 说明请求的是我们js目录下的.js文件 我们拦截这样的请求 并把location置为/js 后面同理-->
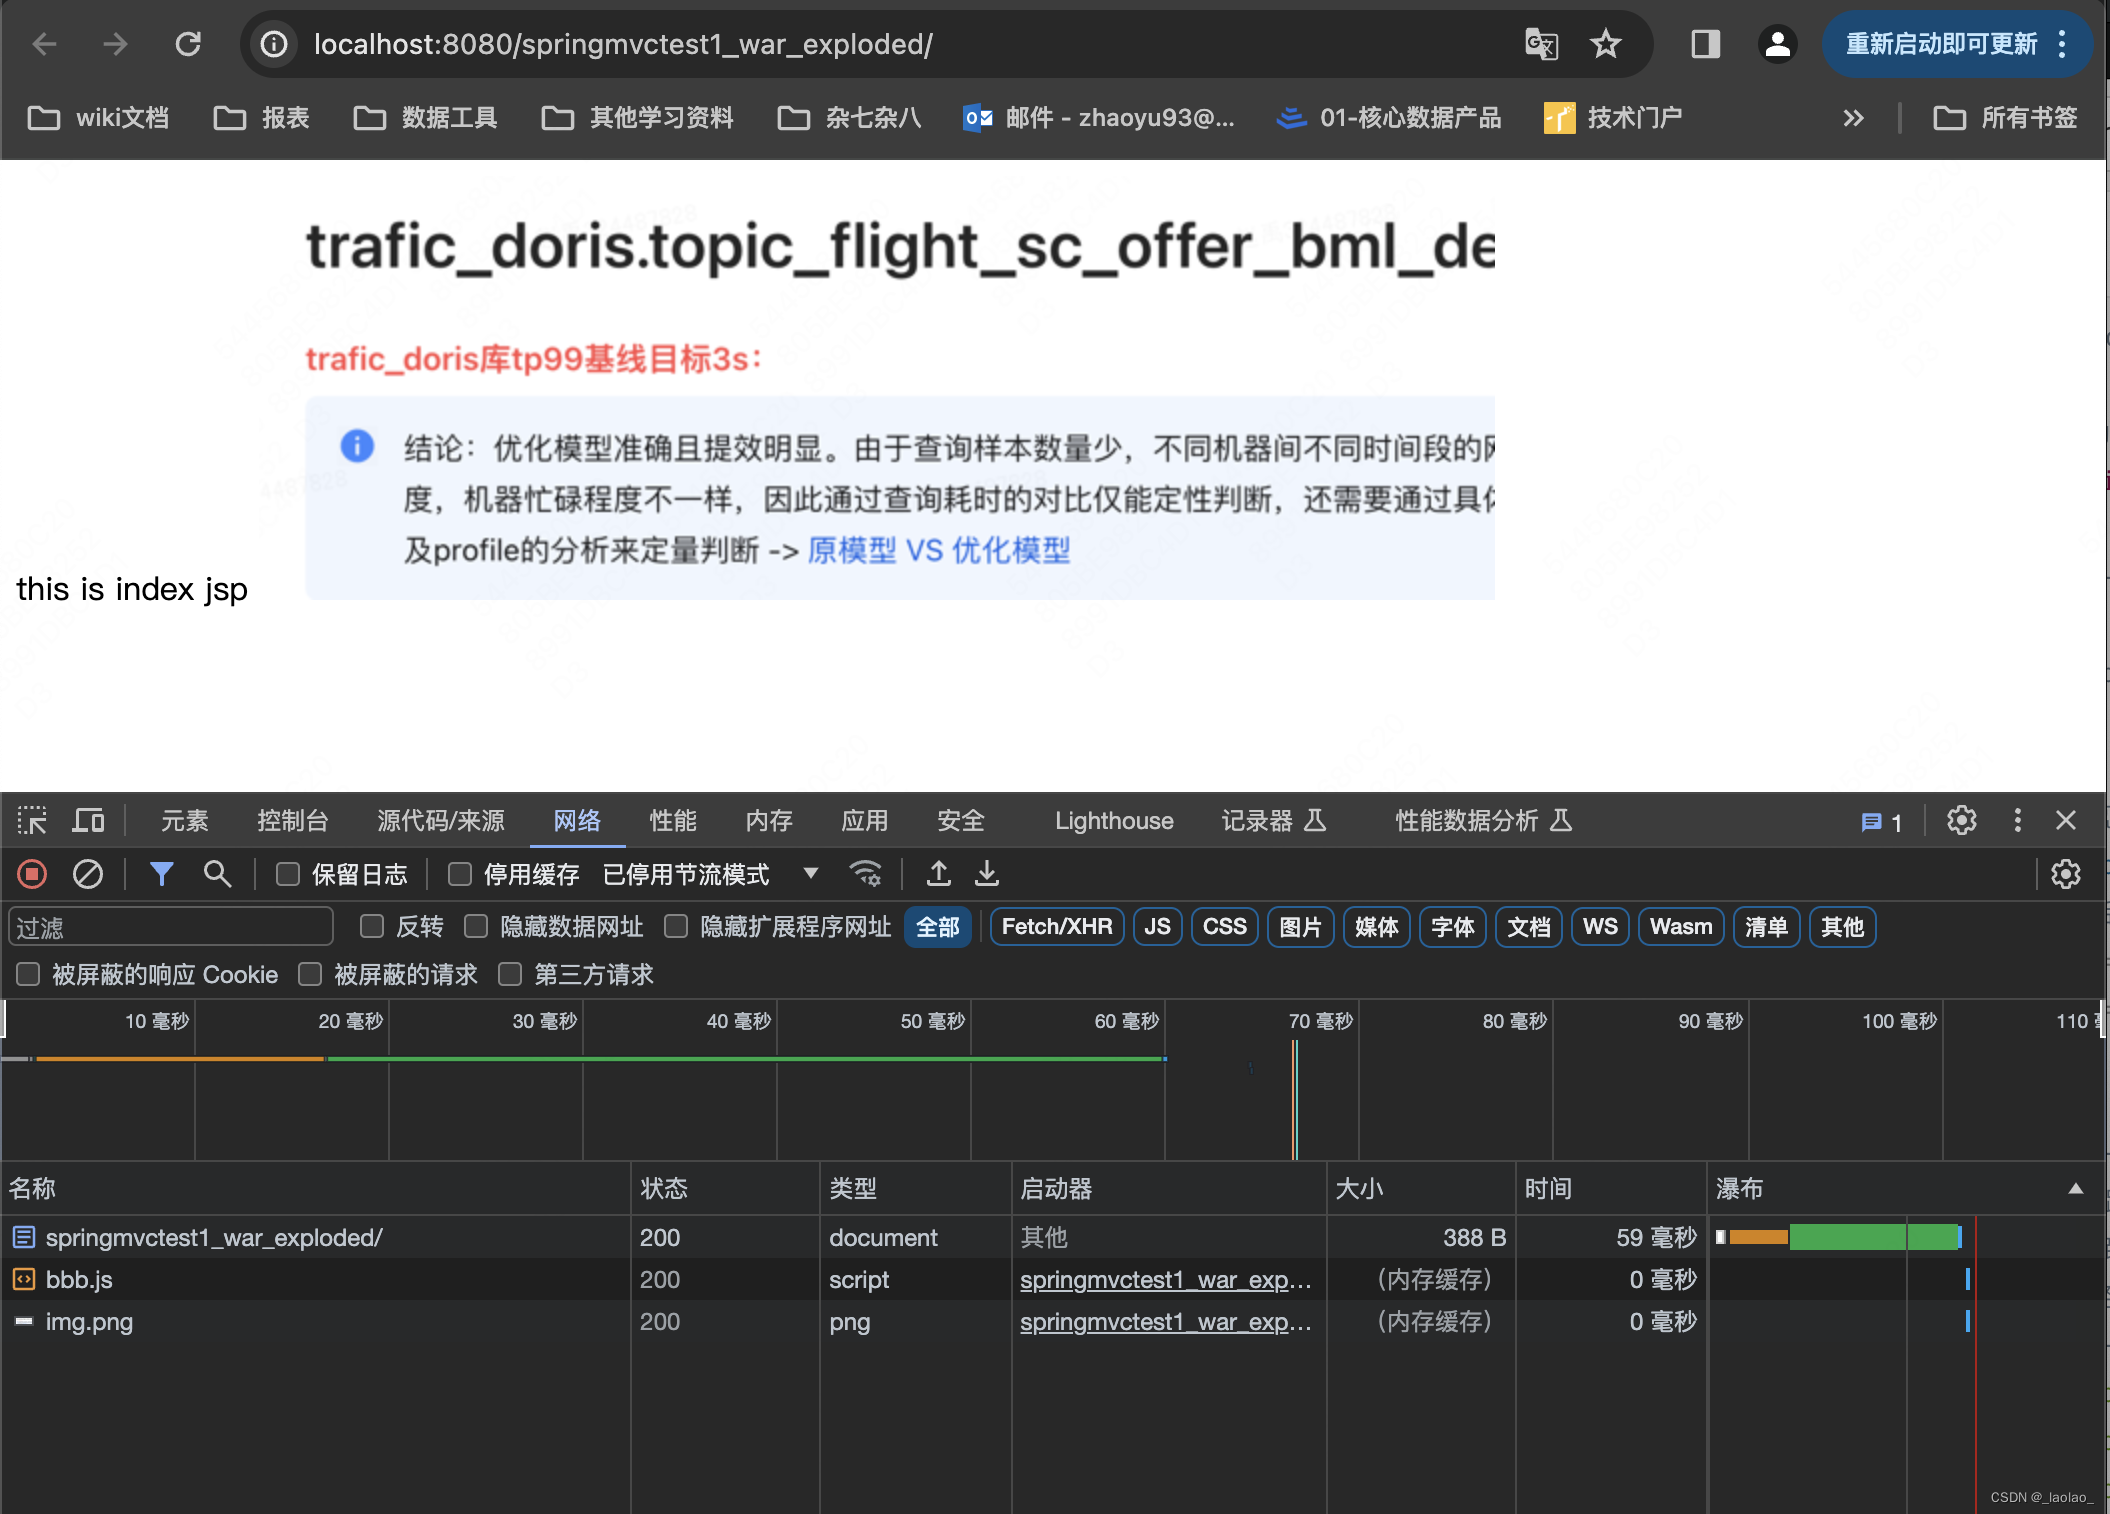
<mvc:resources mapping="/js/**" location="/js/"></mvc:resources>
<mvc:resources mapping="/css/**" location="/css/"></mvc:resources>
<mvc:resources mapping="/img/**" location="/img/"></mvc:resources>
<mvc:resources mapping="/html/**" location="/html/"></mvc:resources>
</beans>
再次请求,发现静态资源放行成功:
我们也可以不创建这么多的目录(js,css…),不写这么多的mapping,把所有的静态资源都放在一个static目录下:
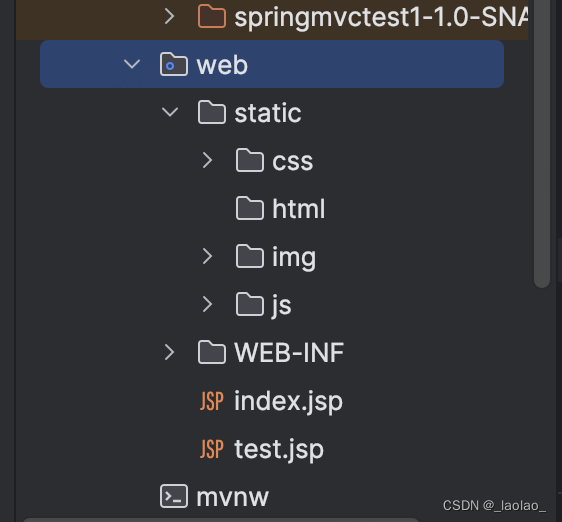
对应修改index.jsp和springmvc.xml:
<%--
  Created by IntelliJ IDEA.
  User: zhaoyu
  Date: 2023/11/16
  Time: 22:39
  To change this template use File | Settings | File Templates.
--%>
<%@ page contentType="text/html;charset=UTF-8" language="java" %>
<html>
<head>
    <title>Title</title>
    <link rel="stylesheet" type="text/css" href="static/css/aaa.css"/>
    <script src="static/js/bbb.js"></script>
</head>
<body>
    this is index jsp
    <img src="static/img/img.png"/>

</body>
</html>
springmvc.xml中的配置也可以简化为:
<?xml version="1.0" encoding="UTF-8"?>
<beans xmlns="http://www.springframework.org/schema/beans"
       xmlns:xsi="http://www.w3.org/2001/XMLSchema-instance"
       xmlns:p="http://www.springframework.org/schema/p"
       xmlns:c="http://www.springframework.org/schema/c"
       xmlns:util="http://www.springframework.org/schema/util"
       xmlns:context="http://www.springframework.org/schema/context"
       xsi:schemaLocation="http://www.springframework.org/schema/beans
       http://www.springframework.org/schema/beans/spring-beans.xsd
       http://www.springframework.org/schema/util
       http://www.springframework.org/schema/util/spring-util.xsd http://www.springframework.org/schema/context https://www.springframework.org/schema/context/spring-context.xsd
       http://www.springframework.org/schema/mvc
       http://www.springframework.org/schema/mvc/spring-mvc.xsd"
       xmlns:mvc="http://www.springframework.org/schema/mvc"

>


    <!--扫描包 springmvc依赖spring-->
    <context:component-scan base-package="com.zy.controller"></context:component-scan>

    <!--配置处理器映射器-->
    <!--springmvc默认创建的映射器和适配器的实现类对象没这两个好-->
<!--
    <bean class="org.springframework.web.servlet.mvc.method.annotation.RequestMappingHandlerMapping"/>
 -->
    <!--使用annotation-driven来简化映射器/适配器对象的创建-->
    <!--使用annotation-driven注解需要修改命名空间"  -->

    <!--开启mvc的注解驱动 自动给我们配置好映射器和适配器 效果等同于我们自己写的那两个映射器和适配器的bean-->
    <mvc:annotation-driven/>

    <!--配置处理器适配器-->
<!--
    <bean class="org.springframework.web.servlet.mvc.method.annotation.RequestMappingHandlerAdapter"/>
 -->

    <!--配置视图解析器(视图解析器解析处理器返回的资源路径)-->
    <bean class="org.springframework.web.servlet.view.InternalResourceViewResolver">
    <!--指定路径的前缀和后缀 自动在处理器返回的资源路径上拼前缀和后缀-->
        <property name="prefix" value="/WEB-INF"/>
        <property name="suffix" value=".jsp"/>
    </bean>

    <!--配置静态资源放行-->
    <!--mapping:url中的路径-->
    <!--location:对应的路径到项目中哪个目录中去找对应的静态资源-->
    <!--如果请求的资源路径是 当前项目下/js/若干层目录 说明请求的是我们js目录下的.js文件 我们拦截这样的请求 并把location置为/js 后面同理-->
<!--    <mvc:resources mapping="/js/**" location="/js/"></mvc:resources>-->
<!--    <mvc:resources mapping="/css/**" location="/css/"></mvc:resources>-->
<!--    <mvc:resources mapping="/img/**" location="/img/"></mvc:resources>-->
<!--    <mvc:resources mapping="/html/**" location="/html/"></mvc:resources>-->
    <mvc:resources mapping="/static/**" location="/static/"></mvc:resources>

</beans>
重新在tomcat中部署项目后,重新请求,依旧没有问题:
6.SpringMVC-控制请求方式
@RequestMapping:
/*
* Copyright 2002-2020 the original author or authors.
*
* Licensed under the Apache License, Version 2.0 (the "License");
* you may not use this file except in compliance with the License.
* You may obtain a copy of the License at
*
* https://www.apache.org/licenses/LICENSE-2.0
*
* Unless required by applicable law or agreed to in writing, software
* distributed under the License is distributed on an "AS IS" BASIS,
* WITHOUT WARRANTIES OR CONDITIONS OF ANY KIND, either express or implied.
* See the License for the specific language governing permissions and
* limitations under the License.
*/
package org.springframework.web.bind.annotation;
import java.lang.annotation.Documented;
import java.lang.annotation.ElementType;
import java.lang.annotation.Retention;
import java.lang.annotation.RetentionPolicy;
import java.lang.annotation.Target;
import org.springframework.core.annotation.AliasFor;
/**
* Annotation for mapping web requests onto methods in request-handling classes
* with flexible method signatures.
*
* <p>Both Spring MVC and Spring WebFlux support this annotation through a
* {@code RequestMappingHandlerMapping} and {@code RequestMappingHandlerAdapter}
* in their respective modules and package structure. For the exact list of
* supported handler method arguments and return types in each, please use the
* reference documentation links below:
* <ul>
* <li>Spring MVC
* <a href="https://docs.spring.io/spring/docs/current/spring-framework-reference/web.html#mvc-ann-arguments">Method Arguments</a>
* and
* <a href="https://docs.spring.io/spring/docs/current/spring-framework-reference/web.html#mvc-ann-return-types">Return Values</a>
* </li>
* <li>Spring WebFlux
* <a href="https://docs.spring.io/spring/docs/current/spring-framework-reference/web-reactive.html#webflux-ann-arguments">Method Arguments</a>
* and
* <a href="https://docs.spring.io/spring/docs/current/spring-framework-reference/web-reactive.html#webflux-ann-return-types">Return Values</a>
* </li>
* </ul>
*
* <p><strong>Note:</strong> This annotation can be used both at the class and
* at the method level. In most cases, at the method level applications will
* prefer to use one of the HTTP method specific variants
* {@link GetMapping @GetMapping}, {@link PostMapping @PostMapping},
* {@link PutMapping @PutMapping}, {@link DeleteMapping @DeleteMapping}, or
* {@link PatchMapping @PatchMapping}.</p>
*
* <p><b>NOTE:</b> When using controller interfaces (e.g. for AOP proxying),
* make sure to consistently put <i>all</i> your mapping annotations - such as
* {@code @RequestMapping} and {@code @SessionAttributes} - on
* the controller <i>interface</i> rather than on the implementation class.
*
* @author Juergen Hoeller
* @author Arjen Poutsma
* @author Sam Brannen
* @since 2.5
* @see GetMapping
* @see PostMapping
* @see PutMapping
* @see DeleteMapping
* @see PatchMapping
*/
@Target({ElementType.TYPE, ElementType.METHOD})
@Retention(RetentionPolicy.RUNTIME)
@Documented
@Mapping
public @interface RequestMapping {
/**
* Assign a name to this mapping.
* <p><b>Supported at the type level as well as at the method level!</b>
* When used on both levels, a combined name is derived by concatenation
* with "#" as separator.
* @see org.springframework.web.servlet.mvc.method.annotation.MvcUriComponentsBuilder
* @see org.springframework.web.servlet.handler.HandlerMethodMappingNamingStrategy
*/
String name() default "";
/**
* The primary mapping expressed by this annotation.
* <p>This is an alias for {@link #path}. For example,
* {@code @RequestMapping("/foo")} is equivalent to
* {@code @RequestMapping(path="/foo")}.
* <p><b>Supported at the type level as well as at the method level!</b>
* When used at the type level, all method-level mappings inherit
* this primary mapping, narrowing it for a specific handler method.
* <p><strong>NOTE</strong>: A handler method that is not mapped to any path
* explicitly is effectively mapped to an empty path.
*/
@AliasFor("path")
String[] value() default {};
/**
* The path mapping URIs (e.g. {@code "/profile"}).
* <p>Ant-style path patterns are also supported (e.g. {@code "/profile/**"}).
* At the method level, relative paths (e.g. {@code "edit"}) are supported
* within the primary mapping expressed at the type level.
* Path mapping URIs may contain placeholders (e.g. <code>"/${profile_path}"</code>).
* <p><b>Supported at the type level as well as at the method level!</b>
* When used at the type level, all method-level mappings inherit
* this primary mapping, narrowing it for a specific handler method.
* <p><strong>NOTE</strong>: A handler method that is not mapped to any path
* explicitly is effectively mapped to an empty path.
* @since 4.2
*/
@AliasFor("value")
String[] path() default {};
/**
* The HTTP request methods to map to, narrowing the primary mapping:
* GET, POST, HEAD, OPTIONS, PUT, PATCH, DELETE, TRACE.
* <p><b>Supported at the type level as well as at the method level!</b>
* When used at the type level, all method-level mappings inherit this
* HTTP method restriction.
*/
RequestMethod[] method() default {};
/**
* The parameters of the mapped request, narrowing the primary mapping.
* <p>Same format for any environment: a sequence of "myParam=myValue" style
* expressions, with a request only mapped if each such parameter is found
* to have the given value. Expressions can be negated by using the "!=" operator,
* as in "myParam!=myValue". "myParam" style expressions are also supported,
* with such parameters having to be present in the request (allowed to have
* any value). Finally, "!myParam" style expressions indicate that the
* specified parameter is <i>not</i> supposed to be present in the request.
* <p><b>Supported at the type level as well as at the method level!</b>
* When used at the type level, all method-level mappings inherit this
* parameter restriction.
*/
String[] params() default {};
/**
* The headers of the mapped request, narrowing the primary mapping.
* <p>Same format for any environment: a sequence of "My-Header=myValue" style
* expressions, with a request only mapped if each such header is found
* to have the given value. Expressions can be negated by using the "!=" operator,
* as in "My-Header!=myValue". "My-Header" style expressions are also supported,
* with such headers having to be present in the request (allowed to have
* any value). Finally, "!My-Header" style expressions indicate that the
* specified header is <i>not</i> supposed to be present in the request.
* <p>Also supports media type wildcards (*), for headers such as Accept
* and Content-Type. For instance,
* <pre class="code">
* @RequestMapping(value = "/something", headers = "content-type=text/*")
* </pre>
* will match requests with a Content-Type of "text/html", "text/plain", etc.
* <p><b>Supported at the type level as well as at the method level!</b>
* When used at the type level, all method-level mappings inherit this
* header restriction.
* @see org.springframework.http.MediaType
*/
String[] headers() default {};
/**
* Narrows the primary mapping by media types that can be consumed by the
* mapped handler. Consists of one or more media types one of which must
* match to the request {@code Content-Type} header. Examples:
* <pre class="code">
* consumes = "text/plain"
* consumes = {"text/plain", "application/*"}
* consumes = MediaType.TEXT_PLAIN_VALUE
* </pre>
* Expressions can be negated by using the "!" operator, as in
* "!text/plain", which matches all requests with a {@code Content-Type}
* other than "text/plain".
* <p><b>Supported at the type level as well as at the method level!</b>
* If specified at both levels, the method level consumes condition overrides
* the type level condition.
* @see org.springframework.http.MediaType
* @see javax.servlet.http.HttpServletRequest#getContentType()
*/
String[] consumes() default {};
/**
* Narrows the primary mapping by media types that can be produced by the
* mapped handler. Consists of one or more media types one of which must
* be chosen via content negotiation against the "acceptable" media types
* of the request. Typically those are extracted from the {@code "Accept"}
* header but may be derived from query parameters, or other. Examples:
* <pre class="code">
* produces = "text/plain"
* produces = {"text/plain", "application/*"}
* produces = MediaType.TEXT_PLAIN_VALUE
* produces = "text/plain;charset=UTF-8"
* </pre>
* <p>If a declared media type contains a parameter (e.g. "charset=UTF-8",
* "type=feed", "type=entry") and if a compatible media type from the request
* has that parameter too, then the parameter values must match. Otherwise
* if the media type from the request does not contain the parameter, it is
* assumed the client accepts any value.
* <p>Expressions can be negated by using the "!" operator, as in "!text/plain",
* which matches all requests with a {@code Accept} other than "text/plain".
* <p><b>Supported at the type level as well as at the method level!</b>
* If specified at both levels, the method level produces condition overrides
* the type level condition.
* @see org.springframework.http.MediaType
*/
String[] produces() default {};
}
RequestMethod枚举类:
/*
 * Copyright 2002-2015 the original author or authors.
 *
 * Licensed under the Apache License, Version 2.0 (the "License");
 * you may not use this file except in compliance with the License.
 * You may obtain a copy of the License at
 *
 *      https://www.apache.org/licenses/LICENSE-2.0
 *
 * Unless required by applicable law or agreed to in writing, software
 * distributed under the License is distributed on an "AS IS" BASIS,
 * WITHOUT WARRANTIES OR CONDITIONS OF ANY KIND, either express or implied.
 * See the License for the specific language governing permissions and
 * limitations under the License.
 */

package org.springframework.web.bind.annotation;

/**
 * Java 5 enumeration of HTTP request methods. Intended for use with the
 * {@link RequestMapping#method()} attribute of the {@link RequestMapping} annotation.
 *
 * <p>Note that, by default, {@link org.springframework.web.servlet.DispatcherServlet}
 * supports GET, HEAD, POST, PUT, PATCH and DELETE only. DispatcherServlet will
 * process TRACE and OPTIONS with the default HttpServlet behavior unless explicitly
 * told to dispatch those request types as well: Check out the "dispatchOptionsRequest"
 * and "dispatchTraceRequest" properties, switching them to "true" if necessary.
 *
 * @author Juergen Hoeller
 * @since 2.5
 * @see RequestMapping
 * @see org.springframework.web.servlet.DispatcherServlet#setDispatchOptionsRequest
 * @see org.springframework.web.servlet.DispatcherServlet#setDispatchTraceRequest
 */
public enum RequestMethod {

	GET, HEAD, POST, PUT, PATCH, DELETE, OPTIONS, TRACE

}
package com.zy.controller;/**
  * @Author:zhoayu
  * @Date:2023/11/19 10:44
  * @Description:com.zy.controller
  * @version:1.0
  */

         import org.springframework.stereotype.Controller;
         import org.springframework.web.bind.annotation.RequestMapping;
         import org.springframework.web.bind.annotation.RequestMethod;

/**
 * @ClassName MyController
 * @Description //TODO
 * @Author zhaoyu
 * @Date 2023/11/19
 */

@Controller
public class MyController {
    //value={xxx,xxx}指定多个映射路径,只给value赋值一个路径的话可以省略{}不写
    //method=xxx or method={xxx,xxx} 控制请求方式 请求方式通过枚举类RequestMethod声明
    //如果client不按method中声明的方式请求 就报Method Not Allowed(请求方法不允许)
    @RequestMapping(value={"/myCon.do","/myCon.action"},method= {RequestMethod.GET,RequestMethod.POST})
    public String test1(){
        return "test";
    }
}
7.SpringMVC-控制请求参数和请求头
@RequestMapping控制请求参数params和请求头headers:
param:表示请求中必须包含名为param的参数
!param:表示请求中不能包含名为param的参数
param=value 表示请求中包含名为param的参数,但是值必须是value 只有当请求头有这样的值时,才映射请求
param!=value 表示请求中包含名为param的参数,但是值不能是value 只有当请求头param!=value时,才映射请求
params = {“param1”,“param2=value”,“param3!=value”…} 可以将上述对于多个参数的要求写入字典
如果请求没有符合我们指定的参数要求 就会报400 Bad Request(错误的请求),如果请求头没有符合我们指定的请求头要求 就会报404 Not Found(资源未找到)
package com.zy.controller;/**
  * @Author:zhoayu
  * @Date:2023/11/19 10:44
  * @Description:com.zy.controller
  * @version:1.0
  */

         import org.springframework.stereotype.Controller;
         import org.springframework.web.bind.annotation.RequestMapping;
         import org.springframework.web.bind.annotation.RequestMethod;

/**
 * @ClassName MyController
 * @Description //TODO
 * @Author zhaoyu
 * @Date 2023/11/19
 */

@Controller
public class MyController {
    //@RequestMapping控制请求方式
    //value={xxx,xxx}指定多个映射路径,只给value赋值一个路径的话可以省略{}不写
    //method=xxx or method={xxx,xxx} 控制请求方式 请求方式通过枚举类RequestMethod声明
    //如果client不按method中声明的方式请求 就报Method Not Allowed(请求方法不允许)
    @RequestMapping(value={"/myCon.do","/myCon.action"},method= {RequestMethod.GET,RequestMethod.POST})
    public String test1(){
        return "test";
    }

    //@RequestMapping控制请求参数和请求头
    //请求参数的控制:要求请求中必须包含username参数,password参数,包含loginname参数 值不能为root
    //请求头的控制:要求请求头中的Accept-Encoding参数必须等于gzip(请求声明能接受的编码格式必须是gzip)
    @RequestMapping(value="test2",method= {RequestMethod.GET,RequestMethod.POST},
                    params={"username","loginname!=root","password"},
                    headers = {"Accept-Encoding=gzip"})
    public String test2(){
        return "test";
    }
}
8.SpringMVC-@PathVariable注解
请求url格式:地址/artifact contextPath/Controller映射路径?参数1=value1&参数2=value2…
这种不是RESTful风格的写法,我们甚至可以通过这个请求url来推断出要求请求的资源和参数(都是暴露出来的)
比如我们搜索:mashibing教育。我们并没有搜索job.jsp/job.html…只是搜索了job就查到了资源,这种就是一个RESTful风格的支持:
地址/artifact contextPath/页面名(不带拓展名)/10(参数1 id的value)/root(参数2 username的value)
@PathVariable注解:
/*
* Copyright 2002-2018 the original author or authors.
*
* Licensed under the Apache License, Version 2.0 (the "License");
* you may not use this file except in compliance with the License.
* You may obtain a copy of the License at
*
* https://www.apache.org/licenses/LICENSE-2.0
*
* Unless required by applicable law or agreed to in writing, software
* distributed under the License is distributed on an "AS IS" BASIS,
* WITHOUT WARRANTIES OR CONDITIONS OF ANY KIND, either express or implied.
* See the License for the specific language governing permissions and
* limitations under the License.
*/
package org.springframework.web.bind.annotation;
import java.lang.annotation.Documented;
import java.lang.annotation.ElementType;
import java.lang.annotation.Retention;
import java.lang.annotation.RetentionPolicy;
import java.lang.annotation.Target;
import org.springframework.core.annotation.AliasFor;
/**
* Annotation which indicates that a method parameter should be bound to a URI template
* variable. Supported for {@link RequestMapping} annotated handler methods.
*
* <p>If the method parameter is {@link java.util.Map Map<String, String>}
* then the map is populated with all path variable names and values.
*
* @author Arjen Poutsma
* @author Juergen Hoeller
* @since 3.0
* @see RequestMapping
* @see org.springframework.web.servlet.mvc.method.annotation.RequestMappingHandlerAdapter
*/
@Target(ElementType.PARAMETER)
@Retention(RetentionPolicy.RUNTIME)
@Documented
public @interface PathVariable {
/**
* Alias for {@link #name}.
*/
@AliasFor("name")
String value() default "";
/**
* The name of the path variable to bind to.
* @since 4.3.3
*/
@AliasFor("value")
String name() default "";
/**
* Whether the path variable is required.
* <p>Defaults to {@code true}, leading to an exception being thrown if the path
* variable is missing in the incoming request. Switch this to {@code false} if
* you prefer a {@code null} or Java 8 {@code java.util.Optional} in this case.
* e.g. on a {@code ModelAttribute} method which serves for different requests.
* @since 4.3.3
*/
boolean required() default true;
}
@PathVariable配合@RequestMapping使用:test3
package com.zy.controller;/**
* @Author:zhoayu
* @Date:2023/11/19 10:44
* @Description:com.zy.controller
* @version:1.0
*/
import org.springframework.stereotype.Controller;
import org.springframework.web.bind.annotation.PathVariable;
import org.springframework.web.bind.annotation.RequestMapping;
import org.springframework.web.bind.annotation.RequestMethod;
/**
* @ClassName MyController
* @Description //TODO
* @Author zhaoyu
* @Date 2023/11/19
*/
@Controller
public class MyController {
//@RequestMapping控制请求方式
//value={xxx,xxx}指定多个映射路径,只给value赋值一个路径的话可以省略{}不写
//method=xxx or method={xxx,xxx} 控制请求方式 请求方式通过枚举类RequestMethod声明
//如果client不按method中声明的方式请求 就报Method Not Allowed(请求方法不允许)
@RequestMapping(value={"/myCon.do","/myCon.action"},method= {RequestMethod.GET,RequestMethod.POST})
public String test1(){
return "test";
}
//@RequestMapping控制请求参数和请求头
//请求参数的控制:要求请求中必须包含username参数,password参数,包含loginname参数 值不能为root
//请求头的控制:要求请求头中的Accept-Encoding参数必须等于gzip(请求声明能接受的编码格式必须是gzip)
@RequestMapping(value="/test2",method= {RequestMethod.GET,RequestMethod.POST},
params={"username","loginname!=root","password"},
headers = {"Accept-Encoding=gzip"})
public String test2(){
return "test";
}
//@PathVariable注解 将用户在url中传的参数映射为对应的变量
//@RequestMapping(value="/test3/{id}/{username}") 将请求路径中的xxx/contextpath/test3/10/root解析成id和username
@RequestMapping(value="/test3/{id}/{username}",method= {RequestMethod.GET,RequestMethod.POST})
//正常来说为了避免类型转换错误的问题,一般都把参数的类型声明为String
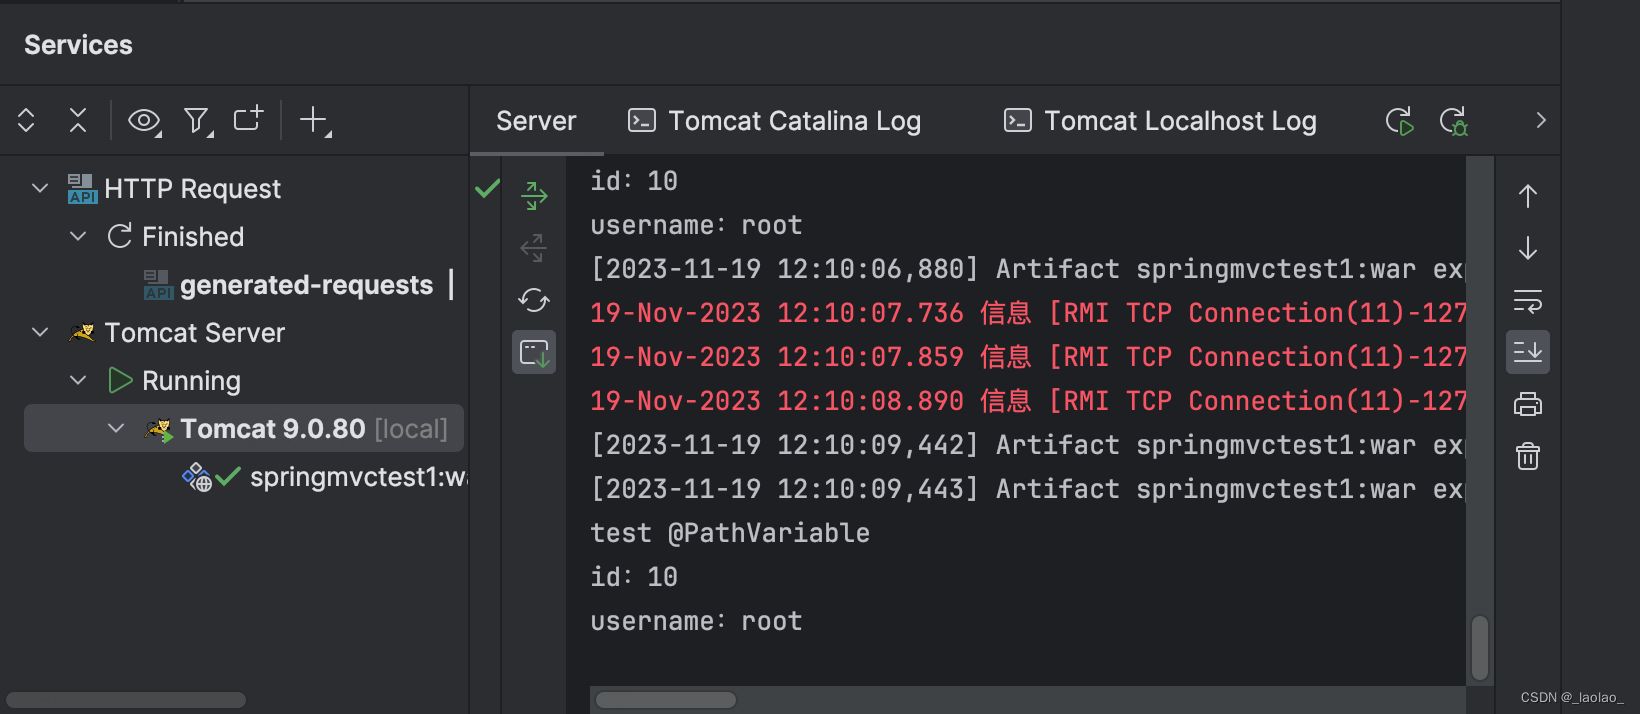
public String test3(@PathVariable("id")String id,@PathVariable("username")String username){
System.out.println("test @PathVariable");
System.out.println("id:" + id);
System.out.println("username:" + username);
return "test";
}
}
注意请求路径的写法:
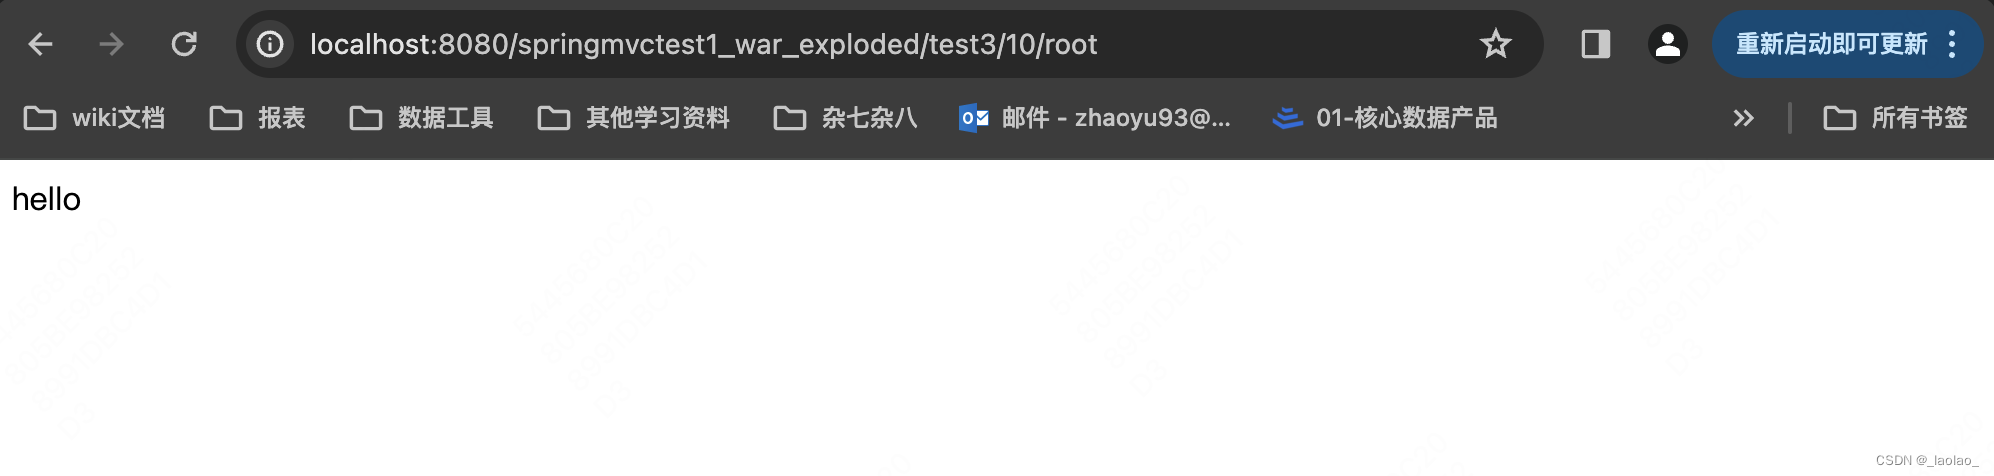
后台输出:成功拿到变量
这就是一个在URL上体现的RESTful风格的支持 通过这种RESTful风格的支持,我们可以取出url中某一段的数据并把他映射到对应的参数上
9.SpringMVC-RESTful风格
REST(一种软件架构风格):
REST即表述性状态传递(Representational State Transfer,简称REST)是Roby Fielding博士在2000年他的博士论文中提出来的一种软件架构风格。它是一种针对网络应用的设计和开发方式,可以降低开发的复杂性,提高系统的可伸缩性。
在三种主流的Web服务实现方案中,因为REST模式的Web服务于复杂的SOAP和XML-RPC对比来讲明显的更加简洁,越来越多的web服务开始采用REST风格设计和实现。例如:Amazon.com提供接近REST风格的Web服务进行图书查找,雅虎提供的Web服务也是REST风格的。
状态转移:
Http协议中,四个表示操作的动词:GET POST PUT DELETE,他们对应四种基本操作,GET用来获取资源,POST用来新建资源,PUT用来更新资源,DELETE用来删除资源
简单来说就是我们在访问资源时,可以通过四个状态表示对资源的不同操作,这四个状态表现为我们请求的四种方式:
/controller/1 HTTP GET:得到id=1的资源
/controller/1 HTTP DELETE:删除id=1的资源
/controller/1 HTTP PUT:更新id=1的资源
/controller/1 HTTP POST:增加id=1的资源
访问同一个url时,通过不同的请求方式对应到不同的controller处理单元 class TestRestFul
package com.zy.controller;/**
  * @Author:zhoayu
  * @Date:2023/11/19 10:44
  * @Description:com.zy.controller
  * @version:1.0
  */

         import org.springframework.stereotype.Controller;
         import org.springframework.web.bind.annotation.PathVariable;
         import org.springframework.web.bind.annotation.RequestMapping;
         import org.springframework.web.bind.annotation.RequestMethod;
         import org.springframework.web.bind.annotation.RestController;

/**
 * @ClassName MyController
 * @Description //TODO
 * @Author zhaoyu
 * @Date 2023/11/19
 */

@Controller
public class MyController {
    //@RequestMapping控制请求方式
    //value={xxx,xxx}指定多个映射路径,只给value赋值一个路径的话可以省略{}不写
    //method=xxx or method={xxx,xxx} 控制请求方式 请求方式通过枚举类RequestMethod声明
    //如果client不按method中声明的方式请求 就报Method Not Allowed(请求方法不允许)
    @RequestMapping(value={"/myCon.do","/myCon.action"},method= {RequestMethod.GET,RequestMethod.POST})
    public String test1(){
        return "test";
    }

    //@RequestMapping控制请求参数和请求头
    //请求参数的控制:要求请求中必须包含username参数,password参数,包含loginname参数 值不能为root
    //请求头的控制:要求请求头中的Accept-Encoding参数必须等于gzip(请求声明能接受的编码格式必须是gzip)
    @RequestMapping(value="/test2",method= {RequestMethod.GET,RequestMethod.POST},
                    params={"username","loginname!=root","password"},
                    headers = {"Accept-Encoding=gzip"})
    public String test2(){
        return "test";
    }

    //@PathVariable注解 将用户在url中传的参数映射为对应的变量
    //@RequestMapping(value="/test3/{id}/{username}") 将请求路径中的xxx/contextpath/test3/10/root解析成id和username
    @RequestMapping(value="/test3/{id}/{username}",method= {RequestMethod.GET,RequestMethod.POST})
    public String test3(@PathVariable("id")String id,@PathVariable("username")String username){
        System.out.println("test @PathVariable");
        System.out.println("id:" + id);
        System.out.println("username:" + username);
        return "test";
    }


}

//如果这里的注解从@Controller->@RestController 那么这个类下的所有处理单元返回的字符串不再会被当成是要跳转的静态资源地址,而是当成普通的字符串
//@RestController注解只能放在类上
@RestController
class TestRestFul{
    //TestRestfulController
    //GET请求
    @RequestMapping(value="/testRest/{id}",method = RequestMethod.GET)
    public String testGET(@PathVariable("id") String id) {
        System.out.println("testGET");
        System.out.println("id:" + id);
        return "test";
    }

    //POST请求
    @RequestMapping(value="/testRest/{id}",method = RequestMethod.POST)
    public String testPOST(@PathVariable("id") String id) {
        System.out.println("testGET");
        System.out.println("id:" + id);
        return "test";
    }

    //PUT请求
    @RequestMapping(value="/testRest/{id}",method = RequestMethod.PUT)
    public String testPUT(@PathVariable("id") String id) {
        System.out.println("testGET");
        System.out.println("id:" + id);
        return "test";
    }

    //DELETE请求
    @RequestMapping(value="/testRest/{id}",method = RequestMethod.DELETE)
    public String testDELETE(@PathVariable("id") String id) {
        System.out.println("testGET");
        System.out.println("id:" + id);
        return "test";
    }
}
在前端通过来进行不同HTTP操作类型的请求
GET请求:
返回对应资源,后台输出10
POST请求:
返回对应资源,后台输出10
PUT请求:
用这种方式来提交PUT/DELETE请求:
<form action="testRest/10" method="post(只有get和post)">
<%--请求中携带一个特殊的参数 _method 用该参数来表示put和delete请求--%>
	<input type="hidden" name="_method" value="put/delete">
	<intpu type="submit" value="PUT">
</from>
但是这样还不能提交put/delete请求,我们还需要在后端web.xml中配置hiddenHttpMethodFilter来把POST请求转换为PUT/DELETE请求:
web.xml配置:
<?xml version="1.0" encoding="UTF-8"?>
<web-app xmlns="http://xmlns.jcp.org/xml/ns/javaee"
         xmlns:xsi="http://www.w3.org/2001/XMLSchema-instance"
         xsi:schemaLocation="http://xmlns.jcp.org/xml/ns/javaee http://xmlns.jcp.org/xml/ns/javaee/web-app_4_0.xsd"
         version="4.0">

    <!--配置前端控制器dispatcherServelt-->
    <servlet>
        <servlet-name>dispatcherServelt</servlet-name>
        <servlet-class>org.springframework.web.servlet.DispatcherServlet</servlet-class>
        <!--利用前端控制器dispatcherServelt的初始化参数指明springmvc.xml的路径-->
        <!--如果不用init-param指定springmvc.xml的路径,springmvc会默认到WEB-INF下查找名字为${servlet-name}-servlet.xml(dispatcherServelt-servlet.xml)-->
        <init-param>
            <param-name>contextConfigLocation</param-name>
            <param-value>classpath:springmvc.xml</param-value>
        </init-param>
        <!--tomcat启动时即初始化参数(否则servlet第一次被请求时才初始化)-->
        <load-on-startup>1</load-on-startup>
    </servlet>
    <servlet-mapping>
        <servlet-name>dispatcherServelt</servlet-name>
        <!--拦截所有请求(不包含jsp,/*包含所有请求包括jsp)-->
        <url-pattern>/</url-pattern>
    </servlet-mapping>

    <!--配置过滤器 过滤器逻辑:post请求方式->put/delete请求方式-->
    <filter>
        <filter-name>hiddenHttpMethodFilter</filter-name>
        <filter-class>org.springframework.web.filter.HiddenHttpMethodFilter</filter-class>
    </filter>
    <filter-mapping>
        <filter-name>hiddenHttpMethodFilter</filter-name>
        <url-pattern>/*</url-pattern>
    </filter-mapping>

</web-app>
HiddenHttpMethodFilter的doFilterInternal方法:
	@Override
	protected void doFilterInternal(HttpServletRequest request, HttpServletResponse response, FilterChain filterChain)
			throws ServletException, IOException {

		HttpServletRequest requestToUse = request;

		if ("POST".equals(request.getMethod()) && request.getAttribute(WebUtils.ERROR_EXCEPTION_ATTRIBUTE) == null) {
			/** Default method parameter: {@code _method}. */
			//public static final String DEFAULT_METHOD_PARAM = "_method";
			//private String methodParam = DEFAULT_METHOD_PARAM;
			String paramValue = request.getParameter(this.methodParam);
			if (StringUtils.hasLength(paramValue)) {
				String method = paramValue.toUpperCase(Locale.ENGLISH);
				if (ALLOWED_METHODS.contains(method)) {
					requestToUse = new HttpMethodRequestWrapper(request, method);
				}
			}
		}

		filterChain.doFilter(requestToUse, response);
	}
doFilterInternal处理逻辑:

配置完后我们就可以进行put/delete请求了
PUT请求:
正常走testPUT方法 返回字符串
DELETE请求:
正常走testDELETE方法 返回字符串
10.SpringMVC-参数注入引入
紧耦合方式(了解):
DispatcherServlet中的service方法直接将此次请求的request对象传递给调用的单元方法即可。同时在单元方法上声明行参HttpServletRequest来接收request实参即可。
解耦合方式(熟练):
DispatcherServlet在其service方法中将请求数据根据需求从request对象中获取出来后,将数据直接传递给对应的单元方法使用。同时在单元方法上直接声明对应的行参接收请求数据即可。在单元方法上声明行参来接收请求数据时,行参名必须和请求数据的键名保持一致,DispatcherServlet会调用单元方法的行参名作为请求数据的键名获取请求数据,然后传递给单元方法。
class TestDataController:
package com.zy.controller;/**
  * @Author:zhoayu
  * @Date:2023/11/19 10:44
  * @Description:com.zy.controller
  * @version:1.0
  */

         import org.springframework.stereotype.Controller;
         import org.springframework.web.bind.annotation.*;

         import javax.servlet.http.HttpServletRequest;
         import javax.servlet.http.HttpServletResponse;

/**
 * @ClassName MyController
 * @Description //TODO
 * @Author zhaoyu
 * @Date 2023/11/19
 */

@Controller
public class MyController {
    //@RequestMapping控制请求方式
    //value={xxx,xxx}指定多个映射路径,只给value赋值一个路径的话可以省略{}不写
    //method=xxx or method={xxx,xxx} 控制请求方式 请求方式通过枚举类RequestMethod声明
    //如果client不按method中声明的方式请求 就报Method Not Allowed(请求方法不允许)
    @RequestMapping(value={"/myCon.do","/myCon.action"},method= {RequestMethod.GET,RequestMethod.POST})
    public String test1(){
        return "test";
    }

    //@RequestMapping控制请求参数和请求头
    //请求参数的控制:要求请求中必须包含username参数,password参数,包含loginname参数 值不能为root
    //请求头的控制:要求请求头中的Accept-Encoding参数必须等于gzip(请求声明能接受的编码格式必须是gzip)
    @RequestMapping(value="/test2",method= {RequestMethod.GET,RequestMethod.POST},
                    params={"username","loginname!=root","password"},
                    headers = {"Accept-Encoding=gzip"})
    public String test2(){
        return "test";
    }

    //@PathVariable注解 将用户在url中传的参数映射为对应的变量
    //@RequestMapping(value="/test3/{id}/{username}") 将请求路径中的xxx/contextpath/test3/10/root解析成id和username
    @RequestMapping(value="/test3/{id}/{username}",method= {RequestMethod.GET,RequestMethod.POST})
    public String test3(@PathVariable("id")String id,@PathVariable("username")String username){
        System.out.println("test @PathVariable");
        System.out.println("id:" + id);
        System.out.println("username:" + username);
        return "test";
    }


}

//如果这里的注解从@Controller->@RestController 那么这个类下的所有处理单元返回的字符串不再会被当成是要跳转的静态资源地址,而是当成普通的字符串
//@RestController注解只能放在类上
@RestController
class TestRestFul{
    //TestRestfulController
    //GET请求
    @RequestMapping(value="/testRest/{id}",method = RequestMethod.GET)
    public String testGET(@PathVariable("id") String id) {
        System.out.println("testGET");
        System.out.println("id:" + id);
        return "test";
    }

    //POST请求
    @RequestMapping(value="/testRest/{id}",method = RequestMethod.POST)
    public String testPOST(@PathVariable("id") String id) {
        System.out.println("testGET");
        System.out.println("id:" + id);
        return "test";
    }

    //PUT请求
    @RequestMapping(value="/testRest/{id}",method = RequestMethod.PUT)
    public String testPUT(@PathVariable("id") String id) {
        System.out.println("testGET");
        System.out.println("id:" + id);
        return "test";
    }

    //DELETE请求
    @RequestMapping(value="/testRest/{id}",method = RequestMethod.DELETE)
    public String testDELETE(@PathVariable("id") String id) {
        System.out.println("testGET");
        System.out.println("id:" + id);
        return "test";
    }
}

//使用解耦合方式进行参数注入的必须项:
//前端提交数据时 参数的变量名和处理器的参数名必须一致(也就是请求中携带的数据的参数名必须和处理器的参数名一致)比如username对username,password对password 可以;pwd对password 不可以
//ps:参数顺序可以不一致
//如果我们就想用不同的名字呢? 可以用@RequestParam注解来声明pwd实际找的是password 这样也是可以的
@RestController
class TestDataController{
    //紧耦合方式参数注入(SpringMVC和Servlet的jar包耦合度高):使用传统的HttpServletRequest对象获取参数
   @RequestMapping("/testdata1")
    public String testData1(HttpServletRequest req, HttpServletResponse resp){
        System.out.println("test data 1");
        System.out.println("username:" + req.getParameter("username"));
        System.out.println("password:" + req.getParameter("password"));
        return "test data 1 success";
    }

    //解耦合方式参数注入:利用SpringMVC框架的功能,自动转换参数,除了解耦合 在写法上也更加简单
    //SpringMVC在调用controller层的处理器单元的时候,处理器适配器会自动检测单元方法中的参数名,并尝试去request中获取,获取到以后注入到这个行参中
    //这里我们写int pwd也行,处理器适配器会做这个简单的类型转换,如果类型转换失败 就报错
    @RequestMapping("/testdata2")
    public String testData2(String username, @RequestParam("password") String pwd){
        System.out.println("test data 2");
        System.out.println("username:" + username);
        System.out.println("password:" + pwd);
        return "test data 2 success";
   }
}
11.SpringMVC-注入POJO类型参数
Person类:
package com.zy.pojo;/**
 * @Author:zhoayu
 * @Date:2023/11/19 20:12
 * @Description:com.zy.pojo
 * @version:1.0
 */

import java.io.Serializable;
import java.util.Arrays;

/**
 * @ClassName Person
 * @Description //TODO
 * @Author zhaoyu
 * @Date 2023/11/19
 */
public class Person implements Serializable {
    private String pname;
    private String gender;
    private String[] hobby;

    public Person() {
    }

    public Person(String pname, String gender, String[] hobby) {
        this.pname = pname;
        this.gender = gender;
        this.hobby = hobby;
    }

    public String getPname() {
        return pname;
    }

    public void setPname(String pname) {
        this.pname = pname;
    }

    public String getGender() {
        return gender;
    }

    public void setGender(String gender) {
        this.gender = gender;
    }

    public String[] getHobby() {
        return hobby;
    }

    public void setHobby(String[] hobby) {
        this.hobby = hobby;
    }

    @Override
    public String toString() {
        return "Person{" +
                "pname='" + pname + '\'' +
                ", gender='" + gender + '\'' +
                ", hobby=" + Arrays.toString(hobby) +
                '}';
    }
}
Controller类:
package com.zy.controller;/**
 * @Author:zhoayu
 * @Date:2023/11/19 20:01
 * @Description:com.zy.controller
 * @version:1.0
 */

import com.zy.pojo.Person;
import org.springframework.stereotype.Controller;
import org.springframework.web.bind.annotation.RequestMapping;

/**
 * @ClassName TestController2
 * @Description //TODO
 * @Author zhaoyu
 * @Date 2023/11/19
 */
@Controller
public class TestController2 {
    //注入pojo类型参数 处理器适配器完成解析request中携带的数据 注入到person对象中的过程
    @RequestMapping("/getDataByPojo")
    public String getDataByPojo(Person p){
        System.out.println(p);
        return "test";
    }
}
发起请求:http://localhost:8080/springmvctest1_war_exploded/getDataByPojo?pname=aa&gender=man&hobby=basket&hobby=football
后台输出:

使用pojo对象接收参数时的注意事项:前端提交的参数名必须和后端的pojo对象的属性名保持一致才能赋值(通过反射使用setxxx给赋值)。并且pojo对象的get/set方法也要有,否则注入失败
补充:什么是POJO类
POJO:Palin Ordinary Java Object,简单的Java对象,通常,表现为更关注属性的那些类型,例如实体类。
POJO类的规范:
所有属性应该是私有的
所有属性都应该有对应的Setter方法、Getter方法
应该生成基于所有属性的hashCode()方法、equals()方法
需要保证:如果2个对象的类型相同,且所有属性值相同,则hashCode()返回相同的结果,且equals()对比结果为true,否则,hashCode()返回不同的结果,且equals()对比结果为false
应该实现Serializable接口
可以不关心是否生成序列化版本ID
12.SpringMVC-注入Date类型参数
如果我们接收的参数类型是Date的话,此时在Spring->Date的时候,可能会报错(前端传的参数都是String类型的)
推荐:我们可以通过加@DateTimeFormat注解来指定Date的模版从而解决String2Date的问题:
    @RequestMapping("/getDataByPojo")
    public String getDataByPojo(@DateTimeFormat(pattern = "yyyy-MM-dd") Date birthdate){
        System.out.println(birthdate);
        return "test";
    }
但是当我们的参数是Person p的时候,这样就不行了 得在Person的属性birthdate上加这个注解 如:
    @RequestMapping("/getDataByPojo")
    public String getDataByPojo(Person p){
        System.out.println(birthdate);
        return "test";
    }

public class Person{
xxx
xxx
xxx
@DateTimeFormat(pattern = "yyyy-MM-dd") Date birthdate
}
@DateTimeFormat(pattern = “yyyy-MM-dd”)可以用在参数列表和类的属性上。
13.SpringMVC-注入List类型参数
新增pet类:
package com.zy.pojo;/**
 * @Author:zhoayu
 * @Date:2023/11/20 16:20
 * @Description:com.zy.pojo
 * @version:1.0
 */

import lombok.Data;

import java.io.Serializable;

/**
 * @ClassName Pet
 * @Description //TODO
 * @Author zhaoyu
 * @Date 2023/11/20
 */
@Data
public class Pet implements Serializable {
    private String petname;
    private String pettype;
}
getDataByPojo2方法:
package com.zy.controller;/**
 * @Author:zhoayu
 * @Date:2023/11/19 20:01
 * @Description:com.zy.controller
 * @version:1.0
 */

import com.zy.pojo.Person;
import com.zy.pojo.Pet;
import org.springframework.stereotype.Controller;
import org.springframework.web.bind.annotation.RequestMapping;

/**
 * @ClassName TestController2
 * @Description //TODO
 * @Author zhaoyu
 * @Date 2023/11/19
 */
@Controller
public class TestController2 {
    //注入pojo类型参数 处理器适配器完成解析request中携带的数据 注入到person对象中的过程
    @RequestMapping("/getDataByPojo")
    public String getDataByPojo(Person p){
        System.out.println(p);
        return "test";
    }

    @RequestMapping("/getDataByPojo2")
    public String getDataByPojo2(Person p, Pet pet){
        System.out.println(p);
        System.out.println(pet);
        return "test";
    }

}
请求参数:http://localhost:8080/springmvctest1_war_exploded/getDataByPojo2?pname=aa&gender=man&hobby=basket&hobby=football&petname=laolao&pettype=cat
后台输出:

但是这里要注意 如果Pet类和Person类中有重名的属性pname,前端在提交时也采用pname=xxx进行提交,那么在注入时,pname会成为一个字符串 由逗号分隔,如下:
修改Pet,使其和Person类有重名的pname属性:
@Data
public class Pet implements Serializable {
    private String pname;
    private String pettype;
}
前端提交的参数:http://localhost:8080/springmvctest1_war_exploded/getDataByPojo2?pname=aa&gender=man&hobby=basket&hobby=football&pname=laolao&pettype=cat
注意 此时后台输出的pname不是列表,而是一个由逗号分隔的字符串

接下来我们先把Pet恢复:
@Data
@NoArgsConstructor
@AllArgsConstructor
public class Pet implements Serializable {
    private String pname;
    private String pettype;
}
然后修改后端的处理器参数为List 期望能够接受前端一次传递的多次pet对象
    @RequestMapping("/getDataByPojo2")
    public String getDataByPojo2(Person p, ArrayList<Pet> pets){
        System.out.println(p);
        System.out.println(pets);
        return "test";
    }
此时需要修改前端代码为:
宠物:
<p>
宠物1: 名字:<input type="text" name="pets[0].petname" >类型:<input type="text" name="pets[0].pettype"></p>
<p>
宠物2:名字:<input type="text" name="pets[1].petname" >类型:<input type="text" name="pets[1].pettype">
</p>
注意:我们前端代码的参数名要和后端实体类的参数名一致,因为前端代码的参数名决定了请求中的参数名,而SpringMVC又是依靠参数名去完成对应实体类属性的注入的。
顺带一提,当某个类的某个属性是List类型时,通过上面的html代码也可以注入成功(前提是这个类的List类型属性名叫pets)
14.SpringMVC-注入Map类型参数
假设我们的Person类中新增一个Map类型的属性petMap
@Data
@AllArgsConstructor
@NoArgsConstructor
public class Person implements Serializable {
    private String pname;
    private String gender;
    private String[] hobby;

    private Map<String,Pet> petMap;
}
前端html修改:其中a,b分别是key值
<p>
宠物1: 名字:<input type="text" name="petMap['a'].petname" >类型:<input type="text" name="petMap['a'].pettype">
</p>
<p>
宠物2: 名字:<input type="text" name="petMap['b'].petname" >类型:<input type="text" name="petMap['b'].pettype">
/p>
前端页面:
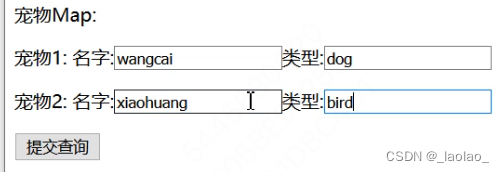
这样就能够注入Map属性了
15.SpringMVC-请求参数乱码
Tomcat 9.0.41可能已经解决了中文乱码的问题,如果有发生中文乱码问题:
GET方式乱码:在tomcat的配置文件中加入URIEncoding="utf-8"的配置

POST方式乱码:在web.xml中配置编码过滤器
<!--SpringMVC 中提供的字符编码过滤器-->
<filter>
   <filter-name>encFilter</filter-name>
    <filter-class>org.springframework.web.filter.CharacterEncodingFilter</filter-class>
    <init-param>
        <param-name>encoding</param-name>
        <param-value>utf-8</param-value>
    </init-param>
</filter>
<filter-mapping>
    <filter-name>encFilter</filter-name>
    <url-pattern>/*</url-pattern>
</filter-mapping>
16.SpringMVC-常见注解
@RequestMapping 映射路径
作用: 用于建立请求 URL 和处理请求方法之间的对应关系
出现位置:
1.类上: 请求 URL 的第一级访问目录。此处不写的话,就相当于应用的根目录。写的话需要以/开头
2.方法上: 请求 URL 的第二级访问目录
属性:
1.value:用于指定请求的 URL。它和 path 属性的作用是一样的。
2.method:用于指定请求的方式。
3.params(了解):用于指定限制请求参数的条件。它支持简单的表达式。要求请求参数的 key 和 value 必须和 配置的一模一样。
3.headers(了解):用于指定限制请求消息头的条件。
@RequestParam 参数别名
作用: 把请求中指定名称的参数给控制器中的形参赋值。
属性:
1.value:请求参数中的名称。
2.required:请求参数中是否必须提供此参数。默认值:true。表示必须提供,如果不提供将报错。
@RequestMapping("/getRequestParam")
public String getRequestParam(@RequestParam("name")String uname, @RequestParam(value="age",required=false)Integer age){
    System.out.println(username+","+age);
    return "success";
}
注意:
- 如果我们处理器的参数列表中的参数名没有在请求中的参数名中出现过,默认会注入null,所以对于int等基本数据类型,可能会因为类型转换问题而报错。
- @RequestParam注解只能放在处理器的参数列表上,不能放在类的属性上,所以接收pojo类时 必须保证pojo类中的属性名和请求中的参数名保持一致
@PathVariable restful风格的参数接收
Restful的简介 :
REST(英文:Representational State Transfer,简称 REST)restful是一种软件架构风格、设计风格,而不是标准,只是提供了一组设计原则和约束条件。它主要用于客户端和服务器交互类的软件。基于这个风格设计的软件可以更简洁,更有层次,更易于实现缓存等机制。
restful 的优点 :
它结构清晰、符合标准、易于理解、扩展方便,所以正得到越来越多网站的采用。
作用:
用于绑定 url 中的占位符。例如:请求 url 中 /delete/{id},这个{id}就是 url 占位符。 url 支持占位符是 spring3.0 之后加入的。是 springmvc 支持 rest 风格 URL 的一个重要标志。
属性:
1.value:用于指定 url 中占位符名称。
2.required:是否必须提供占位符。
@Controller
public class PathController {
    @RequestMapping("/testPathVariable/{id}/{username}")
    public String testPathVariable(@PathVariable("id") Integer id, @PathVariable("username") String username){
        System.out.println("id:"+id);
        System.out.println("username:"+username);
        System.out.println("testPathVariable1");
        return "success";
    }
}
@RequestHeader 获取请求头中的参数(默认找的都是请求体/请求行中的参数)
作用: 用于获取请求消息头。
属性:
1.value:提供消息头名称
2.required:是否必须有此消息头
@RequestMapping("/getRequestHeader")
public String getRequestHeader(@RequestHeader(value="Accept", required=false)String requestHeader){
    System.out.println(requestHeader);
    return "success";
}
@CookieValue 获得cookie
作用: 用于把指定 cookie 名称的值传入控制器方法参数。
属性:
1.value:指定 cookie 的名称。
2.required:是否必须有此 cookie
@RequestMapping("/getCookie")
public String getCookie(@CookieValue(value="JSESSIONID",required=false) String cookieValue){
    System.out.println(cookieValue);
    return "success";
}
17.SpringMVC-响应void
定义一个返回值为void的处理器:
    @RequestMapping("/testvoid")
    public void testvoid(Person p, List<Pet> pets){
        System.out.println(p);
        System.out.println(pets);
        //不做任何返回
    }
此时前端页面报错404:资源未找到,我们的请求找到了这个testvoid的controller,但是找不到/WEB-INF/void.jsp(这是之前我们在springmvc.xml中配置的视图解析器的前缀和后缀的配置)
    <!--配置视图解析器(视图解析器解析处理器返回的资源路径)-->
    <bean class="org.springframework.web.servlet.view.InternalResourceViewResolver">
    <!--指定路径的前缀和后缀 自动在处理器返回的资源路径上拼前缀和后缀-->
        <property name="prefix" value="/WEB-INF/"/>
        <property name="suffix" value=".jsp"/>
    </bean>
如果删除了视图解析器的配置 会报500:服务器内部错误,报错原因是没有返回给视图解析器任何的view。
18.SpringMVC-请求转发和重定向
1.请求转发和响应重定向 ServletAPI实现(紧耦合)
请求转发和响应重定向(和Servlet紧耦合):
@Controller
class testDispatchSender{
    //通过ServletAPI完成请求转发到index.jsp
    @RequestMapping("/changepage")
    public void changepage(HttpServletRequest request, HttpServletResponse response) throws ServletException, IOException {
        //这里跳转到静态资源 or JSP or Controller都可以
        RequestDispatcher requestDispatcher = request.getRequestDispatcher("/index.jsp");
        requestDispatcher.forward(request,response);
    }

    //通过ServletAPI完成响应重定向到index.jsp
    @RequestMapping("/redirect")
    public void redirect(HttpServletRequest request, HttpServletResponse response) throws IOException {
        //注意这里路径的写法和请求转发时有所不同 如果写绝对路径的话 需要加上项目名Application Context
        response.sendRedirect(request.getContextPath() + "/index.jsp");
    }
}
2.请求转发和响应重定向(松耦合方式实现)
forward关键字实现请求转发,redirect关键字实现响应重定向
    //通过返回字符串告诉视图DispatcherServlet要跳转的路径 从而完成请求转发
    //在路径之前放上一个 forward: 关键字 就是请求转发
    //并且如果是请求转发的话,forward:可以省略不写。跳转页面的默认实现就是请求转发
    @RequestMapping("/changepage2")
    public String changepage2() throws IOException {
        return "forward:/index.jsp";
    }

    //在路径前加上一个 redirect:/index.jsp 就是响应重定向
    //redirect不能省略
    @RequestMapping("/redirect2")
    public String redirect2() throws IOException {
    	//此时这个路径/ 就代表当前项目下,不需要项目名ApplicationContext了
        return "redirect:/index.jsp";
    }
19.SpringMVC-View视图
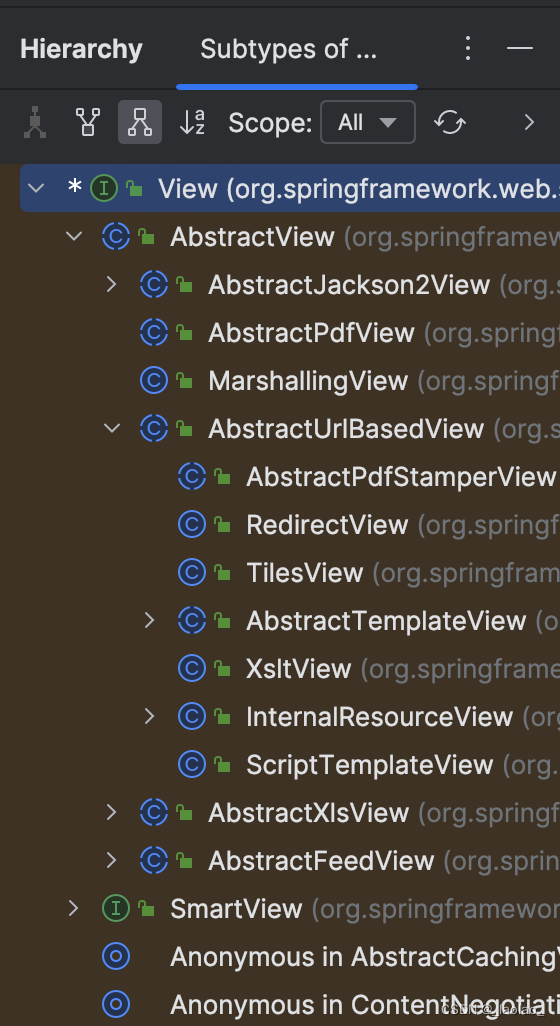
使用View视图对象完成页面跳转:
View接口的继承关系:
这里我们使用InteralResourceView和RedirectView来分别完成请求转发和响应重定向
    @RequestMapping("/view")
    public View view() throws IOException {
        //创建项目内部的视图对象 通过请求转发方式访问
        View view = new InternalResourceView("/index.jsp");
        return view;
    }

    @RequestMapping("/view2")
    public View view2(HttpServletRequest request) throws IOException {
        //通过RedirectView对象完成响应重定向,由于响应重定向可以请求的范围不止本项目,所以这里还是要补充上项目名
        View view = new RedirectView(request.getContextPath() + "/index.jsp");
        return view;
    }
20.SpringMVC-ModelAndView
我们还可以使用ModelAndView对象来完成请求转发和响应重定向:
    @RequestMapping("/modelandview")
    public ModelAndView modelandview() throws IOException {
        ModelAndView modelAndView = new ModelAndView();
        //请求转发
        //方法1:设置资源地址 modelAndView.setViewName("forward:/index.jsp");
        //方法2:设置view 两种方法均可
        modelAndView.setView(new InternalResourceView("/index.jsp"));
        return modelAndView;
    }

    @RequestMapping("/modelandview2")
    public ModelAndView modelandview2(HttpServletRequest request) throws IOException {
        ModelAndView modelAndView = new ModelAndView();
        //响应重定向
        //方法1:设置资源地址 modelAndView.setViewName("response:/index.jsp");
        //方法2:设置view 两种方法均可
        modelAndView.setView(new RedirectView(request.getContextPath() + "/index.jsp"));
        return modelAndView;
    }
后面我们可以使用ModelAndView对象完成一些作用域数据传递的能力
21.SpringMVC-响应JSON
当浏览器发起一个ajax请求给服务器,服务器调用对应的单元方法处理ajax请求。而ajax的请求在被处理后,其处理结果需要直接响应。但是目前我们在单元方法中响应ajax请求,使用的是response对象,这需要我们自己将要响应的数据转换为json字符串响应,而且比较麻烦,而我们希望在单元方法中无论是否是ajax请求,都是用return语句来完成资源的响应,要怎么办呢?
虽然我们希望使用单元方法的返回值来响应ajax请求的处理结果,但是目前DispatcherServlet的底层会将单元方法的返回值按照请求转发或者响应重定向来处理,所以就需要我们告诉DispatcherServlet:单元方法的返回值不要按照请求转发或是响应重定向处理,而是按照直接响应处理,将单元方法的返回值直接响应给浏览器。
1.导入jackjon.jar帮助我们完成字符串->json:
      <dependency>
            <groupId>com.fasterxml.jackson.core</groupId>
            <artifactId>jackson-databind</artifactId>
            <version>2.12.1</version>
      </dependency>
2.使用@ResponseBody注解完成向浏览器返回json字符串
package com.zy.controller;/**
* @Author:zhoayu
* @Date:2023/11/20 19:53
* @Description:com.zy.controller
* @version:1.0
*/
import com.fasterxml.jackson.core.JsonProcessingException;
import com.fasterxml.jackson.databind.ObjectMapper;
import com.zy.pojo.Pet;
import org.junit.Test;
import org.springframework.stereotype.Controller;
import org.springframework.web.bind.annotation.RequestMapping;
import org.springframework.web.bind.annotation.ResponseBody;
/**
* @ClassName TestJSON
* @Description //TODO
* @Author zhaoyu
* @Date 2023/11/20
*/
@Controller
public class TestJSON {
@Test
public void testjson() throws JsonProcessingException {
//对象->json字符串
Pet pet = new Pet("laolao","cat");
ObjectMapper om = new ObjectMapper();
String jsonstring = om.writeValueAsString(pet);
System.out.println(jsonstring);
//输出{"petname":"laolao","pettype":"cat"}
}
//@ResponseBody注解的作用:
//1.方法的返回值不再作为路径,而是直接作为返回给浏览器的数据
//2.可以将方法的返回的数据自动转换为json字符串 它的底层就是通过jackson包中的ObjectMapper对象完成的转换
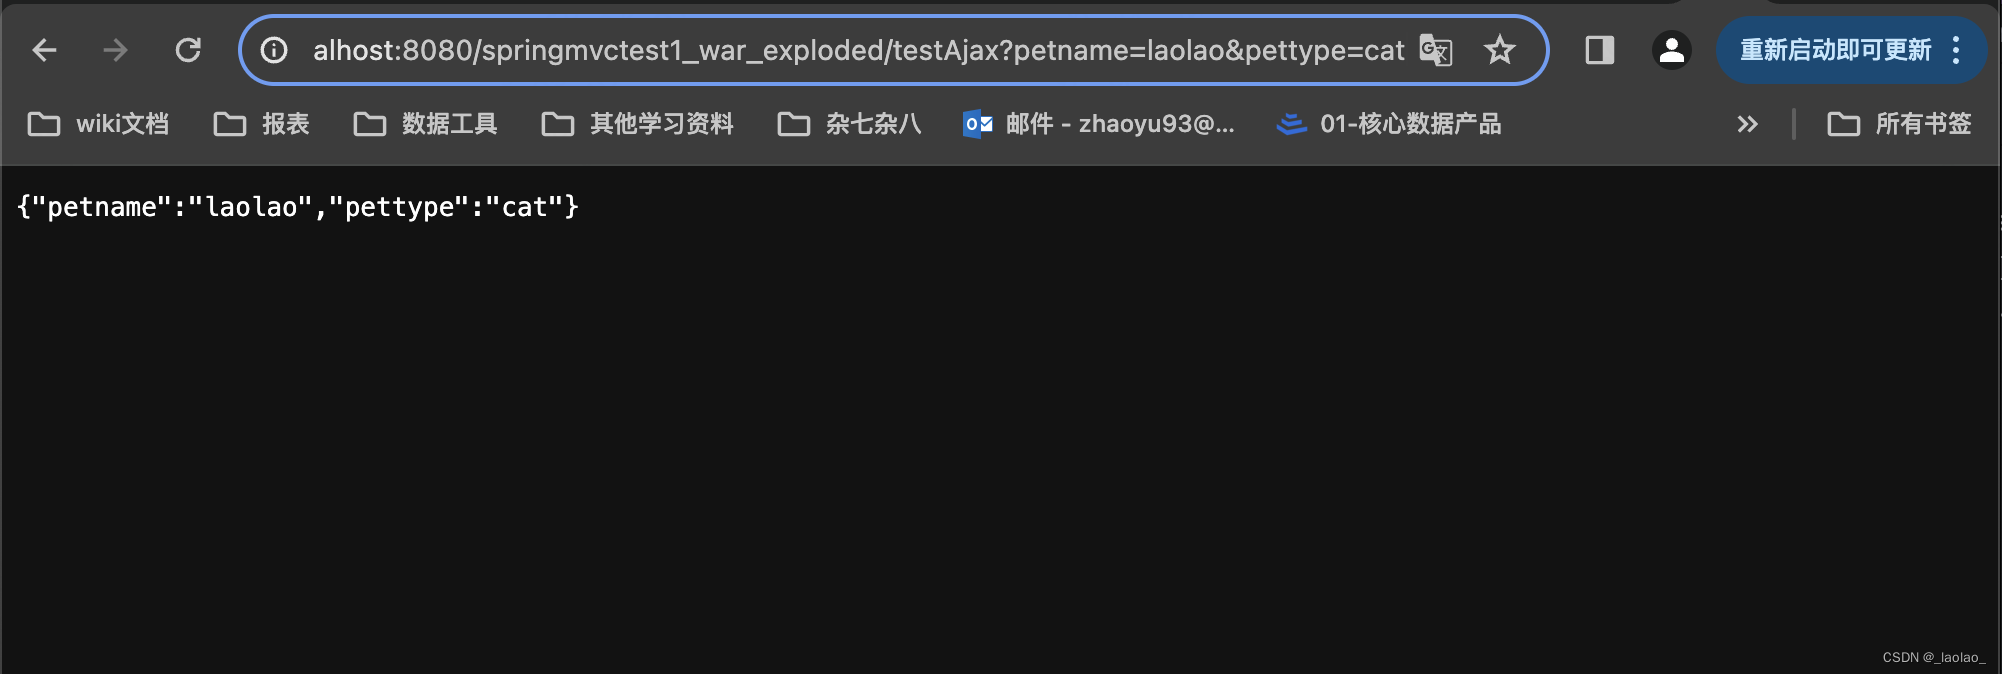
@ResponseBody
@RequestMapping("/testAjax")
public Pet testAjax(String petname,String pettype){
Pet pet = new Pet(petname,pettype);
//返回值被DispatcherServlet接收,DispatcherServlet默认把它接收当作路径进行解析处理,但是我们希望把对象直接响应给浏览器
return pet;
}
}
前端请求一下页面 看到的是一个json对象 后续浏览器在处理这个返回值的时候,自动就会把它当成json对象了,而不再需要Json.parse(String s)解析字符串->json对象。这就是@ResponseBody的强大之处:
ajax异步请求testAjax处理器:
ajax.html
<head>
    <meta charset="UTF-8">
    <title>Title</title>
    <script src="js/jquery.min.js"></script>
    <script>
        $(function(){
            $("#btn").click(function(){
                $.get("testAjax",{petname:"laolao",pettype:"cat"},function(data){
                	//响应成功的回调函数 testAjax处理器返回的是JSON对象 注意如果想要请求ajax.html成功,由于其中引入了js/jquery.min.js 要配置DispatcherServlet对静态资源的放行
                    console.log(data) //打印 Object {petname:"laolao",pettype:"cat"} 获得json对象
                    console.log(data.petname) // laolao
                    console.log(data.pettype) // cat
                })
            })
        })
    </script>
</head>
<body>
<input id="btn" type="button" value="testAjax">
</body>
</html>
3.关于@RestController
@RestController注解相当于是@Controller+@ResponseBody两个注解的结合,如果类上加上了@RestController,返回json数据不需要在方法前加@ResponseBody注解了,但是使用@ResponseController这个注解,粒度是整个类,所以不能跳转到jsp、html等资源。所有的返回值都会被当作json字符串对象解析返回给前端,相对于@Controller+@ResponseBody组合的用法比较方便,但是没有后者灵活
21.SpringMVC-SSM整合
登陆案例开发:
1.准备数据库表格
在本地mysql服务(localhost:3306)创建ssm数据库,并在ssm数据库下创建userinfo表用来存储用户名和密码:

2.搭建maven项目,准备项目目录
准备一个ssmtest的web项目
3.导入依赖
在pom.xml中导入依赖
4.准备配置文件
准备log4j2.xml,jdbc.properties,springmvc.xml、applicationContext.xml、web.xml
log4j2.xml:
<?xml version="1.0" encoding="UTF-8"?>
<Configuration status="DEBUG">
    <Appenders>
        <Console name="Console" target="SYSTEM_ERR">
            <PatternLayout pattern="%d{YYYY-MM-dd HH:mm:ss} [%t] %-5p %c{1}:%L - %msg%n" />
        </Console>
    </Appenders>
    <Loggers>
        <Root level="DEBUG">
            <AppenderRef ref="Console" />
        </Root>
    </Loggers>
</Configuration>
jdbc.properties:
这里记得如果windows环境用driver作别名的话,会出现一个环境变量冲突的问题。
jdbc_driver=com.mysql.cj.jdbc.Driver
jdbc_url=jdbc:mysql://127.0.0.1:3306/ssm?useSSL=false&useUnicode=true&characterEncoding=UTF-8&serverTimezone=Asia/Shanghai
jdbc_username=root
jdbc_password=root
springmvc.xml:
<?xml version="1.0" encoding="UTF-8"?>
<beans xmlns="http://www.springframework.org/schema/beans"
       xmlns:xsi="http://www.w3.org/2001/XMLSchema-instance"
       xmlns:p="http://www.springframework.org/schema/p"
       xmlns:c="http://www.springframework.org/schema/c"
       xmlns:util="http://www.springframework.org/schema/util"
       xmlns:context="http://www.springframework.org/schema/context"
       xmlns:aop="http://www.springframework.org/schema/aop"
       xmlns:tx="http://www.springframework.org/schema/tx"
       xmlns:mvc="http://www.springframework.org/schema/mvc"
       xsi:schemaLocation="
       http://www.springframework.org/schema/beans
       http://www.springframework.org/schema/beans/spring-beans.xsd
       http://www.springframework.org/schema/util
       http://www.springframework.org/schema/util/spring-util.xsd
       http://www.springframework.org/schema/context
       http://www.springframework.org/schema/context/spring-context.xsd
       http://www.springframework.org/schema/aop
       http://www.springframework.org/schema/aop/spring-aop.xsd
       http://www.springframework.org/schema/tx
       http://www.springframework.org/schema/tx/spring-tx.xsd
       http://www.springframework.org/schema/mvc
       http://www.springframework.org/schema/mvc/spring-mvc.xsd
">
    <!--扫描controller-->
    <context:component-scan base-package="controller"></context:component-scan>

    <!--这里配置三大组件:处理器映射器、处理器适配器、视图解析器-->
    <mvc:annotation-driven />

    <!--视图解析器-->
    <bean class="org.springframework.web.servlet.view.InternalResourceViewResolver">
    <!--配置前缀后缀-->
    </bean>

    <!--配置静态资源放行-->
    <!--<mvc:resources mapping="/js/**" location="/js/"></mvc:resources>-->
    <!--<mvc:resources mapping="/css/**" location="/css/"></mvc:resources>-->
    <!--<mvc:resources mapping="/img/**" location="/img/"></mvc:resources>-->
    <!--<mvc:resources mapping="/static/**" location="/static/"></mvc:resources>-->

</beans>
applicationContext.xml:
<?xml version="1.0" encoding="UTF-8"?>
<beans xmlns="http://www.springframework.org/schema/beans"
       xmlns:xsi="http://www.w3.org/2001/XMLSchema-instance"
       xmlns:p="http://www.springframework.org/schema/p"
       xmlns:c="http://www.springframework.org/schema/c"
       xmlns:util="http://www.springframework.org/schema/util"
       xmlns:context="http://www.springframework.org/schema/context"
       xmlns:aop="http://www.springframework.org/schema/aop"
       xmlns:tx="http://www.springframework.org/schema/tx"
       xmlns:mvc="http://www.springframework.org/schema/mvc"
       xsi:schemaLocation="
       http://www.springframework.org/schema/beans
       http://www.springframework.org/schema/beans/spring-beans.xsd
       http://www.springframework.org/schema/util
       http://www.springframework.org/schema/util/spring-util.xsd
       http://www.springframework.org/schema/context
       http://www.springframework.org/schema/context/spring-context.xsd
       http://www.springframework.org/schema/aop
       http://www.springframework.org/schema/aop/spring-aop.xsd
       http://www.springframework.org/schema/tx
       http://www.springframework.org/schema/tx/spring-tx.xsd
       http://www.springframework.org/schema/mvc
       http://www.springframework.org/schema/mvc/spring-mvc.xsd
">
    <!--加载外部属性文件-->
    <context:property-placeholder location="classpath:jdbc.properties"></context:property-placeholder>
    <!--仅仅扫描service层-->
    <context:component-scan base-package="service"></context:component-scan>
    <!--配置德鲁伊数据源-->
    <bean id="dataSource" class="com.alibaba.druid.pool.DruidDataSource">
        <property name="username" value="${jdbc_username}"></property>
        <property name="password" value="${jdbc_password}"></property>
        <property name="url" value="${jdbc_url}"></property>
        <property name="driverClassName" value="${jdbc_driver}"></property>
    </bean>
    <!--配置sqlSessionFactory-->
    <bean id="factory" class="org.mybatis.spring.SqlSessionFactoryBean">
        <property name="dataSource"  ref="dataSource"></property>
        <property name="typeAliasesPackage" value="pojo"></property>
    </bean>
    <!--配置MapperScanner 扫描mapper.xml 和接口-->
    <bean class="org.mybatis.spring.mapper.MapperScannerConfigurer">
        <!--配置SQLSessionFactory-->
        <property name="sqlSessionFactoryBeanName" value="factory"></property>
        <!--扫描mapper-->
        <property name="basePackage" value="mapper"></property>
    </bean>
    <!--配置事务管理器-->
    <bean id="transactionManager" class="org.springframework.jdbc.datasource.DataSourceTransactionManager">
        <property name="dataSource" ref="dataSource"></property>
    </bean>
    <!--开启事务注解-->
    <tx:annotation-driven  transaction-manager="transactionManager"/>


</beans>
web.xml
<?xml version="1.0" encoding="UTF-8"?>
<web-app xmlns="http://xmlns.jcp.org/xml/ns/javaee"
         xmlns:xsi="http://www.w3.org/2001/XMLSchema-instance"
         xsi:schemaLocation="http://xmlns.jcp.org/xml/ns/javaee http://xmlns.jcp.org/xml/ns/javaee/web-app_4_0.xsd"
         version="4.0">

    <!--DispatcherServlet-->
    <servlet>
        <servlet-name>dispatcherServlet</servlet-name>
        <servlet-class>org.springframework.web.servlet.DispatcherServlet</servlet-class>
        <init-param>
            <param-name>contextConfigLocation</param-name>
            <param-value>classpath:springmvc.xml</param-value>
        </init-param>
    </servlet>
    <servlet-mapping>
        <servlet-name>dispatcherServlet</servlet-name>
        <url-pattern>/</url-pattern>
    </servlet-mapping>

    <!--CharacterEncodingFilter-->
    <filter>
        <filter-name>characterEncodingFilter</filter-name>
        <filter-class>org.springframework.web.filter.CharacterEncodingFilter</filter-class>
        <init-param>
            <param-name>encoding</param-name>
            <param-value>UTF-8</param-value>
        </init-param>
    </filter>
    <filter-mapping>
        <filter-name>characterEncodingFilter</filter-name>
        <url-pattern>/*</url-pattern>
    </filter-mapping>

    <!--通过向servletContext中添加spring核心配置文件的位置来创建实例放到容器中-->
    <context-param>
        <param-name>contextConfigLocation</param-name>
        <param-value>classpath:applicationContext.xml</param-value>
    </context-param>

    <!--spring核心容器配置-->
    <!--通过监听器监听javaweb项目中的ServletContext对象,当ServletContext对象创建的时候,就创建一个spring容器并放入ServletContext中-->
    <listener>
        <listener-class>org.springframework.web.context.ContextLoaderListener</listener-class>
    </listener>

</web-app>
要配置的东西非常多,后续springboot可以帮忙简化配置
5.开发业务代码
6.ssm整合的好处
第一次搭建ssm整合项目时,要配置多个配置文件会比较麻烦。但是后续开发都会比较简单,在mapper、service、controller中一顿写就行了。
22.作用域传递数据
JAVAEE的四个域对象:
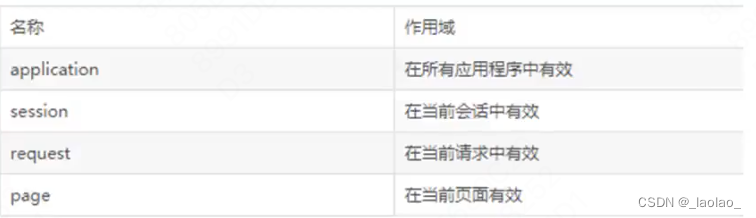
PageContext对象:
作用域范围:当前jsp页面
request对象:
作用域范围:一次请求
作用:解决了一次请求内的数据共享问题
session对象:
作用域范围:一次会话。cookie or session一方失效,即是一次会话的结束。只要是在同一个会话中,多次请求都可以获取到同一个session对象。
作用:解决了一个用户不同请求的数据共享问题
application(ServletContext)对象:
作用域范围:同整个web项目的生命周期
特点:一个项目只有一个ServletContext对象,在tomcat服务器启动的时候完成初始化创建,生命周期同web项目的创建关闭。
作用:解决了不同用户间的数据共享问题
利用域对象在不同资源间传递数据:(传统方式)
package com.zy.controller;/**
 * @Author:zhoayu
 * @Date:2023/11/25 20:25
 * @Description:com.zy.controller
 * @version:1.0
 */

import org.springframework.stereotype.Controller;
import org.springframework.web.bind.annotation.RequestMapping;

import javax.servlet.ServletContext;
import javax.servlet.http.HttpServletRequest;
import javax.servlet.http.HttpSession;

/**
 * @ClassName TestControllerDomain
 * @Description //TODO
 * @Author zhaoyu
 * @Date 2023/11/25
 */
@Controller
public class TestControllerDomain {
    //定义一个处理单元向三个域对象中放入数据
    @RequestMapping("/setdata")
    public String setData(HttpServletRequest request){
        HttpSession session = request.getSession();
        ServletContext servletContext = request.getServletContext();

        //向三个域对象中放入数据
        request.setAttribute("reqmessage","1");
        session.setAttribute("sessmessage","2");
        servletContext.setAttribute("appmessage","3");

        //forward跳转到WEB-INF/test.jsp
        return "test";
    }


}
<%@ page import="java.io.PrintWriter" %><%--
  Created by IntelliJ IDEA.
  User: zhaoyu
  Date: 2023/11/14
  Time: 00:01
  To change this template use File | Settings | File Templates.
--%>
<%@ page contentType="text/html;charset=UTF-8" language="java" %>
<html>
<head>
    <title>Hello</title>
</head>
<body>
hello

<%
    PrintWriter writer = response.getWriter();
    writer.write((String)request.getAttribute("reqmessage"));
    writer.write((String)session.getAttribute("sessmessage"));
    writer.write((String)request.getServletContext().getAttribute("appmessage"));
%>
</body>
</html>
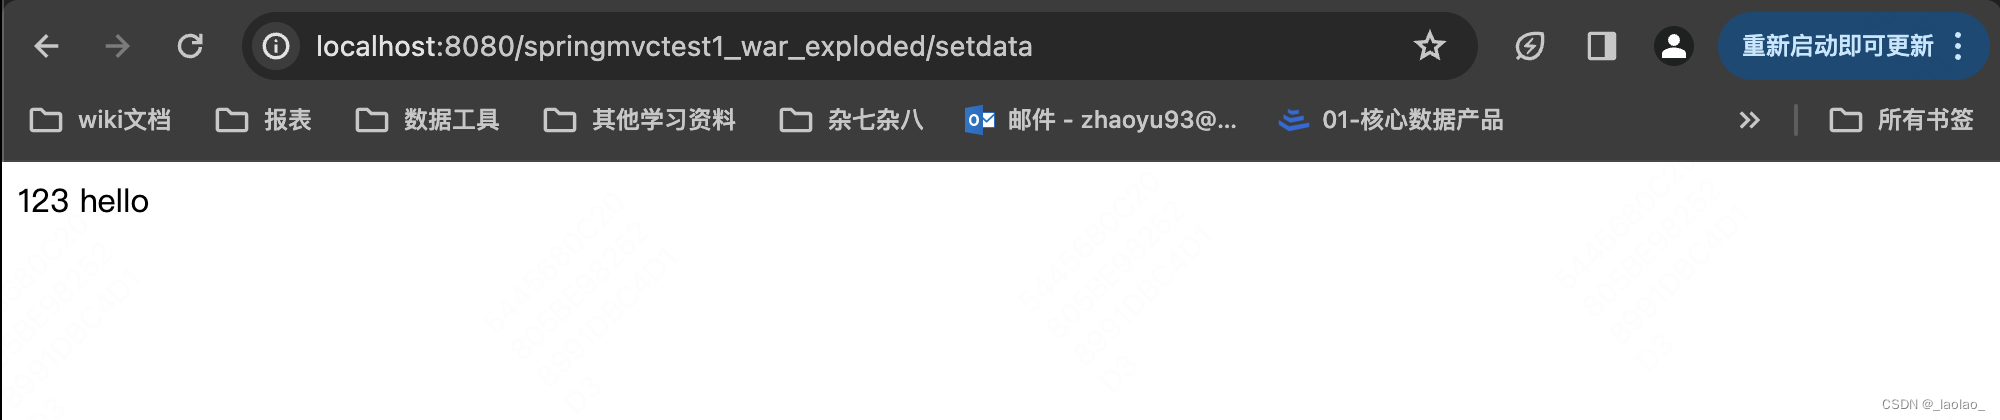
利用SpringMVC提供的Model来传递数据:
    //使用model对象传递数据
    @RequestMapping("/setdata2")
    public String setData2(Model model){
        //model:对request域传递数据的封装,在test.jsp中可以用request.getAttribute("modelmessage")获得数据
        //使用model对象传递数据可以降低controller和Servlet之间的耦合度
        model.addAttribute("modelmessage","4");

        //因为model传递数据的范围是请求域
        //所有如果用redirect:test的话,就获取不到使用model设置的数据了
        //但是重定向下,model中携带的数据会拼接在url后已请求参数的方式请求目标组件
        return "test";
    }
利用SpringMVC提供的ModelAndView来传递数据:
    //使用ModelAndView传递数据
    //Model:数据
    //View:视图
    @RequestMapping("/setdata3")
    public ModelAndView setData3(){
        ModelAndView modelAndView = new ModelAndView();

        //也是往request域中放入数据,在同一个request域中可以获得数据
        Map<String, Object> model = modelAndView.getModel();
        model.put("mvmessage","5");

        //设置视图
        //这里如果设置redeirct响应重定向方式请求,和上面的Model一样,也会把modelandview中的数据以请求参数的形式拼在url后面(只有String类型的数据会拼)
        modelAndView.setViewName("forward:test");

        return modelAndView;
    }
23.SpringMVC-文件上传
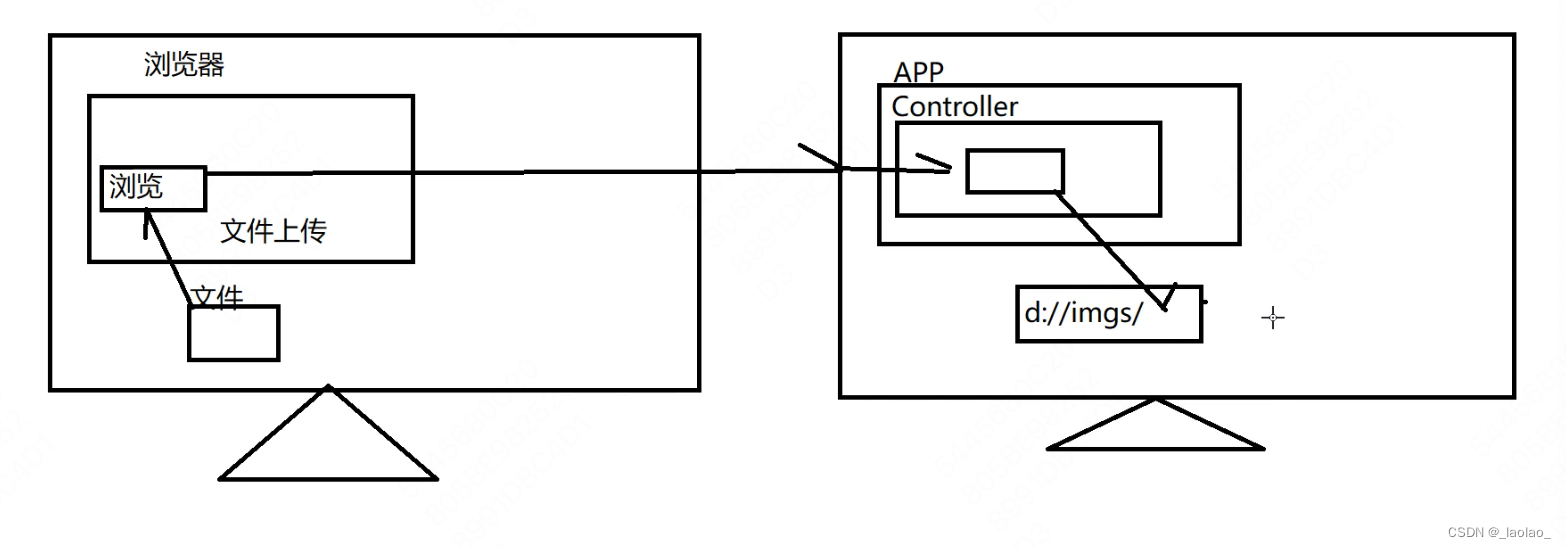
案例:游戏用户注册页面
1.准备用户表ssm.users

2.项目搭建
还是用之前的ssmtest
3.准备login.jsp登录页面


 416
416


 被折叠的 条评论
为什么被折叠?
被折叠的 条评论
为什么被折叠?
 到【灌水乐园】发言


