


一. 前提
要实现鼠标对控件的拖拽移动,首先必须知道下面几点:
-
WPF中的鼠标左键按下、鼠标移动事件,有时候通过XAML界面添加的时候并有没有作用,我们要通过触发事件的元素和要监听的路由事件绑定来进行手动触发;
-
如果在移动时候要持续修改控件的属性,我们通过改变RenderTransform来修改呈现,而不是直接修改控件本身的属性(会卡);
-
通过VisualBrush来填充Rectangle,来实现鼠标拖动控件所形成的影子;
-
通过创建一个带有目标依赖属性的Button的子类,来将有关数据放入Button的子类中;
-
并不需要通过 UIElement.CaptureMouse() 和 UIElement.ReleaseMouseCapture()来对鼠标进行捕获和释放;
-
屏蔽一些键盘热键导致鼠标抬起的消息失去的问题,如:Alt + Ctrl + A 截图等等的热键的影响;
二. 过程
这里以按钮的拖动,分析一下这个过程:
-
首先在点击按钮(鼠标左键按下),我们以按钮为原型创建一个 “影子” ;
-
在鼠标按住左键拖动的时候,实现对这个 “影子” 的拖动跟随效果;
-
最后,在放开鼠标(鼠标左边抬起)时,将原来的按钮的位置直接移动到抬起时的位置并去除跟随的 “影子”;
三. 代码
这边的代码进行了封装,如过要看没有封装的版本请见示例工程(下面可以下载)
- DragButton 类,继承自 Button 类
/// <summary>
/// 拖拽按钮
/// </summary>
public class DragButton : Button
{
    //依赖属性
    private static readonly DependencyProperty IsDragProperty = DependencyProperty.Register("IsDrag", typeof(Boolean), typeof(DragButton));
    private static readonly DependencyProperty CurrentPosProperty = DependencyProperty.Register("CurrentPos", typeof(Point), typeof(DragButton));
    private static readonly DependencyProperty ClickPosProperty = DependencyProperty.Register("ClickPos", typeof(Point), typeof(DragButton));
    private static readonly DependencyProperty RectProperty = DependencyProperty.Register("Rect", typeof(Rectangle), typeof(DragButton));

    /// <summary>
    /// 是否拖拽
    /// </summary>
    public bool IsDrag
    {
        get
        {
            return (bool)this.GetValue(IsDragProperty);
        }
        set
        {
            this.SetValue(IsDragProperty, value);
        }
    }

    /// <summary>
    /// 按钮的定位位置
    /// 按钮左上角的位置
    /// </summary>
    public Point CurrentPos
    {
        get
        {
            //第一次获取如果是没有被初始化,那么吧按钮的坐标初始化过来
            Point p = (Point)this.GetValue(CurrentPosProperty);
            if (p.X == 0 && p.Y == 0)
            {
                p.X \= Canvas.GetLeft(this);
                p.Y \= Canvas.GetTop(this);
            }
            return p;
        }
        set
        {
            this.SetValue(CurrentPosProperty, value);
        }
    }

    /// <summary>
    /// 当前鼠标点在按钮上的位置
    /// </summary>
    public Point ClickPos
    {
        get
        {
            return (Point)this.GetValue(ClickPosProperty);
        }
        set
        {
            this.SetValue(ClickPosProperty, value);
        }
    }

    /// <summary>
    /// 虚拟出来的按钮的显示矩形
    /// </summary>
    public Rectangle Rect
    {
        get
        {
            if (this.GetValue(RectProperty) == null)
            {
                //创建VisualBrush
                VisualBrush visualBrush = new VisualBrush(this);
                Rectangle rect \= new Rectangle() { Width = this.ActualWidth, Height = this.ActualHeight, Fill = visualBrush, Name = "rect" };

                //设置值
                Canvas.SetLeft(rect, Canvas.GetLeft(this));
                Canvas.SetTop(rect, Canvas.GetTop(this));

                rect.RenderTransform \= new TranslateTransform(0d, 0d);
                rect.Opacity \= 0.6;

                this.SetValue(RectProperty, rect);
            }

            return (Rectangle)this.GetValue(RectProperty);
        }
    }
}
- MainWindow的XAML的部分代码
<Window x:Class\="Demo.MainWindow"
        xmlns\="http://schemas.microsoft.com/winfx/2006/xaml/presentation"
        xmlns:x\="http://schemas.microsoft.com/winfx/2006/xaml"
        xmlns:d\="http://schemas.microsoft.com/expression/blend/2008"
        xmlns:mc\="http://schemas.openxmlformats.org/markup-compatibility/2006"
        xmlns:local\="clr-namespace:Demo"
        mc:Ignorable\="d"
        Title\="MainWindow" Height\="350" Width\="525"
        x:Name\="mainWindow"\>
    <Canvas x:Name\="canvas" Background\="Aqua" Margin\="0,0,0,0"\>
        <local:DragButton x:Name\="btn" Canvas.Left\="173" Canvas.Top\="64" Width\="80" Height\="30" Content\="拖拽"/>
        <local:DragButton x:Name\="btn1" Canvas.Left\="94" Canvas.Top\="166" Width\="80" Height\="30" Content\="拖拽"/>
    </Canvas\>
</Window\>
- MainWindow的C#后台部分代码
/// <summary>
/// MainWindow.xaml 的交互逻辑
/// </summary>
public partial class MainWindow : Window
{
    public MainWindow()
    {
        InitializeComponent();

        //添加事件
        this.btn.AddHandler(Canvas.MouseLeftButtonDownEvent, new MouseButtonEventHandler(this.MouseButtonLeftDown), true);
        this.btn1.AddHandler(Canvas.MouseLeftButtonDownEvent, new MouseButtonEventHandler(this.MouseButtonLeftDown), true);

        //防止一些热键的影响
        this.AddHandler(Window.KeyDownEvent, new RoutedEventHandler(this.OtherKeyDownEvent), true);
    }

    /// <summary>
    /// 区域移动事件
    /// </summary>
    private void Canvas\_MouseMove(object sender, MouseEventArgs e)
    {
        DragButton dragButton \= sender as DragButton;
        if (dragButton != null && dragButton.IsDrag)
        {
            Point offsetPoint \= e.GetPosition(this.canvas);
            double xOffset = offsetPoint.X - dragButton.CurrentPos.X - dragButton.ClickPos.X;
            double yOffset = offsetPoint.Y - dragButton.CurrentPos.Y - dragButton.ClickPos.Y;

            TranslateTransform transform \= (TranslateTransform)dragButton.Rect.RenderTransform;
            transform.X += xOffset;
            transform.Y += yOffset;

            dragButton.CurrentPos \= new Point(offsetPoint.X - dragButton.ClickPos.X, offsetPoint.Y - dragButton.ClickPos.Y);
        }
    }

    /// <summary>
    /// 鼠标左键按下
    /// </summary>
    private void MouseButtonLeftDown(object sender, MouseButtonEventArgs e)
    {
        DragButton dragButton \= sender as DragButton;
        if (dragButton != null && !dragButton.IsDrag)
        {
            dragButton.ClickPos \= e.GetPosition(dragButton);
            this.canvas.Children.Add(dragButton.Rect);
            dragButton.IsDrag \= true;

            //注册事件
            dragButton.AddHandler(Canvas.MouseMoveEvent, new MouseEventHandler(this.Canvas\_MouseMove), true);
            dragButton.AddHandler(Canvas.MouseLeftButtonUpEvent, new MouseButtonEventHandler(this.CanvasButtonLeftUp), true);
        }
    }

    /// <summary>
    /// 区域鼠标左键抬起
    /// </summary>
    private void CanvasButtonLeftUp(object sender, MouseButtonEventArgs e)
    {
        ReducingButton(sender);
    }

    /// <summary>
    /// 防止一些热键的影响
    /// </summary>
    private void OtherKeyDownEvent(object sender, RoutedEventArgs e)
    {
        ReducingButton(sender);
    }

    /// <summary>
    /// 避免重复代码
    /// </summary>
    private void ReducingButton(object sender)
    {
        DragButton dragButton \= sender as DragButton;
        if (dragButton != null && dragButton.IsDrag)
        {
            Canvas.SetLeft(dragButton, dragButton.CurrentPos.X);
            Canvas.SetTop(dragButton, dragButton.CurrentPos.Y);

            this.canvas.Children.Remove(dragButton.Rect);
            dragButton.IsDrag \= false;

            //移除事件
            dragButton.RemoveHandler(Canvas.MouseMoveEvent, new MouseEventHandler(this.Canvas\_MouseMove));
            dragButton.RemoveHandler(Canvas.MouseLeftButtonUpEvent, new MouseButtonEventHandler(this.CanvasButtonLeftUp));
        }
    }
}
四. 原理图
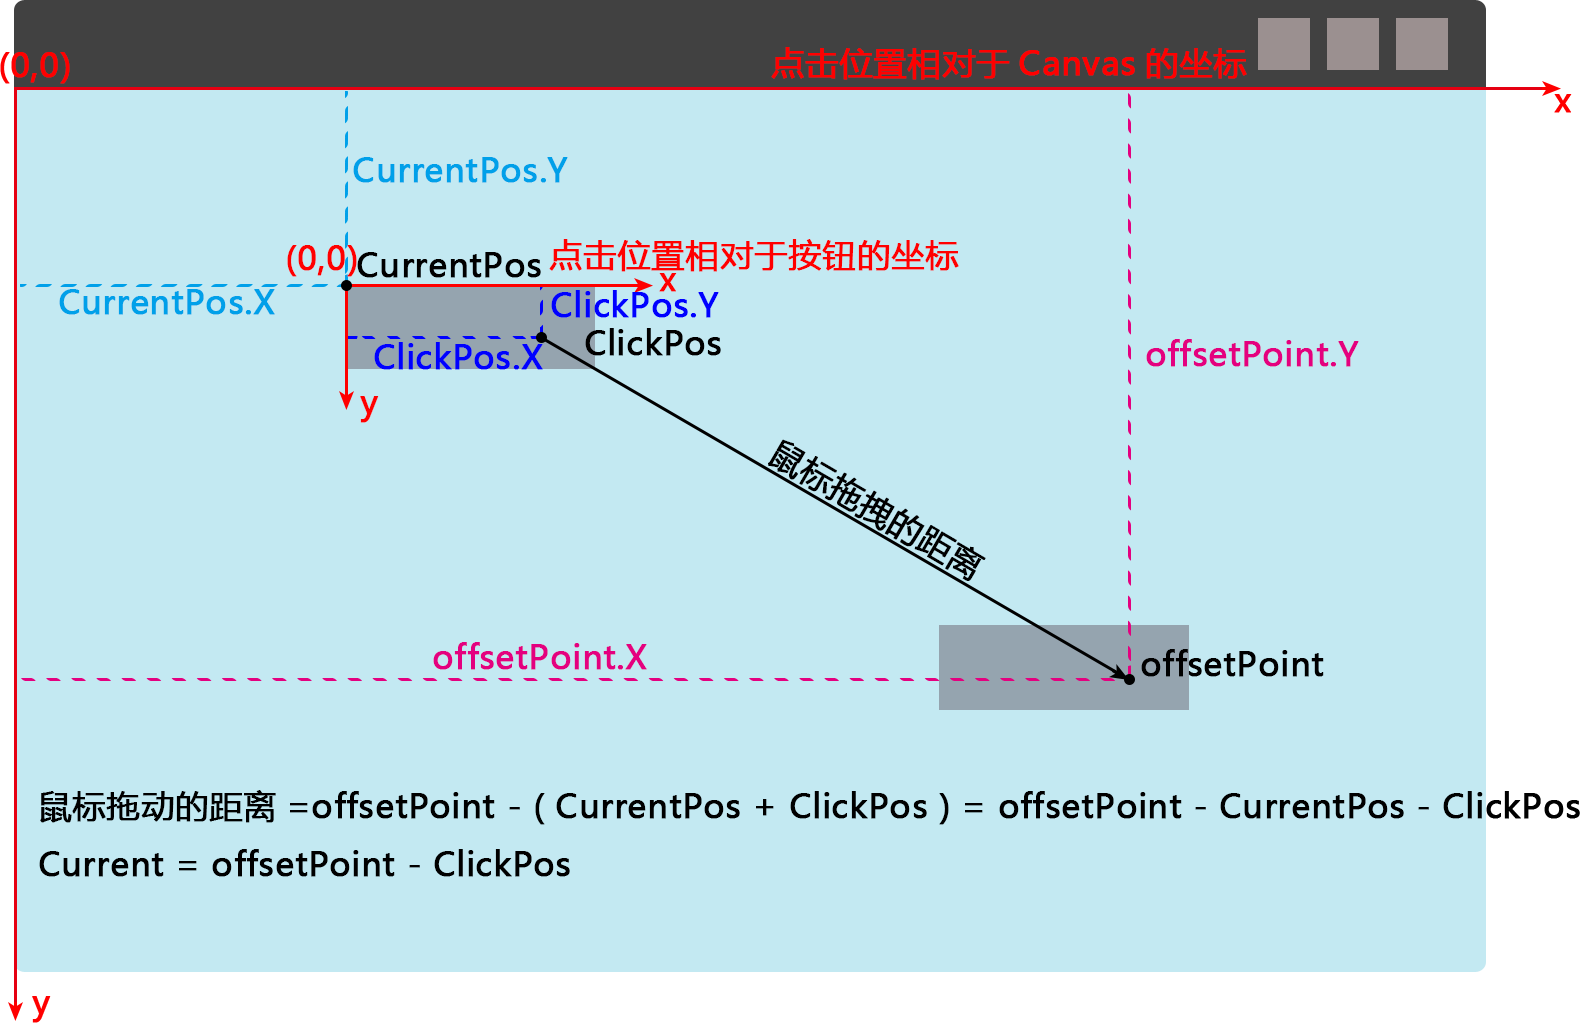
- 鼠标拖动的距离 = offsetPoint - ( CurrentPos + ClickPos) = offsetPoint - CurrentPos - ClickPos
- 鼠标拖动之后按钮左上角的坐标位置(相对于Canvas):Current = offsetPoint - ClickPos
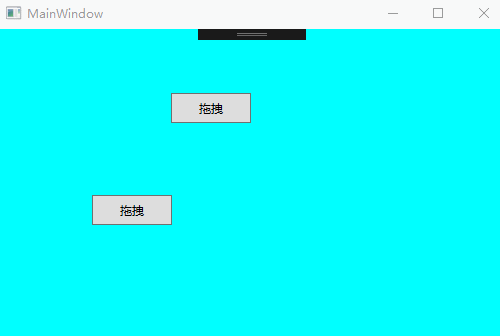
五. 运行效果
六. 工程代码
七. 一些补充
这点的内容是后来自己看之前的代码,觉得不好之后修改了一下,然后补充的。一共写了4各版本,每个版本都在之前的版本上进行了优化,最终的版本是名字后面有 “最终版” 的那一个。
这边稍微记录一下:
1. 关于路由事件的绑定,之前看书的时候,书上并没有写的特别明白。首先 “UIElement.AddHandler” 这边的 UIElement 将会是事件 xxxHandler 的 sender 对象,而这个事件究竟是谁触发路由传递过来的,要通过 e.Source 或者 e.OriginalSource 来获得。总而言之,要让哪个元素来处理,则指明 UIElement ;处理什么,通过一棵树上的指定路由事件来传递;
2. 设置元素到 Canvas 子类的左边距的时候,使用:
Canvas.SetLeft(UIElement,double);
而设置的时候使用:
Canvas.GetLeft(UIElement);
而不是通过下面的方式来设置/获取:
UIElement.SetValue(DependencyProperty,object);
UIElement.GetValue(DependencyProperty);
注:上面的方法可以是可以,就是写的比较烦琐,我们要充分利用附加属性的特点。一般附加属性的设置都在附加属性所在的对象上而不是在被附加的对象上,例如给 Person 增加一个学校的 School 类的班级的附加属性,那么这个设置班级附加属性的方法应该存在于学校 School 中。所以这边和直接调用学校 School 的方法来给 Person 添加班级属性是一个道理。
3. 路由事件可以进行延迟绑定,不需要在开始的时候就进行声明;
4. 关于 UIElement.CaptureMouse() 和 UIElement.ReleaseMouseCapture() 是不是要让元素捕获鼠标,防止一些特殊 Bug ,这个要依据情况来定。这边,我们每当要用来鼠标点击、拖拽的时候,就要考虑到这个问题。
5. 对于 Canvas 等等的元素的填充,可以使用 Margin = “0,0,0,0” 来实现;
原文链接:https://www.cnblogs.com/Jeffrey-Chou/p/12249596.html
效果

另一种实现
布局
<Grid Grid.Row="0" Name="gridChart" Margin="50,20" SizeChanged="gridChart_SizeChanged">
    <Canvas Name="backCanvas" Background="Red">
        <Canvas Name="foreCanvas" Background="AliceBlue"/>
    </Canvas>
</Grid>
1、gridChart 是绘图区域,设置Margin是为了给坐标值腾出位置;SizeChanged事件,更新图
2、为了方便管理,用两个Canvas绘图
3、backCanvas 背景画板用于画一些辅助性的东西。如下图的网格线,背景颜色,坐标值0、50、100那些
4、foreCanvas 前景画蓝色方块,以及包裹它的四条直线,和四个坐标值
5、拖动效果通过方块的三个事件完成:MouseLeftButtonDown、MouseMove、MouseLeftButtonUp

逻辑代码
1、gridChart_SizeChanged
当窗口大小改变时,获取gridChart 的大小,给Canvas赋值。删除前景画板中的所有东西,背景画板留下一个,就是前景画板。
DrawGridLine:在背景画板中画网格线,参数是网格线的横线和纵向偏移量
DrawRec:在前景画板中画蓝色方块,参数是方块的长宽
private void gridChart_SizeChanged(object sender, SizeChangedEventArgs e)
{
    backCanvas.Width = gridChart.ActualWidth;
    backCanvas.Height = gridChart.ActualHeight;
    foreCanvas.Width = gridChart.ActualWidth;
    foreCanvas.Height = gridChart.ActualHeight;

    backCanvas.Children.RemoveRange(1, backCanvas.Children.Count - 1);
    foreCanvas.Children.Clear();

    DrawGridLine(50, 50);
    DrawRec(100, 100);
}
2、DrawGridLine(double dx, double dy)
使用Line依次画垂直的网格和用Label画的横坐标。
使用Line依次画水平的网格和用Label画的纵坐标。
private void DrawGridLine(double dx, double dy)
{
    // 背景边框
    Border border = new Border()
    {
        Width = backCanvas.Width,
        Height = backCanvas.Height,
        BorderBrush = new SolidColorBrush(Color.FromRgb(0, 24, 113)),
        BorderThickness = new Thickness(1)
    };
    backCanvas.Children.Add(border);
    // 网格
    Line line = new Line();
    // 坐标值
    Label label = new Label();
    // 添加垂直网格
    double gridX = 0;
    double gridY = 0;
    while (gridX < backCanvas.Width)
    {
        line = new Line()
        {
            StrokeThickness = 0.1,
            Stroke = Brushes.Black,
            X1 = gridX,
            Y1 = 0,
            X2 = gridX,
            Y2 = backCanvas.Height
        };
        backCanvas.Children.Add(line);

        // 添加横坐标标签
        label = new Label();
        label.Content = gridX;
        backCanvas.Children.Add(label);
        Canvas.SetLeft(label, gridX - 10);
        Canvas.SetTop(label, -20);
        gridX += dx;
    }
    // 添加水平网格
    while (gridY < backCanvas.Height)
    {
        line = new Line()
        {
            StrokeThickness = 0.1,
            Stroke = Brushes.Black,
            X1 = 0,
            Y1 = gridY,
            X2 = backCanvas.Width,
            Y2 = gridY
        };
        backCanvas.Children.Add(line);

        // 添加横坐标标签
        label = new Label();
        label.Content = gridY;
        backCanvas.Children.Add(label);
        Canvas.SetLeft(label, -40);
        Canvas.SetTop(label, gridY -10);
        gridY += dy;
    }
}
3、DrawRec(double width, double height)
为方块添加三个事件MouseLeftButtonDown、MouseMove、MouseLeftButtonUp;
Draw4Lines : 同时画4条包裹它的直线,参数是该方块
private void DrawRec(double width, double height)
{
    // 方块
    Rectangle rec = new Rectangle()
    {
        Width = width,
        Height = height,
        Fill = new SolidColorBrush(Color.FromRgb(0, 24, 113))
    };
    foreCanvas.Children.Add(rec);
    Canvas.SetLeft(rec, foreCanvas.Width / 2 - rec.Width / 2);
    Canvas.SetTop(rec, foreCanvas.Height / 2 - rec.Height / 2);
    // 拖动方块事件
    rec.MouseLeftButtonDown += Rec_MouseLeftButtonDown;
    rec.MouseMove += Rec_MouseMove;
    rec.MouseLeftButtonUp += Rec_MouseLeftButtonUp;
    Draw4Lines(rec);
}
4、Draw4Lines(Rectangle rec)
4条直线由8个坐标点构成,pointList 就是存储该8个点,然后遍历画出,同时画4个由Label构成的坐标值。
private void Draw4Lines(Rectangle rec)
{
    List<Tuple<double, double>> pointList = new List<Tuple<double, double>>()
    {
        // 左竖线
        new Tuple<double, double>(Canvas.GetLeft(rec), 0),
        new Tuple<double, double>(Canvas.GetLeft(rec), foreCanvas.Height),
        // 右竖线
        new Tuple<double, double>(Canvas.GetLeft(rec) + rec.Width, 0),
        new Tuple<double, double>(Canvas.GetLeft(rec) + rec.Width, foreCanvas.Height),
        // 上横线
        new Tuple<double, double>(0, Canvas.GetTop(rec)),
        new Tuple<double, double>(foreCanvas.Width, Canvas.GetTop(rec)),
        // 下横线
        new Tuple<double, double>(0, Canvas.GetTop(rec) + rec.Height),
        new Tuple<double, double>(foreCanvas.Width, Canvas.GetTop(rec) + rec.Height)
    };
    for (int i = 0; i < pointList.Count; i += 2)
    {
        Line line = new Line()
        {
            StrokeThickness = 1,
            Stroke = new SolidColorBrush(Color.FromRgb(225, 88, 93)),
            X1 = pointList[i].Item1,
            Y1 = pointList[i].Item2,
            X2 = pointList[i + 1].Item1,
            Y2 = pointList[i + 1].Item2
        };
        foreCanvas.Children.Add(line);
        // 坐标值
        Label label = new Label()
        {
            Content = (i < 4) ? pointList[i].Item1 : pointList[i].Item2,
            Foreground = new SolidColorBrush(Color.FromRgb(255, 181, 73)),
            Background = new SolidColorBrush(Color.FromRgb(19, 51, 76))
        };
        foreCanvas.Children.Add(label);
        Canvas.SetLeft(label, pointList[i].Item1);
        Canvas.SetTop(label, pointList[i].Item2);
    }
}
5、鼠标事件
鼠标按下、释放,控制鼠标形状。
private void Rec_MouseLeftButtonDown(object sender, MouseButtonEventArgs e)
{
    ((Rectangle)sender).Cursor = Cursors.Hand;
}

private void Rec_MouseLeftButtonUp(object sender, MouseButtonEventArgs e)
{
    ((Rectangle)sender).ReleaseMouseCapture();
    ((Rectangle)sender).Cursor = Cursors.Arrow;
}
鼠标移动时,判断左键是按压状态;
获取鼠标的位置,计算出方块左上角顶点的位置,也就是 (marginLeft ,marginTop),同时判断是否超过边界;
如没有,则移动方块位置;
同时更新4条直线的位置。
private void Rec_MouseMove(object sender, MouseEventArgs e)
{
    if (e.LeftButton == MouseButtonState.Pressed)
    {
        // 鼠标位置
        Point point = e.GetPosition(foreCanvas);
        Rectangle rec = (Rectangle)sender;
        double marginLeft = point.X - rec.Width / 2;
        double marginTop = point.Y - rec.Height / 2;
        // 超出边界
        if (marginLeft < 0)
        {
            marginLeft = 0;
        }
        else if ((marginLeft + rec.Width) > foreCanvas.Width)
        {
            marginLeft = foreCanvas.Width - rec.Width;
        }
        if (marginTop < 0)
        {
            marginTop = 0;
        }
        else if ((marginTop + rec.Height) > foreCanvas.Height)
        {
            marginTop = foreCanvas.Height - rec.Height;
        }
        Canvas.SetLeft(rec, marginLeft);
        Canvas.SetTop(rec, marginTop);
        // 移除四条边框线,重新画
        foreCanvas.Children.RemoveRange(1, foreCanvas.Children.Count - 1);
        Draw4Lines(rec);
    }
}
小Bug
鼠标移动的太快,方块会不动

鼠标移动超过gridChart,例如超过右边界,此时不能上下移动,如下图,注意鼠标一直是按压状态

解决小bug
更新:2021-09-03
解决方法:使小方块强制获取到鼠标CaptureMouse
private void Rec_MouseLeftButtonDown(object sender, MouseButtonEventArgs e)
{
    ((Rectangle)sender).CaptureMouse();
    ((Rectangle)sender).Cursor = Cursors.Hand;
}
因为,MouseMove事件,必须是鼠标处于控件之上才能发生,包括MouseDown和MouseUp事件。
例如鼠标悬浮在控件之上,按下鼠标,此时会触发按下事件;此时鼠标移开到控件外,注意鼠标一直是按下状态,再松开,此时不会触发释放事件。因为鼠标不在控件之上~
解决后的效果,快的飞起~~~


 6228
6228


 被折叠的 条评论
为什么被折叠?
被折叠的 条评论
为什么被折叠?
 到【灌水乐园】发言


