全连接的神经网络忽略了图像在空间上的特征。使用卷积神经网络能够按照原始的空间结构对其进行保存。
卷积(Convolution)→下采样(Subsampling)→卷积→下采样→...→全连接(Fully Connected)
前面卷积的过程是特征提取的过程,全连接网络实现了分类功能。
卷积神经网络就包括了特征提取和分类器两部分。
RGB图像,采用栅格的方式,存储颜色信息。
RGB图像以红绿蓝三个通道,在整个图中,取出一个Patch,通道数保持不变,H和W发生变化。对单个Patch进行卷积,得到了新的Patch,他的C,W,H均会变化。单个Patch的卷积过程中,保留了原有Patch的信息。
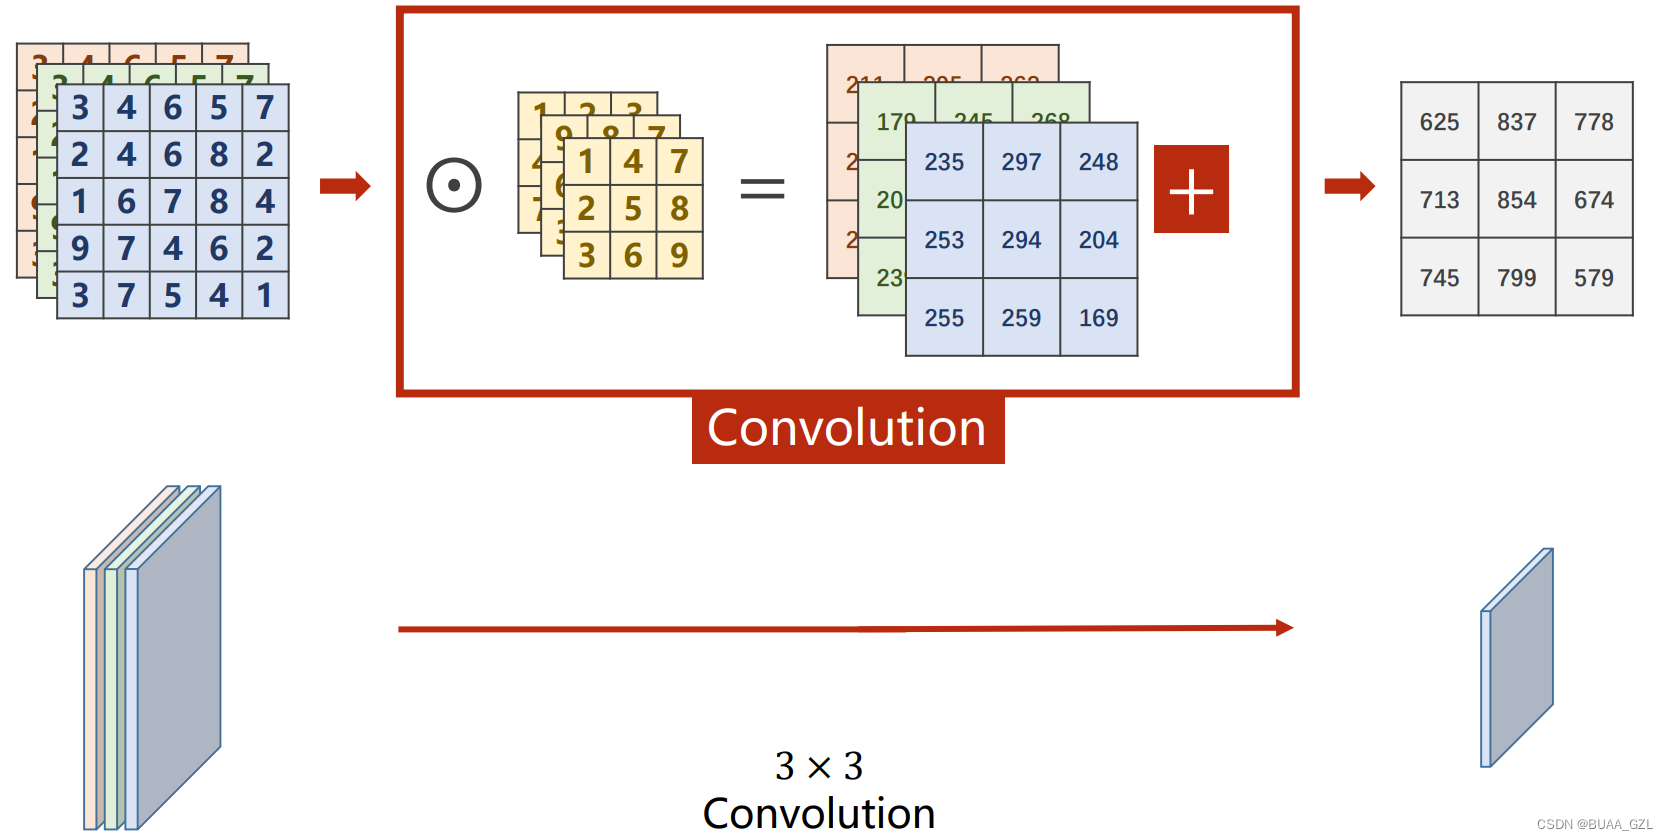
卷积需要指定卷积核(Kernel);多通道到单通道的卷积过程如下所示(图源B站刘二大人):

通过改变卷积核的个数,以改变输出的通道数;例如对输入做两次卷积,将两个输出叠起来,得到三通道的输出。
简单代码示例:
import torch
in_channels, out_channels= 5, 10
width, height = 100, 100
kernel_size = 3                    #卷积核的大小3*3,可以输入一对元组
batch_size = 1                     #批量数
input = torch.randn(batch_size,
                    in_channels,
                    width,
                    height)
conv_layer = torch.nn.Conv2d(in_channels,
                             out_channels,
                             kernel_size=kernel_size)
output = conv_layer(input)

print(input.shape)
print(output.shape)
print(conv_layer.weight.shape)Pading操作:在原始图像外面填充若干圈0,使得输出的图像大小变大。
import torch
input = [3,4,6,5,7,
2,4,6,8,2,
1,6,7,8,4,
9,7,4,6,2,
3,7,5,4,1]
input = torch.Tensor(input).view(1, 1, 5, 5)

conv_layer = torch.nn.Conv2d(1, 1, kernel_size=3, padding=1, bias=False)
#bias在卷积之后增加偏置量
kernel = torch.Tensor([1,2,3,4,5,6,7,8,9]).view(1, 1, 3, 3) #1133分别是输出的通道数,输入的通
                                                            #道数,宽度,高度
#形成一个3*3的卷积核
conv_layer.weight.data = kernel.data #将设置的核的data给卷积层的权重的数据

output = conv_layer(input)
with torch.no_grad()
print(output)
stride参数,在进行卷积的时候,跳跃若干行,可以有效地缩小图像的大小。
conv_layer = torch.nn.Conv2d(1, 1, kernel_size=3, stride=2, bias=False)MaxPooling 最大池化层,下采样的经典操作之一;
对同一个通道内的,2*2的像素格子内取最大值,变成1*1像素格子,可以使得图像缩小为原来的四分之一。
maxpooling_layer = torch.nn.MaxPool2d(kernel_size=2)
output = maxpooling_layer(input)
一个网络的示例:
class Net(torch.nn.Module):
    def __init__(self):
        super(Net, self).__init__()
        self.conv1 = torch.nn.Conv2d(1, 10, kernel_size=5)
        self.conv2 = torch.nn.Conv2d(10, 20, kernel_size=5)
        self.pooling = torch.nn.MaxPool2d(2)
        self.fc = torch.nn.Linear(320, 10)

def forward(self, x):
    # Flatten data from (n, 1, 28, 28) to (n, 784)
    batch_size = x.size(0)
    x = F.relu(self.pooling(self.conv1(x)))
    x = F.relu(self.pooling(self.conv2(x)))
    x = x.view(batch_size, -1) # flatten 做一个View,使得其变成全连接的输入格式
    x = self.fc(x)
    return x

model = Net()
如何使用CUDA:
device = torch.device("cuda:0" if torch.cuda.is_available() else "cpu")
model.to(device)
def train(epoch):
running_loss = 0.0
for batch_idx, data in enumerate(train_loader, 0):
inputs, target = data
inputs, target = inputs.to(device), target.to(device)
#输入和数据迁移到显卡上
optimizer.zero_grad()
# forward + backward + update
outputs = model(inputs)
loss = criterion(outputs, target)
loss.backward()
optimizer.step()
running_loss += loss.item()
if batch_idx % 300 == 299:
print('[%d, %5d] loss: %.3f' % (epoch + 1, batch_idx + 1, running_loss / 2000))def test():
correct = 0
total = 0
with torch.no_grad():
for data in test_loader:
inputs, target = data
inputs, target = inputs.to(device), target.to(device)
#将数据导入给显卡
outputs = model(inputs)
_, predicted = torch.max(outputs.data, dim=1)
total += target.size(0)
correct += (predicted == target).sum().item()
print('Accuracy on test set: %d %% [%d/%d]' % (100 * correct / total, correct, total))


 2313
2313


 被折叠的 条评论
为什么被折叠?


