


SORT系列
SORT-1 项目配置运行-WINDOWS
SORT-2 卡尔曼滤波推导和示例
SORT-3 匈牙利算法和SORT类
SORT-4 SORT项目代码解析
本项目地址
参考:
鲁东大学于泓-卡尔曼滤波+目标跟踪十分推荐!
卡尔曼滤波算法
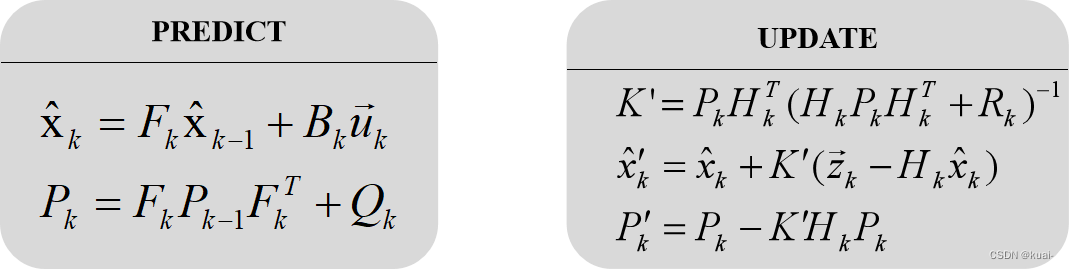
公式推导
卡尔曼滤波的预测方程和更新方程如下。
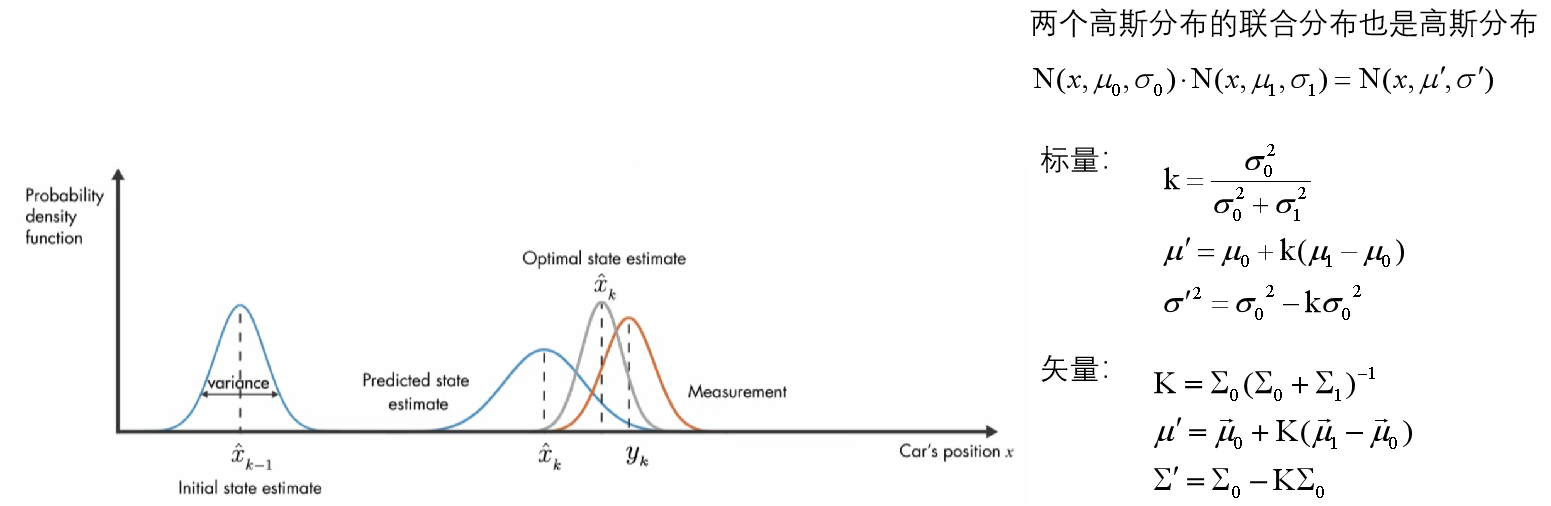
1.两个空间:
状态空间 和 观测空间,分别是两个 高斯分布。
状态空间:

u
k
u_k
uk:外部干扰,目标跟踪任务中通常没有用到。
Q
k
Q_k
Qk:不确定性干扰。
观测空间:

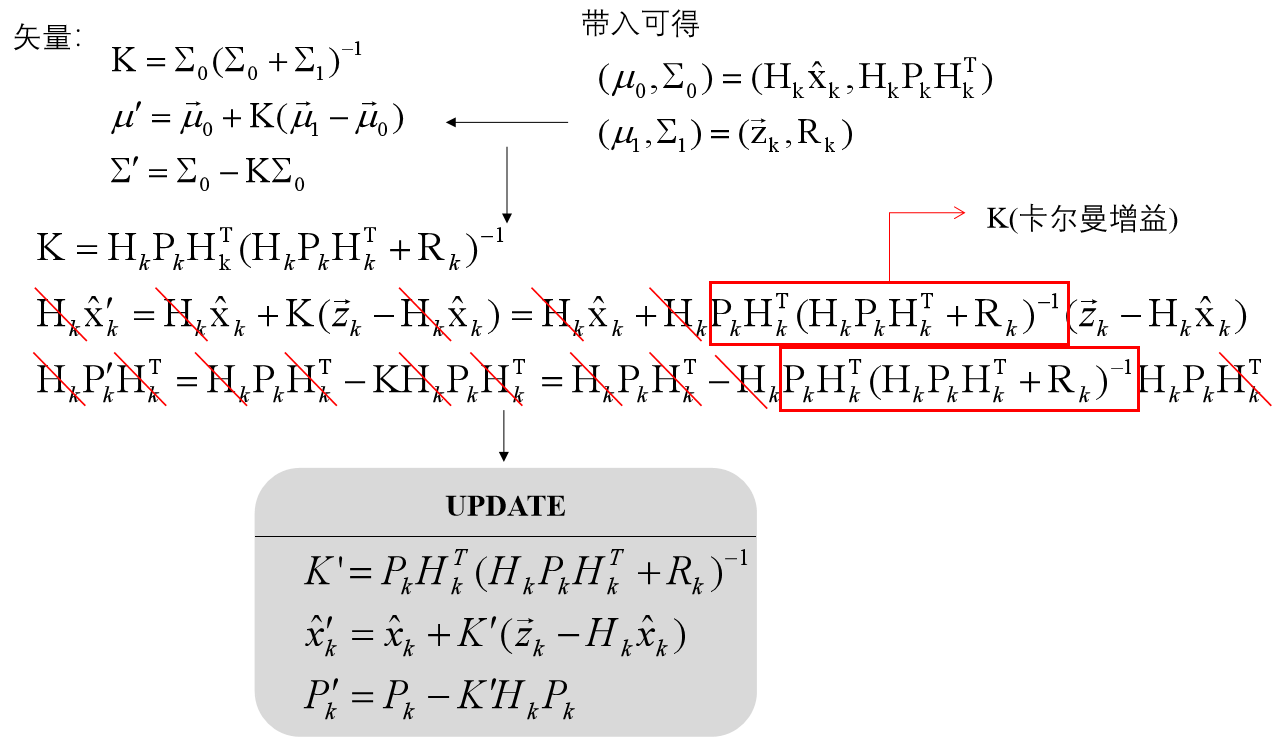
为了综合两个空间,使预测的误差最小,需要综合考虑两个高斯分布,求出联合分布。这也是 卡尔曼滤波 的核心。

2.联合分布
底层代码详解
kalman filter 使用示例
1.创建对应维度的 Kalman Filter 对象 (KalmanFilter (dim_x=2, dim_z=1))
2.设置状态向量协方差 P,预测矩阵 F;观测向量协方差 R,映射矩阵 H 的初始值
3.设置状态向量 X,观测向量 Z 的初始值。
4.进入循环:
z = get_sensor_reading()
f.predict()
f.update(z)
do_something_with_estimate (f.x)
r""" Implements a Kalman filter. You are responsible for setting the
    various state variables to reasonable values; the defaults  will
    not give you a functional filter.

    For now the best documentation is my free book Kalman and Bayesian
    Filters in Python [2]_. The test files in this directory also give you a basic idea of use, albeit without much description.
    目前最好的文档是我的免费书《卡尔曼和贝叶斯》Python[2]中的过滤器_。此目录中的测试文件还为您提供了使用的基本概念,尽管没有太多描述。

    In brief, you will first construct this object, specifying the size of    the state vector with dim_x and the size of the measurement vector that    you will be using with dim_z. These are mostly used to perform size checks    when you assign values to the various matrices. For example, if you    specified dim_z=2 and then try to assign a 3x3 matrix to R (the    measurement noise matrix you will get an assert exception because R    should be 2x2. (If for whatever reason you need to alter the size of    things midstream just use the underscore version of the matrices to    assign directly: your_filter._R = a_3x3_matrix.)
    简而言之,您将首先构造此对象,用dim_x指定状态向量的大小,以及将使用dim_z的测量向量的大小。当您为各种矩阵赋值时,它们主要用于执行大小检查。例如,如果您指定了dim_z=2,然后尝试将一个3x3矩阵赋给R(测量噪声矩阵,您将得到一个断言异常,因为R应该是2x2。(如果出于任何原因,您需要在中途改变事物的大小,只需使用矩阵的下划线版本直接赋值:your_filter.R=a_3x3_matrix。)

    After construction the filter will have default matrices created for you,    but you must specify the values for each. It’s usually easiest to just    overwrite them rather than assign to each element yourself. This will be    clearer in the example below. All are of type numpy.array.
    构造过滤器后,将为您创建默认矩阵,但您必须为每个矩阵指定值。通常最简单的方法是覆盖它们,而不是自己分配给每个元素。
    在下面的示例中,这一点将更加清楚。所有类型都是numpy.array。

    Examples
    --------
    #指定 x,z 的维度 dim_x,dim_z;X,P/Z,R ,以及 F,H 赋初始值

    Here is a filter that tracks position and velocity using a sensor that only
    reads position.

    First construct the object with the required dimensionality.
	首先创建一个符合实际维度的对象。
    .. code::

        from filterpy.kalman import KalmanFilter
        f = KalmanFilter (dim_x=2, dim_z=1)


    Assign the initial value for the state (position and velocity). You can do this    with a two dimensional array like so:

        .. code::

            f.x = np.array([[2.],    # position
                            [0.]])   # velocity

    or just use a one dimensional array, which I prefer doing.

    .. code::

        f.x = np.array([2., 0.])


    Define the state transition matrix:

        .. code::

            f.F = np.array([[1.,1.],
                            [0.,1.]])

    Define the measurement function:

        .. code::

        f.H = np.array([[1.,0.]])

    Define the covariance matrix. Here I take advantage of the fact that
    P already contains np.eye(dim_x), and just multiply by the uncertainty:
    P 是状态方程的 协方差,采用对角阵,P 的维度为 [dim_x,dim_x]

    .. code::

        f.P *= 1000.

    I could have written:

    .. code::

        f.P = np.array([[1000.,    0.],
                        [   0., 1000.] ])

    You decide which is more readable and understandable.

    Now assign the measurement noise. Here the dimension is 1x1, so I can
    use a scalar
    指定测量方程的方差,由于是一维的,故直接使用一个标量

    .. code::

        f.R = 5

    I could have done this instead:

    .. code::

        f.R = np.array([[5.]])

    Note that this must be a 2 dimensional array, as must all the matrices.

    Finally, I will assign the process noise. Here I will take advantage of
    another FilterPy library function:

    .. code::

        from filterpy.common import Q_discrete_white_noise
        f.Q = Q_discrete_white_noise(dim=2, dt=0.1, var=0.13)


    Now just perform the standard predict/update loop:
    接下来进行标准的 预测/更新 循环:

    while some_condition_is_true:

    .. code::

        z = get_sensor_reading()
        f.predict()
        f.update(z)

        do_something_with_estimate (f.x)


 被折叠的 条评论
为什么被折叠?
被折叠的 条评论
为什么被折叠?
 到【灌水乐园】发言


