


 本文档详细介绍了LaTeX的基本结构、数学公式、图片和表格的插入方法,以及如何使用伪代码和代码块。通过实例展示了如何创建文档标题、设置页面布局、引用和脚注,以及使用宏包实现特定功能。此外,还涵盖了数学公式的对齐、希腊字母、矩阵和分段函数的表示,以及伪代码的通用模板。
目录
一、Latex基础
编译器配置:XeLaTeX
1、架构
\documentclass{article} % article 文档
\usepackage[UTF8]{ctex} % 使用宏包(为了能够显示汉字)
% 设置页面的环境,a4纸张大小,左右上下边距信息
\usepackage[a4paper,left=10mm,right=10mm,top=15mm,bottom=15mm]{geometry}
\title{Latex基础} % 文章标题
\author{Haiyang liu} % 作者的名称
\date{\today} % 当天日期
% 正文开始
\begin{document}
\maketitle % 添加这一句才能够显示标题等信息
% 摘要开始部分
\begin{abstract}
该部分内容是放置摘要信息的。
\par\textbf{Keywords: } Keyword1; Keyword2; Keyword3 %“\par”在段首,表示另起一行,“\textbf{}”,花括号内的内容加粗显示
\end{abstract}
% 关键字也可以通过下面这种方式实现
\keywords{Keyword1 \and Keyword2 \and Keyword3 \and more}
% 生成目录设置
\renewcommand{\contentsname}{目录} %将content转为目录
\tableofcontents
% 标题开始
\section{一级标题1}
一级标题1第一段下的内容。 \par
一级标题1第二段下的内容。
\subsection{二级标题1.1}
二级标题下的内容。
\subsubsection{三级标题下的内容1.1.1}
三级标题下的内容。
\section{一级标题2}
一级标题2中的内容
% 正文结束
\end{document}
2、引用、脚注
需要添加脚注的文字\footnote{脚注内容}*****
\begin{quote}
引用内容
\end{quote}
3、单栏、双栏
文献有单栏和双栏两种,方法就是在\documentclass{article}中间加上[onecolumn](单栏)或[twocolumn](双栏):
-
单栏
\documentclass[onecolumn]{article}-
双栏
\documentclass[twocolumn]{article}4、常用快捷键
Ctrl+B:粗体
Ctrl+I:斜体
Ctrl+/:注释
Ctrl+Z:撤销
Ctrl+Y:重做
Ctrl+F:查找和替换
Ctrl+Home:到文档顶部
Ctrl+End:到文档底部
Ctrl+S:重新编译
Ctrl+Enter:重新编译
5、宏包
LaTex 的所有宏包文件都要写在 \documentclass 命令之后和 \begin{document} 之前。
\usepackage{宏包1, 宏包2}-
常用的宏包:
ctex:中文支持
amsmath:latex数学公式支持
graphicx:插入图片
algorithm和algorithmic:算法排版
listings:插入代码块
6、空格
-
LaTeX支持
| 源代码 | 显示 | 宽度 |
|---|---|---|
a \quad b | a b | 1个中文字符的宽度 |
a \qquad b | a b | 2个中文字符的宽度 |
a\ b | a b | 1/3字符宽度 |
ab | ab | 正常宽度 |
a \quad b

a \qquad b

a\ b

ab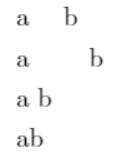
-
LaTeX数学公式支持
| 源代码 | 显示 | 宽度 |
|---|---|---|
$a\;b$ | 2/7字符宽度 | |
$a\,b$ | 1/6字符宽度 | |
$a\!b$ | 缩进1/6字符宽度 |
$a\;b$
$a\,b$
$a\!b$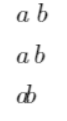
7、换行、行间距
\\:换行,一般在一行的最后写。
\\[offset]:换行,并且与下一行的行间距为原来行间距+offset,offset单位一般是em或pt。
8、换段
sentence1 \par sentence2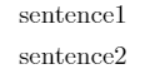
9、下划线
a\_b
a\textunderscore b
10、引号
'English'
''English''
`English'
``English''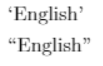
11、注释
-
单行
% 注释内容-
多行
\iffalse
注释内容
\fi
12、字体
-
样式
{\songti 宋体}
{\heiti 黑体}
{\kaishu 楷书}
{\bf 粗体}
{\it 斜体}
{\sl 斜体}
\textbf{粗体}
\textit{斜体}
\textsl{斜体}
-
大小
{\tiny Hello} \\
{\scriptsize Hello} \\
{\footnotesize Hello} \\
{\small Hello} \\
{\normalsize Hello} \\
{\large Hello}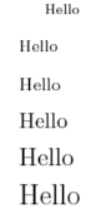
13、缩进
\noindent %取消缩进如果不默认缩进,则
\usepackage{indentfirst}
\setlength{\parindent}{2em} % 2表示缩进2个字符
14、超链接
\usepackage[colorlinks,linkcolor=black]{hyperref}:所需宏包
\href{}{}:第一个{}填链接,第二个{}填链接名称
\href{http://www.baidu.com}{Baidu}
15、新页
\newpage16、项目编号和符号
不带序号
latex默认生成的简单列表,默认为一个小圆点,而我们在写文章时可能想要一些不一样的列表符号,比如 -, * 之类的. 我们可以这样写:
\begin{itemize}
\item[-] 第一个
\item[-] 第二个
\end{itemize}
带序号
\begin{enumerate}[step 1]
\item 第一个
\item 第二个
\end{enumerate}
17、调整页间距
\usepackage{geometry}

\geometry{left=1.5cm,right=1.5cm,top=2cm,bottom=2cm}
二、图片
图片排版时使用到的宏包文件有:
\usepackage{graphicx}  %%  图片包
\usepackage{subfig}    %% 子图包
\usepackage{float}     %% 浮动个数
在论文中主要有两种图片排版方式:
图片的直接插入:遵循文字的样式
图片的浮动插入:独占页面的一部分
1、图片的直接插入
-
模板
\begin{figure}[htbp]
    \centering
    \includegraphics[width=5in]{myfigure}
    \caption{Simulation results for the network.}
    \label{fig_sim}
\end{figure}-
例子
\begin{figure}[!h]
    \centering
    \includegraphics[width=5in]{kebi.jpg} %%图片最好用相对路径
    \caption{科比}
    \label{pic1}
\end{figure}
1.1基本框架
\begin{figure}[htbp]
\end{figure}[htbp]是个可选参数项,可以是下列字母的任意组合。
h(here): 当前位置;将图形放置在 正文文本中给出该图形环境的地方。如果本页所剩的页面不够, 这一参数将不起作用。
t(top): 顶部;将图形放置在页面的顶部。
b(bottom): 底部;将图形放置在页面的底部。
p(page): 浮动页;将图形放置在一只允许有浮动对象的页面上。
1.2居中显示
\centering1.3添加图片
\includegraphics[width=5in]{kebi.jpg}width=5in 是图片的大小,in 是单位,含义是英寸,还可以是cm(厘米)等;{ } 中就是图片的路径及名称,如果是同一个文件夹下,那么我们就可以省略路径。
1.4标题
\caption{科比}1.5标签
\label{pic1}用于后面引用
1.6引用
\ref+标签名
As show in Figure \ref{pic1} %% 英文引用图片
正如图 \ref{pic1} %% 中文引用图片
\begin{document}
\maketitle
科比布莱恩特是湖人名宿,黑曼巴是他的外号,曼巴精神影响力遍布全球。
\begin{figure}[!h]
\centering
\includegraphics[width=4.5in]{kebi.jpg}
\caption{科比布莱恩特}
\label{pic1}
\end{figure}
如图 \ref{pic1},
这身穿白色球衣的男人就是科比布莱恩特。
\end{document} 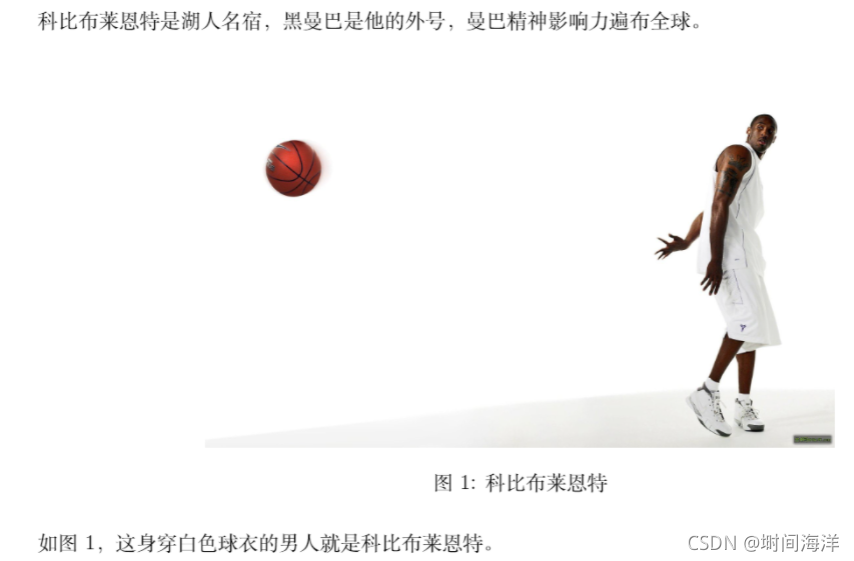
2、图片的浮动插入模板
\begin{figure*}[!t]
    \centering
    \subfloat[Case I]{\includegraphics[width=2.5in]{box}
    \label{fig_first_case}}
    \hfil
    \subfloat[Case II]{\includegraphics[width=2.5in]{box}%
    \label{fig_second_case}}
    \caption{Simulation results for the network.}
    \label{fig_sim}
\end{figure*}-
例子
\begin{figure*}[!h]
    \centering
    \subfloat[科比 I]{\includegraphics[width=1.5in]{kebi.jpg} \label{X}}
    \hfill
    \subfloat[科比 II]{\includegraphics[width=1.5in]{kebi.jpg} \label{Y}}
    \hfill
    \subfloat[科比 III]{\includegraphics[width=1.5in]{kebi.jpg} \label{Z}}
    \caption{NBA球星-科比布莱恩特}
    \label{pic}
\end{figure*}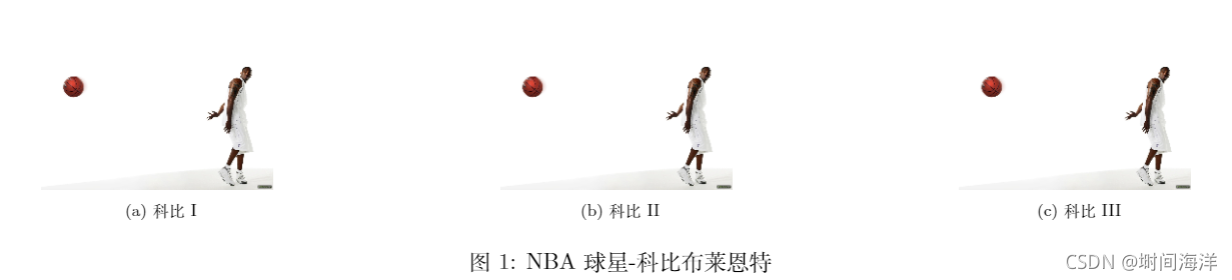
2.1基本框架
\begin{figure*}[htbp]
\end{figure*}[htbp]是个可选参数项,可以是下列字母的任意组合。
h(here): 当前位置;将图形放置在 正文文本中给出该图形环境的地方。如果本页所剩的页面不够, 这一参数将不起作用。
t(top): 顶部;将图形放置在页面的顶部。
b(bottom): 底部;将图形放置在页面的底部。
p(page): 浮动页;将图形放置在一只允许有浮动对象的页面上。
2.2居中显示
\centering2.3添加图片
\subfloat[科比 I]{\includegraphics[width=1.5in]{kebi.jpg} \label{X}}subfloat 表示插入浮动子图,第一个 [ ] 中存放的是子图的标题,默认编号是 (a),(b)……。大括号里面的就是单图的格式,和上面相同。
2.4标题
\caption{NBA球星-科比布莱恩特}同上
2.5标签
\label{pic}用于后面引用
2.6引用
\ref+标签名
多图的引用分两种,一种是引用整体,另一种是引用某一个子图。
-
引用整体
As show in Figure \ref{pic} %% 英文引用图片
正如图 \ref{pic} %% 中文引用图片
-
引用子图
As show in Figure \ref{pic} \subref{Z}
正如图 \ref{pic} \subref{Z} 
三、表格
与 LaTeX 表格相关的宏包如下:
\usepackage{booktabs}  %% 三线表
\usepackage{diagbox}   %% 斜线表头
\usepackage{multirow}  %% 合并单元格
1、基本结构
\begin{table}[!h]
    \renewcommand{\arraystretch}{1.5}
    \caption{An Example of a Table}
    \label{table1}
    \centering
    \begin{tabular}{|c|c|}
        \hline
        A & B \\
        \hline
        1 & 2\\
        \hline
    \end{tabular}
\end{table}
1.1框架
\begin{table}[htbp]
\end{table}[htbp]同上
对于两栏的论文,如果表格想横跨两栏,可以将{table}换成{table*},与上面图片浮动插入{figure*}类似。
1.2行高
\renewcommand{\arraystretch}{1.5}设置的表格的行高,上面例子设置为1.5。
1.3标题
\caption{An Example of a Table}{ } 中是标题的具体内容,可自动编号。
1.4标签
\label{table1}用于后面的引用,\ref和{}中的标签名结合可实现表的引用。
1.5居中
\centering1.6表格
\begin{tabular}{|c|c|}
    \hline
    A & B \\
    \hline
    1 & 2\\
    \hline
\end{tabular}
1.6.1表格体
\begin{tabular}{|c|c|}
\end{tabular}l代表左对齐,c代表居中,r代表右对齐,这里我们用的c(居中)。
1.6.2表格的横线
\hline表示该边框是有实线的,如果没有\hline,就表示这行没有边框横线。
如果我们希望部分有实线部分没有应该咋样做了?
如下面例子,我们想第二行的第 1 列、第 3 列 和第 5 列有横向,可以这样写:\cline{1-1} \cline{3-3} \cline{5-5};
其中\cline{a-b}中a-b表示a列至b列。
这里我们使用了{table*},表格可横跨两栏。
\begin{table*}[!h]
    \renewcommand{\arraystretch}{1.2}
    \caption{An Example of a Table}
    \label{table1}
    \centering
    \begin{tabular}{c c c c c}
        \hline
        A & B & C & D & E \\
        \cline{1-1} \cline{3-3} \cline{5-5}
        1 & 2 & 3 & 4 & 5 \\
        1 & 2 & 3 & 4 & 5 \\
        \hline
    \end{tabular}
\end{table*}
1.6.3宽度调整
-
\setlength{\tabcolsep}{输入尺寸}{}:按页面宽度调整表格
\setlength{\tabcolsep}{输入尺寸}{
\begin{table}[htbp]
......
\end{table}
}-
\resizebox{\textwidth}{输入尺寸}{}:按文本内容调整表格
\resizebox{\textwidth}{输入尺寸}{
\begin{table}[htbp]
......
\end{table}
}
2、引用表格
同图片引用
As show in Table \ref{table1}
正如表 \ref{table1}
3、常见表格类型
3.1三线表
\usepackage{booktabs}:引入三线表宏包
\toprule:顶部线 \midrule:中部线 \bottomrule:底部线。最上面和最下面的横线更粗。
\begin{table}[htbp]
    \renewcommand{\arraystretch}{1.5}
    \centering
    \caption{three-line table}
    \label{table_example}
    \begin{tabular}{c c c c}
        \toprule  % 顶部线
        1&2&3&4 \\
        \midrule  % 中部线
        one&two&three&four \\
        \bottomrule  % 底部线
    \end{tabular}
\end{table}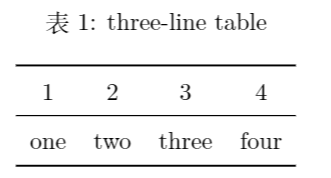
3.2 斜线表头
\usepackage{diagbox}:斜线表头所需的宏包
\diagbox{A1}{A2}:将单元格分成两块,分别是A1和A2;\diagbox{A1}{A2}{A3}: 将单元格分成三块,分别是A1、A2和A3。其他部分与普通表无异。
\begin{table}[!h]
    \renewcommand{\arraystretch}{1.5}
    \caption{An Example of a Table}
    \label{table_example}
    \centering
    \begin{tabular}{|c|c|c|c|c|}
        \hline
        \diagbox{A1}{A2}{A3} & B & C & D & E \\
        \hline
        a1 & 2 & 3 & 4 & 5 \\
        \hline
        a2 & 2 & 3 & 4 & 5 \\
        \hline
        a3 & 2 & 3 & 4 & 5 \\
        \hline
    \end{tabular}
\end{table}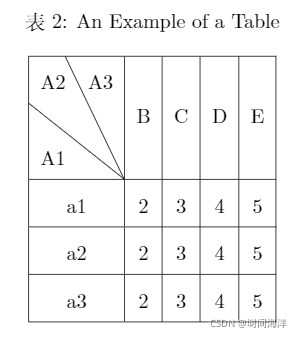
3.3合并单元格
\usepackage{multirow}:合并单元格所需的宏包
1、\multicolumn{}{}{}:多列合并
2、\multirow{}{}{}:多行合并
如果是嵌套使用,那就是多行多列合并。
-
第一个大括号是要合并的数量,用到第一个命令中就是要合并多少列,用到第二个命令中就是要合并多少行。
-
第二个大括号是行中每列数据的格式及对应的边框线。合并行的格式一般都默认是遵循前面的,写*。
-
第三个大括号是当前单元格的内容。
\begin{table}[!h]
    \renewcommand{\arraystretch}{1.5}
    \caption{An Example of a Table}
    \label{table_example}
    \centering
    \begin{tabular}{|c|c|c|c|c|}
        \hline
        \multicolumn{2}{|c|}{\multirow{2}{*}{A}} & \multicolumn{3}{c|}{B} \\
        \cline{3-5}
        \multicolumn{2}{|c|}{} & B1 & B2 & B3 \\
        \hline
         1 & 2 & 3 & 4 & 5 \\
        \hline
    \end{tabular}
\end{table}
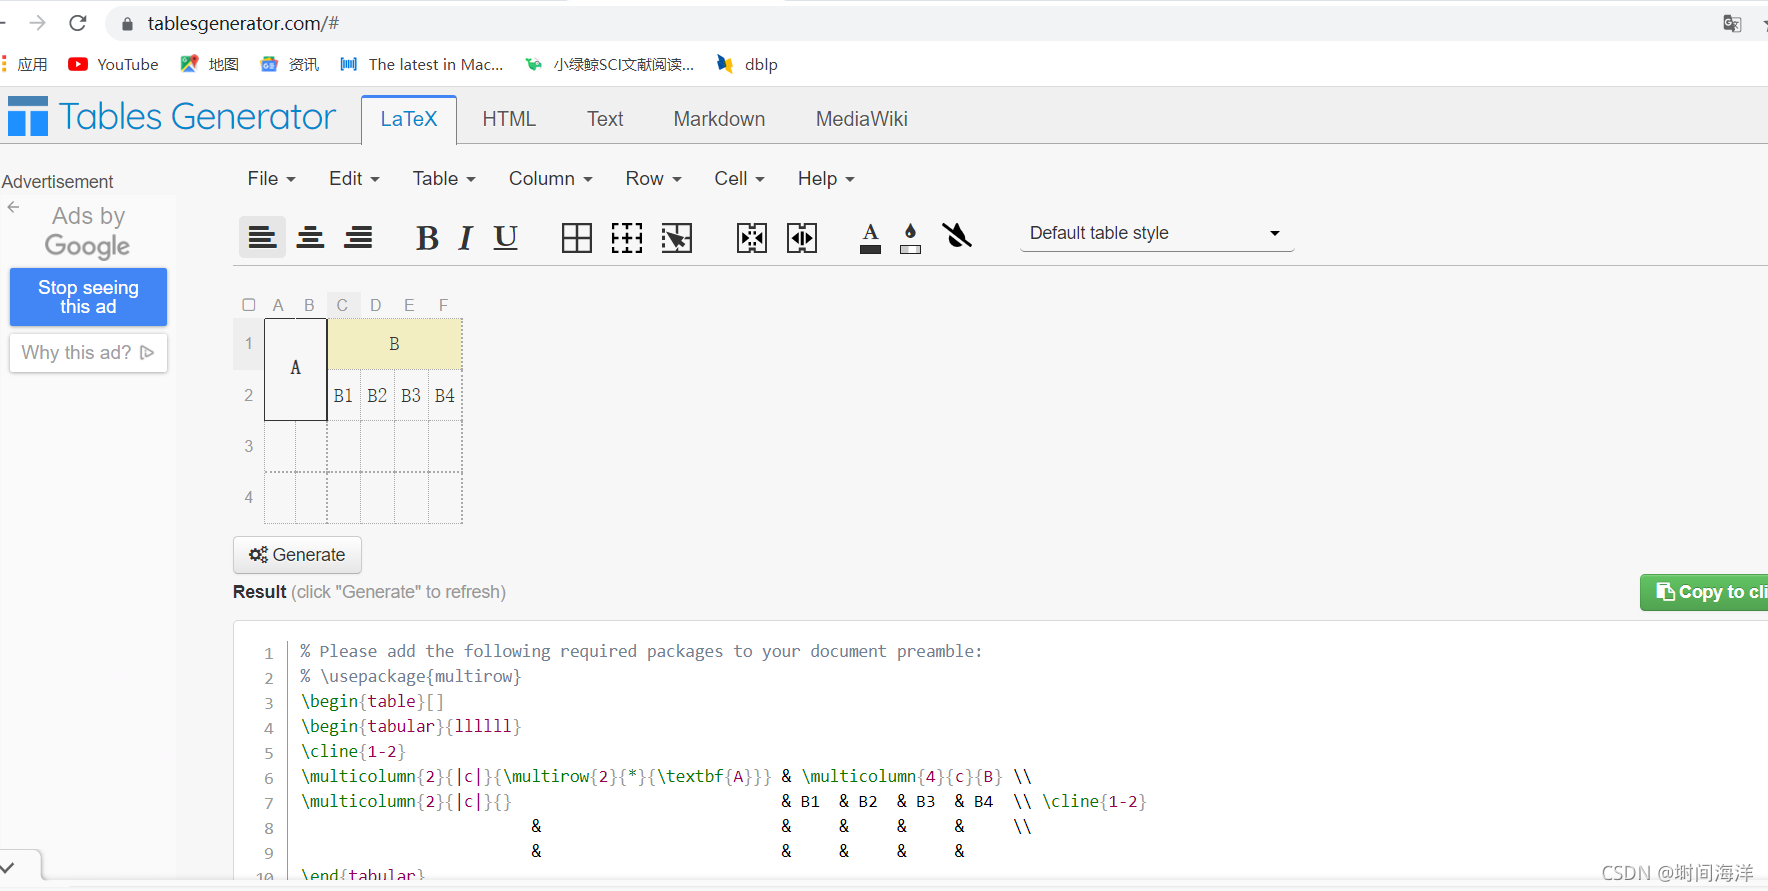
4、在线表格生成工具
Create LaTeX tables online – TablesGenerator.com
四、数学公式
\usepackage{amsmath}:导言区引用数学公式的宏包
1、基础操作
1.1插入公式
有两种插入公式的方法:
1、$数学公式$:行中公式,数学公式与$连接处不要有空格,否则公式不会显示。
2、$$数学公式$$:居中公式(独立公式),数学公式与$$连接处可以有空格。
1.2 编号
$$
x+y=z
\tag{1}
$$
(1)
1.3对齐
使用\begin{aligned}进行对齐,&表示对齐位置,一般都在=前面。
$$
\begin{aligned}
f(x)&=2x+1 \\
&=2+1 \\
&=3
\end{aligned}
$$
1.4上下标
^表示上标, _ 表示下标。如果上下标的内容多于一个字符,需要用 {}将这些内容括成一个整体。
| 输入 | 显示 |
|---|---|
$a^2$ | |
$a_2$ | |
$x^{y+z}$ | |
$p_{xj}$ | |
$x_i$ | |
$x_{\text i}$ | |
$\text{e}$ |
$$
x^{y^z_w}=(1+{\rm e}^x)^{-2xy^w}
$$
2、希腊字母
输入 \小写希腊字母英文全称和\首字母大写希腊字母英文全称来分别输入小写和大写希腊字母。 对于大写希腊字母与现有字母相同的,直接输入大写字母即可。
| 输入 | 显示 | 输入 | 显示 |
|---|---|---|---|
$\alpha$ | $A$ | A | |
$\beta$ | $B$ | B | |
$\gamma$ | $\Gamma$ | ||
$\delta$ | $\Delta$ | ||
$\epsilon$ | $E$ | E | |
$\zeta$ | $Z$ | Z | |
$\eta$ | $H$ | H | |
$\theta$ | $\Theta$ | ||
$\iota$ | $I$ | I | |
$\kappa$ | $K$ | K | |
$\lambda$ | $\Lambda$ | ||
$\nu$ | $N$ | N | |
$\mu$ | $M$ | M | |
$\xi$ | $\Xi$ | ||
$o$ | o | $O$ | O |
$\pi$ | $\Pi$ | ||
$\rho$ | $P$ | P | |
$\sigma$ | $\Sigma$ | ||
$\tau$ | $T$ | T | |
$\upsilon$ | $\Upsilon$ | ||
$\phi$ | $\Phi$ | ||
$\chi$ | $X$ | X | |
$\psi$ | $\Psi$ | ||
$\omega$ | $\Omega$ |
3、字体
{\字体 {需转换的字符} }:进行字体转换,里面一层大括号可省略。一般情况下,公式默认为意大利体,直体为罗马体 。
| 输入 | 说明 | 显示实例 |
|---|---|---|
$\rm D$ | 罗马体 | |
$\mathcal D$ | 花体 | |
$\it D$ | 斜体(默认,意大利体) | |
$\mathit D$ | 数学斜体 | |
$\Bbb D$ | 黑板粗体 | |
$\bf D$ | 粗体 | |
$\sf D$ | 等线体 | |
$\mathscr D$ | 手写体 | |
$\tt D$ | 打字机体 | |
$\frak D$ | 旧德式字体 | |
$\boldsymbol D$ | 黑体 |
4、括号
4.1括号
()、[]、|表示符号本身,使用 \{\} 来表示 {}。
| 输入 | 显示 | 输入 | 显示 |
|---|---|---|---|
$\langle1+2\rangle$ | $()$ | ||
$\lceil1+2\rceil$ | $[]$ | ||
$\lfloor1+2\rfloor$ | $[0,1)$ | ||
$\lbrace1+2\rbrace$ | $\binom{a}{b}$ |
4.2大括号
-
方法1
使用 \left和 \right来创建自动匹配高度的括号,包含 (圆括号)、[方括号]、|绝对值|。如$\left(表达式\right)$,$\left[表达式\right]$,$\left|表达式\right|$......
$$
f\left(
   \left[
     \frac{
       1+\left\{x,y\right\}
     }{
       \left(
          \frac{x}{y}+\frac{y}{x}
       \right)
       \left(u+1\right)
     }+a
   \right]^{3/2}
\right)
$$有时候要用\left.或\right.进行匹配而不显示本身。
$$
\left.
\frac{{\rm d}u}{{\rm d}x}
\right|_{x=0}
$$-
方法2
使用\big和\bigg来创建逐级变大的括号,包含 (圆括号)、[方括号]、|绝对值|。
$$\bigg( \big( ( ) \big) \bigg)$$$$\bigg[ \big[ [ ] \big] \bigg]$$$$\bigg| \big| | | \big| \bigg|$$5、运算符
5.1关系运算符
| 输入 | 符号 | 输入 | 符号 |
|---|---|---|---|
$\pm$ $\mp$ | $\geq$ 或 $\ge$ | ||
$\times$ | $\neq$ 或 $\ne$ | ||
$\div$ | $\approx$ | ||
$\mid$ | $\equiv$ | ||
$\nmid$ | $\ll$ | ||
$\cdot$ | $\gg$ | ||
$\circ$ | $\sum$ | ||
$\ast$ | $\prod$ | ||
$\bigodot$ | $\coprod$ | ||
$\bigotimes$ | $\prec$ | ||
$\bigoplus$ | $\preceq$ | ||
+, -, *, /, = | +, -, *, /, = | $\succ$ | |
$\leq$ 或 $\le$ | $\succeq$ | ||
| $\bullet$ |
5.2集合运算符
| 输入 | 符号 | 输入 | 符号 |
|---|---|---|---|
$\emptyset$ | $\bigcap$ | ||
$\in$ | $\bigcup$ | ||
$\notin$ | $\bigvee$ | ||
$\subset$ | $\bigwedge$ | ||
$\supset$ | $\biguplus$ | ||
$\subseteq$ | $\bigsqcup$ | ||
$\supseteq$ | $\sim$ | ||
$\backsim$ |
5.3三角运算符
| 输入 | 符号 | 输入 | 符号 |
|---|---|---|---|
$\bot$ | $\angle$ | ||
$30^\circ$ | $\sin$ | ||
$\cos$ | $\tan$ | ||
$\cot$ | $\sec$ | ||
$\csc$ |
5.4微积分运算符
| 输入 | 符号 | 输入 | 符号 |
|---|---|---|---|
$\prime$ | $\int$ | \ | |
$\iint$ | $\iiint$ | ||
$\oint$ | $\oiint$ | ||
$\oiiint$ | $\lim$ | ||
$\infty$ | $\nabla$ | ||
$\partial$ |
5.5逻辑运算符
| 输入 | 符号 | 输入 | 符号 |
|---|---|---|---|
$\because$ | $\not=$ | ||
$\therefore$ | $\not>$ | ||
$\forall$ | $\not\subset$ | ||
$\exists$ | $\propto$ |
5.6箭头运算符
| 输入 | 符号 |
|---|---|
$\uparrow$ | |
$\downarrow$ | |
$\Uparrow$ | |
$\Downarrow$ | |
$\rightarrow$ 或 $\to$ | |
$\leftarrow$ 或 `$\gets$ | |
$\Rightarrow$ | |
$\Leftarrow$ | |
$\longrightarrow$ | |
$\longleftarrow$ | |
$\Longrightarrow$ 或 $\implies$ | |
$\Longleftarrow$ | |
$\Longleftrightarrow$ | |
$f: {\mathbf x_t} \mapsto {\mathbf y_t}$ |
5.7省略号
| 输入 | 符号 | 说明 |
|---|---|---|
$\ldots$ | 与文本底线对齐的横向省略号 | |
$\cdots$ | 与文本中线对齐的横向省略号 | |
$\vdots$ | 纵向省略号 | |
$\ddots$ | 斜向省略号 |
$\ldots$ %底线对齐$\cdots$ %文本中线对齐$$
f(x_1,x_2,\underbrace{\ldots}_{\rm ldots} ,x_n) = x_1^2 + x_2^2 + \underbrace{\cdots}_{\rm cdots} + x_n^2
$$6、符号
6.1帽子符号
| 输入 | 符号 | 输入 | 符号 |
|---|---|---|---|
$\hat{A}$ | $\widehat{A}$ | ||
$\check{A}$ | $\widecheck{A}$ | ||
$\breve{A}$ | $\tilde{A}$ | ||
$\widetilde{A}$ | $\overline{A}$ | ||
$\underline{A}$ | $\overleftarrow{A}$ | ||
$\overrightarrow{A}$ | $\overbrace{A}$ | ||
$\underbrace{A}$ | $\overset{a}{b}$ | ||
$\underset{a}{b}$ | `` |
6.2特殊符合
| 输入 | 符号 | 说明 |
|---|---|---|
$\infty$ | 无穷大符号 | |
$\hat x$ | 帽 | |
$\ell_p$ | 范数 | |
$\xrightarrow{f}$ | 箭头备注 | |
$\overset{def}{=}$ | 上备注 | |
$\underset{x\in S\subseteq X}{max}$ | 下备注 |
7、数学公式
7.1分式
通常使用 \frac {分子} {分母} 命令产生一个分式,分式可嵌套。
便捷情况可直接输入\frac ab来快速生成一个。
如果分式很复杂,亦可使用 分子 \over 分母 命令,此时分式仅有一层。
$$
\frac{a-1}{b-1} \quad and \quad {a+1\over b+1}
$$
如果分式的分子显小,可以使用 \dfrac 代替 \frac。
$$
\frac{\dfrac{1}{x}+1}{y+1}
$$
7.2根式
\sqrt [根指数] {被开方数},注意,当缺省根指数时默认为2
$$
\sqrt{2} \quad and \quad \sqrt[n]{x+y}
$$
7.3对数
\log_{对数底数}{表达式},其中表达式的大括号可省略。
| 输入 | 符号 | 输入 | 符号 | 输入 | 符号 |
|---|---|---|---|---|---|
$\log$ | $\lg$ | $\ln$ | |||
$\log_n x$ | $\lg x$ | $\ln x$ |
7.4最值
\max_{下标表达式}{最值表达式}表示最大值
\min_{下标表达式}{最值表达式}表达最小值。
$$
||x||_\infty=\max_{1\leq i\leq n}{|x_i|}
$$
7.5矢量
使用 \vec{矢量}来自动产生一个矢量。
$$
\vec{a} \cdot \vec{b}=0
$$
7.6极限
\lim_{变量 \to 表达式} 表达式, \to 符号可以根据需要更改为任意符号。此类符号在行内显示($表达式$)时第一个{}中的条件将会移至右下角。
$$
\lim_{n \to +\infty} \frac{1}{n(n+1)} \quad and \quad \lim_{x\leftarrow{example} \infty} \frac{1}{n(n+1)}
$$
7.7导数
1.7.1导数
${\rm d}x$或${\text d}x$或$\text{d}x$
$${\rm d}x \quad and \quad {\text d}x \quad and \quad \text{d}x$$7.7.2偏导
$$\frac{\partial y}{\partial x}$$7.7.3梯度
$$\nabla f(x)$$7.8积分
\int_积分下限^积分上限 {被积表达式}
$$
\int_0^1 {x^2} \,{\rm d}x
$$
7.9累加和累乘
使用 \sum_{下标表达式}^{上标表达式}{累加表达式}来输入一个累加。 与之类似,使用 \prod、\bigcup、\bigcap来分别输入累乘、并集和交集。 此类符号在行内显示($表达式$)时上下标表达式将会移至右上角和右下角。
$$
\sum_{i=1}^n \frac{1}{i^2} \quad and \quad \prod_{i=1}^n \frac{1}{i^2} \quad and \quad \bigcup_{i=1}^{2} R \quad and \quad \bigcap_{i=1}^{2} R
$$
7.10方程组和分段函数
7.10.1方程组
方程组有2种方式,分别是\begin{aligned}和\begin{cases}方式,&表示对齐位置。
-
\begin{aligned}方式:
$$
\left\{
\begin{aligned}
a+b&=2 \\
a-b&=4 \\
\end{aligned}
\right.
$$-
\begin{cases}方式(推荐):
$$
\begin{cases}
a+b=2 \\
a-b=4 \\
\end{cases}
$$
7.10.2分段函数
用\begin{cases}方式实现,不同的是方程式和条件之间要用&符号隔开
$$
y =
\begin{cases}
\sin(x)       & x<0 \\
x^2 + 2x +4   & 0 \leq x < 1 \\
x^3           & x \geq 1 \\
\end{cases}
$$
8、矩阵
8.1普通矩阵
使用\begin{matrix}…\end{matrix} 来表示矩阵,在\begin 与\end 之间加入矩阵中的元素即可。矩阵的行之间使用\\ 分隔,\\表示换行;列之间使用& 分隔,&表示对齐位置。
$$
\begin{matrix}
1 & x & x^2 \\
1 & y & y^2 \\
1 & z & z^2 \\
\end{matrix}
$$
8.2括号矩阵
如果要对矩阵加括号,可以使用\left 与\right 配合表示括号符号。也可以使用特殊的matrix ,即替换\begin{matrix}…\end{matrix} 中matrix 为pmatrix ,bmatrix ,Bmatrix ,vmatrix , Vmatrix 。
下面的例子使用替换matric.
-
1.pmatrix
$$
\begin{pmatrix}
1 & 2 \\
3 & 4 \\
\end{pmatrix}
$$-
2.bmatrix
$$
\begin{bmatrix}
1 & 2 \\
3 & 4 \\
\end{bmatrix}
$$-
3.Bmatrix
$$
\begin{Bmatrix}
1 & 2 \\
3 & 4 \\
\end{Bmatrix}
$$-
4.vmatrix
$$
\begin{vmatrix}
1 & 2 \\
3 & 4 \\
\end{vmatrix}
$$-
5.Vmatrix
$$
\begin{Vmatrix}
1 & 2 \\
3 & 4 \\
\end{Vmatrix}
$$
8.3行列式
上一小结已经介绍,有两种方法。
-
1、使用
\left与\right表示括号
$$
\left|
\begin{matrix}
1 & x & x^2 \\
1 & y & y^2 \\
1 & z & z^2 \\
\end{matrix}
\right|
$$-
2、使用特殊的
matrix
$$
\begin{vmatrix}
1 & x & x^2 \\
1 & y & y^2 \\
1 & z & z^2 \\
\end{vmatrix}
$$
8.4元素省略矩阵
可以使用\cdots : ,
\ddots: ,
\vdots:,来省略矩阵中的元素。
$$
\begin{pmatrix}
1 & a_1 & a_1^2 & \cdots &a_1^n \\
1 & a_2 &a_2^2 & \cdots &a_2^n \\
\vdots & \vdots & \vdots & \ddots & \vdots \\
1&a_m & a_m^2 & \cdots & a_m^n \\
\end{pmatrix}
$$
8.5增广矩阵
可以使用\begin{array} ... \end{array} 来实现。
$$
\left[
\begin{array}  {c c | c}
% 这里的c表示数组中元素对其方式:c居中、r右对齐、l左对齐;竖线表示2、3列间插入竖线
1 & 2 & 3 \\
4 & 5 & 6
\end{array}
\right]
$$
五、伪代码
需要用到的宏包:
\usepackage{algorithmic}
\usepackage{algorithm}
1、通用模板
对于计算机专业的学生,在论文中插入伪代码描述所用的算法还是比较常见的。下面是伪代码的通用模板,我们先体验一下其效果,然后在后面详细讲解模板中的每个细节。
\begin{algorithm}[!h]
    \caption{Algorithm of SUM}
    \label{alg:AOS}
    \renewcommand{\algorithmicrequire}{\textbf{Input:}}
    \renewcommand{\algorithmicensure}{\textbf{Output:}}

    \begin{algorithmic}[1]
        \REQUIRE $A$, $B$, $C$(This is Inputs)  %%input
        \ENSURE XXX(This is Outputs)    %%output

        \STATE  xxxxx

        \WHILE{$A=B$}
            \STATE xxxxx
        \ENDWHILE

        \FOR{each $i \in [1,10]$}
            \IF {$C = 0$}
                \STATE xxxxx
            \ELSE
                \STATE xxxxx
            \ENDIF
        \ENDFOR

        \RETURN Outputs
    \end{algorithmic}
\end{algorithm}
2、模块细节
2.1模板说明
2.1.1框架
\begin{algorithm}[htbp]
...
\end{algorithm}
整体大框架明确了伪代码或算法结构的开始(\begin)和结束(\end)的位置,而 algorithm 说明插入的内容是算法。
[htbp] 是算法的摆放位置,括号内容可根据需求选填,表示意思与图片、表格相同。
2.1.2标题、标签
\caption{Algorithm of SUM}
\label{alg:AOS}
caption 是算法的标题。{ }中就是标题展示的具体内容,标题也会有编号,一般都是自动编号。label 是标签,标签主要是在引用的时候会用到。
2.1.3输入输出设置
\renewcommand{\algorithmicrequire}{\textbf{Input:}}
\renewcommand{\algorithmicensure}{\textbf{Output:}}\renewcommand{}{}:第二个{}是名称,这里设为Input:和Output:。
如果每个算法都遵循这个设定,可将其设为全局命令:添加到引言区。(算法优先选择自己内部局部设定的命令)
假如直接使用下面命令:
\algorithmicrequire
\algorithmicensure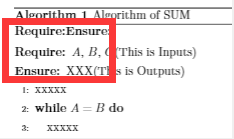
因为算法一般都要有输入输出,所以上面这个命令不可取。
2.1.4算法内容框架
\begin{algorithmic}[1]

\end{algorithmic}
这一对是算法内容的框架,表示算法的具体实现以伪代码的形式写在这里。
[]中的参数一般写1,表示算法内容几行标一次序号,这里是一行一标记。如果没有[],则不标记序号。
2.1.5输入输出
\REQUIRE $A$, $B$, $C$(This is Inputs)  %%input
\ENSURE XXX(This is Outputs) %%output\REQUIRE命令表示输入,\ENSURE 命令表示输出。
2.1.6算法内容
\STATE xxxxx
\WHILE{$A=B$}
\STATE xxxxx
\ENDWHILE
\FOR{each $i \in [1,10]$}
\IF {$C = 0$}
\STATE xxxxx
\ELSE
\STATE xxxxx
\ENDIF
\ENDFOR
\RETURN Outputs每一条独立的语句,前面都要添加命令\STATE。除此之外,我们最常用的还有IF判断语句、FOR循环语句、WHILE循环语句和RETURN返回语句。
2.2模板引用
As show in Algorithm \ref{alg:AOS} %% 英文引用算法
正如算法 \ref{alg:AOS} %% 中文引用算法
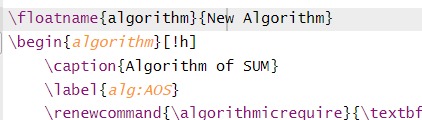
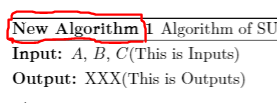
2.3模板改名
只需要在模块前面添加一行:\floatname{algorithm}{名称}。
3、常用语句
在算法的伪代码书写模式中有一些常用的语句,比如:条件分支、循环结构等。这些语法的使用要用到 algorithmic 宏包,即:\usepackage{algorithmic}。
3.1IF条件判断语句
\IF {条件}
    \STATE 语句1
\ELSE
    \STATE 语句2
\ENDIF
\IF {条件}
\STATE 语句1
\ENDIF\IF {条件1}
\STATE 语句1
\ELSE
\IF{条件2} \STATE 语句2
\ELSE \STATE 语句3
\ENDIF
\ENDIF3.2FOR循环语句
\FOR{循环条件}
    \STATE  循环语句
\ENDFOR
3.3WHILE循环语句
\WHILE{条件}
    \STATE 循环语句
\ENDWHILE
六、代码块
1、基础用法
\usepackage{listings}:所需要的宏包
\lstset{}进行基础设置
\begin{lstlisting}[language=xxx]和\end{lstlisting}插入代码块。
\documentclass{article}
\usepackage[UTF8]{ctex}
\usepackage{listings}
% 代码块基础设置
\lstset{
numbers=left, % 在左侧显示行号
showstringspaces=false, % 不显示字符串中的空格
frame=single, % 设置代码块边框
}
\title{Latex基础} % 文章标题
\author{埘间海洋} % 作者的名称
\date{\today} % 当天日期
\begin{document}
\maketitle
\section{C Language}
\begin{lstlisting}[language=c]
#include <stdio.h>
// main function
int main() {
printf("Hello World!");
return 0;
}
\end{lstlisting}
\end{document}
2、高级用法
在基础用法基础上增加了\usepackage{xcolor}宏包,并使用\lstset{}进行高级设置。
高级设置除基础设置外,还包括关键字格式,字符串格式等设置。
\documentclass{article}
\usepackage[UTF8]{ctex}
\usepackage{listings}
\usepackage{xcolor}
% 代码块高级设置
\lstset{
% basicstyle=\footnotesize, % 设置整体的字体大小
showstringspaces=false, % 不显示字符串中的空格
frame=single, % 设置代码块边框
numbers=left, % 在左侧显示行号
% numberstyle=\footnotesize\color{gray}, % 设置行号格式
numberstyle=\color{darkgray}, % 设置行号格式
backgroundcolor=\color{white}, % 设置背景颜色
keywordstyle=\color{blue}, % 设置关键字颜色
commentstyle=\it\color[RGB]{0,100,0}, % 设置代码注释的格式
stringstyle=\sl\color{red}, % 设置字符串格式
}
\title{Latex基础} % 文章标题
\author{埘间海洋} % 作者的名称
\date{\today} % 当天日期
\begin{document}
\maketitle
\section{C Language}
\begin{lstlisting}[language=c]
#include <stdio.h>
// main function
int main() {
printf("Hello World!");
return 0;
}
\end{lstlisting}
\end{document}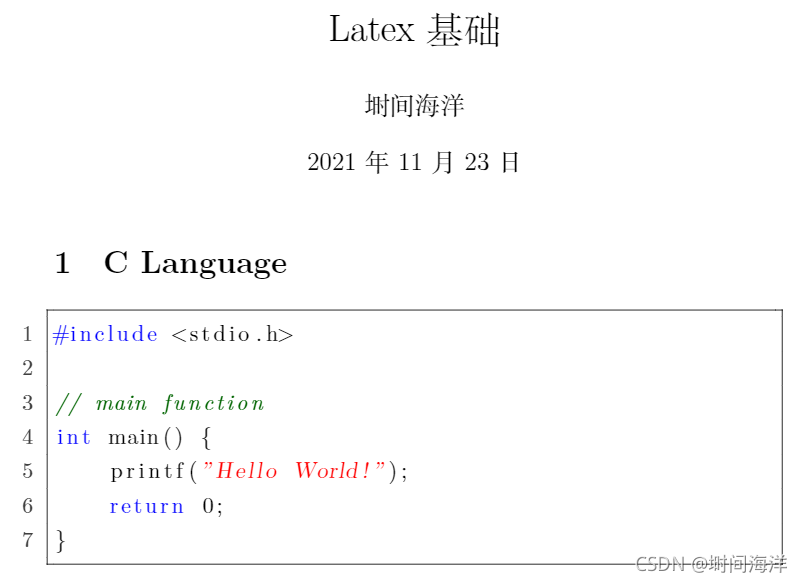
七、参考文献
参考文献排版与引用所用到的宏包有:
\usepackage{cite}
\usepackage[square, sort&compress]{natbib}\usepackage[option]{natbib},option具体可选值包括:
round: (default) 使用圆括号
square: 使用方括号
curly: 使用花括号
angle: 使用尖括号
colon:(default) 用引号分隔多个引用
comma: 用逗号分隔多个引用
authoryear: (default)使用作者–年引用形式
numbers: 使用编号引用形式
super: 使用 Nature 那样的上标编号引用
sort:多个引用按照首字母排序
sort&compress: 除排序外,多个引用可以合并 (如 3-6, 15)
longnamesfirst:多个作者的文献第一次被引用时列出所有作者,以后的引用可以缩写为 et al.
sectionbib: 重定义了\thebibliography 使用 \section* 而不是 \chapter*。这样使用 chapterbib宏包时,参考文献名称为 section 一级
nonamebreak: 在一行排版所有作者名字,这可能引起 overfull hbox 警告但是消除了跨行的hyperref 问题
1、直接插入法
1.1插入文献

找到所要插入的文献引用,一一列举出来。
下面列举了5个参考文献 ,{thebibliography}[100] 的选项100表示参考文献的最大数量为100。\bibitem{label} 表示一条参考文献,其中的 label 则表示的是文献的标注,即在正文的引用中会被用到。
\begin{thebibliography}{100}
\bibitem{ref1}Lv Y, Duan Y, Kang W, et al. Traffic flow prediction with big data: a deep learning approach[J]. IEEE Transactions on Intelligent Transportation Systems, 2014, 16(2): 865-873.
\bibitem{ref2}Wu Y, Tan H, Qin L, et al. A hybrid deep learning based traffic flow prediction method and its understanding[J]. Transportation Research Part C: Emerging Technologies, 2018, 90: 166-180.
\bibitem{ref3}Polson N G, Sokolov V O. Deep learning for short-term traffic flow prediction[J]. Transportation Research Part C: Emerging Technologies, 2017, 79: 1-17.
\bibitem{ref4}Yin H, Wong S C, Xu J, et al. Urban traffic flow prediction using a fuzzy-neural approach[J]. Transportation Research Part C: Emerging Technologies, 2002, 10(2): 85-98.
\bibitem{ref5}Fu R, Zhang Z, Li L. Using LSTM and GRU neural network methods for traffic flow prediction[C]//2016 31st Youth Academic Annual Conference of Chinese Association of Automation (YAC). IEEE, 2016: 324-328.
\end{thebibliography}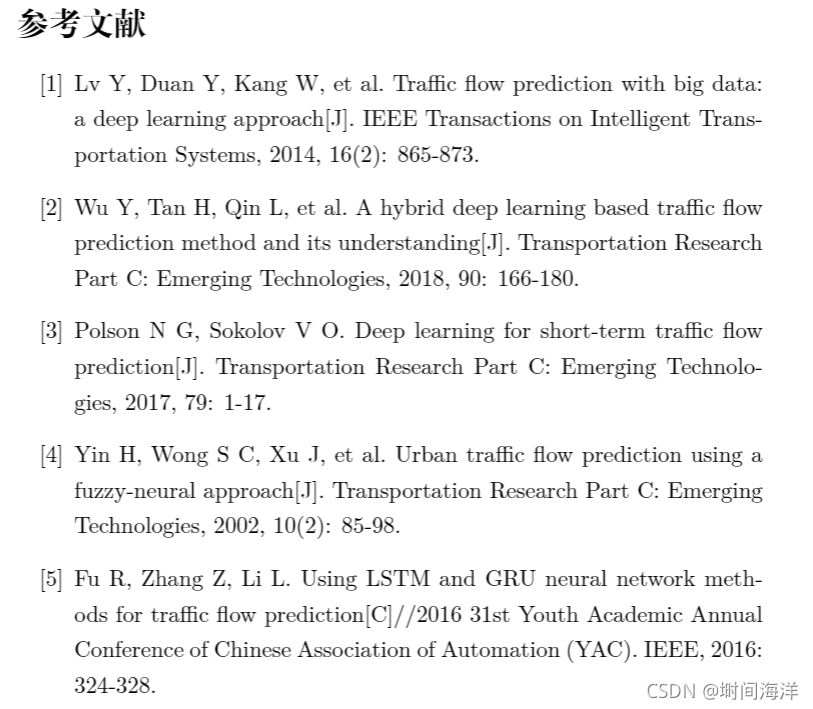
1.2引用文献
\usepackage{cite}:引用参考文献需要的宏包
参考文献的引用要用到命令 \cite
1.2.1单文献引用
We want to cite the paper \cite{ref1}
1.2.2多文献引用
We want to cite the paper \cite{ref1,ref2,ref5} \par
We want to cite the paper \cite{ref1,ref2,ref3}
2、BibTex法
BibTeX 是一种格式和一个程序,用于协调LaTeX的参考文献处理. BibTeX 使用数据库的的方式来管理参考文献. 在当前 .tex 文件所在的文件目录下,创建一个以 .bib 为后缀的格式文件,命名为 lookup.bib
2.1论文类
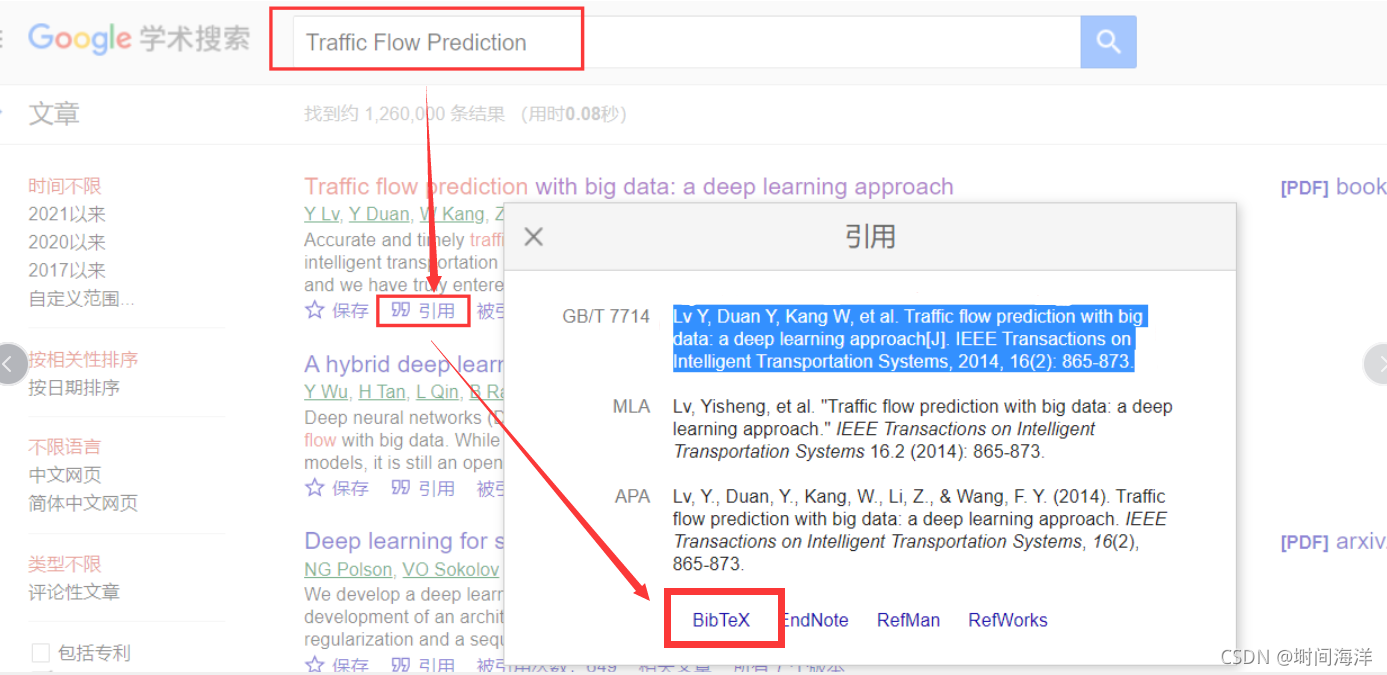
以下面一篇文献为例。
@article{2015Traffic,
  title={Traffic Flow Prediction With Big Data: A Deep Learning Approach},
  author={ Lv, Y.  and  Duan, Y.  and  Kang, W.  and  Li, Z.  and  Wang, F. Y. },
  journal={IEEE Transactions on Intelligent Transportation Systems},
  volume={16},
  number={2},
  pages={865-873},
  year={2015},
}-
标签
@article{2015Traffic,
}其中,2015Traffic是标签,用于正文中引用文献。标签是可以改动的,只要和本论文中其他的参考文献不重复就行。
-
文献参数
title:论文题目,
author:论文作者,
journal:论文发布期刊、会议或者所属,有些论文用booktitle,
volume:卷,
number:号,
pages:页码,
year:年份
有些论文生成可能没有这么全,就需要我们去找到相关的信息,自己补进来了。
下面例子中我们共添加了五篇文献的BibTex到lookup.bib文件:
@article{2015Traffic,
title={Traffic Flow Prediction With Big Data: A Deep Learning Approach},
author={ Lv, Y. and Duan, Y. and Kang, W. and Li, Z. and Wang, F. Y. },
journal={IEEE Transactions on Intelligent Transportation Systems},
volume={16},
number={2},
pages={865-873},
year={2015},
}
@inproceedings{2017Traffic,
title={Traffic Flow Prediction with Big Data: A Deep Learning based Time Series Model},
author={ Chen, Y. and Lei, S. and Lei, W. },
booktitle={IEEE INFOCOM 2017 -IEEE Conference on Computer Communications Workshops (INFOCOM WKSHPS)},
year={2017},
}
@article{2019Big,
title={Big data‐driven machine learning‐enabled traffic flow prediction},
author={ Fanhui, Kong and Jian, Li and Bin, Jiang and Tianyuan, Zhang and Houbing, Song },
journal={Transactions on Emerging Telecommunications Technologies},
volume={30},
pages={e3482-},
year={2019},
}
@article{2019Deep,
title={Deep Transfer Learning for Intelligent Cellular Traffic Prediction Based on Cross-Domain Big Data},
author={ Zhang, C. and Zhang, H. and Qiao, J. and Yuan, D. and Zhang, M. },
journal={IEEE Journal on Selected Areas in Communications},
pages={1-1},
year={2019},
}
@article{Hong2014Deep,
title={Deep Architecture for Traffic Flow Prediction: Deep Belief Networks With Multitask Learning},
author={Hong and H. and Xie and K. and Huang and W. and Song and G.},
journal={IEEE transactions on intelligent transportation systems},
volume={15},
number={5},
pages={2191-2201},
year={2014},
}main.tex中正文部分:
\section{REFERENCES}
\subsection{An overview of references}
We want to cite the paper \cite{2015Traffic}, \par
We want to cite the paper \cite{2015Traffic,2017Traffic, 2019Big}, \par
We want to cite the paper \cite{2015Traffic,2019Big,Hong2014Deep}, \par
\bibliographystyle{ieeetr}
\bibliography{lookup} % lookup就是存储参考文献信息的.bib文件名
从结果我们可以看出,在lookup.bib文件中我们添加了五篇参考文献,但在文章参考文献部分只出现四篇。原因是:BibTex方法排版文献,如果某篇论文正文中未被引用,即使.bib文件中有,参考文献不会显示。
\bibliographystyle{...}是插入参考文献的样式,不同的杂志期刊的样式不一样。常见的预设样式的可选项有8种,分别是:
-
plain:按字母的顺序排列,比较次序为作者、年度和标题;
-
unsrt:样式同plain,只是按照引用的先后排序;
-
abbrv:类似plain,将月份全拼改为缩写,更显紧凑;
-
ieeetr:国际电气电子工程师协会期刊样式;
-
acm:美国计算机学会期刊样式;
-
siam:美国工业和应用数学学会期刊样式;
2.2网页类
网页的参考文献最终样式是:
[1] 作者. 网页名称. (时间). [Online]. Available: 网页链接(网址)网页引用需要涉及到五个部分:标签、作者、标题、链接以及时间。其中标签、标题和链接是必不可少的。
@online{标签,
  author="作者名称",
  title="{网页名称}",
  url="网页链接",
  note="(年, 月 日)",
}online表示的是该文献是网页,其中最重要的格式是时间(2021, Jun 1):
-
年要用阿拉伯数字,且年后要加逗号;
-
月要用英文前三个字母,且首字母大写。
-
日要用阿拉伯数字,要和月有一个空格。
将下面网页内容添加进lookup.bib文件,并在main.tex文件中引用(因为这样才能在参考文献中显示)。
@online{PBClibrary,
  author="Ben Lynn",
  title="{The Pairing-Based Cryptography (PBC) library}",
  url="https://crypto.stanford.edu/pbc/",
  note="(2013, Jun 14)",
}
3、改变引用颜色
改变引用颜色前最好在导言区导入xcolor宏包,代码为\usepackage{xcolor}。 改变引用颜色需要在导言区添加如下代码:
\usepackage[colorlinks,bookmarksopen,bookmarksnumbered,citecolor=green, linkcolor=red, urlcolor=blue]{hyperref}citecolor为参考文献颜色,linkcolor为图表和公式引用的颜色,urlcolor为超链接颜色。各颜色可根据偏好或要求自行更改。
\href{http://www.baidu.com}{Baidu} %超链接
As Picture \ref{pic1} %图片
As show in Table \ref{table1} %表格
We want to cite the paper \cite{2015Traffic} %文献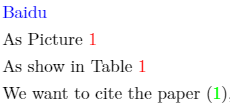
Latex相关内容链接:


 1009
1009

 被折叠的 条评论
为什么被折叠?
被折叠的 条评论
为什么被折叠?
 到【灌水乐园】发言


