下拉列表框

基本使用
静态指定
<Spinner
    android:layout_width="wrap_content"
    android:layout_height="wrap_content"
    android:entries="@array/menu"
    ></Spinner>
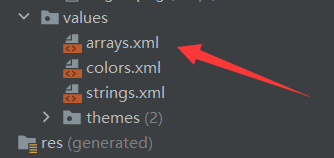
静态指定文件,这里的@array/menu就是在values的定义的arrays文件


arrays.xml
<?xml version="1.0" encoding="utf-8"?>
<resources>

    <string-array name="menu">
        <item>全部</item>
        <item>数学</item>
        <item>英语</item>
        <item>政治</item>
        <item>历史</item>
    </string-array>
</resources>
通过Java文件指定内容
1、xml文件
<?xml version="1.0" encoding="utf-8"?>
<LinearLayout xmlns:android="http://schemas.android.com/apk/res/android"
    xmlns:app="http://schemas.android.com/apk/res-auto"
    xmlns:tools="http://schemas.android.com/tools"
    android:layout_width="match_parent"
    android:layout_height="match_parent"
    tools:context=".MainActivity"

    >

    <Spinner
        android:id="@+id/spinner"
        android:layout_width="wrap_content"
        android:layout_height="wrap_content"
        android:entries="@array/menu"
        ></Spinner>

</LinearLayout>
2、Java文件
package com.example.test;

import androidx.appcompat.app.AppCompatActivity;

import android.content.Context;
import android.os.Bundle;
import android.view.MotionEvent;
import android.view.View;
import android.view.ViewGroup;
import android.view.WindowManager;
import android.view.animation.AnimationUtils;
import android.widget.AdapterView;
import android.widget.ArrayAdapter;
import android.widget.BaseAdapter;
import android.widget.GridLayout;
import android.widget.GridView;
import android.widget.ImageSwitcher;
import android.widget.ImageView;
import android.widget.SimpleAdapter;
import android.widget.Spinner;
import android.widget.Toast;
import android.widget.ViewSwitcher;

import java.util.ArrayList;
import java.util.HashMap;
import java.util.List;
import java.util.Map;

public class MainActivity extends AppCompatActivity {


    @Override
    protected void onCreate(Bundle savedInstanceState) {
        super.onCreate(savedInstanceState);
        setContentView(R.layout.activity_main);

        Spinner spinner = findViewById(R.id.spinner);
        String[] menu = new String[]{"全部", "政治", "英语", "数学"};
        /**
         * 第一个参数是上下文对象
         * 第二个参数是指定的下拉列表框的样式
         * 第三个参数是指定显示的数据列表
         */
        ArrayAdapter<String> arrayAdapter  = new ArrayAdapter<>(this, android.R.layout.simple_list_item_1, menu);
//      指定下拉框下拉时的样式
        arrayAdapter.setDropDownViewResource(android.R.layout.simple_spinner_dropdown_item);
        spinner.setAdapter(arrayAdapter);
//      监听选项改变
        spinner.setOnItemSelectedListener(new AdapterView.OnItemSelectedListener() {
            @Override
            public void onItemSelected(AdapterView<?> adapterView, View view, int i, long l) {
//              获取被选中的选项,注意开始显示的时候的初始值也会会被调用
                String s = adapterView.getItemAtPosition(i).toString();
                Toast.makeText(MainActivity.this,s, Toast.LENGTH_SHORT).show();

            }

            @Override
            public void onNothingSelected(AdapterView<?> adapterView) {

            }
        });

    }
}
列表视图

基本使用
静态指定
activity_main.xml
<?xml version="1.0" encoding="utf-8"?>
<LinearLayout xmlns:android="http://schemas.android.com/apk/res/android"
    xmlns:app="http://schemas.android.com/apk/res-auto"
    xmlns:tools="http://schemas.android.com/tools"
    android:layout_width="match_parent"
    android:layout_height="match_parent"
    tools:context=".MainActivity"
    >
    <ListView
        android:layout_width="match_parent"
        android:layout_height="wrap_content"
        android:entries="@array/list"
        ></ListView>


</LinearLayout>
values/arrays.xml
<?xml version="1.0" encoding="utf-8"?>
<resources>
    <string-array name="list">
        <item>全部</item>
        <item>数学</item>
        <item>英语</item>
        <item>政治</item>
        <item>历史</item>
    </string-array>
</resources>

动态指定
activity_main.xml文件
<?xml version="1.0" encoding="utf-8"?>
<LinearLayout xmlns:android="http://schemas.android.com/apk/res/android"
    xmlns:app="http://schemas.android.com/apk/res-auto"
    xmlns:tools="http://schemas.android.com/tools"
    android:layout_width="match_parent"
    android:layout_height="match_parent"
    tools:context=".MainActivity"
    >
    <ListView
        android:layout_width="match_parent"
        android:layout_height="wrap_content"
        ></ListView>
</LinearLayout>
Java文件
实例
1、需求:实现类似朋友圈列表

2、需求分析:对于复杂的列表,使用SimpleAapter进行配置
3、activity_main.xml文件
<?xml version="1.0" encoding="utf-8"?>
<LinearLayout xmlns:android="http://schemas.android.com/apk/res/android"
    xmlns:app="http://schemas.android.com/apk/res-auto"
    xmlns:tools="http://schemas.android.com/tools"
    android:layout_width="match_parent"
    android:layout_height="match_parent"
    tools:context=".MainActivity"
    android:orientation="vertical"
    >

    <ListView
        android:id="@+id/listView"
        android:layout_width="match_parent"
        android:layout_height="wrap_content"
        ></ListView>

</LinearLayout>
4、自定义cell.xml文件,就是每一个列表
<?xml version="1.0" encoding="utf-8"?>
<LinearLayout xmlns:android="http://schemas.android.com/apk/res/android"
    android:layout_width="match_parent"
    android:layout_height="60dp"
    android:gravity="center_vertical"
    android:orientation="horizontal"
    >

    <ImageView
        android:id="@+id/tx"
        android:layout_width="60dp"
        android:layout_height="60dp"
        android:layout_marginRight="20dp"
        android:padding="10dp"
        ></ImageView>

    <TextView
        android:id="@+id/name"
        android:textSize="16dp"
        android:layout_width="wrap_content"
        android:layout_height="wrap_content"
        android:padding="10dp"
        ></TextView>

</LinearLayout>
5、Java文件
package com.example.test;

import androidx.appcompat.app.AppCompatActivity;

import android.content.Context;
import android.os.Bundle;
import android.view.MotionEvent;
import android.view.View;
import android.view.ViewGroup;
import android.view.WindowManager;
import android.view.animation.AnimationUtils;
import android.widget.AdapterView;
import android.widget.ArrayAdapter;
import android.widget.BaseAdapter;
import android.widget.GridLayout;
import android.widget.GridView;
import android.widget.ImageSwitcher;
import android.widget.ImageView;
import android.widget.ListView;
import android.widget.SimpleAdapter;
import android.widget.Spinner;
import android.widget.Toast;
import android.widget.ViewSwitcher;

import java.util.ArrayList;
import java.util.HashMap;
import java.util.List;
import java.util.Map;

public class MainActivity extends AppCompatActivity {
    @Override
    protected void onCreate(Bundle savedInstanceState) {
        super.onCreate(savedInstanceState);
        setContentView(R.layout.activity_main);
        String[] names = new String[]{"小明", "小红", "小兰", "小黄"};
        Integer[] imagesSources = new Integer[]{ R.drawable.img01,R.drawable.img01,R.drawable.img01,R.drawable.img01,};
        List<Map<String, Object>> list = new ArrayList<>();
        for (int i = 0 ; i < names.length ; i++){
            Map<String, Object> map = new HashMap<>();
            map.put("image", imagesSources[i]);
            map.put("name", names[i]);
            list.add(map);
        }
        /**
         * 第一个参数是上下文环境
         * 第二个参数是数据列表
         * 第三个参数是布局源文件
         * 第四个参数数据列表中将被使用的字段
         * 第五个参数是资源源文件中被使用的组件
         */
        SimpleAdapter simpleAdapter = new SimpleAdapter(this, list, R.layout.cell,
                new String[]{"image", "name"}, new int[]{R.id.tx, R.id.name});
        ListView listView = findViewById(R.id.listView);
//      点击监听
        listView.setOnItemClickListener(new AdapterView.OnItemClickListener() {
            @Override
            public void onItemClick(AdapterView<?> adapterView, View view, int i, long l) {
//              获取点击的昵称
                Toast.makeText(MainActivity.this, ((HashMap<String, Object>)adapterView.getItemAtPosition(i)).get("name").toString(), Toast.LENGTH_SHORT).show();
            }
        });
        listView.setAdapter(simpleAdapter);

    }
}
滚动视图

基本使用
<?xml version="1.0" encoding="utf-8"?>
<LinearLayout xmlns:android="http://schemas.android.com/apk/res/android"
    xmlns:app="http://schemas.android.com/apk/res-auto"
    xmlns:tools="http://schemas.android.com/tools"
    android:layout_width="match_parent"
    android:layout_height="match_parent"
    tools:context=".MainActivity">
    <ScrollView
        android:layout_width="match_parent"
        android:layout_height="400dp">
        <TextView
            android:layout_width="match_parent"
            android:layout_height="match_parent"
            android:text="@string/content"
            ></TextView>
    </ScrollView>
</LinearLayout>

默认是垂直方向滚动
如果需要水平方向滚动可以使用如下
    <HorizontalScrollView
        android:layout_width="match_parent"
        android:layout_height="400dp">
        <TextView
            android:layout_width="match_parent"
            android:layout_height="match_parent"
            android:text="@string/content"
            ></TextView>
    </HorizontalScrollView>
一个滚动视图里边只能放一个组件,如果需要放多个组件就要使用布局管理器
<?xml version="1.0" encoding="utf-8"?>
<LinearLayout xmlns:android="http://schemas.android.com/apk/res/android"
    xmlns:app="http://schemas.android.com/apk/res-auto"
    xmlns:tools="http://schemas.android.com/tools"
    android:layout_width="match_parent"
    android:layout_height="match_parent"
    tools:context=".MainActivity">
    <ScrollView
        android:layout_width="match_parent"
        android:layout_height="400dp">
        <LinearLayout
            android:layout_width="wrap_content"
            android:layout_height="wrap_content"
            android:orientation="vertical"
            >
            <TextView
                android:layout_width="match_parent"
                android:layout_height="match_parent"
                android:text="@string/content"
                ></TextView>
            <TextView
                android:layout_width="match_parent"
                android:layout_height="match_parent"
                android:text="@string/content"
                ></TextView>
        </LinearLayout>
    </ScrollView>
</LinearLayout>
选项卡

选项卡实现步骤

实例
1、实现点击选线卡显示图片

2、activity_main.xml文件
<?xml version="1.0" encoding="utf-8"?>
<TabHost xmlns:android="http://schemas.android.com/apk/res/android"
    xmlns:app="http://schemas.android.com/apk/res-auto"
    android:id="@android:id/tabhost"
    xmlns:tools="http://schemas.android.com/tools"
    android:layout_width="match_parent"
    android:layout_height="match_parent"
    tools:context=".MainActivity">

    <LinearLayout
        android:layout_width="match_parent"
        android:layout_height="match_parent"
        android:orientation="vertical"
        >

        <TabWidget
            android:id="@android:id/tabs"
            android:layout_width="match_parent"
            android:layout_height="wrap_content"
            ></TabWidget>

        <FrameLayout
            android:layout_width="match_parent"
            android:layout_height="match_parent"
            android:id="@android:id/tabcontent"
            ></FrameLayout>

    </LinearLayout>

</TabHost>
3、tab1.xml文件:选项卡一内容
<?xml version="1.0" encoding="utf-8"?>
<LinearLayout xmlns:android="http://schemas.android.com/apk/res/android"
    android:layout_width="match_parent"
    android:layout_height="match_parent"
    android:id="@+id/tab1">

    <ImageView
        android:layout_width="match_parent"
        android:layout_height="match_parent"
        android:src="@mipmap/img01"
        ></ImageView>

</LinearLayout>
4、tab2.xml文件:选项卡二内容
<?xml version="1.0" encoding="utf-8"?>
<LinearLayout xmlns:android="http://schemas.android.com/apk/res/android"
    android:layout_width="match_parent"
    android:layout_height="match_parent"
    android:id="@+id/tab2">

    <ImageView
        android:layout_width="match_parent"
        android:layout_height="match_parent"
        android:src="@mipmap/img02"
        ></ImageView>

</LinearLayout>
5、Java文件
package com.example.study1;
import androidx.appcompat.app.AppCompatActivity;
import android.os.Bundle;
import android.view.LayoutInflater;
import android.widget.TabHost;
import java.util.zip.Inflater;
public class MainActivity extends AppCompatActivity {
    @Override
    protected void onCreate(Bundle savedInstanceState) {
        super.onCreate(savedInstanceState);
        setContentView(R.layout.activity_main);

        TabHost tabHost = findViewById(android.R.id.tabhost);
//      创建tabHost
        tabHost.setup();
//      创建选项卡并配置相应的布局文件
        LayoutInflater inflater = LayoutInflater.from(this);
        inflater.inflate(R.layout.tab1, tabHost.getTabContentView());
        inflater.inflate(R.layout.tab2, tabHost.getTabContentView());
//      为每个布局文件配置选项卡并绑定选项卡要显示的内容
        tabHost.addTab(tabHost.newTabSpec("tab1").setIndicator("选项一").setContent(R.id.tab1));
        tabHost.addTab(tabHost.newTabSpec("tab2").setIndicator("选项二").setContent(R.id.tab2));
    }
}


 767
767


 被折叠的 条评论
为什么被折叠?


