


摘要
在变换域进行嵌入水印有更好的鲁棒性。目前相关实现代码大多基于Matlab,本文使用Python简单进行了DCT域的水印嵌入,并且对攻击进行了测试,计算攻击后图像的PSNR以及SSIM。
方法
1. 代码
喜欢的东西都在码里,可以不用本地配置环境,使用百度的飞浆平台进行在线运行。
开源这个代码不求赞,只求你们可以注册帮我拿点算力,或者fork一下项目,我真的很需要算力,所以希望我劝各位年轻人,要讲武德,耗子尾汁,不要白嫖。好卑微的博主呜呜呜。下面第一个Link给的算力多,注册之后点第二个link可以在线运行
百度飞浆邀请注册地址
# =========================
# -*- coding:utf-8 -*-
# @author: JFZ
# @version: 2.0
# @time: 2022-05-30-13-06
# =========================
import cv2
import numpy as np
# pip install scikit-image -i https://pypi.tuna.tsinghua.edu.cn/simple
import skimage.util as skiu
from skimage import transform, metrics
import matplotlib.pyplot as plt
# 主要参考https://blog.csdn.net/WilsonSong1024/article/details/80318006、https://github.com/lfreya/Watermark-embed-and-extract进行实现
class DCT_Embed(object):
def __init__(self, background, watermark, block_size=8, alpha=30):
b_h, b_w = background.shape[:2]
w_h, w_w = watermark.shape[:2]
assert w_h <= b_h / block_size and w_w <= b_w / block_size, \
"\r\n请确保您的的水印图像尺寸 不大于 背景图像尺寸的1/{:}\r\nbackground尺寸{:}\r\nwatermark尺寸{:}".format(
block_size, background.shape, watermark.shape
)
# 保存参数
self.block_size = block_size
# 水印强度控制
self.alpha = alpha
# 随机的序列
self.k1 = np.random.randn(block_size)
self.k2 = np.random.randn(block_size)
def dct_blkproc(self, background):
"""
对background进行分块,然后进行dct变换,得到dct变换后的矩阵
:param image: 输入图像
:param split_w: 分割的每个patch的w
:param split_h: 分割的每个patch的h
:return: 经dct变换的分块矩阵、原始的分块矩阵
"""
background_dct_blocks_h = background.shape[0] // self.block_size # 高度
background_dct_blocks_w = background.shape[1] // self.block_size # 宽度
background_dct_blocks = np.zeros(shape=(
(background_dct_blocks_h, background_dct_blocks_w, self.block_size, self.block_size)
)) # 前2个维度用来遍历所有block,后2个维度用来存储每个block的DCT变换的值
# 实现参照https://www.cnblogs.com/gxgl314/p/9287628.html
h_data = np.vsplit(background, background_dct_blocks_h) # 垂直方向分成background_dct_blocks_h个块
for h in range(background_dct_blocks_h):
block_data = np.hsplit(h_data[h], background_dct_blocks_w) # 水平方向分成background_dct_blocks_w个块
for w in range(background_dct_blocks_w):
a_block = block_data[w]
background_dct_blocks[h, w, ...] = cv2.dct(a_block.astype(np.float64)) # dct变换
return background_dct_blocks
def dct_embed(self, dct_data, watermark):
"""
将水印嵌入到载体的dct系数中
:param dct_data: 背景图像(载体)的DCT系数
:param watermark: 归一化二值图像0-1 (uint8类型)
:return: 空域图像
"""
temp = watermark.flatten()
assert temp.max() == 1 and temp.min() == 0, "为方便处理,请保证输入的watermark是被二值归一化的"
result = dct_data.copy()
for h in range(watermark.shape[0]):
for w in range(watermark.shape[1]):
k = self.k1 if watermark[h, w] == 1 else self.k2
# 查询块(h,w)并遍历对应块的中频系数(主对角线),进行修改
for i in range(self.block_size):
result[h, w, i, self.block_size - 1] = dct_data[h, w, i, self.block_size - 1] + self.alpha * k[i]
return result
def idct_embed(self, dct_data):
"""
进行对dct矩阵进行idct变换,完成从频域到空域的变换
:param dct_data: 频域数据
:return: 空域数据
"""
row = None
result = None
h, w = dct_data.shape[0], dct_data.shape[1]
for i in range(h):
for j in range(w):
block = cv2.idct(dct_data[i, j, ...])
row = block if j == 0 else np.hstack((row, block))
result = row if i == 0 else np.vstack((result, row))
return result.astype(np.uint8)
def dct_extract(self, synthesis, watermark_size):
"""
从嵌入水印的图像中提取水印
:param synthesis: 嵌入水印的空域图像
:param watermark_size: 水印大小
:return: 提取的空域水印
"""
w_h, w_w = watermark_size
recover_watermark = np.zeros(shape=watermark_size)
synthesis_dct_blocks = self.dct_blkproc(background=synthesis)
p = np.zeros(8)
for h in range(w_h):
for w in range(w_w):
for k in range(self.block_size):
p[k] = synthesis_dct_blocks[h, w, k, self.block_size - 1]
if corr2(p, self.k1) > corr2(p, self.k2):
recover_watermark[h, w] = 1
else:
recover_watermark[h, w] = 0
return recover_watermark
class Attack():
def __init__(self):
pass
@staticmethod
def Gaussian(attack_obj, mean=0.0, var=1e-2):
"""高斯噪声"""
result = skiu.random_noise(attack_obj, mode="gaussian", mean=mean, var=var) * 255
return result.astype(np.uint8)
@staticmethod
def SaltPepper(attack_obj):
"""椒盐噪声"""
result = skiu.random_noise(attack_obj, mode="s&p") * 255
return result.astype(np.uint8)
@staticmethod
def HighPassFilter(attack_obj, kernel_size=3):
"""使用Sobel算子進行高通濾波,kernel_size=3x3"""
grad_x = cv2.Sobel(attack_obj, cv2.CV_16S, 1, 0, ksize=kernel_size)
grad_y = cv2.Sobel(attack_obj, cv2.CV_16S, 0, 1, ksize=kernel_size)
imgx_uint8 = cv2.convertScaleAbs(grad_x)
imgy_uint8 = cv2.convertScaleAbs(grad_y)
result = cv2.addWeighted(imgx_uint8, 0.5, imgy_uint8, 0.5, 0)
return result
@staticmethod
def MedianFilter(attack_obj, kernel_size=3):
"""中值濾波"""
result = cv2.medianBlur(attack_obj, ksize=kernel_size)
return result
@staticmethod
def MeanFilter(attack_obj, kernel_size=3):
"""均值滤波"""
result = cv2.blur(attack_obj, ksize=(kernel_size, kernel_size))
return result
@staticmethod
def Rotate(attack_obj, angle=45):
"""旋转攻击"""
result = transform.rotate(attack_obj, angle) * 255
return result.astype(np.uint8)
class Metrics():
def __init__(self):
pass
def PSNR(self, img1, img2, data_range=255):
PSNR = metrics.peak_signal_noise_ratio(img1, img2, data_range=data_range)
return PSNR
def SSIM(self, img1, img2):
SSIM = metrics.structural_similarity(img1, img2, full=True, win_size=7)
return SSIM[0]
# https://www.cnpython.com/qa/183113
def mean2(x):
y = np.sum(x) / np.size(x);
return y
def corr2(a, b):
"""
相关性判断
"""
a = a - mean2(a)
b = b - mean2(b)
r = (a * b).sum() / np.sqrt((a * a).sum() * (b * b).sum())
return r
if __name__ == '__main__':
root = ".."
# 0. 超参数设置
alpha = 20 # 尺度控制因子,控制水印添加强度,决定频域系数被修改的幅度
blocksize = 8 # 分块大小
# 1. 数据读取
watermark = cv2.imread(r"{}/datasets/watermark/swjtu_64x64.png".format(root), cv2.IMREAD_GRAYSCALE)
watermark = np.where(watermark < np.mean(watermark), 0, 1) # watermark进行(归一化的)二值化
background = cv2.imread(r"{}/datasets/background/lena_color.png".format(root))
background = cv2.cvtColor(background, cv2.COLOR_BGR2RGB)
background_backup = background.copy()
yuv_background = cv2.cvtColor(background, cv2.COLOR_RGB2YUV) # 将RBG格式的背景转为YUV格式,Y为灰度层,U\V为色彩层,此处选择U层进行嵌入
Y, U, V = yuv_background[..., 0], yuv_background[..., 1], yuv_background[..., 2]
Y_backup = Y.copy()
bk = Y # 嵌入对象为bk
# 2. 初始化DCT算法
dct_emb = DCT_Embed(background=bk, watermark=watermark, block_size=blocksize, alpha=alpha)
# 3. 进行分块与DCT变换
background_dct_blocks = dct_emb.dct_blkproc(background=bk) # 得到分块的DCTblocks
# 4. 嵌入水印图像
embed_watermak_blocks = dct_emb.dct_embed(dct_data=background_dct_blocks, watermark=watermark) # 在dct块中嵌入水印图像
# 5. 将图像转换为空域形式
synthesis = dct_emb.idct_embed(dct_data=embed_watermak_blocks) # idct变换得到空域图像
# 5.1 攻擊
attack = Attack()
attack_results = list()
attack_results.append(synthesis) # 没有攻击
attack_results.append(attack.Gaussian(synthesis.copy())) # 高斯 0-1
attack_results.append(attack.SaltPepper(synthesis.copy())) # 椒盐
attack_results.append(attack.MeanFilter(synthesis.copy())) # 均值
attack_results.append(attack.MedianFilter(synthesis.copy())) # 中值
attack_results.append(attack.HighPassFilter(synthesis.copy())) # 高通
attack_results.append(attack.Rotate(synthesis.copy(),10)) # 旋转
# 5.2 在彩图中的表现
after_attack = list()
after_attack_black = list()
for img in attack_results:
yuv_background[..., 0] = img
img2 = cv2.cvtColor(yuv_background, cv2.COLOR_YUV2RGB)
after_attack.append(img2)
after_attack_black.append(img)
# 6. 提取水印
extract_watermarks = list()
for img in attack_results:
extract_watermark = dct_emb.dct_extract(synthesis=img, watermark_size=watermark.shape) * 255
extract_watermarks.append(extract_watermark)
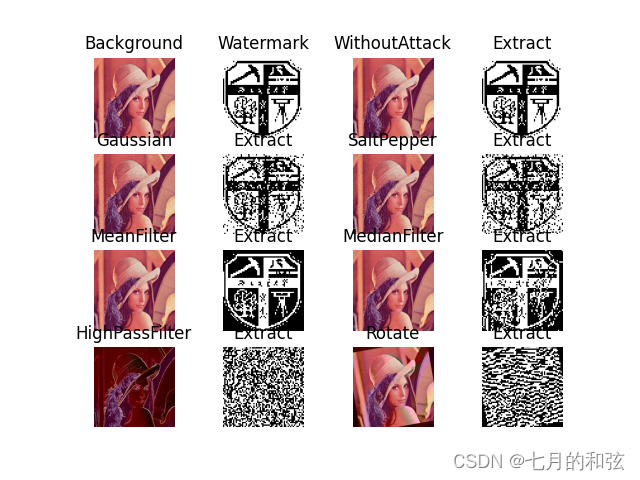
titles = [
["Background", "Watermark", "WithoutAttack", "Extract"],
["Gaussian", "Extract", "SaltPepper", "Extract"],
["MeanFilter", "Extract", "MedianFilter", "Extract"],
["HighPassFilter", "Extract", "Rotate", "Extract"],
]
images = [
[background_backup, watermark, after_attack[0], extract_watermarks[0]],
[after_attack[1], extract_watermarks[1], after_attack[2], extract_watermarks[2]],
[after_attack[3], extract_watermarks[3], after_attack[4], extract_watermarks[4]],
[after_attack[5], extract_watermarks[5], after_attack[6], extract_watermarks[6]],
]
images2 = [
[Y_backup, watermark, after_attack_black[0], extract_watermarks[0]],
[after_attack_black[1], extract_watermarks[1], after_attack_black[2], extract_watermarks[2]],
[after_attack_black[3], extract_watermarks[3], after_attack_black[4], extract_watermarks[4]],
[after_attack_black[5], extract_watermarks[5], after_attack_black[6], extract_watermarks[6]],
]
# 7. 可视化处理
index = 1
for i in range(4):
for j in range(4):
plt.subplot(4, 4, index)
if index % 2:
plt.imshow(images[i][j].astype(np.uint8))
else:
plt.imshow(images[i][j].astype(np.uint8), cmap=plt.cm.gray)
plt.title(titles[i][j])
index += 1
plt.axis("off")
plt.show()
index = 1
for i in range(4):
for j in range(4):
plt.subplot(4, 4, index)
plt.imshow(images2[i][j].astype(np.uint8), cmap=plt.cm.gray)
plt.title(titles[i][j])
index += 1
plt.axis("off")
plt.show()
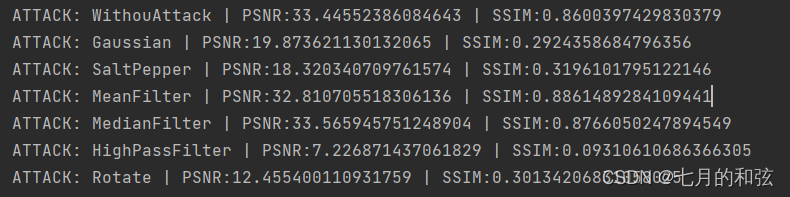
# 8. 指标计算
M = Metrics()
base = Y_backup
info = ["WithouAttack", "Gaussian", "SaltPepper", "MeanFilter", "MedianFilter", "HighPassFilter", "Rotate"]
for i, img in enumerate(after_attack_black):
PSNR = M.PSNR(base, img)
SSIM = M.SSIM(base, img)
print("ATTACK: {} | PSNR:{} | SSIM:{}".format(info[i], PSNR, SSIM))
3. 实验现象
为了方便观察,将嵌入对象设置为Lena YUV通道的Y通道。
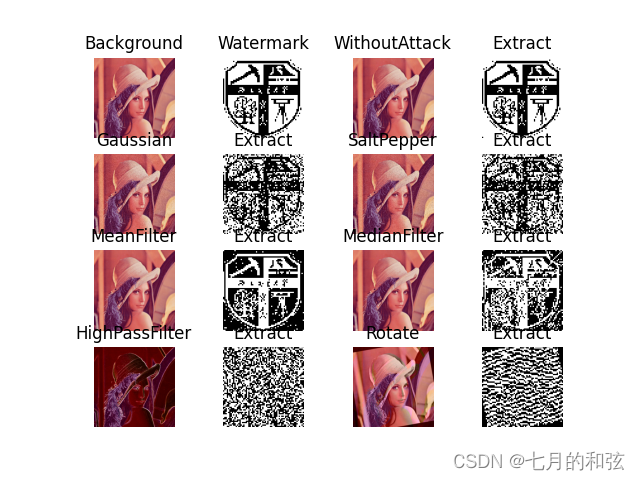
无法抵抗高通滤波器的攻击、以及几何旋转攻击。对于其他的低通滤波器攻击有一定的抵御性。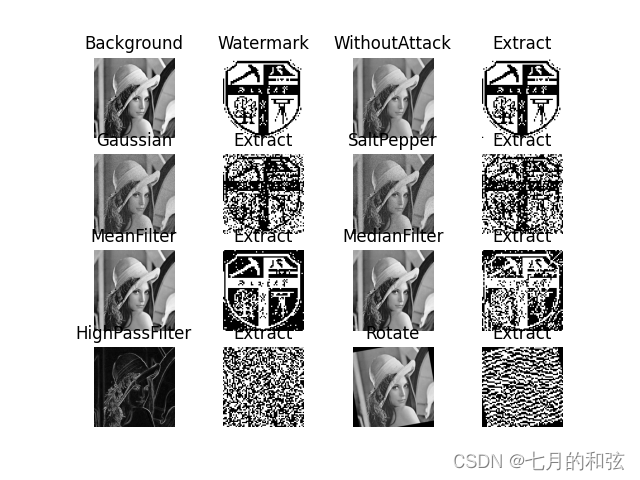
PSNR以及SSIM也表明了对低通滤波器有一定的抗性,被攻击后图像也不会看起来很糟。
水印嵌入相关Link
LSB水印嵌入与提取-灰度图像-Python
LSB水印嵌入与提取-彩色图像-Python
DCT水印嵌入与提取Base-Python


 2704
2704

 被折叠的 条评论
为什么被折叠?
被折叠的 条评论
为什么被折叠?
 到【灌水乐园】发言


