


ucontext函数族
这里的context族是偏向底层的,其实底层就是通过汇编来实现的,但是我们使用的时候就和平常使用变量和函数一样使用就行,因为大佬们已经将它们封装成C库里了的
我们先来看看寄存器
寄存器:寄存器是CPU内部用来存放数据的一些小型存储区域,用来暂时存放参与运算的数据和运算结果
我们常用的寄存器是X86-64中的其中16个64位的寄存器,它们分别是
%rax, %rbx, %rcx, %rdx, %esi, %edi, %rbp, %rsp
%r8, %r9, %r10, %r11, %r12, %r13, %r14, %r15
其中
- %rax作为函数返回值使用
- %rsp栈指针寄存器, 指向栈顶
- %rdi, %rsi, %rdx, %rcx, %r8, %r9用作函数的参数,从前往后依次对应第1、第2、…第n参数
- %rbx, %rbp, %r12, %r13, %r14, %r15用作数据存储,遵循被调用这使用规- 则,调用子函数之前需要先备份,防止被修改。
- %r10, %r11用作数据存储,遵循调用者使用规则,使用前需要保存原值
ucontext_t
ucontext_t是一个结构体变量,其功能就是通过定义一个ucontext_t来保存当前上下文信息的。
ucontext_t结构体定义信息如下
typedef struct ucontext
  {
    unsigned long int uc_flags;
    struct ucontext *uc_link;//后序上下文
    __sigset_t uc_sigmask;// 信号屏蔽字掩码
    stack_t uc_stack;// 上下文所使用的栈
    mcontext_t uc_mcontext;// 保存的上下文的寄存器信息
    long int uc_filler[5];
  } ucontext_t;

//其中mcontext_t 定义如下
typedef struct
  {
    gregset_t __ctx(gregs);//所装载寄存器
    fpregset_t __ctx(fpregs);//寄存器的类型
} mcontext_t;

//其中gregset_t 定义如下
typedef greg_t gregset_t[NGREG];//包括了所有的寄存器的信息
getcontext()
函数:int getcontext(ucontext_t* ucp)
功能:将当前运行到的寄存器的信息保存在参数ucp中
函数底层汇编实现代码(部分):
ENTRY(__getcontext)
    /* Save the preserved registers, the registers used for passing
       args, and the return address.  */
    movq    %rbx, oRBX(%rdi)
    movq    %rbp, oRBP(%rdi)
    movq    %r12, oR12(%rdi)
    movq    %r13, oR13(%rdi)
    movq    %r14, oR14(%rdi)
    movq    %r15, oR15(%rdi)

    movq    %rdi, oRDI(%rdi)
    movq    %rsi, oRSI(%rdi)
    movq    %rdx, oRDX(%rdi)
    movq    %rcx, oRCX(%rdi)
    movq    %r8, oR8(%rdi)
    movq    %r9, oR9(%rdi)

    movq    (%rsp), %rcx
    movq    %rcx, oRIP(%rdi)
    leaq    8(%rsp), %rcx       /* Exclude the return address.  */
    movq    %rcx, oRSP(%rdi)
我们知道%rdi就是函数的第一个参数,这里指的就是ucp。我们取一段代码大概解释一下
下面代码就是将%rbx内存中的信息先备份然后再将值传递保存到%rdi中
movq %rbx, oRBX(%rdi)
我们上面部分代码就是将上下文信息和栈顶指针都保存到我们ucontext_t结构体中的gregset_t[NGREG],而gregset_t也就是我们结构体中的uc_mcontext的成员,所有调用getcontext函数后,就能将当前的上下文信息都保存在ucp结构体变量中了
setcontext()
函数:int setcontext(const ucontext_t *ucp)
功能:将ucontext_t结构体变量ucp中的上下文信息重新恢复到cpu中并执行
函数底层汇编实现代码(部分):
ENTRY(__setcontext)
    movq    oRSP(%rdi), %rsp
    movq    oRBX(%rdi), %rbx
    movq    oRBP(%rdi), %rbp
    movq    oR12(%rdi), %r12
    movq    oR13(%rdi), %r13
    movq    oR14(%rdi), %r14
    movq    oR15(%rdi), %r15

    /* The following ret should return to the address set with
    getcontext.  Therefore push the address on the stack.  */
    movq    oRIP(%rdi), %rcx
    pushq   %rcx

    movq    oRSI(%rdi), %rsi
    movq    oRDX(%rdi), %rdx
    movq    oRCX(%rdi), %rcx
    movq    oR8(%rdi), %r8
    movq    oR9(%rdi), %r9

    /* Setup finally  %rdi.  */
    movq    oRDI(%rdi), %rdi
我们可以看到和getcontext中汇编代码类似,但是setcontext是将参数变量中的上下文信息重新保存到cpu中
使用演示
setcontext一般都是要配合getcontext来使用的,我们来看一下代码
#include <stdio.h>
#include <stdlib.h>
#include <unistd.h>
#include <ucontext.h>
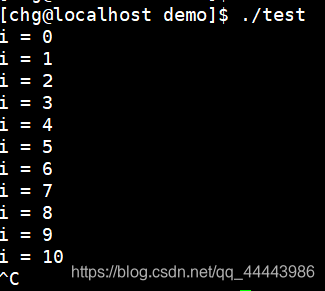
int main()
{
int i = 0;
ucontext_t ctx;//定义上下文结构体变量
getcontext(&ctx);//获取当前上下文
printf("i = %d\n", i++);
sleep(1);
setcontext(&ctx);//回复ucp上下文
return 0;
}
执行结果:在getcontext(&ctx);中,我们会将下一条执行的指令环境保存到结构体ctx中,也就是printf(“i = %d\n”, i++)指令。然后运行到setcontext(&ctx)时就会将ctx中的指令回复到cpu中,所以该代码就是让cpu去运行ctx所保存的上下文环境,所以又回到了打印的那一行代码中,所以运行是一个死循环,而i值不变是因为i是存在内存栈中的,不是存在寄存器中的,所以切换并不影响i的值
makecontext()
函数:void makecontext(ucontext_t *ucp, void (*func)(), int argc, ...)
功能:修改上下文信息,参数ucp就是我们要修改的上下文信息结构体;func是上下文的入口函数;argc是入口函数的参数个数,后面的…是具体的入口函数参数,该参数必须为整形值
函数底层汇编实现代码(部分):
 void __makecontext (ucontext_t *ucp, void (*func) (void), int argc, ...)
  {
    extern void __start_context (void);
    greg_t *sp;
    unsigned int idx_uc_link;
    va_list ap;
    int i;

    /* Generate room on stack for parameter if needed and uc_link.  */
    sp = (greg_t *) ((uintptr_t) ucp->uc_stack.ss_sp
             + ucp->uc_stack.ss_size);
    sp -= (argc > 6 ? argc - 6 : 0) + 1;
    /* Align stack and make space for trampoline address.  */
    sp = (greg_t *) ((((uintptr_t) sp) & -16L) - 8);

    idx_uc_link = (argc > 6 ? argc - 6 : 0) + 1;

    /* Setup context ucp.  */
    /* Address to jump to.  */
    ucp->uc_mcontext.gregs[REG_RIP] = (uintptr_t) func;
    /* Setup rbx.*/
    ucp->uc_mcontext.gregs[REG_RBX] = (uintptr_t) &sp[idx_uc_link];
    ucp->uc_mcontext.gregs[REG_RSP] = (uintptr_t) sp;

    /* Setup stack.  */
    sp[0] = (uintptr_t) &__start_context;
    sp[idx_uc_link] = (uintptr_t) ucp->uc_link;

    va_start (ap, argc);
    /* Handle arguments.

       The standard says the parameters must all be int values.  This is
       an historic accident and would be done differently today.  For
       x86-64 all integer values are passed as 64-bit values and
       therefore extending the API to copy 64-bit values instead of
       32-bit ints makes sense.  It does not break existing
       functionality and it does not violate the standard which says
       that passing non-int values means undefined behavior.  */
    for (i = 0; i < argc; ++i)
      switch (i)
        {
        case 0:
      ucp->uc_mcontext.gregs[REG_RDI] = va_arg (ap, greg_t);
      break;
        case 1:
      ucp->uc_mcontext.gregs[REG_RSI] = va_arg (ap, greg_t);
      break;
        case 2:
      ucp->uc_mcontext.gregs[REG_RDX] = va_arg (ap, greg_t);
      break;
        case 3:
      ucp->uc_mcontext.gregs[REG_RCX] = va_arg (ap, greg_t);
      break;
        case 4:
      ucp->uc_mcontext.gregs[REG_R8] = va_arg (ap, greg_t);
      break;
        case 5:
      ucp->uc_mcontext.gregs[REG_R9] = va_arg (ap, greg_t);
      break;
        default:
      /* Put value on stack.  */
      sp[i - 5] = va_arg (ap, greg_t);
      break;
        }
    va_end (ap);
  }
这里就是将func的地址保存到寄存器中,把ucp上下文结构体下一条要执行的指令rip改变为func函数的地址。并且将其所运行的栈改为用户自定义的栈
使用演示
#include <stdio.h>
#include <stdlib.h>
#include <unistd.h>
#include <ucontext.h>
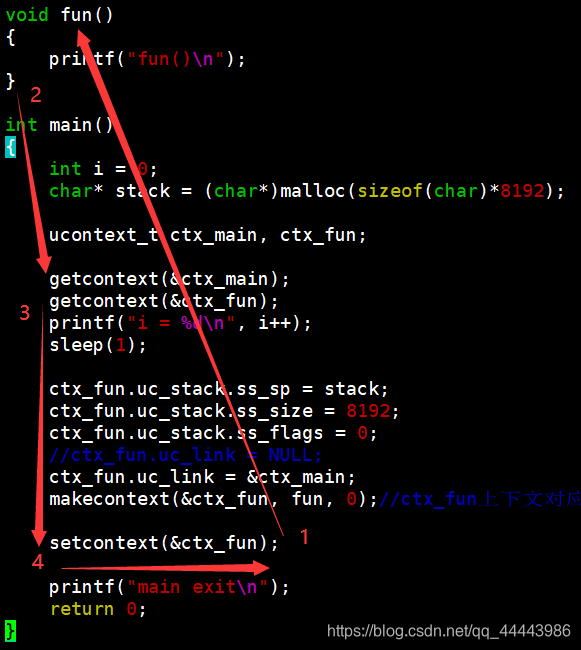
void fun()
{
printf("fun()\n");
}
int main()
{
int i = 0;
//定义用户的栈
char* stack = (char*)malloc(sizeof(char)*8192);
//定义两个上下文
//一个是主函数的上下文,一个是fun函数的上下文
ucontext_t ctx_main, ctx_fun;
getcontext(&ctx_main);
getcontext(&ctx_fun);
printf("i = %d\n", i++);
sleep(1);
//设置fun函数的上下文
//使用getcontext是先将大部分信息初始化,我们到时候只需要修改我们所使用的部分信息即可
ctx_fun.uc_stack.ss_sp = stack;//用户自定义的栈
ctx_fun.uc_stack.ss_size = 8192;//栈的大小
ctx_fun.uc_stack.ss_flags = 0;//信号屏蔽字掩码,一般设为0
ctx_fun.uc_link = &ctx_main;//该上下文执行完后要执行的下一个上下文
makecontext(&ctx_fun, fun, 0);//将fun函数作为ctx_fun上下文的下一条执行指令
setcontext(&ctx_fun);
printf("main exit\n");
return 0;
}
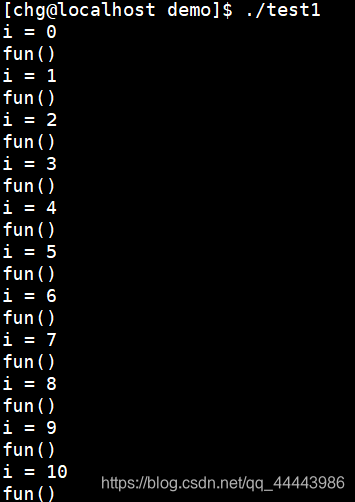
运行结果:当执行到setcontext(&ctx_fun)代码时会去运行我们之前makecontext时设置的上下文入口函数所以在打印i完后会打印fun(),然后我们设置ctx_fun上下文执行完后要执行的下一个上下文是ctx_main,所以执行完后会执行到getcontext(&ctx_fun),所以最后也是一个死循环
swapcontext()
函数:int swapcontext(ucontext_t *oucp, ucontext_t *ucp)
功能:将当前cpu中的上下文信息保存带oucp结构体变量中,然后将ucp中的结构体的上下文信息恢复到cpu中
这里可以理解为调用了两个函数,第一次是调用了getcontext(oucp)然后再调用setcontext(ucp)
函数底层汇编实现代码(部分):
ENTRY(__swapcontext)
    /* Save the preserved registers, the registers used for passing args,
       and the return address.  */
    movq    %rbx, oRBX(%rdi)
    movq    %rbp, oRBP(%rdi)
    movq    %r12, oR12(%rdi)
    movq    %r13, oR13(%rdi)
    movq    %r14, oR14(%rdi)
    movq    %r15, oR15(%rdi)

    movq    %rdi, oRDI(%rdi)
    movq    %rsi, oRSI(%rdi)
    movq    %rdx, oRDX(%rdi)
    movq    %rcx, oRCX(%rdi)
    movq    %r8, oR8(%rdi)
    movq    %r9, oR9(%rdi)

    movq    (%rsp), %rcx
    movq    %rcx, oRIP(%rdi)
    leaq    8(%rsp), %rcx       /* Exclude the return address.  */
    movq    %rcx, oRSP(%rdi)


    /* Load the new stack pointer and the preserved registers.  */
    movq    oRSP(%rsi), %rsp
    movq    oRBX(%rsi), %rbx
    movq    oRBP(%rsi), %rbp
    movq    oR12(%rsi), %r12
    movq    oR13(%rsi), %r13
    movq    oR14(%rsi), %r14
    movq    oR15(%rsi), %r15

    /* The following ret should return to the address set with
    getcontext.  Therefore push the address on the stack.  */
    movq    oRIP(%rsi), %rcx
    pushq   %rcx

    /* Setup registers used for passing args.  */
    movq    oRDI(%rsi), %rdi
    movq    oRDX(%rsi), %rdx
    movq    oRCX(%rsi), %rcx
    movq    oR8(%rsi), %r8
    movq    oR9(%rsi), %r9
我们一开始就知道%rdi就是我们函数中的第一参数,%rsi就是函数中的第二个参数。汇编代码中就是将当前cpu中的上下文信息保存到函数的第一个参数中,然后再将第二个参数的上下文信息恢复到cpu中
使用演示
#include <stdio.h>
#include <stdlib.h>
#include <unistd.h>
#include <ucontext.h>
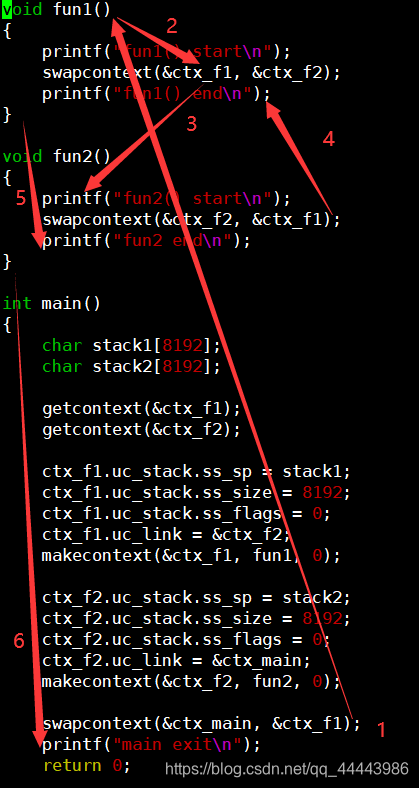
ucontext_t ctx_main, ctx_f1, ctx_f2;
void fun1()
{
printf("fun1() start\n");
swapcontext(&ctx_f1, &ctx_f2);
printf("fun1() end\n");
}
void fun2()
{
printf("fun2() start\n");
swapcontext(&ctx_f2, &ctx_f1);
printf("fun2 end\n");
}
int main()
{
char stack1[8192];
char stack2[8192];
getcontext(&ctx_f1);//初始化ctx_f1
getcontext(&ctx_f2);//初始化ctx_f2
ctx_f1.uc_stack.ss_sp = stack1;
ctx_f1.uc_stack.ss_size = 8192;
ctx_f1.uc_stack.ss_flags = 0;
ctx_f1.uc_link = &ctx_f2;
makecontext(&ctx_f1, fun1, 0);//设置上下文变量
ctx_f2.uc_stack.ss_sp = stack2;
ctx_f2.uc_stack.ss_size = 8192;
ctx_f2.uc_stack.ss_flags = 0;
ctx_f2.uc_link = &ctx_main;
makecontext(&ctx_f2, fun2, 0);
//保存ctx_main的上下文信息,并执行ctx_f1所设置的上下文入口函数
swapcontext(&ctx_main, &ctx_f1);
printf("main exit\n");
return 0;
}
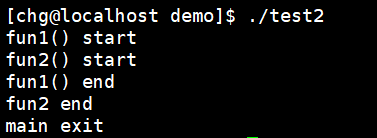
运行结果:定义三个上下文变量,ctx_main、ctx_f1、ctx_f2。当执行到swapcontext(&ctx_main, &ctx_f1)时会执行fun1函数,然后打印fun1() start。再执行swapcontext(&ctx_f1, &ctx_f2),也就是保存ctx_f1的上下文,然后去执行ctx_f2的上下文信息,也就是fun2函数,所以会打印fun2() start。执行到swapcontext(&ctx_f2, &ctx_f1);是会切换到fun1当时切换时的上下文环境,此时会打印fun1() end,ctx_f1上下文执行完后会执行之前设置的后继上下文,也就是ctx_f2,所以会打印fun2 end。fun2函数执行完会执行ctx_f2的后继上下文,其后继上下文为ctx_main,而此时的ctx_main的下一条指令就是printf(“main exit\n”),所以会打印main exit


 1557
1557

 被折叠的 条评论
为什么被折叠?
被折叠的 条评论
为什么被折叠?
 到【灌水乐园】发言


