


 本文介绍如何利用OpenCV和dlib库实现眼动检测,通过计算眼睛纵横比(EAR)来判断眨眼行为,结合面部特征点和论文方法进行实时监控。
这里我们使用opencv 和 dlib 库实现眨眼提取的过程
参考论文:Real-Time Eye Blink Detection using Facial Landmarks
在该片论文中,作者提出了一种提取几何特征——眼睛纵横比(eye aspect ratio (EAR))——的方法,通过计算这个EAR的数值,我们可以判断眼睛是张开还是闭合,从而检测眨眼动作。
使用的预测模型见:
https://download.csdn.net/download/qq_44465615/14975999
眼睛纵横比(EAR)
在讨论眼部纵横比之前,我们先来看一下面部特征点:
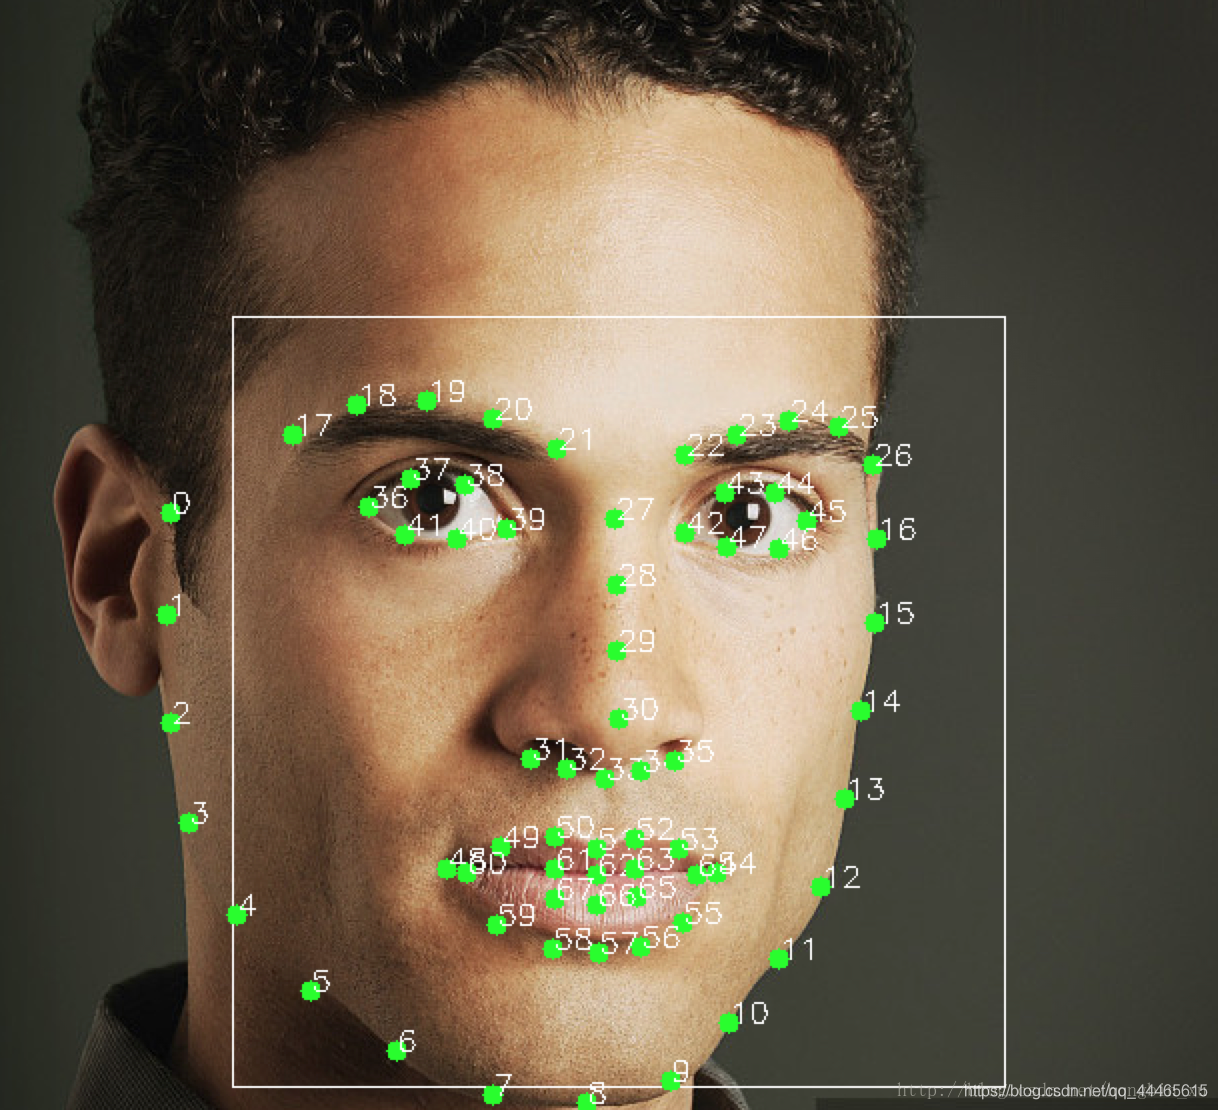
在dlib库中给出了具体实现。
从图中我们可以看到左眼和右眼分别对应了6个特征点,我们后面的讨论都是基于这6个特征点来进行。
论文中给出的EAR定义的图片如下:
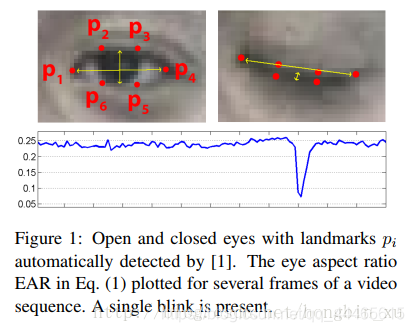
EAR=(P2P6+P3P5)/(P1P4*2)
EAR在眼睛睁开时是基本保持不变的,在小范围内会上下浮动,然而,当眼睛闭合时,EAR会迅速下降。
#coding=utf-8
import numpy as np
import cv2
import dlib
from scipy.spatial import distance
import os
from imutils import face_utils

face_detector = cv2.CascadeClassifier('D:/haar/haarcascade_frontalface_alt2.xml')
eye_detector = cv2.CascadeClassifier('D:/haar/haarcascade_mcs_eyepair_big.xml')

# 计算EAR
def eye_aspect_ratio(eye):
	# print(eye)
	A = distance.euclidean(eye[1], eye[5])
	B = distance.euclidean(eye[2], eye[4])
	C = distance.euclidean(eye[0], eye[3])
	ear = (A + B) / (2.0 * C)
	return ear

def eye_catch(img,save_path,count):
	gray = cv2.cvtColor(img, code=cv2.COLOR_BGR2BGRA)
	face_zone = face_detector.detectMultiScale(gray, 1.3, 3, minSize=(80, 80))
	if len(face_zone) > 0:
		h_up = int(face_zone[0, -1] * 0.6)
		# print(len(face_zone))
		if len(face_zone) != 1:
			return
		x, y, w, h = face_zone.reshape(-1)
		head = gray[y:y + h, x:x + w]
		head_up = head[0:h_up]
		eye_zone = eye_detector.detectMultiScale(head_up, 1.3, 3, minSize=(10, 10))
		if len(eye_zone) > 0:
			path3 = save_path + "/frame{:05d}.jpg".format(count)
			print(path3)
			for mx, my, mw, mh in eye_zone:
				eye_image = img[my + y:my + y + mh, mx + x:mx + x + mw]
				cv2.imwrite(path3, eye_image)


pwd = os.getcwd()# 获取当前路径
model_path = os.path.join(pwd, 'model')# 模型文件夹路径
shape_detector_path = os.path.join(model_path, 'shape_predictor_68_face_landmarks.dat')# 人脸特征点检测模型路径

detector = dlib.get_frontal_face_detector()# 人脸检测器
predictor = dlib.shape_predictor(shape_detector_path)# 人脸特征点检测器

EYE_AR_THRESH = 0.3 # EAR阈值
EYE_AR_CONSEC_FRAMES = 3 # 当EAR小于阈值时,接连多少帧一定发生眨眼动作

# 对应特征点的序号
RIGHT_EYE_START = 37 - 1
RIGHT_EYE_END = 42 - 1
LEFT_EYE_START = 43 - 1
LEFT_EYE_END = 48 - 1


def video_split(video_path):
	cap = cv2.VideoCapture(video_path)
	success = cap.isOpened()
	video_label = "".join(video_path.split("/")[-1:])[:-4]
	save_path="D:/img_eye/" + video_label
	if not os.path.isdir(save_path):
		print("Save Directory does not exist")
		os.makedirs("D:/img_eye/" + video_label)
		print("Save Directory creates successfully")
	count=0
	flag = 0
	print("Starting deal " + video_label)
	ret,img_ = cap.read()
	while(success):
		success, img = cap.read()

		gray = cv2.cvtColor(img, cv2.COLOR_BGR2GRAY)
		rects = detector(gray, 0)
		for rect in rects:
			print('-'*20)
			shape = predictor(gray, rect)
			points = face_utils.shape_to_np(shape)# convert the facial landmark (x, y)-coordinates to a NumPy array

			leftEye = points[LEFT_EYE_START:LEFT_EYE_END + 1]
			rightEye = points[RIGHT_EYE_START:RIGHT_EYE_END + 1]
			leftEAR = eye_aspect_ratio(leftEye)
			rightEAR = eye_aspect_ratio(rightEye)
			print('leftEAR = {0}'.format(leftEAR))
			print('rightEAR = {0}'.format(rightEAR))

			ear = (leftEAR + rightEAR) / 2.0


			if ear < EYE_AR_THRESH:
				flag=1
				eye_catch(img_,save_path,count)
				count+=1
			else:
				if flag == 1:
					eye_catch(img_,save_path,count)
					count += 1
					flag = 0

		if cap.get(7) == cap.get(0):
			break
		img_ = img
	cap.release()
	print(video_label + " Deal over")

if __name__ == '__main__':
    Folder = "D:/video/video/"
    i=15
    Video = Folder +str(i)+ ".mp4".format(i)
    video_split(Video)


 3548
3548

 被折叠的 条评论
为什么被折叠?
被折叠的 条评论
为什么被折叠?
 到【灌水乐园】发言


