


说明:本人之前按照源码中给的安装步骤安装,但是奈何pytorch1.0在线安装不了,只得安装高版本。一下是官方给的安装步骤
#### Windows 10
```bash
open a cmd and change to desired installation directory
from now on will be refered as INSTALL_DIR
conda create --name maskrcnn_benchmark
conda activate maskrcnn_benchmark
# this installs the right pip and dependencies for the fresh python
conda install ipython
# maskrcnn_benchmark and coco api dependencies
pip install ninja yacs cython matplotlib tqdm opencv-python
# follow PyTorch installation in https://pytorch.org/get-started/locally/
# we give the instructions for CUDA 9.0
## Important : check the cuda version installed on your computer by running the command in the cmd :
nvcc -- version
conda install -c pytorch pytorch-nightly torchvision cudatoolkit=9.0
git clone https://github.com/cocodataset/cocoapi.git
#To prevent installation error do the following after commiting cocooapi :
#using file explorer naviagate to cocoapi\PythonAPI\setup.py and change line 14 from:
#extra_compile_args=['-Wno-cpp', '-Wno-unused-function', '-std=c99'],
#to
#extra_compile_args={'gcc': ['/Qstd=c99']},
#Based on https://github.com/cocodataset/cocoapi/issues/51
cd cocoapi/PythonAPI
python setup.py build_ext install
# navigate back to INSTALL_DIR
cd ..
cd ..
# install apex
git clone https://github.com/NVIDIA/apex.git
cd apex
python setup.py install --cuda_ext --cpp_ext
# navigate back to INSTALL_DIR
cd ..
# install PyTorch Detection
git clone https://github.com/Idolized22/maskrcnn-benchmark.git
cd maskrcnn-benchmark
# the following will install the lib with
# symbolic links, so that you can modify
# the files if you want and won't need to
# re-build it
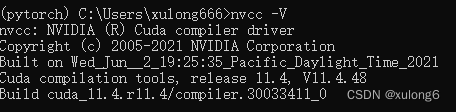
python setup.py build develop一、CUDA 安装
我安装的是11.4 ,这个部分我就省略了,如果需要安装虚拟环境自行安装Anaconda.
二、创建虚拟环境并进入虚拟环境
conda create -n maskrcnn python==3.6.13
conda activate maskrcnn
三、安装相关的包
3.1 必要组件
conda install ipython pip
pip install ninja yacs cython matplotlib tqdm opencv-python
3.2 安装PyTorch1.10,其他版本自行到Start Locally | PyTorch查找安装命令


conda install pytorch==1.10.0 torchvision==0.11.0 torchaudio==0.10.0 cudatoolkit=11.3 -c pytorch -c conda-forge3.3 安装pycocotools
3.3.1克隆源码到本地
git clone https://github.com/cocodataset/cocoapi.git3.3.2 找到 cocoapi\PythonAPI\setup.py 文件 14行进行如下修改
# To compile and install locally run "python setup.py build_ext --inplace"
# To install library to Python site-packages run "python setup.py build_ext install"

ext_modules = [
    Extension(
        'pycocotools._mask',
        sources=['../common/maskApi.c', 'pycocotools/_mask.pyx'],
        include_dirs = [np.get_include(), '../common'],
        #extra_compile_args=['-Wno-cpp', '-Wno-unused-function', '-std=c99'],
		extra_compile_args={'gcc': ['/Qstd=c99']},
    )
]
3.3.3进入源码目录并进行安装
cd cocoapi/PythonAPI
python setup.py build_ext install
安装成功结果如下图所示

3.4 安装 apex
cd ../..
git clone https://github.com/NVIDIA/apex.git
cd apex
pip install packaging
python setup.py install
如果出现以下情况说明Python 版本不对需要调整为合适的python版本

3.5 安装 maskrcnn-benchmark
3.5.1 执行如下指令
#回到用户根目录
cd ../..
git clone https://github.com/Idolized22/maskrcnn-benchmark.git
cd maskrcnn-benchmark

# the following will install the lib with
# symbolic links, so that you can modify
# the files if you want and won't need to
# re-build it
python setup.py build develop
3.5.2【报错1】报如下错误
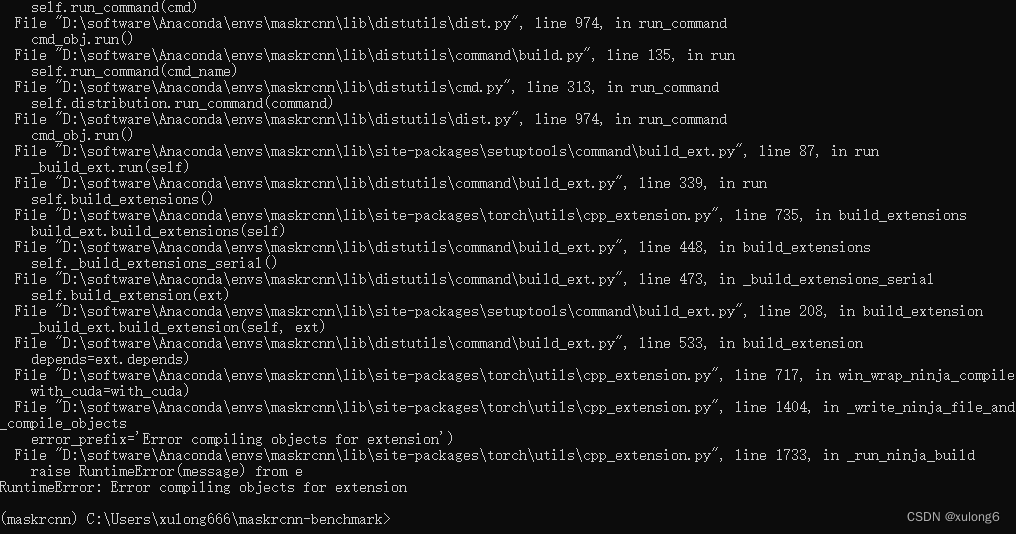
往上找会发现如下错误(此错误是由于老版本pytorch使用的是“AT_CHECK”新版本使用的是“TORCH_CHECK”):
error: identifier “AT_CHECK” is undefined

【解决办法1】:找到报错的.cpp、.cu、.h文件,搜索并替换 “AT_CHECK”修改为“TORCH_CHECK”
3.5.3
重新执行 python setup.py build develop命令进行安装,安装成功如下图所示。

四、进行测试,测试前需要准备一颗摄像头
4.1测试具体指令Readme.md中有具体指令

4.2 在终端输入以下测试代码
cd demo
# by default, it runs on the GPU
# for best results, use min-image-size 800
python webcam.py --min-image-size 800
【报错1】:会报如下错误:AttributeError: module 'torch._six' has no attribute 'PY3'
【解决办法1】:将将PY3改为PY37即可
# Copyright (c) Facebook, Inc. and its affiliates. All Rights Reserved.
import torch

#if torch._six.PY3:
if torch._six.PY37:
    import importlib
    import importlib.util
    import sys
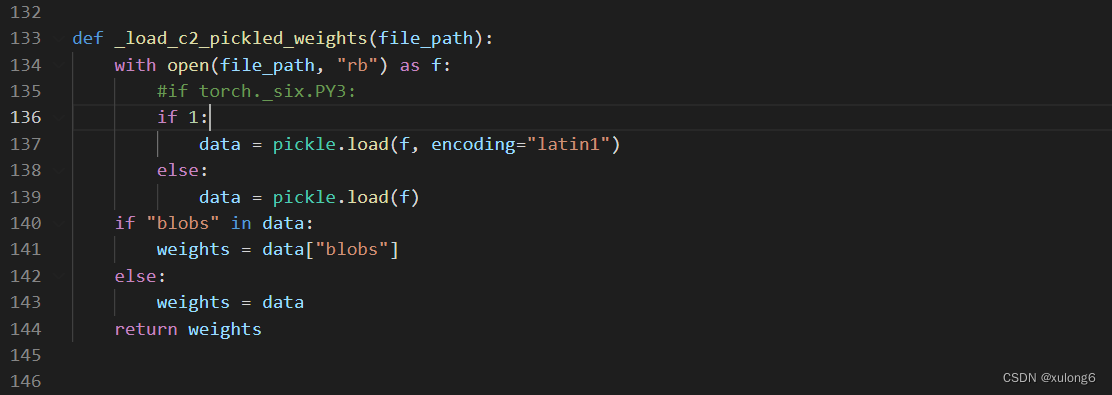
【报错2】:重新运行测试程序会报同样的错误 :AttributeError: module 'torch._six' has no attribute 'PY3'

【解决办法2】:此处直接将“if torch._six.PY3” 改为 “if 1:”
重新执行指令 python webcam.py --min-image-size 800 ,大功告成!!!!!


 6854
6854


 被折叠的 条评论
为什么被折叠?
被折叠的 条评论
为什么被折叠?
 到【灌水乐园】发言


