


官方介绍及下载
Google mediapipe人脸检测:https://ai.google.dev/edge/mediapipe/solutions/vision/face_detector/android?hl=zh-cn
官方Demo下载:
git clone https://github.com/google-ai-edge/mediapipe-samplesAndroid项目打开:
找到里面的android目录

获取图片分析流程
通过camera或者gallery获取图片uri,传入
随后得到点特征数据,并将数据通过setResult方法传入到overlayView.kt进行预览
private fun runDetectionOnImage(uri: Uri) {
        setUiEnabled(false)
        backgroundExecutor = Executors.newSingleThreadScheduledExecutor()
        updateDisplayView(MediaType.IMAGE)
        if (Build.VERSION.SDK_INT >= Build.VERSION_CODES.P) {
            val source = ImageDecoder.createSource(
                requireActivity().contentResolver,
                uri
            )
            ImageDecoder.decodeBitmap(source)
        } else {
            MediaStore.Images.Media.getBitmap(
                requireActivity().contentResolver,
                uri
            )
        }
            .copy(Bitmap.Config.ARGB_8888, true)
            ?.let { bitmap ->
                fragmentGalleryBinding.imageResult.setImageBitmap(bitmap)

                // Run face landmarker on the input image
                backgroundExecutor.execute {

                    faceLandmarkerHelper =
                        FaceLandmarkerHelper(
                            context = requireContext(),
                            runningMode = RunningMode.IMAGE,
                            minFaceDetectionConfidence = viewModel.currentMinFaceDetectionConfidence,
                            minFaceTrackingConfidence = viewModel.currentMinFaceTrackingConfidence,
                            minFacePresenceConfidence = viewModel.currentMinFacePresenceConfidence,
                            maxNumFaces = viewModel.currentMaxFaces,
                            currentDelegate = viewModel.currentDelegate
                        )

                    faceLandmarkerHelper.detectImage(bitmap)?.let { result ->
                        activity?.runOnUiThread {
                            if (fragmentGalleryBinding.recyclerviewResults.scrollState != ViewPager2.SCROLL_STATE_DRAGGING) {
                                faceBlendshapesResultAdapter.updateResults(result.result)
                                faceBlendshapesResultAdapter.notifyDataSetChanged()
                            }
                            fragmentGalleryBinding.overlay.setResults(
                                result.result,
                                bitmap.height,
                                bitmap.width,
                                RunningMode.IMAGE
                            )

                            setUiEnabled(true)
                            fragmentGalleryBinding.bottomSheetLayout.inferenceTimeVal.text =
                                String.format("%d ms", result.inferenceTime)
                        }
                    } ?: run { Log.e(TAG, "Error running face landmarker.") }

                    faceLandmarkerHelper.clearFaceLandmarker()
                }
            }
    }


// Accepted a Bitmap and runs face landmarker inference on it to return
    // results back to the caller
    fun detectImage(image: Bitmap): ResultBundle? {
        if (runningMode != RunningMode.IMAGE) {
            throw IllegalArgumentException(
                "Attempting to call detectImage" +
                        " while not using RunningMode.IMAGE"
            )
        }


        // Inference time is the difference between the system time at the
        // start and finish of the process
        val startTime = SystemClock.uptimeMillis()

        // Convert the input Bitmap object to an MPImage object to run inference
        val mpImage = BitmapImageBuilder(image).build()

        // Run face landmarker using MediaPipe Face Landmarker API
        faceLandmarker?.detect(mpImage)?.also { landmarkResult ->
            val inferenceTimeMs = SystemClock.uptimeMillis() - startTime
            return ResultBundle(
                landmarkResult,
                inferenceTimeMs,
                image.height,
                image.width
            )
        }

        // If faceLandmarker?.detect() returns null, this is likely an error. Returning null
        // to indicate this.
        faceLandmarkerHelperListener?.onError(
            "Face Landmarker failed to detect."
        )
        return null
    }
官方特征点
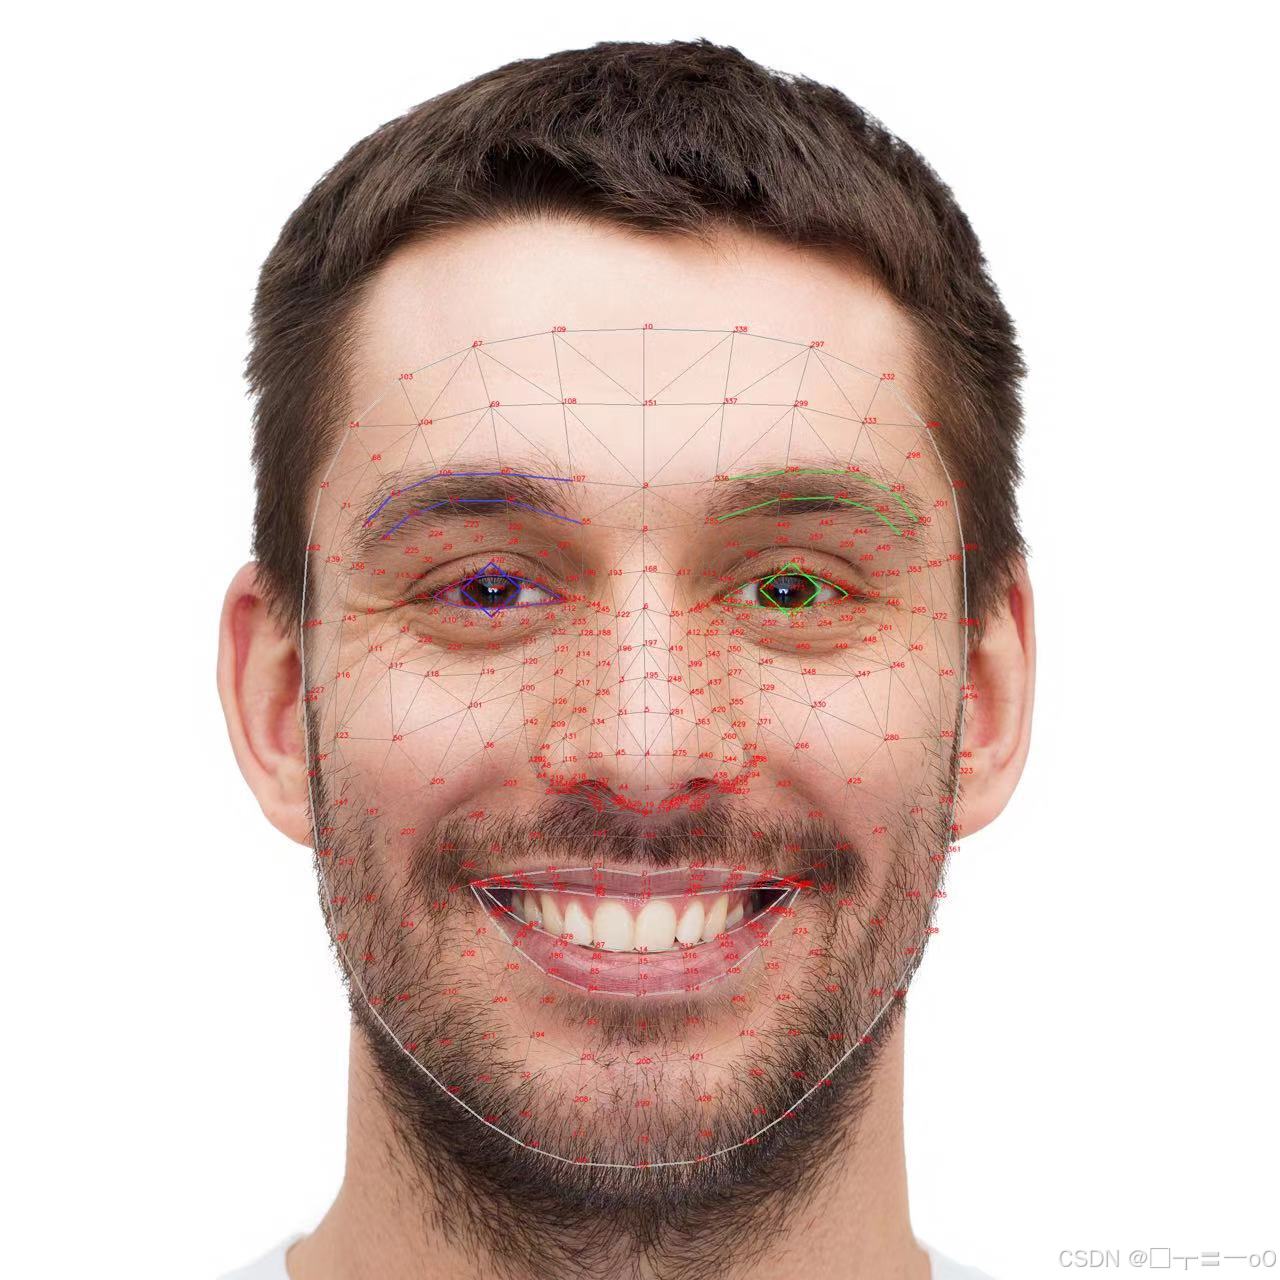
通过特征点获取上下嘴唇范围
overlayView draw方法绘制:
override fun draw(canvas: Canvas) {
super.draw(canvas)
if (results == null || results!!.faceLandmarks().isEmpty()) {
clear()
return
}
results?.let { faceLandmarkerResult ->
//黄点关键点
for(landmark in faceLandmarkerResult.faceLandmarks()) {
for(normalizedLandmark in landmark) {
canvas.drawPoint(normalizedLandmark.x() * imageWidth * scaleFactor, normalizedLandmark.y() * imageHeight * scaleFactor, pointPaint)
}
}
//蓝色线条
FaceLandmarker.FACE_LANDMARKS_LIPS.forEach {
canvas.drawLine(
faceLandmarkerResult.faceLandmarks().get(0).get(it!!.start()).x() * imageWidth * scaleFactor,
faceLandmarkerResult.faceLandmarks().get(0).get(it.start()).y() * imageHeight * scaleFactor,
faceLandmarkerResult.faceLandmarks().get(0).get(it.end()).x() * imageWidth * scaleFactor,
faceLandmarkerResult.faceLandmarks().get(0).get(it.end()).y() * imageHeight * scaleFactor,
linePaint
)
}
drawLips(canvas)
}
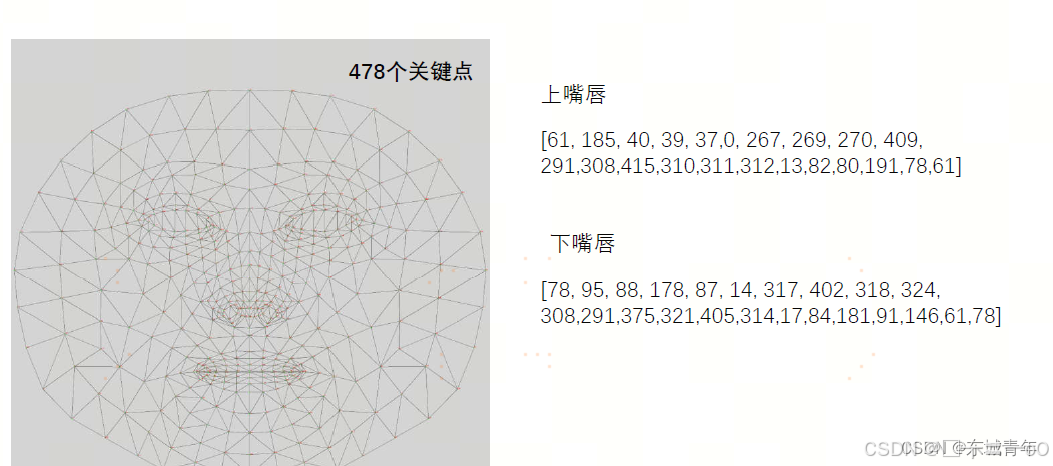
}其中得到的嘴唇数组特征点:
val lipUp = intArrayOf(61, 185, 40, 39, 37, 0, 267, 269, 270, 409, 291, 308, 415, 310, 311, 312, 13, 82, 80, 191, 78, 61)

val lipDown = intArrayOf(78, 95, 88, 178, 87, 14, 317, 402, 318, 324, 308, 291, 375, 321, 405, 314, 17, 84, 181, 91, 146, 61, 78)
关键drawLips方法:
fun drawLips(canvas: Canvas) {
        results?.let { faceLandmarkerResult ->
            val lipUp = intArrayOf(61, 185, 40, 39, 37, 0, 267, 269, 270, 409, 291, 308, 415, 310, 311, 312, 13, 82, 80, 191, 78, 61)
            val lipDown = intArrayOf(78, 95, 88, 178, 87, 14, 317, 402, 318, 324, 308, 291, 375, 321, 405, 314, 17, 84, 181, 91, 146, 61, 78)

            // 假设 `allFaceLandmarks` 是当前检测到的所有脸部特征点列表
            val allFaceLandmarks = faceLandmarkerResult.faceLandmarks().get(0)

            // 初始化 Path 用于绘制嘴唇的上下轮廓
            val lipsPath = Path()

            // 处理上嘴唇轮廓(使用 lipUp 列表中的索引点)
            val firstUpperLipPoint = allFaceLandmarks[lipUp[0]]
            lipsPath.moveTo(
                firstUpperLipPoint.x() * imageWidth * scaleFactor,
                firstUpperLipPoint.y() * imageHeight * scaleFactor
            )

            // 按顺序连接所有上嘴唇点,形成闭合的上嘴唇区域
            lipUp.forEach { index ->
                val point = allFaceLandmarks[index]
                lipsPath.lineTo(
                    point.x() * imageWidth * scaleFactor,
                    point.y() * imageHeight * scaleFactor
                )
            }

            // 闭合上嘴唇路径
            lipsPath.close()

            // 处理下嘴唇轮廓(使用 lipDown 列表中的索引点)
            val firstLowerLipPoint = allFaceLandmarks[lipDown[0]]
            lipsPath.moveTo(
                firstLowerLipPoint.x() * imageWidth * scaleFactor,
                firstLowerLipPoint.y() * imageHeight * scaleFactor
            )

            // 按顺序连接所有下嘴唇点,形成闭合的下嘴唇区域
            lipDown.forEach { index ->
                val point = allFaceLandmarks[index]
                lipsPath.lineTo(
                    point.x() * imageWidth * scaleFactor,
                    point.y() * imageHeight * scaleFactor
                )
            }

            // 闭合下嘴唇路径
            lipsPath.close()

            // 设置路径的填充类型为 WINDING,确保内部区域被完整填充
            lipsPath.fillType = Path.FillType.WINDING

            // 使用 Paint 设置填充路径的颜色
            val fillPaint = Paint().apply {
                color = Color.RED // 设置嘴唇区域的涂鸦颜色
                style = Paint.Style.FILL
                isAntiAlias = true
            }

            // 绘制路径到 Canvas
            canvas.drawPath(lipsPath, fillPaint)
        }
    }
效果:


 130
130

 被折叠的 条评论
为什么被折叠?
被折叠的 条评论
为什么被折叠?
 到【灌水乐园】发言


