


使用场景:我的需求,当我需要查看某个区间的值,并进行显著的标注,又不影响其他区域渐变的颜色。
导入一些库
import numpy as np
import seaborn as sns
import matplotlib.pyplot as plt
绘制一个heatmap
以查看torch的dropout层对矩阵的效果为例
import torch
import torch.nn as nn
m = nn.Dropout(p=0.2)
input = torch.randn(8, 8)
output = m(input)
#我们获得了input,其值分布在0-1的[10,10]的矩阵
#output矩阵,有0.2的值被置为了0
# 绘制热力图
fig,(ax1, ax2) = plt.subplots(ncols=2,figsize=(10, 4))
sns.heatmap(input, annot=True, cmap="YlGnBu", ax=ax1)
# 设置标题和坐标轴标签
ax1.set_title("8x8 Matrix Heatmap")
ax1.set_xlabel("Column")
ax1.set_ylabel("Row")
sns.heatmap(output, annot=True, cmap="YlGnBu", ax=ax2)
ax2.set_title("8x8 Matrix Heatmap")
ax2.set_xlabel("Column")
ax2.set_ylabel("Row")
# 显示图像
# 调整子图之间的spacing
plt.subplots_adjust(wspace=0.4)
plt.show()
- cmap:matplotlib的colormap名称或颜色对象;如果没有提供,默认为cubehelix map (数据集为连续数据集时) 或 RdBu_r (数据集为离散数据集时)
我们并不能很好的查看到0点的颜色。

查看colormap
cmap = sns.color_palette("YlGnBu", as_cmap=True)
查看一下这个配色的colorbar
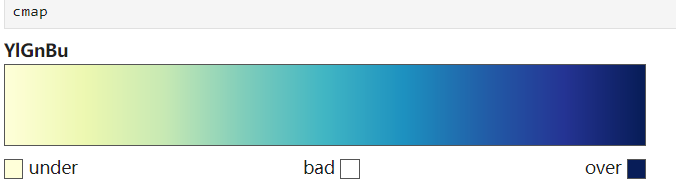
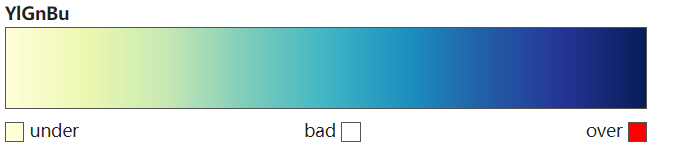
#设置超过,低于的颜色
custom_cmap.set_over('r', 1.0)
#如果数据包含了无效值(如NaN或inf)
# 设置无效值颜色为灰色
cmap.set_bad(color='gray')
有了显示这个特定的值的第一个方案,将我们希望标注的值设置为无效值,这损失了信息,但是可以起到可视化的效果。
#使用numpy实现
data = np.random.rand(5, 5)
# 定义条件
condition = (data > 0.5) & (data < 0.8)
# 应用条件得到布尔掩码数组
mask = np.where(condition)
data[mask] = np.nan
#torch
import torch
# 创建示例张量
data = torch.rand(5, 5)
# 定义条件
condition = (data > 0.5) & (data < 0.8)
# 使用掩码索引和赋值
data[condition] = float('nan')
#torch检查nan
#torch.isnan()
#tensor和numpy的转换
import torch
import numpy
A = X.numpy()
B = torch.tensor(A)
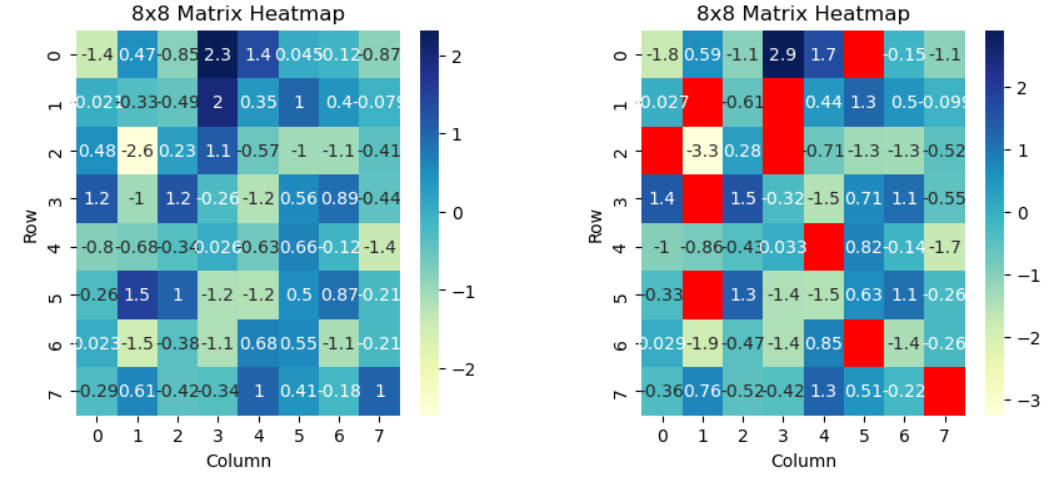
总体的解决方案1:
import torch
import torch.nn as nn
m = nn.Dropout(p=0.2)
input = torch.randn(8, 8)
output = m(input)
condition = (output > -0.0001) & (output < 0.0001)
output[condition] = float('nan')
# 获取颜色映射对象
custome_cmap = sns.color_palette("YlGnBu", as_cmap=True)
# 设置无效值颜色为红色,对于没有自带的nan的数据
custome_cmap.set_bad(color='red',alpha=1.0)

# 绘制热力图
fig,(ax1, ax2) = plt.subplots(ncols=2,figsize=(10, 4))

sns.heatmap(input, annot=True, cmap=custome_cmap, ax=ax1)
# 设置标题和坐标轴标签
ax1.set_title("8x8 Matrix Heatmap")
ax1.set_xlabel("Column")
ax1.set_ylabel("Row")

sns.heatmap(output, annot=True, cmap=custome_cmap, ax=ax2)
ax2.set_title("8x8 Matrix Heatmap")
ax2.set_xlabel("Column")
ax2.set_ylabel("Row")
# 显示图像
# 调整子图之间的spacing
plt.subplots_adjust(wspace=0.4)
plt.show()
如何自定义color_map?
cmap是什么数据类型?
分开的色块
cmap = plt.cm.get_cmap('YlGnBu')
custome_cmap = sns.color_palette("YlGnBu", as_cmap=True)
type(cmap)
#matplotlib.colors.LinearSegmentedColormap
没什么有效信息
生成一个分割色块
colors = ['blue', 'green', 'yellow', 'red']
bounds = [0, 25, 50, 75, 100]
cmap = ListedColormap(colors)
cmap

cmap.N:
一个整数,表示颜色映射(cmap)中包含的颜色数量。
cmap.colors:
对应的颜色
#这些颜色是一个一行多列的数组(列数取决于色彩的编码方式)
['blue', 'green', 'yellow', 'red']
norm = BoundaryNorm(bounds, cmap.N)
BoundaryNorm是matplotlib中的一个类,用于根据给定的边界值(bounds)将数值映射到离散的颜色索引。它会将数值划分到不同的区间,并将每个区间映射到颜色映射中的一种颜色。
将这个norm对象与你的颜色映射cmap一起使用。在绘制条形图、热力图或其他可视化时。这样,不同的数值范围就会被映射到不同的颜色,使得可视化结果更加清晰和直观。
渐变色块
cmap = plt.cm.plasma # 你可以使用其他渐变色,如 plt.cm.plasma, plt.cm.inferno, plt.cm.magma
数据的类型有所改变
matplotlib.colors.ListedColormap
对这个进行属性的plt.cm.plasma
cmap.colors
是一个[256,3]的数组
#等效
len(cmap.colors)
cmap.N
#256
渐变色和之前的分割差不多,只是使用的颜色更多、
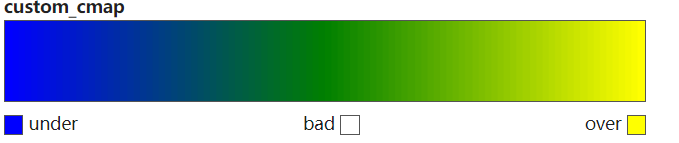
生成一个渐变色块
colors = ["blue", "green", "yellow"]
#颜色的数量,按照区分的数量划分,没有bounds这个分割的界了
n_bins = 100
#名字,可以随意设置
cmap_name = 'custom_cmap'
cmap = LinearSegmentedColormap.from_list(cmap_name, colors, N=n_bins)
#渐变色块的另一个声明方法
cmap_custom = LinearSegmentedColormap.from_list(
    "custom_cmap",
    [(0.0, "blue"), (0.40, "cyan"), (0.5, "green"), (0.60, "yellow"), (1.0, "red")],
    N=256
)
取一个颜色
对连续颜色块的取色
cmap是一个颜色的映射,相当于一个指示,我们真正把数值变到对应的颜色,需要使用norm。
norm是Normalize,百分比值
colors = ["blue", "green", "yellow"]
#颜色的数量,按照区分的数量划分,没有bounds这个分割的界了
n_bins = 100
#名字,可以随意设置
cmap_name = 'custom_cmap'
cmap = LinearSegmentedColormap.from_list(cmap_name, colors, N=n_bins)

#进行均匀的分割
norm = Normalize(vmin=0, vmax=100)
value = 50
normalized_value = norm(value) #0.5,百分比值
color_at_50 = cmap(normalized_value)
# 打印颜色值
print(f"The color at value {value} is: {color_at_50}")
fig, ax = plt.subplots(figsize=(6, 1))
# 使用矩形填充显示颜色
rect = plt.Rectangle((0, 0), 1, 1, fc=color_at_50)
ax.add_patch(rect)

# 移除坐标轴和边框
ax.set_xticks([])
ax.set_yticks([])
ax.set_frame_on(False)
plt.show()
对分段块的取色和显示
BoundaryNorm
colors = ['blue', 'green', 'yellow', 'red']
bounds = [0, 25, 50, 75, 100]
# 创建颜色映射和规范化对象
cmap = mcolors.ListedColormap(colors)
norm = mcolors.BoundaryNorm(bounds, cmap.N)
#按照设置的bounds=[0, 25, 50, 75, 100]来进行映射
bounds=[0, 25, 50, 75, 100]
norm = BoundaryNorm(bounds, cmap.N)

# 获取值为50对应的颜色
color_value = 100
color_rgb = cmap(norm([color_value]))[0]
#norm([color_value])
#映射为0,1,2,3,4.bounds 数组的索引
# 创建一个图像和轴域对象
fig, ax = plt.subplots(figsize=(6, 1))

# 使用矩形填充显示颜色
#起始点,行,列
rect = plt.Rectangle((0, 0), 1, 1, fc=color_rgb)
ax.add_patch(rect)

# 移除坐标轴和边框
ax.set_xticks([])
ax.set_yticks([])
ax.set_frame_on(False)

# 显示图像
plt.show()
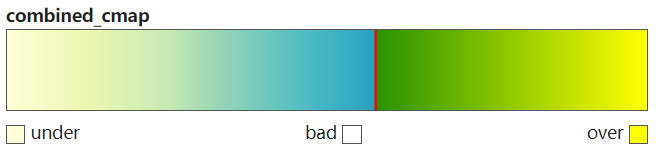
设置渐变和离散色块合并
bounds = [0, 40, 50, 60, 100]
# 定义渐变颜色映射
colors_grad = ["cyan", "green", "yellow"]
cmap_grad = LinearSegmentedColormap.from_list("grad_cmap", colors_grad)
# 定义离散颜色映射
colors_disc = ["blue", "red"]
# 合并两个颜色映射
#通过人为构建一个从0到1的256个数量的序列
combined_colors = ["blue"] + [cmap_grad(i/256.0) for i in range(150)] + ["red"]*10+
[cmap_grad(i/256.0) for i in np.arange(160,256)]+["red"]
cmap_combined = LinearSegmentedColormap.from_list("combined_cmap", combined_colors)

解决方案2:
import torch
import torch.nn as nn
m = nn.Dropout(p=0.2)
input = torch.randn(8, 8)
output = m(input)
#我们要确定0在最大值和最小值的区间范围
#先默认考虑最小值小于0,最大值大于0
output_min=torch.min(output)
output_max=torch.max(output)
ratio=-output_min/(output_max-output_min)
#256个色块,int直接向下取整
index=int(ratio*256)
print(index)
# 获取颜色映射对象
custome_cmap = sns.color_palette("YlGnBu", as_cmap=True)
#custome_cmap.N =256
custome_cmap = [custome_cmap(i/256.0) for i in range(index)] + ["red"]*1+[cmap_grad(i/256.0) for i in np.arange(index+1,256)]
cmap_combined = LinearSegmentedColormap.from_list("combined_cmap", custome_cmap)
接向下取整
index=int(ratio*256)
print(index)
获取颜色映射对象
custome_cmap = sns.color_palette("YlGnBu", as_cmap=True)
#custome_cmap.N =256
custome_cmap = [custome_cmap(i/256.0) for i in range(index)] + ["red"]*1+[cmap_grad(i/256.0) for i in np.arange(index+1,256)]
cmap_combined = LinearSegmentedColormap.from_list("combined_cmap", custome_cmap)


 2403
2403

 被折叠的 条评论
为什么被折叠?
被折叠的 条评论
为什么被折叠?
 到【灌水乐园】发言


