


下面通过webStrom来写代码,通过微信开发者工具来调试!
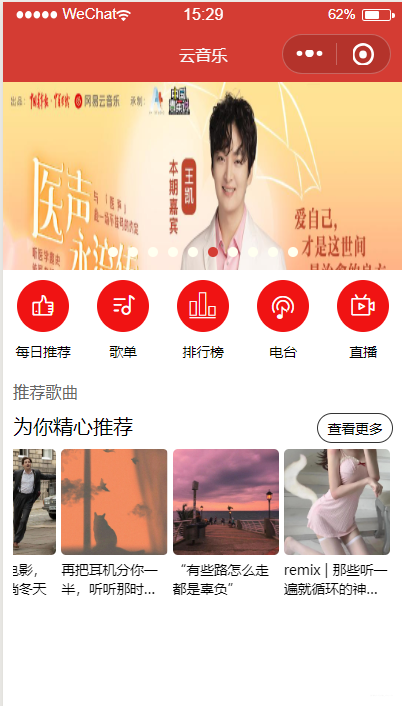
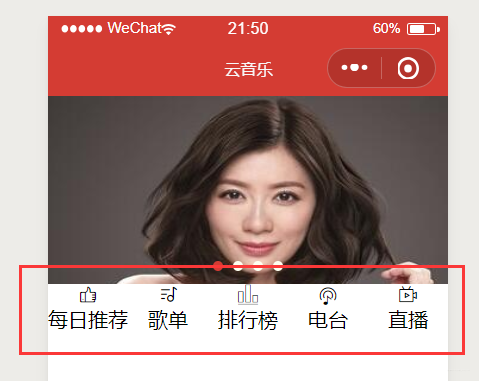
本篇最终效果图:
这里写目录标题
一、轮播图

<!--- 轮播图 ----->
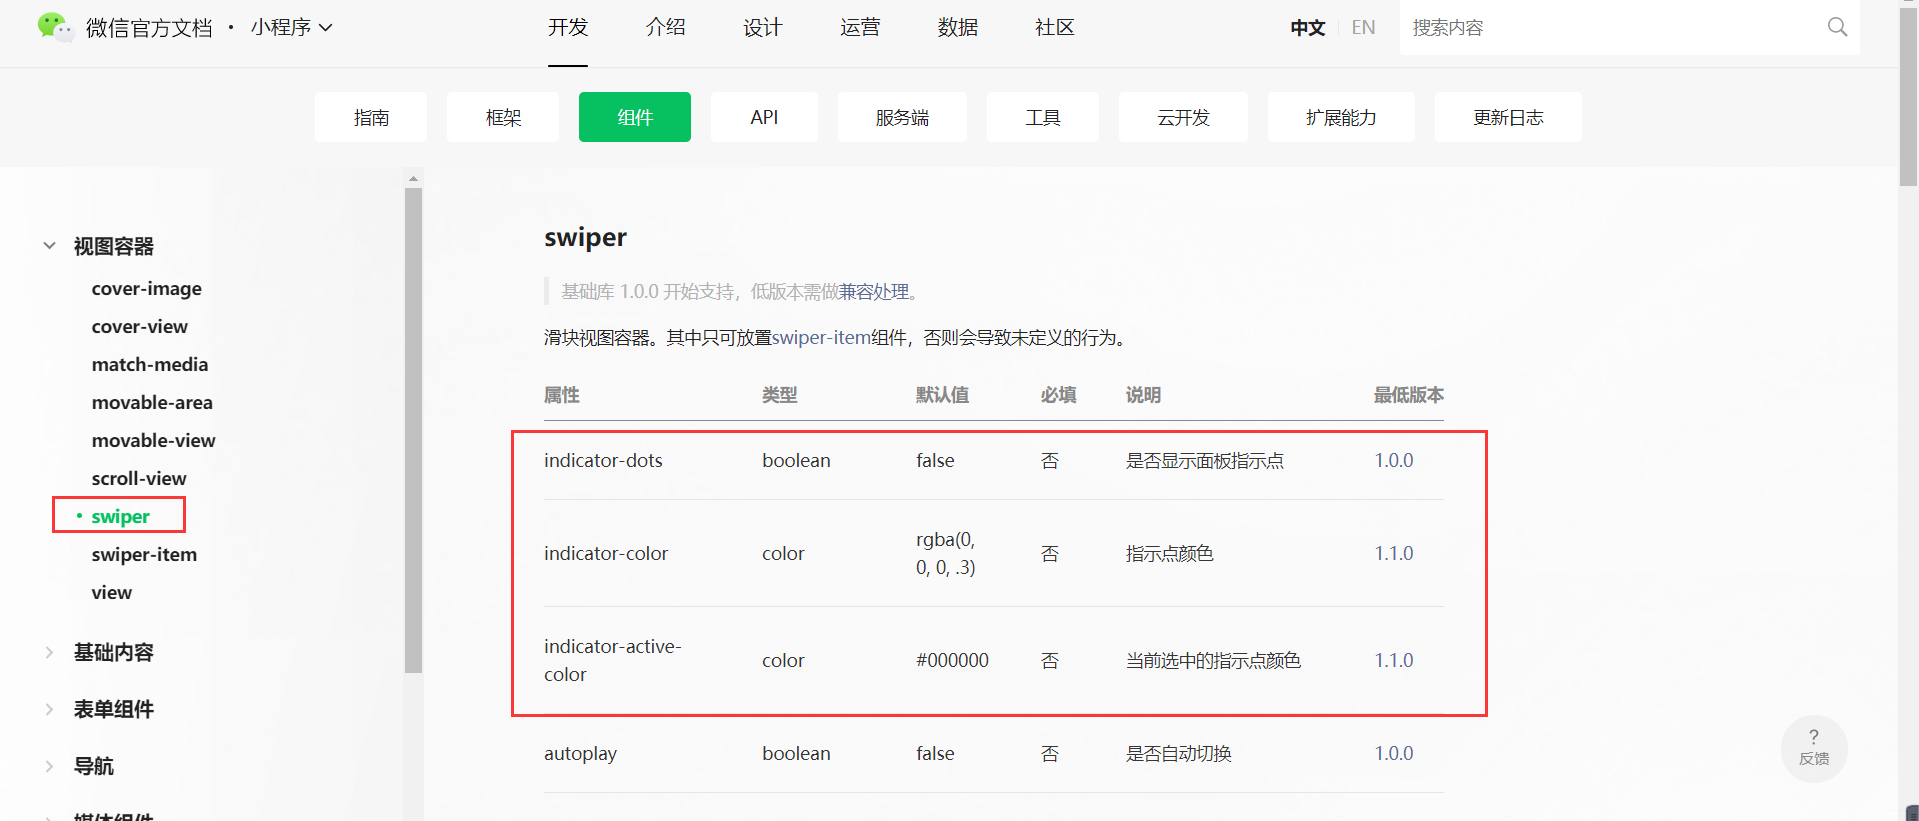
<swiper
class="banners"
indicator-dots="true"
indicator-color="ivory"
indicator-active-color="#d43c33"
>
<swiper-item>
<image src="/static/images/nvsheng.jpg" />
</swiper-item>
<swiper-item>
<image src="/static/images/nvsheng.jpg" />
</swiper-item>
<swiper-item>
<image src="/static/images/nvsheng.jpg" />
</swiper-item>
<swiper-item>
<image src="/static/images/nvsheng.jpg" />
</swiper-item>
</swiper>
.banner{
  width: 100%;
  height: 300rpx;
}

.banner image{
  width: 100%;
  height: 100%;
}
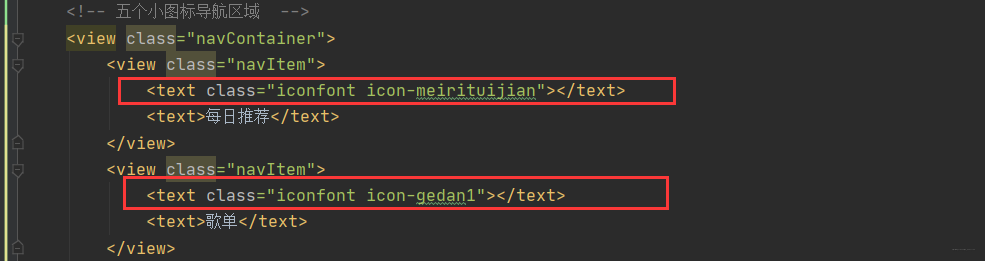
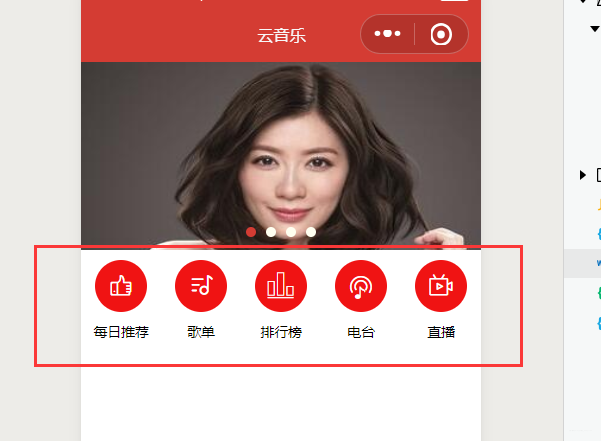
二、 五个小图标
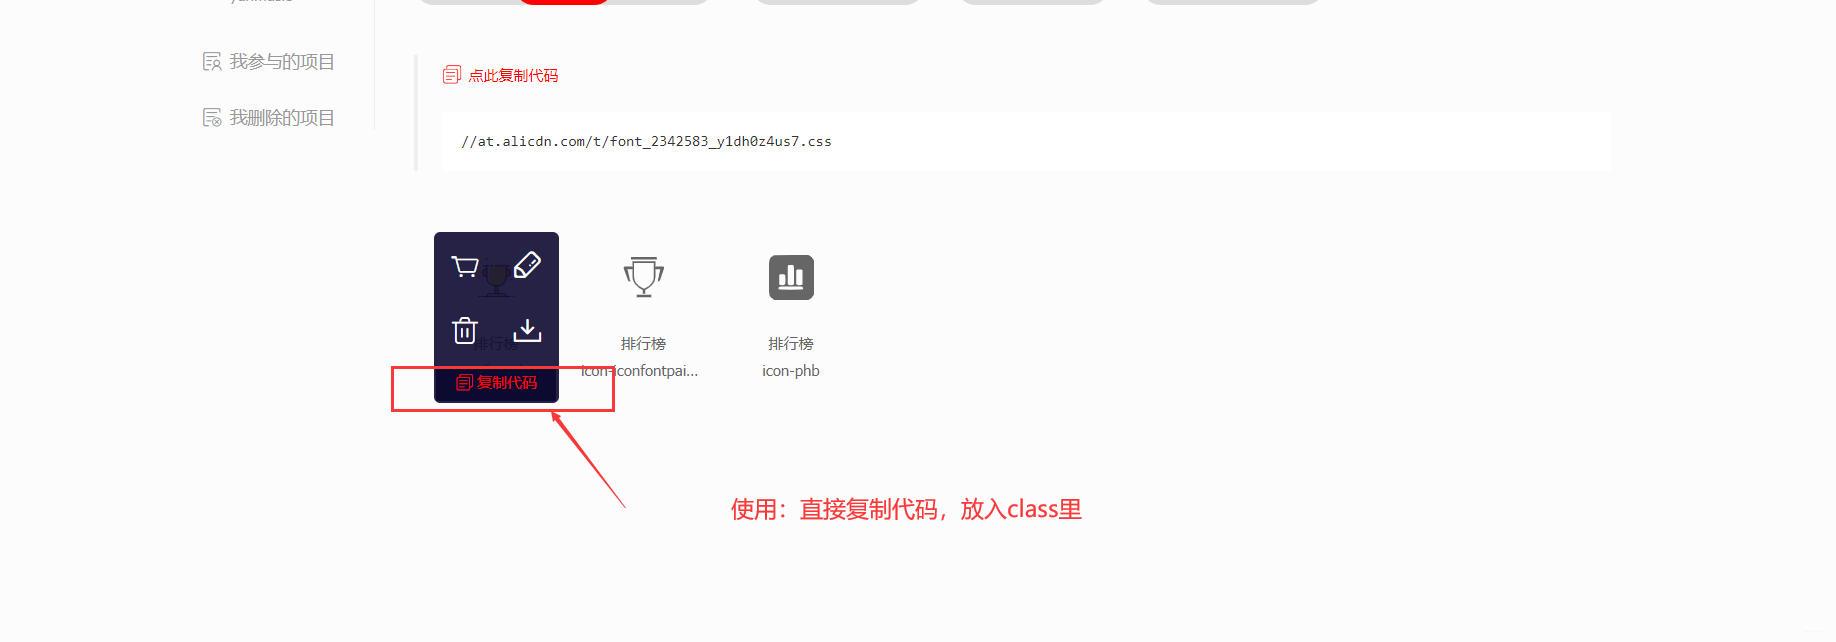
1. 将阿里巴巴矢量图标转换为本地的
登录账号,将需要的图标加入到购物车中
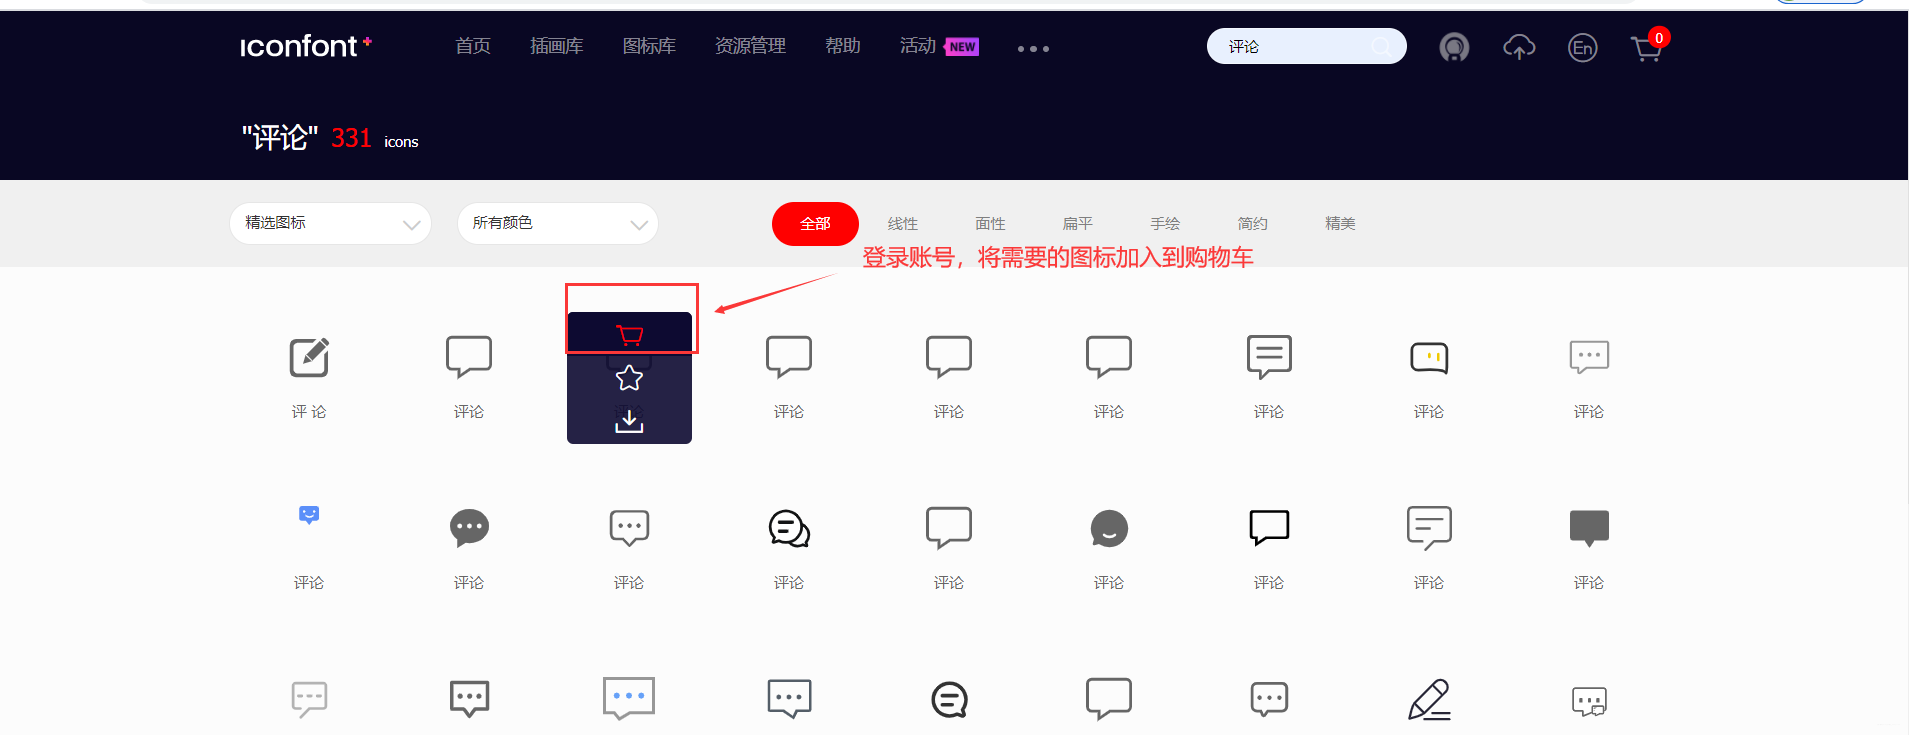
点击购物车,将所选择的图标,添加到项目(就是方便管理)
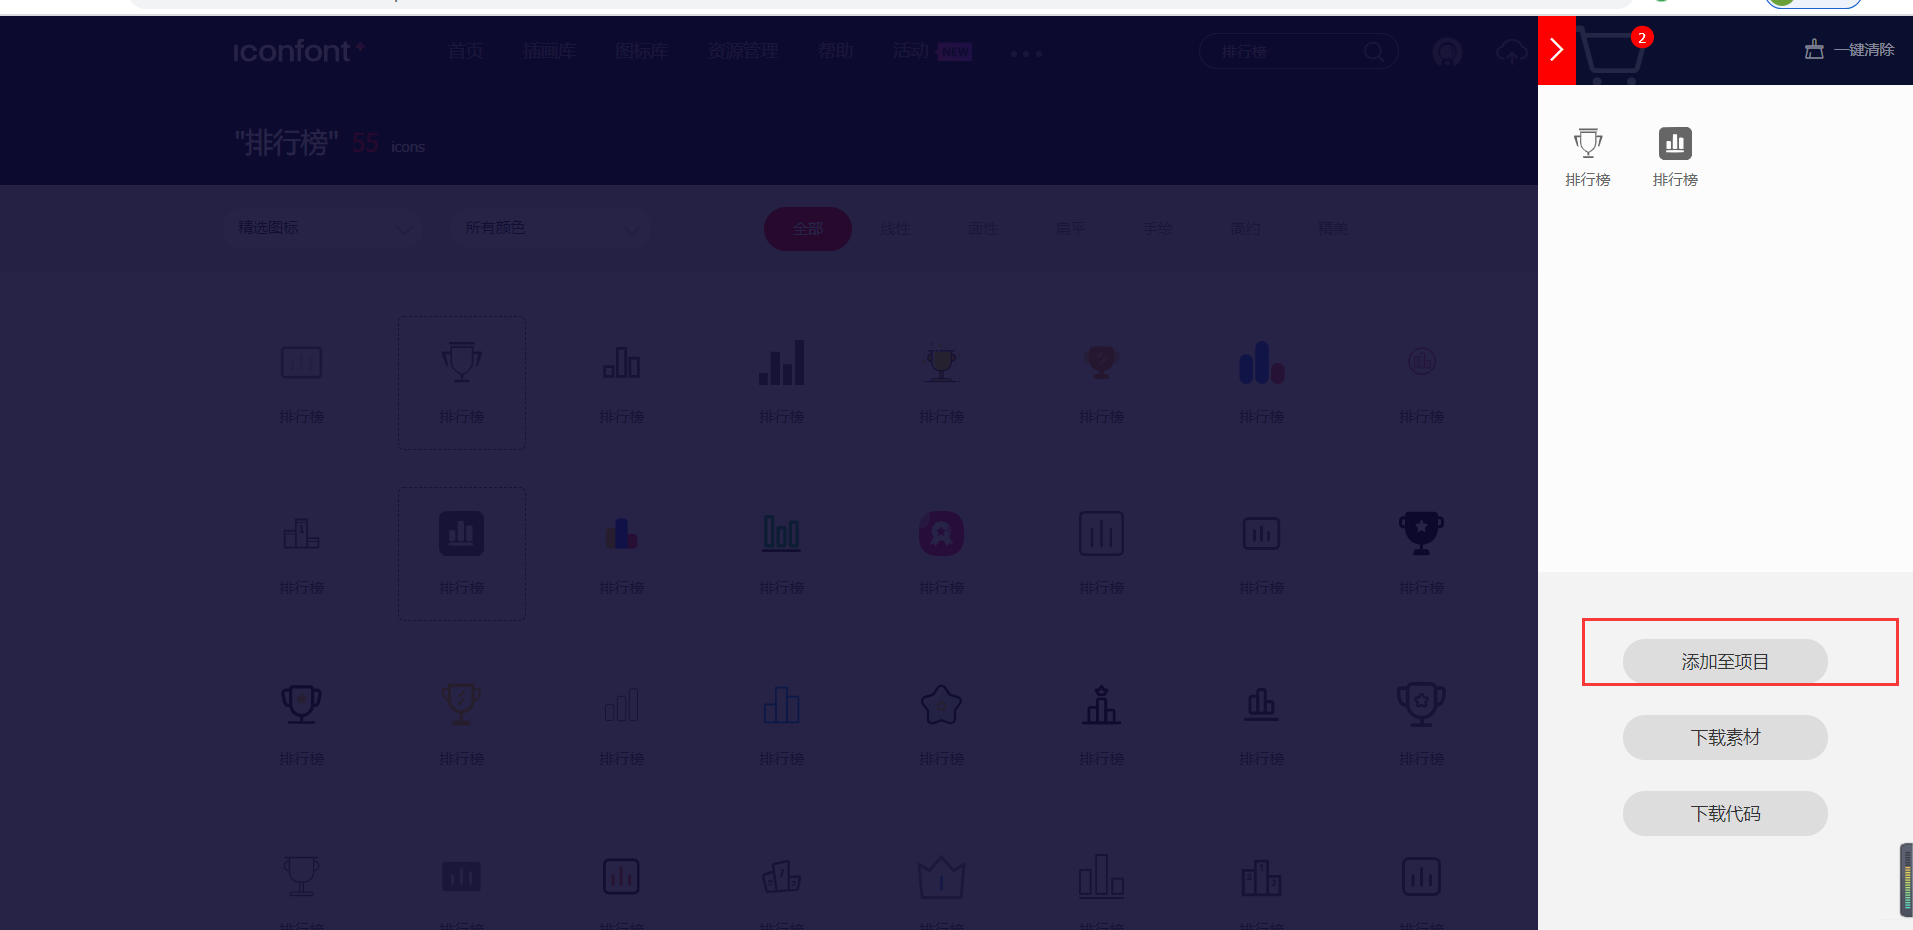
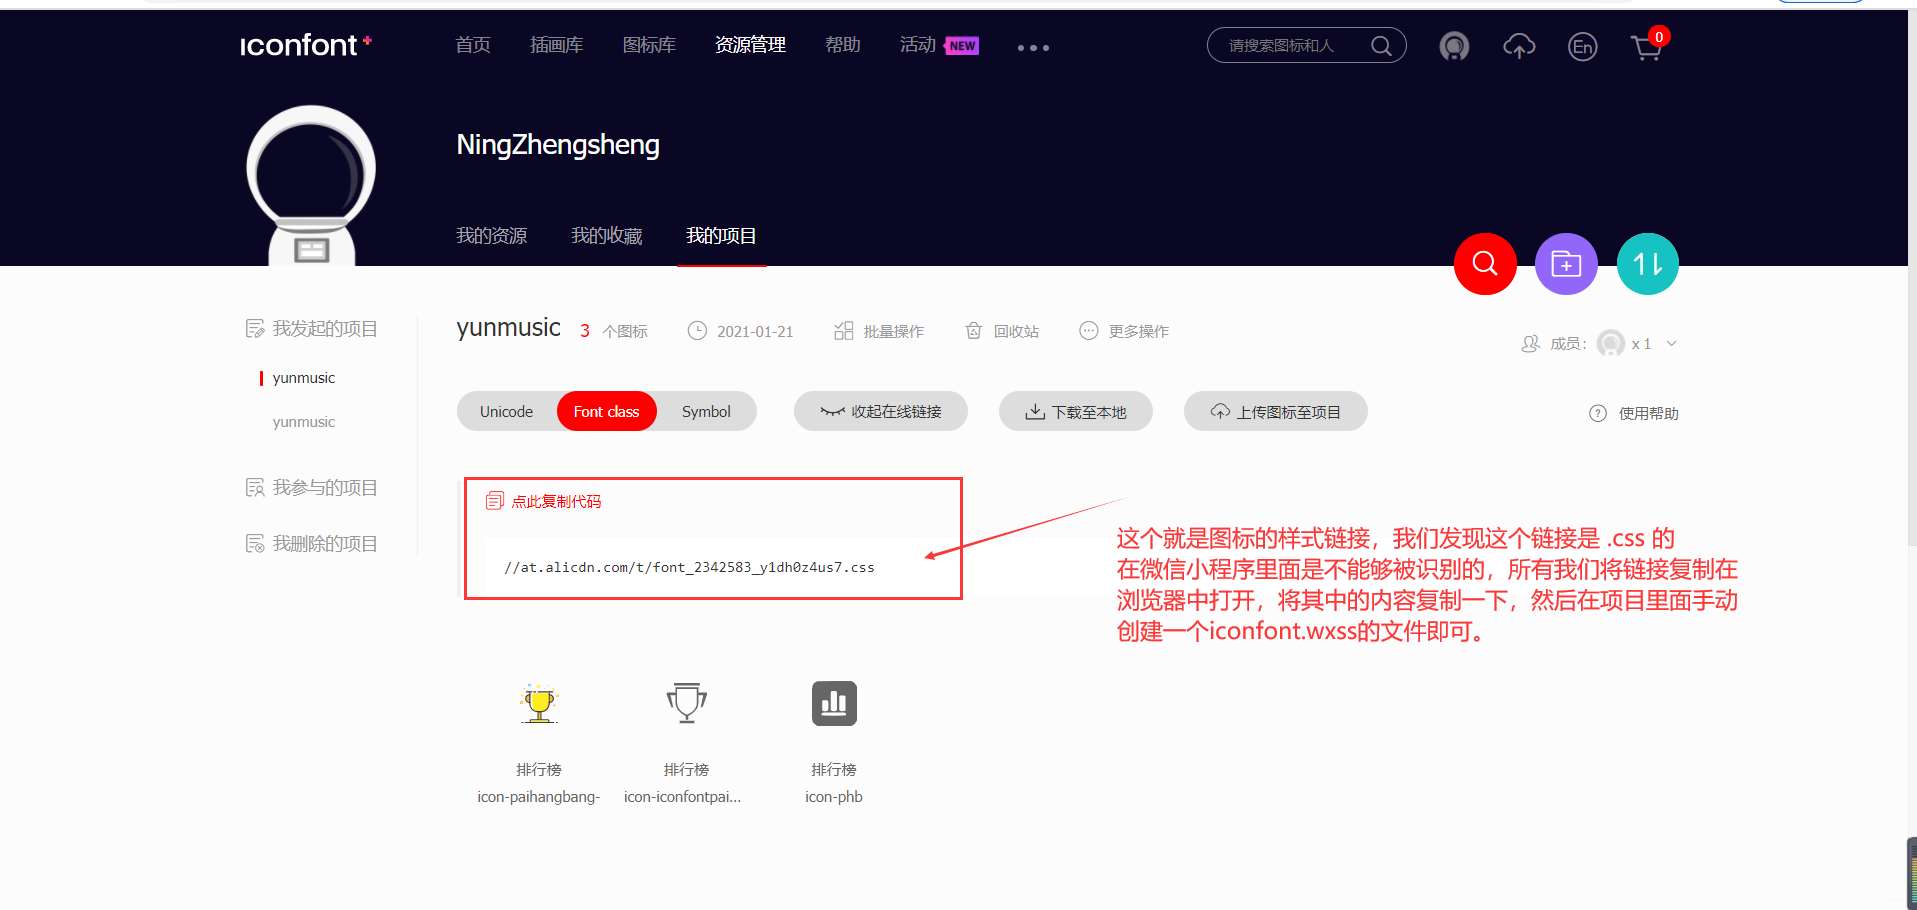
将代码样式加入项目
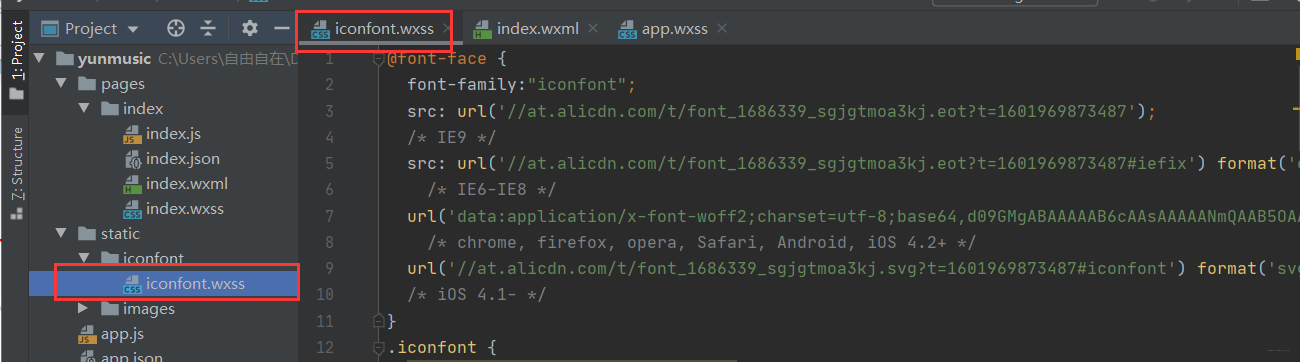
2. 项目使用图标
全局引用iconfont.wxss样式

效果图:
下面调一下样式:
/* 五个导航栏的样式 */
.navContainer{
  display: flex;
}

.navItem{
  display: flex;
  flex-direction: column;
  align-items: center;
  width: 20%;
}

.navItem .iconfont{
  width: 100rpx;
  height: 100rpx;
  border-radius: 50%;
  text-align: center;
  line-height: 100rpx;
  background: rgb(240,19,19);
  font-size: 50rpx;
  color: #fff;
  margin: 20rpx 0;
}


.navItem text{
  font-size: 26rpx;
}
三、滚动条 scroll-view
注意点:
enable-flex 启用 flexbox 布局。开启后,当前节点声明了 display: flex 就会成为 flex container,并作用于其孩子节点。
scroll-x 允许横向滚动

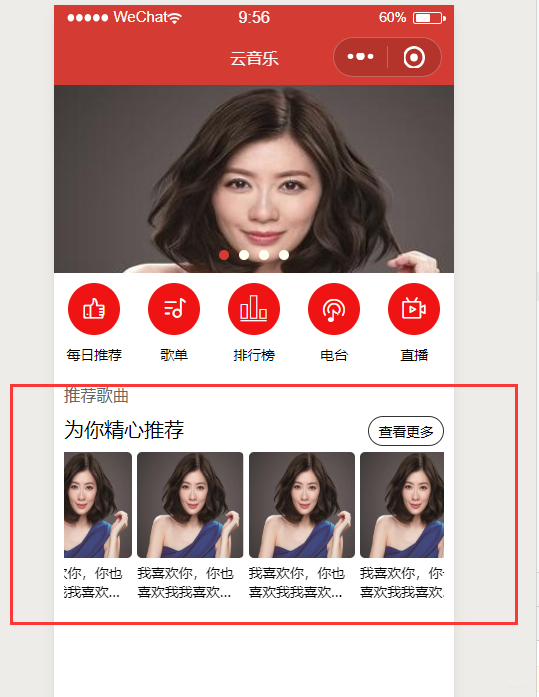
	<!-- 推荐歌曲区域	-->
	<view class="commmendContainer">
		<!--	头部	-->
		<view class="header">
			<text class="title">推荐歌曲</text>
			<view>
				<text>为你精心推荐</text>
				<text class="more">查看更多</text>
			</view>
		</view>
		<!--	内容区	-->
		<scroll-view class="recommendScroll" enable-flex scroll-x>
			<view class="scrollItem">
				<image src="/static/images/nvsheng.jpg"></image>
				<text>我喜欢你,你也喜欢我我喜欢你,你也喜欢我</text>
			</view>
			<view class="scrollItem">
				<image src="/static/images/nvsheng.jpg"></image>
				<text>我喜欢你,你也喜欢我我喜欢你,你也喜欢我</text>
			</view>
			<view class="scrollItem">
				<image src="/static/images/nvsheng.jpg"></image>
				<text>我喜欢你,你也喜欢我我喜欢你,你也喜欢我</text>
			</view>
			<view class="scrollItem">
				<image src="/static/images/nvsheng.jpg"></image>
				<text>我喜欢你,你也喜欢我我喜欢你,你也喜欢我</text>
			</view>
			<view class="scrollItem">
				<image src="/static/images/nvsheng.jpg"></image>
				<text>我喜欢你,你也喜欢我我喜欢你,你也喜欢我</text>
			</view>
		</scroll-view>
	</view>
/* 推荐歌曲样式设置 */
.commmendContainer{
  padding: 20rpx;
}

.commmendContainer .header{
  padding-bottom: 20rpx;
}

.commmendContainer .header .title{
  font-size: 32rpx;
  line-height: 80rpx;
  color: #666;
}

.commmendContainer .header .more{
  float: right;
  border: 1rpx solid #333;
  padding: 10rpx 20rpx;
  font-size: 26rpx;
  border-radius: 30rpx;
}

/* 推荐内容区 的样式*/
.recommendScroll{
  display: flex;
}

.scrollItem{
  width: 200rpx;
  margin-right: 10rpx;
}

.scrollItem image{
  width: 200rpx;
  height: 200rpx;
  border-radius: 10rpx;
}

.scrollItem text{
  font-size: 26rpx;
  /* 单行文本溢出隐藏 省略号代替 */
  /*display: block;*/
  /*white-space: nowrap;*/
  /*overflow: hidden;*/
  /*text-overflow: ellipsis;*/

  /*  多行文本溢出隐藏 省略号代替 */
  overflow: hidden;
  text-overflow: ellipsis;
  display: -webkit-box;
  -webkit-box-orient: vertical; /* 设置对其模式 */
  -webkit-line-clamp:2; /* 设置多行的行数*/
}
四、前后端交互(获取动态数据)
官方文档 wx.request(Object object)
我从网易云的提供的接口获取数据,然后将小程序的静态数据替换掉。
语法: wx.request()
注意事项:
- 协议必须是https协议;
- 一个接口最多配置20个域名;
- 并发上限是10个;
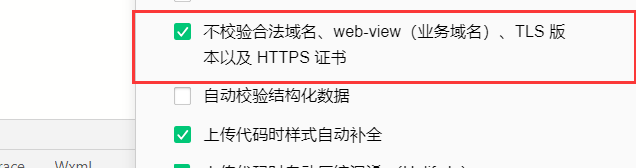
- 我们在本地开发 可以设置不校验合法域名;开发工具–>右上角详情–>本地设置–>设置不校验;
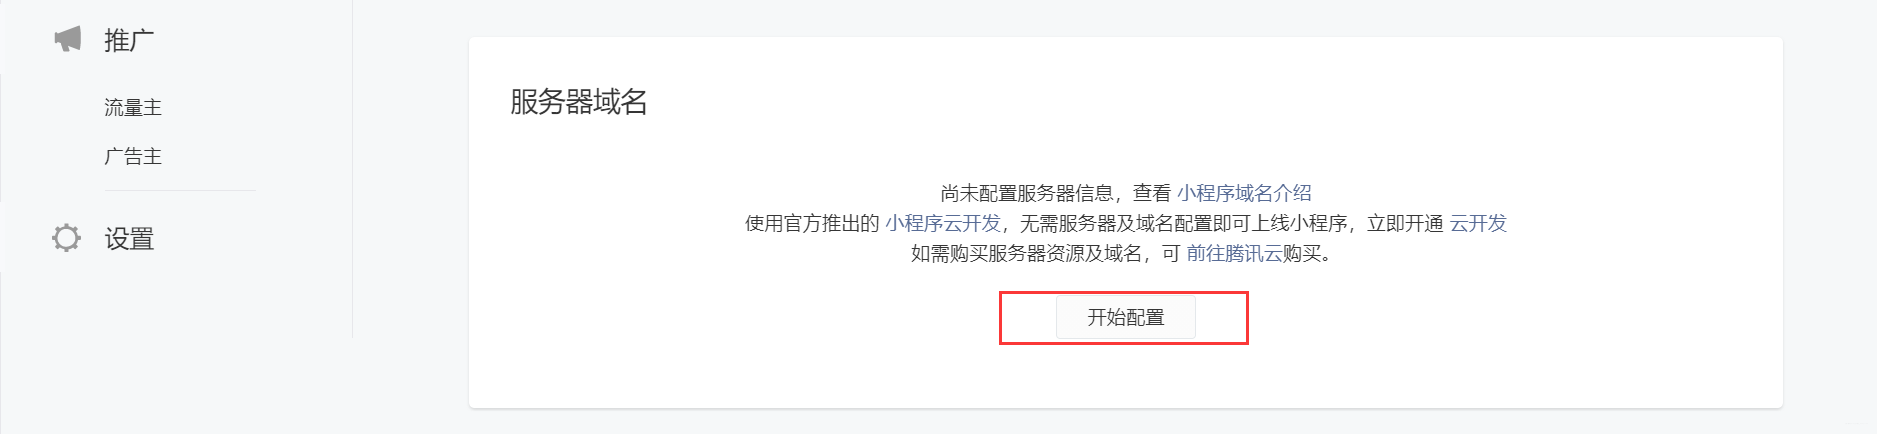
1. 登录微信小程序设置服务器域名 (实际开发中)
我们在实际开发中需要设置一下小程序的域名,不然会报错说,域名不合法。
由于我们本文中是本地开发学习,所以我们就不进行设置了。
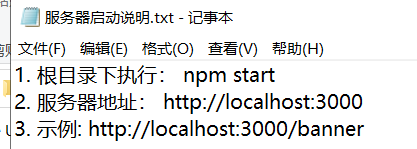
2. 本地开发(http:localhost:3000/)
(1) 本地启动服务器
这个是已经封装好的接口,不需要我们从网易云获取数据,这个算是中介吧,方便我们使用也规范。

(2) 获取数据
index.js 代码 获取后台数据
  onLoad: function (options) {
    wx.request({
      url:"http://localhost:3000/banner",
      data:{
        type:2
      },
      success:(res)=>{
        // 获取后台数据成功
        console.log("获取后台数据成功",res);
      },
      fail:(err)=>{
        // 获取后台数据失败
        console.log("获取后台数据失败",err);
      }
    })
  },
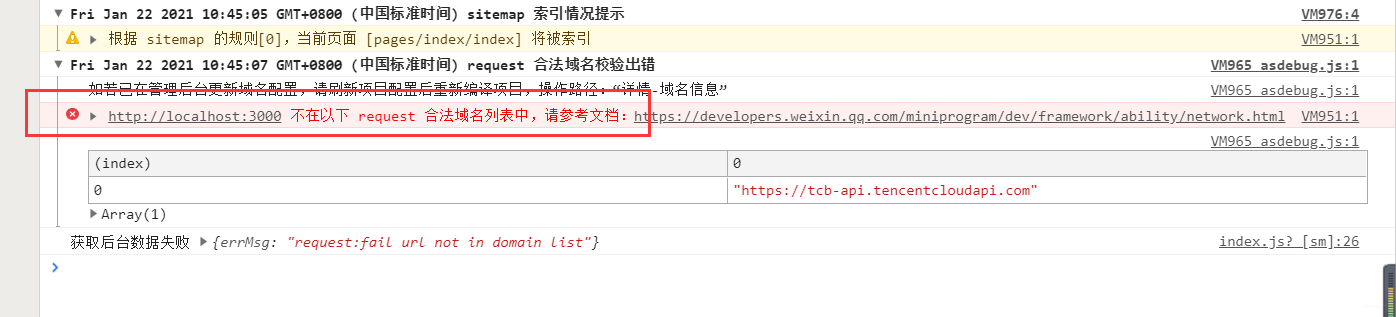
如果没有设置域名检测,就会上面的报错,需要设置如下;
设置后获取数据:

(3) 封装功能函数
await和async 配合使用,实现获取数据!
index.代码:
import request from "../../utils/request";
  /**
   * 生命周期函数--监听页面加载
   */
  onLoad: async function (options) {
    let result = await request("http://localhost:3000/banner", {type: 2});
    console.log("返回结果:",result);
  },
request.ja代码:
// 专门发送ajax请求

export default(url , data={}, method="GET")=>{
    return new Promise((resolve,reject)=>{
        // 1. new Promise 初始化promise 实例的状态pending
        wx.request({
            url,
            data,
            method,
            success:(res)=>{
                // 获取后台数据成功
                console.log("获取后台数据成功",res);
                resolve(res.data);
            },
            fail:(err)=>{
                // 获取后台数据失败
                console.log("获取后台数据失败",err);
                reject(err);
            }
        })
    })
}
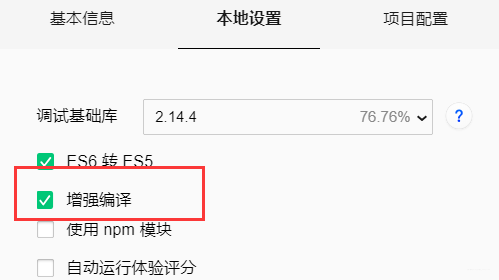
刚使用上面封装函数时,出现下面的错误:
TypeError: Cannot read property 'mark' of undefined
决解方案:(将增强编译开启)
拿到数据:

五、列表渲染 (将轮廓图和推荐歌曲使用动态数据)
官方文档 列表渲染
wx:for
在组件上使用 wx:for 控制属性绑定一个数组,即可使用数组中各项的数据重复渲染该组件。默认数组的当前项的下标变量名默认为 index,数组当前项的变量名默认为 item.
官方给的例子:
<view wx:for="{{array}}">
  {{index}}: {{item.message}}
</view>
Page({
  data: {
    array: [{
      message: 'foo',
    }, {
      message: 'bar'
    }]
  }
})

项目应用:
	<!---  轮播图  ----->
	<swiper class="banners" indicator-dots="true" indicator-color="ivory" indicator-active-color="#d43c33">
		<swiper-item wx:for="{{bannerList}}" wx:key="bannerId">
			<image src="{{item.pic}}" ></image>
		</swiper-item>
	</swiper>

	<!-- 推荐歌曲区域	-->
	<view class="commmendContainer">
		<!--	内容区	-->
		<scroll-view class="recommendScroll" enable-flex scroll-x>
			<view class="scrollItem" wx:for="{{recommendList}}" wx:key="id">
				<image src="{{item.picUrl}}"></image>
				<text>{{item.name}}</text>
			</view>
		</scroll-view>
	</view>
  onLoad: async function (options) {
    // 1. 获取轮廓图的数据
    let bannerList = await request("/banner", {type: 2});
    this.setData({
      bannerList:bannerList.banners
    });

    // 2. 获取推荐歌单的数据
    let recommendList = await request("/personalized",{limit:10});
    this.setData({
      recommendList:recommendList.result
    });
  },


 1531
1531


 被折叠的 条评论
为什么被折叠?
被折叠的 条评论
为什么被折叠?
 到【灌水乐园】发言


