


既然弄明白了SpringBoot的自动装配机制是什么,即可以很方便地实现一个starter组件了。 如下示例展示在一个自定义的starter组件中定义一个访问Redis的客户端组件RedissonClient。
新建一个artifactId为redisson-spring-boot-starter的项目,添加依赖:
<project xmlns="http://maven.apache.org/POM/4.0.0" xmlns:xsi="http://www.w3.org/2001/XMLSchema-instance"
  xsi:schemaLocation="http://maven.apache.org/POM/4.0.0 http://maven.apache.org/xsd/maven-4.0.0.xsd">
  <modelVersion>4.0.0</modelVersion>

  <groupId>org.chench.extra.spring.boot</groupId>
  <artifactId>redisson-spring-boot-starter</artifactId>
  <version>1.0.0</version>

  <dependencies>
    <dependency>
      <groupId>org.springframework.boot</groupId>
      <artifactId>spring-boot-starter</artifactId>
      <version>2.3.1.RELEASE</version>
      <!-- 禁止传递依赖 -->
      <optional>true</optional>
    </dependency>

    <dependency>
      <groupId>org.redisson</groupId>
      <artifactId>redisson</artifactId>
      <version>3.13.1</version>
    </dependency>

    <!-- 配置参数提示,需加此依赖 -->
    <dependency>
      <groupId>org.springframework.boot</groupId>
      <artifactId>spring-boot-configuration-processor</artifactId>
      <version>2.3.1.RELEASE</version>
    </dependency>

  </dependencies>
</project>新一个保存配置参数信息的类RedissonProperties,用于从Spring Boot配置文件中加载以auto.redisson为前缀的参数。
// 从SpringBoot配置文件中读取以`auto.redisson`为前缀的参数,如:auto.redisson.host=127.0.0.1
@ConfigurationProperties(prefix = "auto.redisson")
public class RedissonProperties {
    private String host = "localhost";
    private int port = 6379;
    private int timeout = 1000;
    private boolean ssl = false;

    public String getHost() {
        return host;
    }

    public void setHost(String host) {
        this.host = host;
    }

    public int getPort() {
        return port;
    }

    public void setPort(int port) {
        this.port = port;
    }

    public int getTimeout() {
        return timeout;
    }

    public void setTimeout(int timeout) {
        this.timeout = timeout;
    }

    public boolean isSsl() {
        return ssl;
    }

    public void setSsl(boolean ssl) {
        this.ssl = ssl;
    }
}新建一个创建RedissonClient对象的配置类:
@ConditionalOnClass(Redisson.class) // 使用条件注解,只有当依赖了Redisson时才加载到容器
@EnableConfigurationProperties(RedissonProperties.class) // 加载配置参数类
@Configuration // 这是一个配置类
public class RedissionAutoConfiguration {
    @Bean // 实例化RedissonClient对象
    public RedissonClient redissonClient(RedissonProperties redissonProperties) {
        Config config = new Config();
        String prefix = redissonProperties.isSsl() ? "rediss://" : "redis://";
        String host = redissonProperties.getHost();
        int port = redissonProperties.getPort();
        int timeout = redissonProperties.getTimeout();
        config.useSingleServer()
                .setAddress(prefix + host + ":" + port)
                .setTimeout(timeout);
        return Redisson.create(config);
    }
}根据SpringBoot自动装配的规范要求,需要在文件META-INF/spring.factories文件添加需要自动装配的类。 所以新建文件src\main\resources\META-INF\spring.factories,在文件中添加自动装配的类信息:
# 自动装配的类可以是多个,用英文逗号分隔,使用\进行换行 org.springframework.boot.autoconfigure.EnableAutoConfiguration=\ org.chench.extra.spring.boot.redisson.RedissionAutoConfiguration
至此,一个支持在SpringBoot中进行自动装配的starter组件基本功能就开发完毕了,执行mvn clean install将项目打包安装到本地Maven仓库,然后就可以在SpringBoot项目中引入该starter组件进行使用了。 但是,如果希望在SpringBoot配置文件中添加配置参数时能进行提示,如下图:
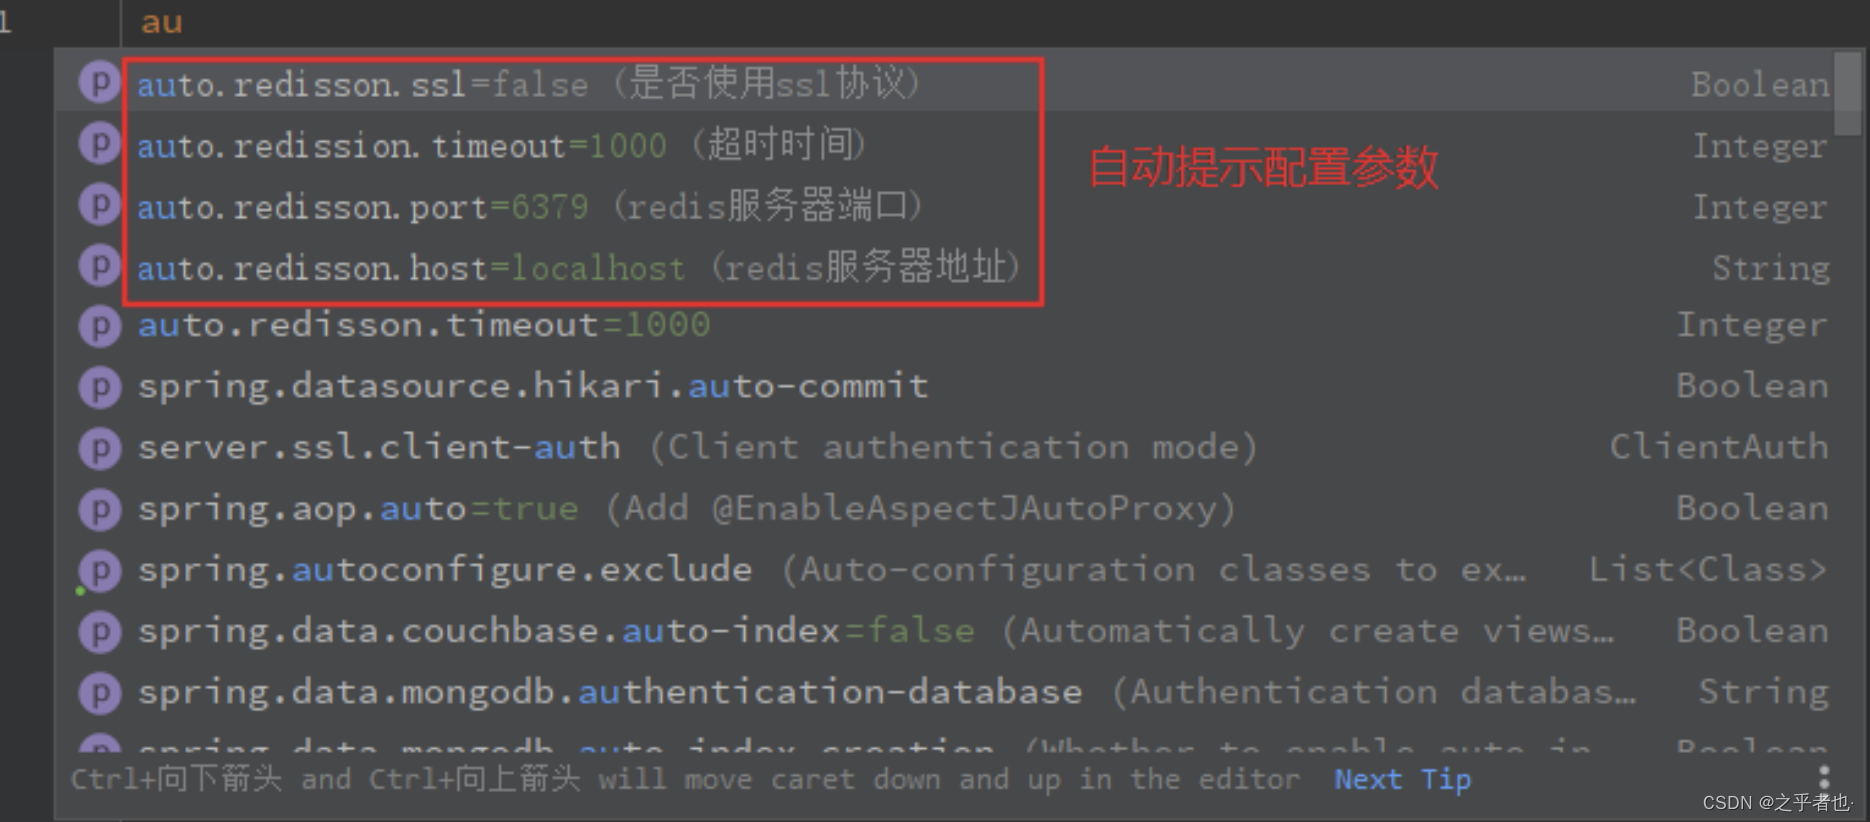 还需要在
还需要在src\main\resources\META-INF\路径下添加一个配置文件additional-spring-configuration-metadata.json,内容如下:
{
  "properties": [
    {
      "name": "auto.redisson.host",
      "type": "java.lang.String",
      "description": "redis服务器地址.",
      "defaultValue": "localhost"
    },{
      "name": "auto.redisson.port",
      "type": "java.lang.Integer",
      "description": "redis服务器端口.",
      "defaultValue": 6379
    },{
      "name": "auto.redisson.ssl",
      "type": "java.lang.Boolean",
      "description": "是否使用ssl协议.",
      "defaultValue": false
    }, {
      "name": "auto.redission.timeout",
      "type": "java.lang.Integer",
      "description": "超时时间.",
      "defaultValue": 1000
    }
  ]
}再另一个项目中直接引入这个自定义的starter组件使用其中定义的RedissonClient组件即可。
 <!-- 引入自定义的starter组件 -->
 <dependency>
    <groupId>org.chench.extra.spring.boot</groupId>
    <artifactId>redisson-spring-boot-starter</artifactId>
    <version>1.0.0</version>
</dependency>在SpringBoot配置文件application.properties中添加配置参数:

直接引用自定义组件中的RedissonClient组件:
// 直接依赖一个在starter中定义的Bean
@Autowired
RedissonClient redissonClient;

private void execute() {
    long now = new Date().getTime();
    this.redissonClient.getBucket("now").set(now);
}


 1118
1118


 被折叠的 条评论
为什么被折叠?
被折叠的 条评论
为什么被折叠?
 到【灌水乐园】发言


