


Git-flow is for better cooperation with others in some big projects.
There are two common branches: master and develop.
The first one master branch is for releasing projects when reaching a new version. Mostly, every commit of master branch is a single version with a tag illustrating its version.
The second one develop branch is for developing. When it finish some important development, this branch will be merged into master branch (through a release branch) and make a new version of release.
Those two branches are visible on remote, which also known as origin in git. And they will both exist for a lifelong time.
Besides those two branches, there are some branches that will not exist on origin, but will exist locally, which are also known as supporting branches, they are:
- Feature branches;
- Release branches;
- Hotfix branches;
Those branches have a shorter life time. They usually are deleted after being merged into other branches.
Feature branches
A feature branch may be off from develop branch, and must be back into develop branch. Its name can be anything illustrating the feature, except: master, develop, release-*, or hotfix-*.
A feature branch’s life time is like the figure below:
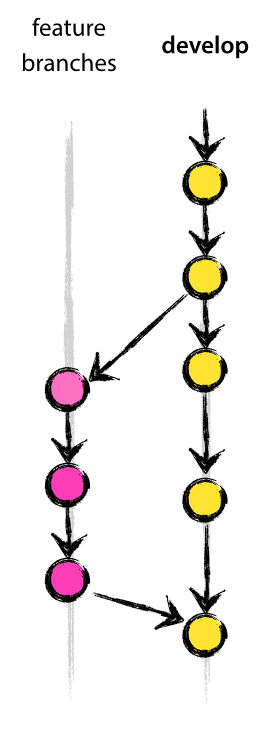
Once it has been merged into develop, it will be deleted.
Those commands are commonly used during a feature branch’s lifetime:
# create a new feature branch from develop
git checkout -b myfeature develop
# add some commits and finish a feature...

# switch to develop branch and merge feature branch into develop branch
git checkout develop
git merge --no-ff myfeature

# after merged into develop branch, the feature branch's life time is over
git branch -d myfeature

# at last we push develop to origin
# git push <remote-url> <local-branch>[:remote-branch]
git push origin develop
The --no-ff is important. This option will creating a commit all the times, even if this can be performed with a fast-forward. This will make sure that the information that there once was a feature branch always be in the commits.
This feature branch makes more clearly compared with committing on the develop branch directly (There will always one commit for every feature):
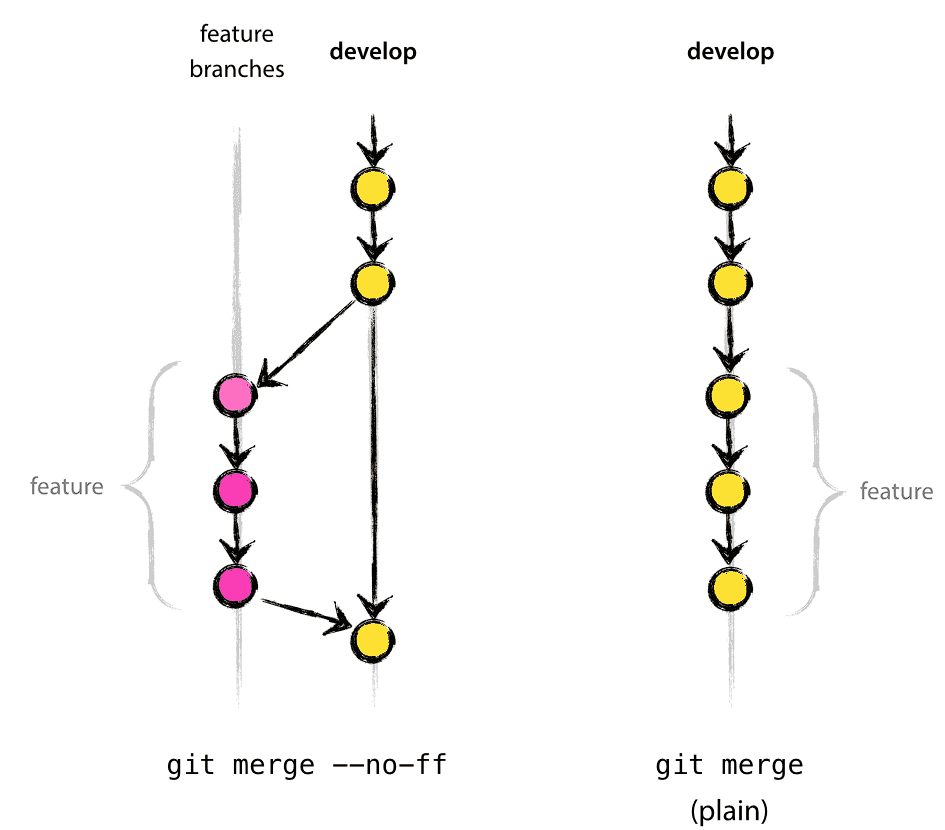
In the latter one, it is also convenient for reverting between features.
Release branches
A release branch may be off from develop branch, must be back into develop and master branch.
Its name must be looked like: release-*.
A release branch is to prepare the release of a new version. Mostly, there will only be one release branch related to the next version. This branch is created when all the feature of next version are implemented.
Creating this release branch is mainly for update some version information. Once this branch is created, bug fixed may be applied in this branch rather than develop branch. Adding new large features is prohibited by this branch, those features must be merged into devolop branch waiting next release branch to release.
After finishing the version information updates, this release branch can be merged into master and you should add a tag for the master branch to illustrate the version information.
Of course, this release branch should be merged into develop branch to make sure the changes be kept by the develop branch. There may be some conflicts, you need fix them and make a commit.
Finally, the release branch can be deleted.
Those commands are used during a release branch’s life time:
# new version 1.2 will be released
git checkout -b release-1.2 develop

# update the version information on the release-1.2 branch...

# commit the version information updates
git commit -a -m "Bump to version 1.2"

# there may be some bug fixes be apllied to the release branch

# now we make sure to release a new version, merge this branch to master
git checkout master
git merge --no-ff release-1.2
git tag -a 1.2

# to keep the changes made in the release branch, we need to merge it into develop branch
git checkout develop
git merge --no-ff release-1.2

# now we can delete the release branch
git branch -d release-1.2
The --no-ff option is still necessary, which will enable us to see the new version.
Hotfix branches
A hot-fix branch may be off from master branch, and must be back into develop and master branches. Its name is looked like: hotfix-*.
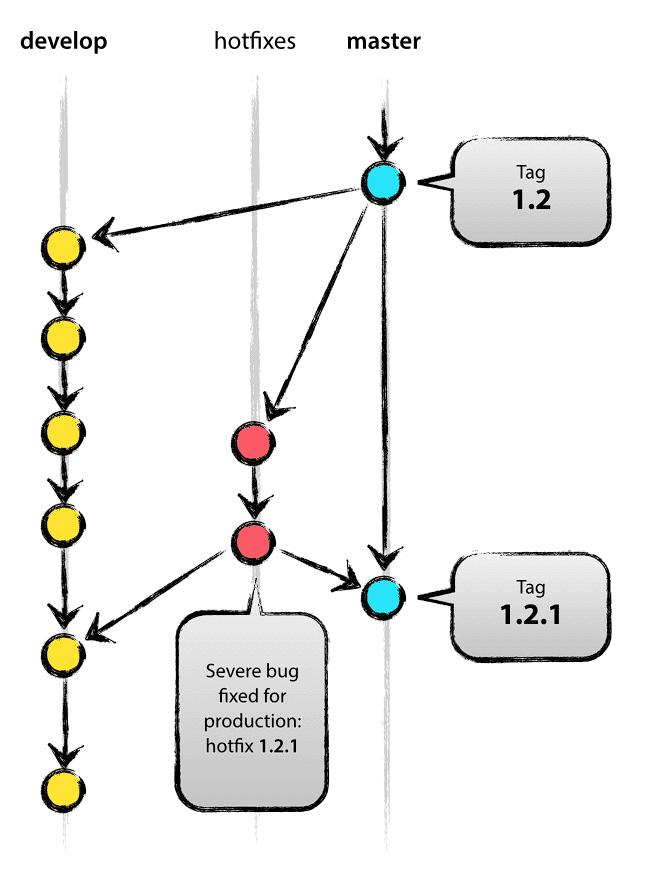
This hot-fix branch is similar with release branch, the only difference is that this branch is to fix a bug which need to be fixed immediately, and this branch will increase the minor version number by one.
The figure below illustrates how to use a hot-fix branch to fix a critical bug:
Those commands are used during the hot-fix life time:
# someone reported a new critical bug, we must fix it quickly.
git checkout -b hotfix-1.2.1 master

# we must update version information first, and create a commit to illustrate this.
git commit -a -m "Bumped version number to 1.2.1"

# then fix the bug, after that create a commit.
git commit -m "Fix a severe production problem."

# merge this branch into master
git checkout master
git merge --no-ff hotfix-1.2.1
git tag -a 1.2.1

# merge this branch into develop, if there is no release branch
# otherwise, merge this branch into the release branch rather than develop branch
git checkout develop
git merge --no-ff hotfix-1.2.1

# delete the hotfix branch
git branch -d hotfix-1.2.1
The --no--ff option is still necessary, and notice that you should merge this branch into a release branch if there is one, unless the develop branch immediately requires this bugfix and cannot wait for the release branch to be finished, you may safely merge the bugfix into the develop branch.
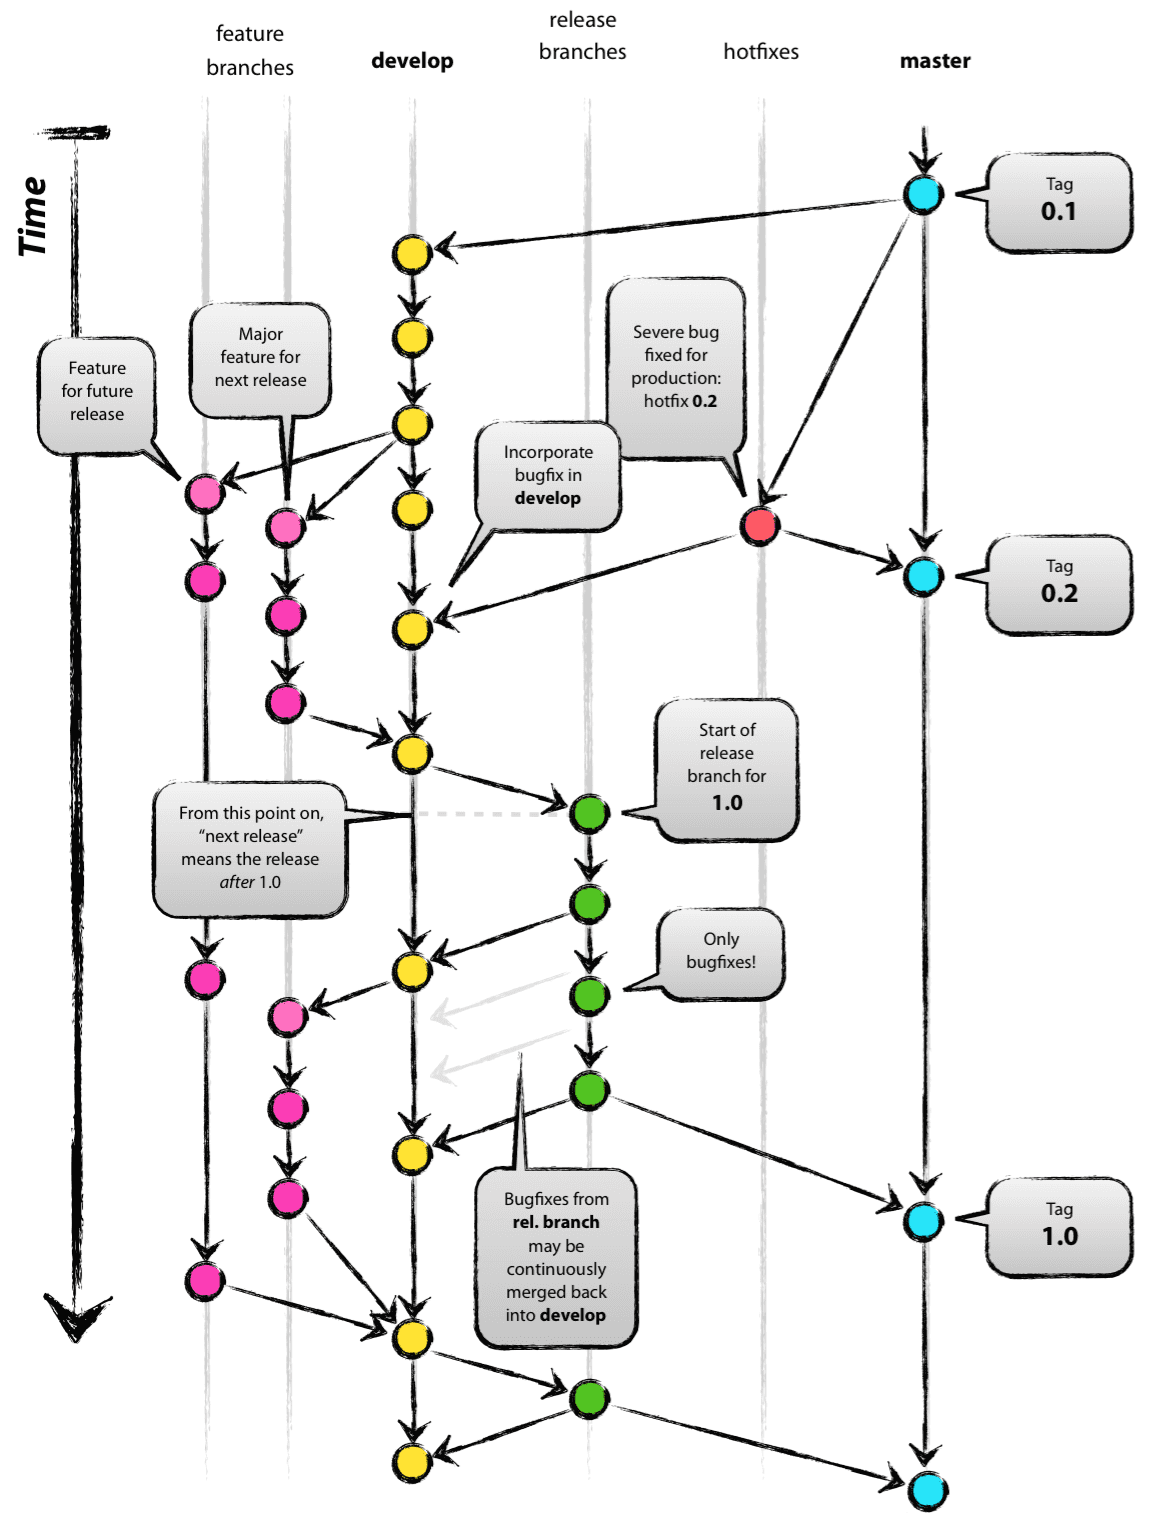
Summary
The whole git flow with all these branches:


 1555
1555


 被折叠的 条评论
为什么被折叠?
被折叠的 条评论
为什么被折叠?
 到【灌水乐园】发言


