


 本文详细介绍了如何在PyTorch中实现AlexNet网络架构,包括环境配置、参数设定、模型定义、数据预处理、多GPU训练、损失记录与可视化、模型保存等步骤。此外,还提供了数据集的整理方法。
环境要求
numpy1.14.5
Pillow6.2.0
protobuf3.6.0
six1.11.0
tensorboardX1.2
torch0.4.0
torchvision==0.2.1
参数配置定义
device = torch.device('cuda' if torch.cuda.is_available() else 'cpu')

# define model parameters
NUM_EPOCHS = 90  # original paper
BATCH_SIZE = 128 # 一次馈入的数据量
MOMENTUM = 0.9 # 优化器的参数
LR_DECAY = 0.0005
LR_INIT = 0.01 #初始学习率
IMAGE_DIM = 227  # pixels;Alexnet model 需要的图片尺寸
NUM_CLASSES = 1000  # 1000 classes for imagenet 2012 dataset
DEVICE_IDS = [0, 1, 2, 3]  # GPUs to use;指定多GPU训练的标号
# modify this to point to your data directory
INPUT_ROOT_DIR = 'alexnet_data_in'
TRAIN_IMG_DIR = 'alexnet_data_in/imagenet'
OUTPUT_DIR = 'alexnet_data_out'
LOG_DIR = OUTPUT_DIR + '/tblogs'  # tensorboard logs
CHECKPOINT_DIR = OUTPUT_DIR + '/models'  # model checkpoints

# make checkpoint path directory
#递归创建文件夹,/home/skzeng/models/model,若目录的models不存在,那会创建models及其下面的model文件夹。对应os.removedirs()
#os.mkdir()则仅能创建一个文件,对应os.rmdir
os.makedirs(CHECKPOINT_DIR, exist_ok=True)
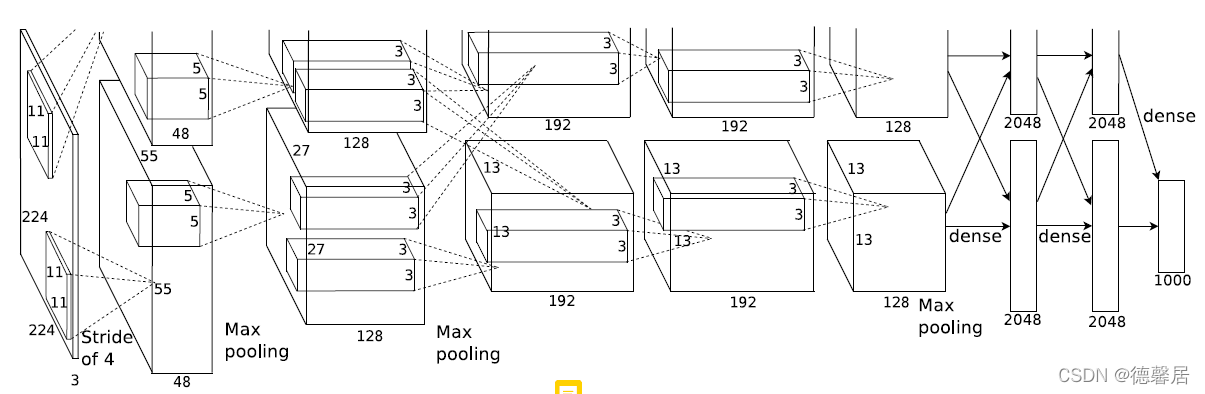
AlexNet网络架构及代码
Alexnet model class
class AlexNet(nn.Module):
    """
    Neural network model consisting of layers propsed by AlexNet paper.
    """
    def __init__(self, num_classes=1000):
        """
        Define and allocate layers for this neural net.

        Args:
            num_classes (int): number of classes to predict with this model
        """
        #加上该句使得子类能够调用父类的属性
        #如果不加,则该子类仅能调用父类的方法
        super().__init__()
        # input size should be : (b x 3 x 227 x 227)
        # The image in the original paper states that width and height are 224 pixels, but
        # the dimensions after first convolution layer do not lead to 55 x 55.
        #按照一下网络来推理原文中的网络图。通过padding弥补,pooling过的特征图大小,最终维持获得的原文图。
        #这里pooling并没有改变特征图的通道数。
        #可以将pooling理解为conv layer后面紧贴的一层
		# net 定义仅针对数据的操作进行设置,输入输出通道、卷积核,卷积的步数,填充等等;可谓万事具备只差数据,复用就是这样,模子做好,来什么我馈入输出就是了。
        self.net = nn.Sequential(
            nn.Conv2d(in_channels=3, out_channels=96, kernel_size=11, stride=4),  # (b x 96 x 55 x 55)
            nn.ReLU(),
            nn.LocalResponseNorm(size=5, alpha=0.0001, beta=0.75, k=2),  # section 3.3
            nn.MaxPool2d(kernel_size=3, stride=2),  # (b x 96 x 27 x 27)
            nn.Conv2d(96, 256, 5, padding=2),  # (b x 256 x 27 x 27)
            nn.ReLU(),
            nn.LocalResponseNorm(size=5, alpha=0.0001, beta=0.75, k=2),
            nn.MaxPool2d(kernel_size=3, stride=2),  # (b x 256 x 13 x 13)
            nn.Conv2d(256, 384, 3, padding=1),  # (b x 384 x 13 x 13)
            nn.ReLU(),
            nn.Conv2d(384, 384, 3, padding=1),  # (b x 384 x 13 x 13)
            nn.ReLU(),
            nn.Conv2d(384, 256, 3, padding=1),  # (b x 256 x 13 x 13)
            nn.ReLU(),
            nn.MaxPool2d(kernel_size=3, stride=2),  # (b x 256 x 6 x 6)
        )
        # classifier is just a name for linear layers
        # 全连接层本身就是一个分类器,这里写的好
        self.classifier = nn.Sequential(
            nn.Dropout(p=0.5, inplace=True),
            nn.Linear(in_features=(256 * 6 * 6), out_features=4096),
            nn.ReLU(),
            nn.Dropout(p=0.5, inplace=True),
            nn.Linear(in_features=4096, out_features=4096),
            nn.ReLU(),
            nn.Linear(in_features=4096, out_features=num_classes),
        )
        self.init_bias()  # initialize bias

#按照原文,初始化权重和偏置
# 遍历nn.Sequential()里面的所有组件
    def init_bias(self):
        for layer in self.net:
            if isinstance(layer, nn.Conv2d):
                nn.init.normal_(layer.weight, mean=0, std=0.01)
                nn.init.constant_(layer.bias, 0)
        # original paper = 1 for Conv2d layers 2nd, 4th, and 5th conv layers
        nn.init.constant_(self.net[4].bias, 1)
        nn.init.constant_(self.net[10].bias, 1)
        nn.init.constant_(self.net[12].bias, 1)

    def forward(self, x):
        """
        Pass the input through the net.

        Args:
            x (Tensor): input tensor

        Returns:
            output (Tensor): output tensor
        """
        x = self.net(x)
		#类似于reshape()功能
        x = x.view(-1, 256 * 6 * 6)  # reduce the dimensions for linear layer input
        return self.classifier(x)
main.py(data load+train+数据作图记录)
 # print the seed value
    seed = torch.initial_seed()
    print('Used seed : {}'.format(seed))

    tbwriter = SummaryWriter(log_dir=LOG_DIR)
    print('TensorboardX summary writer created')

    # create model,并把模型放入cuda
    alexnet = AlexNet(num_classes=NUM_CLASSES).to(device)


    # train on multiple GPUs,多GPU计算。
    alexnet = torch.nn.parallel.DataParallel(alexnet, device_ids=DEVICE_IDS)
    print(alexnet)
    print('AlexNet created')

    # create dataset and data loader
    # transforms.Compose 数据转换组件,内含对数据的一系列操作
    # 此处的数据需要具有root/dog/xxx.png的结构,因此需要首先将数据组织成root/类别/图片,的形式
    dataset = datasets.ImageFolder(TRAIN_IMG_DIR, transforms.Compose([
        # transforms.RandomResizedCrop(IMAGE_DIM, scale=(0.9, 1.0), ratio=(0.9, 1.1)),
        transforms.CenterCrop(IMAGE_DIM),
        # transforms.RandomHorizontalFlip(),
        transforms.ToTensor(),
        transforms.Normalize(mean=[0.485, 0.456, 0.406], std=[0.229, 0.224, 0.225]),
    ]))
    print('Dataset created')
    # 按照参数要求加载数据
    dataloader = data.DataLoader(
        dataset,
        shuffle=True,
        pin_memory=True,
        num_workers=8,
        drop_last=True,
        batch_size=BATCH_SIZE)
    print('Dataloader created')

    # create optimizer
    # the one that WORKS
    optimizer = optim.Adam(params=alexnet.parameters(), lr=0.0001)
    ### BELOW is the setting proposed by the original paper - which doesn't train....
    # optimizer = optim.SGD(
    #     params=alexnet.parameters(),
    #     lr=LR_INIT,
    #     momentum=MOMENTUM,
    #     weight_decay=LR_DECAY)
    print('Optimizer created')

    # multiply LR by 1 / 10 after every 30 epochs,经过一个step_size,按照gamma系数进行缩放学习率
    lr_scheduler = optim.lr_scheduler.StepLR(optimizer, step_size=30, gamma=0.1)
    print('LR Scheduler created')

    # start training!!
    print('Starting training...')
    total_steps = 1
    for epoch in range(NUM_EPOCHS):
        #每经过一个epoch,下面就自动计数一次,到达阈值则触发衰减学习率
        lr_scheduler.step()
        for imgs, classes in dataloader:
            #将加载到的每一批数据放入cuda
            imgs, classes = imgs.to(device), classes.to(device)
            output = alexnet(imgs)
            loss = F.cross_entropy(output, classes)

            # 三部曲,清除冗余梯度;反向传播;优化
            optimizer.zero_grad()
            loss.backward()
            optimizer.step()

            # 每10轮计算一次acc
            if total_steps % 10 == 0:
                with torch.no_grad():
                    # axis=1则按照横向,返回max的索引和对应的类别
                    _, pred = torch.max(output, 1)
                    accuracy = torch.sum(preds == classes)


            # log the information and add to tensorboard
            # 每10轮做一下可视化图
            if total_steps % 10 == 0:
                with torch.no_grad():
                    _, preds = torch.max(output, 1)
                    accuracy = torch.sum(preds == classes)

                    print('Epoch: {} \tStep: {} \tLoss: {:.4f} \tAcc: {}'
                        .format(epoch + 1, total_steps, loss.item(), accuracy.item()))

                    #记录loss和step之间的关系,一定要用item取tensor里面的具体数值;
                    #表名:"loss",Y轴:loss.item(),X轴total_steps
                    tbwriter.add_scalar('loss', loss.item(), total_steps)
                    tbwriter.add_scalar('accuracy', accuracy.item(), total_steps)

            # print out gradient values and parameter average values
            if total_steps % 100 == 0:
                with torch.no_grad():
                    # print and save the grad of the parameters
                    # also print and save parameter values
                    print('*' * 10)

                    #每100轮,分别记录网络的 grad和total_steps、weight和total_steps的关系
                    for name, parameter in alexnet.named_parameters():
                        if parameter.grad is not None:
                            avg_grad = torch.mean(parameter.grad)
                            print('\t{} - grad_avg: {}'.format(name, avg_grad))
                            tbwriter.add_scalar('grad_avg/{}'.format(name), avg_grad.item(), total_steps)
                            tbwriter.add_histogram('grad/{}'.format(name),
                                    parameter.grad.cpu().numpy(), total_steps)
                        if parameter.data is not None:
                            avg_weight = torch.mean(parameter.data)
                            print('\t{} - param_avg: {}'.format(name, avg_weight))
                            tbwriter.add_histogram('weight/{}'.format(name),
                                    parameter.data.cpu().numpy(), total_steps)
                            tbwriter.add_scalar('weight_avg/{}'.format(name), avg_weight.item(), total_steps)

            total_steps += 1

        # save checkpoints
        checkpoint_path = os.path.join(CHECKPOINT_DIR, 'alexnet_states_e{}.pkl'.format(epoch + 1))
        state = {
            'epoch': epoch,
            'total_steps': total_steps,
            'optimizer': optimizer.state_dict(),
            'model': alexnet.state_dict(),
            'seed': seed,#保留随机种子,以最大可能复现试验
        }
        torch.save(state, checkpoint_path)
rearrange_voc.py(对原始voc进行修改,以利用)
import os
import os.path as path


VOC_ROOT = path.join('./', 'VOCdevkit', 'VOC2012')
VOC_LABEL_DIR = path.join(VOC_ROOT, 'ImageSets', 'Main')
VOC_IMG_DIR = path.join(VOC_ROOT, 'JPEGImages')
VOC_OUT_REARRANGED = path.join('./', 'voc-data-rearr')

CLASSES = ['aeroplane', 'bicycle', 'bird', 'boat', 'bottle', 'bus', 'car', 'cat', 'chair', 'cow', 'diningtable', 'dog', 'horse', 'motorbike', 'person', 'pottedplant', 'sheep', 'sofa', 'train', 'tvmonitor']


def move_img(img_name, cls_name):
    img_path = path.join(VOC_IMG_DIR, img_name + '.jpg')
    out_img_path = path.join(VOC_OUT_REARRANGED, cls_name)
    #os的骚操作,cp source-path dist-path
    #像这种“{}”.format(),就是把format()内部的内容取代{};简而言之{}是一个数据占位符
    os.system('cp {} {}'.format(img_path, out_img_path))


# create output directory
if not os.path.exists(VOC_OUT_REARRANGED):
    os.mkdir(VOC_OUT_REARRANGED)

for clsname in CLASSES:
    class_folder = path.join(VOC_OUT_REARRANGED, clsname)
    if not os.path.exists(class_folder):
        os.mkdir(class_folder)

#os.listdir仅获取路径下面一级的文件夹和文件名,返回一个数组
for filename in os.listdir(VOC_LABEL_DIR):
    if filename in ['val.txt', 'train.txt', 'trainval.txt']:
        continue

    # 返回:.之前的内容;.之后的后缀
    cls_traintype, _ = path.splitext(filename)
   # 根据cls_traintype的内容,以_进行多部分的分割,返回一个数组
    clsname, traintype = cls_traintype.split('_')

    if traintype != 'train':
        continue

    print('Processing: {}'.format(filename))

    #以对话管理器的形式打开路径文件,执行完毕则自动回收资源

    with open(path.join(VOC_LABEL_DIR, filename), 'r') as f:
        # 读取文件中的所有行的内容
        lines = f.readlines()
        for line in lines:
       #针对每一行的内容进行strip(),之后进行split()。由于是空,默认为是空格;strip()首先消除首尾的空格,然后使用split()将返回的内容进行分割成多部分

          img_name, is_cls = line.strip().split()
          #如果是该类别,则将图片进行复制到目标路径
          if is_cls == '1':
             # 调用移动函数
              move_img(img_name, clsname)


 1052
1052

 被折叠的 条评论
为什么被折叠?
被折叠的 条评论
为什么被折叠?
 到【灌水乐园】发言


