


RGB:
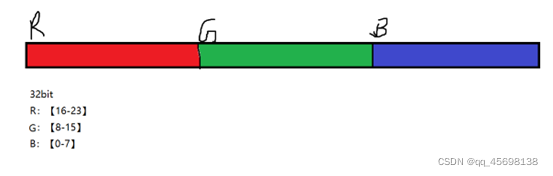
ARGB 32bit 4Byte
A:【24-31】
R:【16-23】
G:【8-15】
B:【0-7】
图片显示
显示思路:
(1)打开液晶屏(open),进行内存映射(mmap)
(2)打开图片,读取颜色数据
(3)将读取到的颜色数据映射到液晶屏
(4)关闭图片文件,液晶屏,解除内存映射
BMP图片显示:
没有经过压缩的二进制位图文件,文件较大,获取颜色数据方便
一张800*480的bmp格式的图片
8004803 = 1152000Byte 图片在存储的时候,头部有54个字节是存放的图片的信息
BMP文件组成
BMP文件由文件头、位图信息头、颜色信息和图形数据四部分组成。
//BMP文件头(14字节)
struct bitmap_header
{
      int16_t type;// 位图文件的类型,必须为BM(1-2字节)
      int32_t size;// 位图文件的大小,以字节为单位(3-6字节)
      int16_t reserved1;// 位图文件保留字,必须为0(7-8字节)
      int16_t reserved2;// 位图文件保留字,必须为0(9-10字节)
      int32_t offbits;// 位图数据的起始位置,以相对于位图(11-14字节)
           // 文件头的偏移量表示,以字节为单位
}__attribute__((packed));

//位图信息头(40字节)
struct bitmap_info
{
    int32_t size;// 本结构所占用字节数(15-18字节)
    int32_t width;// 位图的宽度,以像素为单位(19-22字节)
    int32_t height;// 位图的高度,以像素为单位(23-26字节)
    int16_t planes;// 目标设备的级别,必须为1(27-28字节)
    int16_t bit_count;// 每个像素所需的位数,必须是1(双色),(29-30字节)
                     // 4(16色),8(256色)或24(真彩色)之一
    int32_t compression;// 位图压缩类型,必须是 0(不压缩),(31-34字节)
                     // 1(BI_RLE8压缩类型)或2(BI_RLE4压缩类型)之一
    int32_t size_img;// 位图的大小,以字节为单位(35-38字节)
    int32_t X_pel;// 位图水平分辨率,每米像素数(39-42字节)
   int32_t Y_pel;// 位图垂直分辨率,每米像素数(43-46字节)
   int32_t clrused;// 位图实际使用的颜色表中的颜色数(47-50字节)
   int32_t clrImportant;// 位图显示过程中重要的颜色数(51-54字节)
}__attribute__((packed));
attribute((packed)):作用:告诉编译器取消结构体在编译过程中的优化对齐,按照实际占用字节数进行对齐
图片的宽度必须要是4的整数倍
需要注意的是,在Windows存放BMP位图数据的时候,按行计算,如果一行的像素点数据不能被4整除,那么补齐空白字符0x00(差几个就补几个)
比如:
4030的24位图:54+(4024/8+0)*30 = 3654字节
3040的24位图:54+(3024/8+2)*40 = 3734字节
void show_bmp(int fd, char *bmpfile)
{
	//进行内存映射
	int *p = mmap(NULL, 800*480*4, PROT_WRITE | PROT_READ, MAP_SHARED, fd, 0);
	if (p == (void *)-1)
	{
		perror("mmap");
		return ;
	}

	//打开图片,读取颜色数据
	int bmp_fd = open(bmpfile, O_RDWR);
	if (bmp_fd == -1)
	{
		perror("open bmp");
	}

	struct bitmap_header head;
	struct bitmap_info info;

	read(bmp_fd, &head, 14);
	read(bmp_fd, &info, 40);

	int width = info.width;
	int height = info.height;

	// char head[54];
	// read(bmp_fd, head, 54);
	// int width = head[18] | head[19]<<8 | head[20]<<16 | head[21]<<24;//18 19 20 21
	// int height = head[22] | head[23]<<8 | head[24]<<16 | head[25]<<24;//22 23 24 25
	printf("width = %d height = %d\n", width, height);

	int start_x = (800-width)/2;
	int start_y = (480-height)/2;

	if (start_x+width>800 || start_y+height>480)
	{
		printf("超出显示范围\n");
		return ;
	}

	char bmp_buf[width*height*3];

	// switch((width%4))
	switch(4 - (width*info.bit_count/8 % 4))
	{
		case 1:for (int i = 0; i < height; ++i)
			{
				read(bmp_fd, bmp_buf+width*3*i, width*3);
				lseek(bmp_fd, 1, SEEK_CUR);
			}break;

		case 2:for (int i = 0; i < height; ++i)
			{
				read(bmp_fd, bmp_buf+width*3*i, width*3);
				lseek(bmp_fd, 2, SEEK_CUR);
			}break;

		case 3:for (int i = 0; i < height; ++i)
			{
				read(bmp_fd, bmp_buf+width*3*i, width*3);
				lseek(bmp_fd, 3, SEEK_CUR);
			}break;

		default:read(bmp_fd, bmp_buf, width*height*3);
	}

	int i = 0;
	int color;
	char b, g, r;
	for (int y = 0; y < height; ++y)
	{
		for (int x = 0; x < width; ++x)
		{
			b = bmp_buf[i++];
			g = bmp_buf[i++];
			r = bmp_buf[i++];
			color = r<<16 | g<<8 | b;
			*(p+(height-1-y+start_y)*800+x+start_x) = color;
		}
	}

	close(bmp_fd);
	munmap(p, 800*480*4);
}
2、jpeg/jpg格式图片显示
经过有损压缩的图片文件格式,文件较小,获取颜色数据需要解压
JPEG库安装移植
链接:https://pan.baidu.com/s/1DQ3h6nrh3DJaqwl6mzs5SA
提取码:Yeng
安装JPEG库
(1)sudo -s
(2)在家路径下创建一个jpeg的文件夹,用来存放生成的文件
(3)解压tar -zxvf jpegsrc.v9a.tar.gz -C /home/gec/
(4)cd ~/jpeg-9a
(5)配置
./configure --prefix=/home/user/jpeg/arm-jpeg CC=arm-linux-gcc --host=arm-linux --enable-shared --enable-static
(6)make
(7)make install
安装完成之后
链接:https://pan.baidu.com/s/1UeDuV9f0ePXn2W5K6M1Mng
提取码:Yeng
jpeg解压缩过程
(1)打开设备文件和图片文件
int lcd_fd = open(“/dev/fb0”, O_RDWR);
FILE *infile = fopen(argv[1], “r+”);
(2)为jpeg对象分配空间并初始化
jpeg_create_decompress(&cinfo);
(3)指定解压缩数据源
jpeg_stdio_src(&cinfo, infile);
(4)为解压缩设定参数,包括图像大小,颜色空间
cinfo.scale_num = 1; //分子
cinfo.scale_denom = n; //分母
(5)开始解压缩
jpeg_start_decompress(&cinfo);
(6)取出数据(做相关的应用)
jpeg_read_scanlines(&cinfo, (JSAMPARRAY)&buffer, 1);
将每行数据显示到LCD
(7)解压缩完毕
jpeg_finish_decompress(&cinfo);
(8)释放资源
jpeg_destroy_decompress(&cinfo);
munmap(p, lcd_wlcd_hlcd_b);
close(lcd_fd);
fclose(infile);
free(buffer);
jpeg压缩过程
(1)为jpeg对象分配空间并初始化
(2)指定图像输出目标
(3)为压缩设定参数,包括图像大小,颜色空间
(4)开始压缩
(5)写入数据(做相关的应用)
(6)压缩完毕
(7)释放资源
#include <stdio.h>
#include <errno.h>
#include <string.h>
#include <time.h>
#include <sys/types.h>
#include <sys/stat.h>
#include <unistd.h>
#include <pwd.h>
#include <grp.h>
#include <stdlib.h>
#include <dirent.h>
#include <fcntl.h>
#include <sys/mman.h>
#include <linux/fb.h>
#include <sys/ioctl.h>
#include <stdbool.h>
#include "jpeglib.h"
int main(int argc, char const *argv[])
{

	if (argc != 2)
	{
		printf("./可执行文件 <jpeg格式图片文件>\n");
		return -1;
	}

	//打开液晶屏
	int lcd_fd = open("/dev/fb0", O_RDWR);
	if (lcd_fd == -1)
	{
		perror("open");
		return -1;
	}

	//获取液晶屏信息
	struct fb_var_screeninfo vinfo;
	ioctl(lcd_fd, FBIOGET_VSCREENINFO, &vinfo); // 获取可变属性
	int lcd_w = vinfo.xres;
	int lcd_h = vinfo.yres;
	int lcd_b = vinfo.bits_per_pixel/8;
	printf("该液晶屏宽:%d,高:%d, 每个像素点%d个字节\n", lcd_w, lcd_h, lcd_b);

	//进行内存映射
	int *p = mmap(NULL, lcd_w*lcd_h*lcd_b, PROT_WRITE | PROT_READ, MAP_SHARED, lcd_fd, 0);
	if (p == (void *)-1)
	{
		perror("mmap");
		return -2;
	}
	//(1)为jpeg对象分配空间并初始化
	struct jpeg_decompress_struct cinfo;	//解压jpeg的对象结构体
	struct jpeg_error_mgr jerr;				//定义错误结构体

	cinfo.err = jpeg_std_error(&jerr);		//错误处理结构体绑定
	jpeg_create_decompress(&cinfo);			//初始化jpeg的对象结构体

	//(2)指定解压缩数据源
	FILE *infile = fopen(argv[1], "r+");
	if (infile == NULL)
	{
		perror("fopen jpeg");
		return -3;
	}
	jpeg_stdio_src(&cinfo, infile);//指定解压缩数据源

	//(3)获取文件信息
	jpeg_read_header(&cinfo, true);

	//(4)为解压缩设定参数,包括图像大小,颜色空间
	int n = 1;			//缩小倍数
	while(cinfo.image_width/n>lcd_w || cinfo.image_height/n>lcd_h)
	{
		n *= 2;
	}

	//设定的缩小倍数
	cinfo.scale_num = 1;		//分子
	cinfo.scale_denom = n;		//分母
	// cinfo.out_color_space = JCS_GRAYSCALE;	//颜色空间
	printf("width1:%d height1:%d\n", cinfo.image_width, cinfo.image_height);//设定之前的宽高

	//(5)开始解压缩
	jpeg_start_decompress(&cinfo);
	printf("width:%d height:%d\n", cinfo.output_width, cinfo.output_height);//设定解压缩之后的宽高

	//(6)取出数据(做相关的应用),安装一行一行去读取的
	//output_components像素点大小
	//申请能够存放一行数据的缓冲区
	int row_size = cinfo.output_width*cinfo.output_components;
	char *buffer = (char *)malloc(row_size);
	//output_scanline当前读取行数
	while(cinfo.output_scanline < cinfo.output_height)
	{
		//按行读取数据
		jpeg_read_scanlines(&cinfo, (JSAMPARRAY)&buffer, 1);
		//将读取到的一行数据进行显示
		int i = 0, j = 0;
		for (;j< cinfo.output_width; i+=3, j++)
		{
			//内存映射的方式
			*(p+(cinfo.output_scanline-1)*lcd_w + j) = buffer[i+0]<<16| buffer[i+1]<<8| buffer[i+2];
		}
	}

	//(7)解压缩完毕
	jpeg_finish_decompress(&cinfo);

	//(8)释放资源
	jpeg_destroy_decompress(&cinfo);
	munmap(p, lcd_w*lcd_h*lcd_b);
	close(lcd_fd);
	fclose(infile);
	free(buffer);

	return 0;
}


 1747
1747


 被折叠的 条评论
为什么被折叠?
被折叠的 条评论
为什么被折叠?
 到【灌水乐园】发言


