


依赖
      <!--  及时通信服务 使用http协议实现ws长链接-->
        <dependency>
            <groupId>com.corundumstudio.socketio</groupId>
            <artifactId>netty-socketio</artifactId>
            <version>1.7.18</version>
<!--            <version>1.7.7</version>-->
        </dependency>
配置文件
socketio:
  # host在本地测试可以设置为localhost或者本机IP,在Linux服务器跑可换成服务器IP
  host:  0.0.0.0
  # 端口号
  port: 8082
  # 设置最大每帧处理数据的长度,防止他人利用大数据来攻击服务器
  maxFramePayloadLength: 1048576
  # 设置http交互最大内容长度
  maxHttpContentLength: 1048576
  # socket连接数大小(如只监听一个端口boss线程组为1即可)
  bossCount: 1

  workCount: 100

  allowCustomRequests: true
  # 协议升级超时时间(毫秒),默认10秒。HTTP握手升级为ws协议超时时间
  upgradeTimeout: 1000000
  # Ping消息超时时间(毫秒),默认60秒,这个时间间隔内没有接收到心跳消息就会发送超时事件
  pingTimeout: 6000000
  # Ping消息间隔(毫秒),默认25秒。客户端向服务器发送一条心跳消息间隔
  pingInterval: 25000
信息体
@Component
@Data
@AllArgsConstructor
@NoArgsConstructor
public class Message implements Serializable {

	private static final long serialVersionUID = -5345570479231988220L;
	/**
	 * 发送人
	 */
	private String senderId;
	/**
	 * 接收人
	 */
	private String receiverId;
	/**
	 * 消息类型
	 */
	private String msgType;
	/**
	 * 消息体
	 */
	private Object content;

	/**
	 * 订阅的事件名称
	 */
	private String event;

	/**
	 * 创建的时间
	 */
	private String time;


}
NettySocketIOConfig 配置类
@Configuration
public class NettySocketIOConfig {

	@Value("${socketio.host}")
     private String host;

	 @Value("${socketio.port}")
     private Integer port;

	 @Value("${socketio.bossCount}")
     private int bossCount;

	@Value("${socketio.workCount}")
     private int workCount;

	 @Value("${socketio.allowCustomRequests}")
     private boolean allowCustomRequests;

	 @Value("${socketio.upgradeTimeout}")
     private int upgradeTimeout;

	 @Value("${socketio.pingTimeout}")
     private int pingTimeout;

	@Value("${socketio.pingInterval}")
     private int pingInterval;

	@Value("${socketio.maxFramePayloadLength}")
	private int maxFramePayloadLength;

	@Value("${socketio.maxHttpContentLength}")
	private int maxHttpContentLength;


    @Bean
   public SocketIOServer socketIOServer() {

	 com.corundumstudio.socketio.Configuration config = new com.corundumstudio.socketio.Configuration();
		// 开启Socket端口复用
		com.corundumstudio.socketio.SocketConfig socketConfig = new com.corundumstudio.socketio.SocketConfig();
		socketConfig.setReuseAddress(true);
		config.setSocketConfig(socketConfig);
		socketConfig.setTcpNoDelay(true);
		socketConfig.setSoLinger(0);
		         config.setSocketConfig(socketConfig);
		         config.setHostname(host);
		         config.setPort(port);
		         config.setBossThreads(bossCount);
		         config.setWorkerThreads(workCount);
		         config.setAllowCustomRequests(allowCustomRequests);
		         config.setUpgradeTimeout(upgradeTimeout);
		         config.setPingTimeout(pingTimeout);
		         config.setPingInterval(pingInterval);
		config.setMaxHttpContentLength(maxHttpContentLength);

		config.setMaxFramePayloadLength(maxFramePayloadLength);

		         return new SocketIOServer(config);
	}

	@Bean
	public SpringAnnotationScanner springAnnotationScanner() {
		return new SpringAnnotationScanner(socketIOServer());
	}

}
NettySocketIOServer 启动类 在Main方法执行之后立即执行
@Component
public class NettySocketIOServer implements CommandLineRunner {
	@Autowired
	private NettySocketIOService nettySocketIOService;

	@Override
	public void run(String... args) throws Exception {
		nettySocketIOService.start();
	}
}
NettySocketIOService接口
public interface NettySocketIOService {
	void  start();

	void stop();

	ResData<Map<String, Object>> sendMessage(Message message) throws Exception;
}
NettySocketIOService 接口实现类
@Component
@Slf4j
public class NettySocketIOServiceImpl implements NettySocketIOService {

	@Autowired
	private SocketIOServer socketIoServer;

	public static Map<String, SocketIOClient> socketIOClientMap = new ConcurrentHashMap<>();

	@OnConnect
	public void onConnect(SocketIOClient client) {
		String uid = client.getHandshakeData().getSingleUrlParam("uid");
		socketIOClientMap.remove(uid);
		socketIOClientMap.put(uid, client);
	}

	@OnEvent("sendMsg")
	public void sendMsg(SocketIOClient socketIOClient, AckRequest ackRequest, Message data) {
log.info("接收到前端发来的数据:{}",data);
		if (data!= null) {
			// 全部发送
			socketIOClientMap.forEach((key, client) -> {
				if (client != null) {
					client.sendEvent("receiveMsg", JSONObject.toJSONString(data));
				}
			});
		}
	}


	/**
	 * 客户端断开
	 */
	@OnDisconnect
	public void onDisconnect(SocketIOClient client) {
		String uid = client.getHandshakeData().getSingleUrlParam("uid");
		if(uid!=null){
			Set<String> keySet = socketIOClientMap.keySet();
			for (String key : keySet) {
				if(uid.equals(key)){
					SocketIOClient socketIOClient = socketIOClientMap.get(key);
				if(StrUtil.isBlankIfStr(socketIOClient)){
					socketIOClient.disconnect();
					log.info("用户 {} 端断开链接",uid);
				}

				}
			}
		}

	}


	@Override
	public void start() {
		socketIoServer.addEventListener("chatevent", Message.class, new DataListener<Message>() {
			@Override
			public void onData(SocketIOClient client, Message data, AckRequest ackRequest) {
				socketIoServer.getBroadcastOperations().sendEvent("chatevent", data);
			}
		});
		socketIoServer.start();
	}

	@Override
	public void stop() {
		socketIoServer.stop();
	}

	@Override
	public ResData<Map<String, Object>> sendMessage(Message message) throws Exception {
		String msg = JSONObject.toJSONString(message);

		return ResData.success("推送信息成功");
	}
}
前端代码
<template>
<div>
<el-button @click="sendMsg">发送</el-button>

</div>
</template>

<script>
import socketio from "socket.io-client";
// import {io} from "socket.io-client";  //高版本时

export default {
  name: "Test",
  data(){
    return{
      socket:null,
      message:{
        senderId:'',
        receiverId:'',
        msgType:'',
        content:'',
        event:'',
        time:''
      }
    }
  },mounted() {
    this.initSocketIO()
  },methods:{
    initSocketIO(){

       try {
         this.socket =  socketio.connect('http://localhost:8082?uid=1');

         this.socket.on('connect', function() {
           console.log('链接成功');
         });

         this.socket.on('receiveMsg', function(data) {

           console.log("服务器发送的消息是:"+data);
         });

         this.socket.on('disconnect', function () {
           console.log('socket断开连接');
         });
       }catch (e){
         console.log(e)
       }
    },

   sendMsg(){
     let data = new Date().toLocaleString();
     let fomatDate = data.replaceAll("/","-");
     this.message={
         senderId:'1',
         receiverId:'2',
         msgType:'0',
         content:'哈哈哈哈啊',
         event:'88',
         time:fomatDate
     }
     console.log(JSON.stringify(this.message))
     this.socket.emit('sendMsg',this.message);
}
  }
}
</script>

<style scoped>

</style>
注意: socket.io-client 版本太高可能不能使用,我最初使用高版本一直无法连接成功,后把它的版本降低至 "socket.io-client": "^2.4.0" 才连接成功
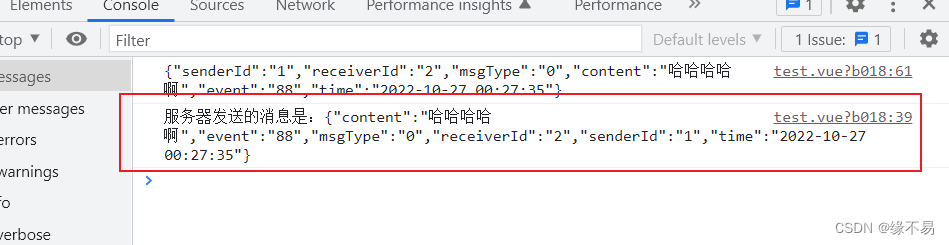
执行效果:


 301
301


 被折叠的 条评论
为什么被折叠?
被折叠的 条评论
为什么被折叠?
 到【灌水乐园】发言


