


今天发现那个opencv 是付费内容……罢了,还是直接实战pytorch吧,过了考试再转opencv好了
首先,查看自己的pytorch版本,我的pytorch版本是1.11 python版本是3.9.7
import sys
import torch
print(torch.__version__)
print(sys.version)
学习是按照PyTorch中文文档
下面是cifar10分类神经网络代码,大部分说明写在注释中:
代码目录结构:
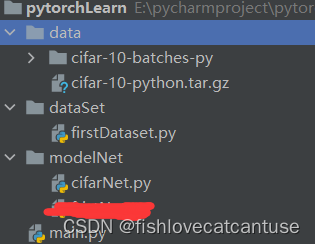
DataSet
import torch
import torchvision
import torchvision.transforms as transforms
import matplotlib.pyplot as plt
import numpy as np
import os
os.environ["KMP_DUPLICATE_LIB_OK"]="TRUE"


transform = transforms.Compose(
    [transforms.ToTensor(),
     # transforms.Normalize((0.5, 0.5, 0.5), (0.5, 0.5, 0.5)),
     # 图像在[-1,1]范围内归一化,image =(图像-平均值)/ std
     # 通用的统计值
     transforms.Normalize((0.485, 0.456, 0.406), (0.229, 0.224, 0.225))
     #(0.5,0.5,0.5) 是 R G B 三个通道上的均值, 后面(0.5, 0.5, 0.5)是三个通道的标准差

     ])

trainset = torchvision.datasets.CIFAR10(root='./data', train=True, download=False, transform=transform)
trainloader = torch.utils.data.DataLoader(trainset, batch_size=4, shuffle=True, num_workers=0)
#2.train =True处理数据时从training.pt读取训练数据,=False 从test.pt读取测试数据。仔细观察,上面两句话只有在train这个选项处不同.
#shuffle  每一个epoch过程中会打乱数据顺序,重新随机选择
#num_workers如果不为零,要在主函数中运行。
#num_workers:导入数据时的线程数目,默认为0,主线程导入数据   参看:https://blog.csdn.net/qq_28057379/article/details/115427052
testset = torchvision.datasets.CIFAR10(root='./data', train=False, download=True, transform=transform)
testloader = torch.utils.data.DataLoader(testset, batch_size=4, shuffle=False, num_workers=0)

classes = ('plane', 'car', 'bird', 'cat', 'deer', 'dog', 'frog', 'horse', 'ship', 'truck')

# 输出图像的函数


def imshow(img):
    img = img / 2 + 0.5     # unnormalize
    npimg = img.numpy()
    plt.imshow(np.transpose(npimg, (1, 2, 0)))
    plt.show()


dataiter = iter(trainloader)
#images, labels = dataiter.next()
# 显示图片
#imshow(torchvision.utils.make_grid(images))
# 打印图片标签
#print(' '.join('%5s' % classes[labels[j]] for j in range(4)))
Model
import torch.nn as nn
import torch.nn.functional as F


class Net(nn.Module):
    def __init__(self):
        super(Net, self).__init__()
        self.conv1 = nn.Conv2d(3, 6, 5)
        self.pool = nn.MaxPool2d(2, 2)
        self.conv2 = nn.Conv2d(6, 16, 5)
        self.fc1 = nn.Linear(16 * 5 * 5, 120)    #question : [4,400]  => 400 nodes   how?
        self.fc2 = nn.Linear(120, 84)
        self.fc3 = nn.Linear(84, 10)

    def forward(self, x):
        x = self.pool(F.relu(self.conv1(x)))
        x = self.pool(F.relu(self.conv2(x)))
        x = x.view(-1, 16 * 5 * 5)
        #print("fc1 before",x.size())  #->fc1 before torch.Size([4, 400])
        x = F.relu(self.fc1(x))
        #print(x.size())              #->torch.Size([4, 120])
        x = F.relu(self.fc2(x))
        x = self.fc3(x)
        # print("outputs size: ",x.size())    #-> torch.Size([4, 10])
        return x


net = Net()
Train
from __future__ import print_function
import torch
import torch.optim as optim
import torch.nn as nn
import torch.nn.functional as F
import torchvision
import matplotlib.pyplot as plt
import numpy as np
from dataSet.firstDataset import trainloader,testloader,imshow,classes
import torch
import torchvision
import torchvision.transforms as transforms
import matplotlib.pyplot as plt
import numpy as np
import os
os.environ["KMP_DUPLICATE_LIB_OK"]="TRUE"
from modelNet.cifarNet import net
#定义损失函数和优化器
#使用分类的交叉熵损失和随机梯度下降(使用momentum)
criterion = nn.CrossEntropyLoss()
optimizer = optim.SGD(net.parameters(), lr=0.001, momentum=0.9)
# momentum: 在SGD的基础上加一个动量,如果当前收敛效果好,就可以加速收敛,如果不好,则减慢它的步伐。
# 如果本次和上次的梯度符号是相同的,那么就能够加速下降(幅度变大),就能够解决原先下降太慢的问题;
# 如果本次和上次的梯度符号是相反的,那么这次就和上次相互抑制,减缓震荡。
# 由于有动量的作用,在局部最优点时,它可以借助动量跳出来,不易陷入局部最优点。
for epoch in range(1): # loop over the dataset multiple times
running_loss = 0.0
for i, data in enumerate(trainloader, 0):
#enumerate()用于可迭代\可遍历的数据对象组合为一个索引序列,
#同时列出数据和数据下标.上面代码的0表示从索引从0开始,假如为1的话,那索引就从1开始。
# get the inputs
inputs, labels = data
#print(inputs.size()) #-> torch.Size([4, 3, 32, 32]) 4张
# zero the parameter gradients
optimizer.zero_grad()
# forward + backward + optimize
outputs = net(inputs)
loss = criterion(outputs, labels)
loss.backward()
optimizer.step()
# print statistics
running_loss += loss.item() #Accumulation of losses .item() from tensor to numb
if i % 2000 == 1999: # print every 2000 mini-batches
print('[%d, %5d] loss: %.3f' % (epoch + 1, i + 1, running_loss / 2000)) #average loss
running_loss = 0.0
print('Finished Training')
#test
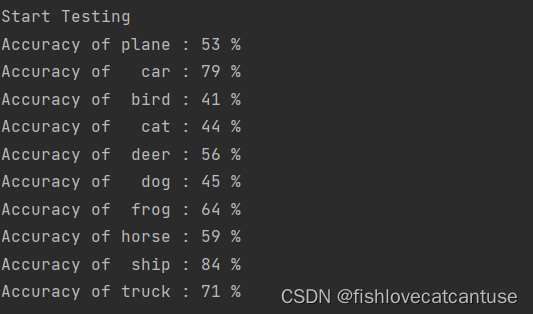
print("Start Testing")
# single test
# dataiter = iter(testloader)
# images, labels = dataiter.next()
# # 输出图片
# imshow(torchvision.utils.make_grid(images))
# print('GroundTruth: ', ' '.join('%5s' % classes[labels[j]] for j in range(4)))
# outputs = net(images)
# _, predicted = torch.max(outputs, 1) #输出是10个类别的量值,选取最大的值
# # 数字1其实可以写为dim=1,这里简写为1,python也可以自动识别
# # dim=1表示输出所在行的最大值,若改写成dim=0则输出所在列的最大值。
# # torch.max()这个函数返回的是两个值,第一个值是具体的value(我们用下划线_表示)
# # 第二个值是value所在的index(也就是predicted)。
# # 下划线代表不需要用到的变量。比如在图像分类任务中,值所对应的index就对应着相应的类别class,
# # 当我们只关心网络预测的类别是什么,而不关心该类别的预测概率是多少时,就选择使用下划线_。
# print('Predicted: ', ' '.join('%5s' % classes[predicted[j]] for j in range(4)))
# # batchsize=4 so predicted categories are four
# # multiple test
# correct = 0
# total = 0
# with torch.no_grad(): #dont backword
# for data in testloader:
# images, labels = data
# outputs = net(images)
# _, predicted = torch.max(outputs.data, 1)
# total += labels.size(0)
# correct += (predicted == labels).sum().item()
#
# print('Accuracy of the network on the 10000 test images: %d %%' % (
# 100 * correct / total))
# multiple test----Calculate the accuracy of each category
class_correct = list(0. for i in range(10))
class_total = list(0. for i in range(10))
with torch.no_grad():
for data in testloader:
images, labels = data
outputs = net(images)
_, predicted = torch.max(outputs, 1)
c = (predicted == labels).squeeze()
# print(c) # tensor([ True, False, False, True])
# print("c unsqueeze: ",c.shape) # torch.Size([4])
# c = (predicted == labels).squeeze()
# print(c) # tensor([ True, False, False, True])
# print("c squeezed: ", c.shape) # torch.Size([4])
# 根据以上测试,本测试中并不需要压缩,不太懂为什么要采用squeeze
#.squeeze(a,axis = None)
# 不用去想它长什么样,压缩后不变
# 表示若第arg维的维度值为1,则去掉该维度,否则tensor不变。
# axis的取值可为None 或 int 或 tuple of ints, 可选。
# 若axis为空,则删除所有单维度的条目;
for i in range(4): #batchsize = 4
label = labels[i]
class_correct[label] += c[i].item()
class_total[label] += 1
for i in range(10):
print('Accuracy of %5s : %2d %%' % (
classes[i], 100 * class_correct[i] / class_total[i]))
# 当GPU可用时,我们可以运行以下代码
# 我们将使用`torch.device`来将tensor移入和移出GPU
# x = torch.rand(5)
# if torch.cuda.is_available():
# device = torch.device("cuda") # a CUDA device object
# y = torch.ones_like(x, device=device) # 直接在GPU上创建tensor
# x = x.to(device) # 或者使用`.to("cuda")`方法
# z = x + y
# print(z)
# print(z.to("cpu", torch.double)) # `.to`也能在移动时改变dtype
# else:
# print("cant use gpu")
报错处理
An attempt has been made to start a new process before the
        current process has finished its bootstrapping phase.

        This probably means that you are not using fork to start your
        child processes and you have forgotten to use the proper idiom
        in the main module:

            if __name__ == '__main__':
                freeze_support()
                ...

        The "freeze_support()" line can be omitted if the program
        is not going to be frozen to produce an executable.
1.多线程程序要放在主函数中训练,把训练图像的代码放入下方中,这样才可以正常运行。#防止在被其他文件导入时显示多余的程序主体部分。
2. 去掉num_workers参数(或者将num_workers=0)此处我定义了num_workers为2,同时没有在主函数中,所以会报错。如果把num_workers 放在主函数中就不会报错。
你直接crtl+shift+F全局搜索num_workers,然后让它等于0就可以解决
if __name__ == '__main__':
第二个报错
OMP: Error #15: Initializing libiomp5md.dll, but found libiomp5md.dll already initialized.
OMP: Hint This means that multiple copies of the OpenMP runtime have been linked into the program. That is dangerous, since it can degrade performance or cause incorrect results. The best thing to do is to ensure that only a single OpenMP runtime is linked into the process, e.g. by avoiding static linking of the OpenMP runtime in any library. As an unsafe, unsupported, undocumented workaround you can set the environment variable KMP_DUPLICATE_LIB_OK=TRUE to allow the program to continue to execute, but that may cause crashes or silently produce incorrect results. For more information, please see http://www.intel.com/software/products/support/.
Process finished with exit code 3
解决:
import os
os.environ["KMP_DUPLICATE_LIB_OK"]="TRUE
本问题出现主要是因为torch包中包含了名为libiomp5md.dll的文件,与Anaconda环境中的同一个文件出现了某种冲突,所以需要删除一个。
运行结果
epoch = 10
小结
不足,未加入最后的准确率可视化。网络过于简单,准确率不高。
继续加油。


 3940
3940


 被折叠的 条评论
为什么被折叠?
被折叠的 条评论
为什么被折叠?
 到【灌水乐园】发言


