


1. Spring
1.1 简介
-
SSM : Spring + SpringMVC + Mybatis
-
官网:https://spring.io/projects/spring-framework
maven 依赖:
<!-- https://mvnrepository.com/artifact/org.springframework/spring-webmvc -->
<dependency>
    <groupId>org.springframework</groupId>
    <artifactId>spring-webmvc</artifactId>
    <version>5.3.8</version>
</dependency>
1.2 优点
- spring是一个开源免费的框架
- 是一个轻量级,非入侵式的框架
- 控制反转(ioc),面向切面编程(AOP)
- 支持事务的处理,对框架整合的支持
总的一句话来说:Spring就是一个轻量级控制反转(IOC)和面向切面编程的框架
1.3 spring的模块组成
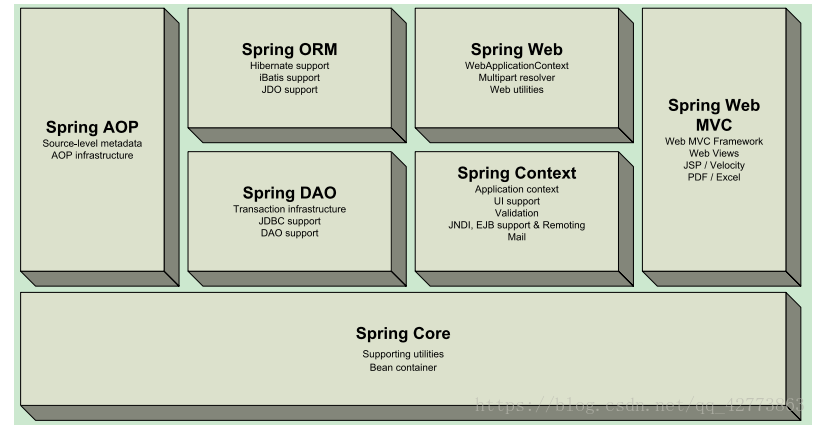
Spring-Core:
Core包是框架的最基础部分,并提供依赖注入(Dependency Injection)管理Bean容器功能。这里的基础概念是BeanFactory,它提供对Factory模式的经典实现来消除对程序性单例模式的需要,并真正地允许你从程序逻辑中分离出依赖关系和配置。
Spring-Context:(Spring核心容器<上下文模块>)
核心模块的BeanFactory使Spring成为一个容器,而上下文模块使它成为一个框架。这个模块扩展了BeanFactory的概念,增加了消息、事件传播以及验证的支持。另外,这个模块提供了许多企业服务,例如电子邮件、JNDI访问、EJB集成、远程以及时序调度(scheduling)服务。也包括了对模版框架例如Velocity和FreeMarker集成的支持。
Spring-Aop:
Spring在它的AOP模块中提供了对面向切面编程的丰富支持。例如方法拦截器(servletListener ,controller…)和切点,可以有效的防止代码上功能的耦合,这个模块是在Spring应用中实现切面编程的基础。Spring的AOP模块也将元数据编程引入了Spring。使用Spring的元数据支持,你可以为你的源代码增加注释,指示Spring在何处以及如何应用切面函数。
Spring-Dao:
使用JDBC经常导致大量的重复代码,取得连接、创建语句、处理结果集,然后关闭连接、旧代码中迁移自定义工具类JDBCUtil 也让开发变得繁琐。Spring的Dao模块对传统的JDBC进行了抽象,还提供了一种比编程性更好的声明性事务管理方法。
Spring-Web:
Web上下文模块建立于应用上下文模块之上,提供了WEB开发的基础集成特性,例如文件上传。另外,这个模块还提供了一些面向服务支持。利用Servlet listeners进行IOC容器初始化和针对Web的applicationcontext。
Spring Web MVC:
(Model-View-Controller)Spring为构建Web应用提供了一个功能全面的MVC框架。它提供了一种清晰的分离模型,在领域模型代码和web form之间。并且,还可以借助Spring框架的其他特性。
Spring-ORM:
关系映射模块,ORM包为流行的“关系/对象”映射APIs提供了集成层,包括JDO,Hibernate和iBatis(MyBatis)。通过ORM包,可以混合使用所有Spring提供的特性进行“对象/关系”映射,方便开发时小组内整合代码。
1.4 拓展
-
SpringBoot
-
一个快速开发的脚手架
-
基于SpringBoot可以快速开发单个微服务
-
约定大于配置
-
-
Springcloud
- 基于SpringBoot实现的
学习Springboot前提要先把spring和springMVC掌握
2. IOC理论
- UserDao 接口
- UserDaoImpl 实现类
- UserService 业务接口
- UserServiceImpl 业务实现类
在我们之前的业务中,用户的需求可能会影响我们原来的代码,我们需要根据用户的需求去修改代码,如果程序代码量非常庞大,修改一次的成本代价非常昂贵。
我们使用一个Set接口实现
public class test {
    private User user;

    public void setUser(User user) {
        this.user = user;
    }
}
使用set注入之后,程序不再具有主动性,变成被动对象
这种思想从本质上解决了问题,我们不再需要去管理对象的创建。系统耦合性大大降低,可以更加专注的在业务的实现上,这就是IOC原型
2.1 IOC本质
控制反转是一种设计思想,DI(依赖注入)是实现IOC的一种方法。
控制反转是一种通过描述(XML或注解)并通过第三方去生产或获取特定对象的方式。在Spring中实现控制反转的是IOC容器,其实现方法是依赖注入。
3. Spring基本配置
3.1 beans.xml配置
<?xml version="1.0" encoding="UTF-8"?>
<beans xmlns="http://www.springframework.org/schema/beans"
    xmlns:xsi="http://www.w3.org/2001/XMLSchema-instance"
    xsi:schemaLocation="http://www.springframework.org/schema/beans
        http://www.springframework.org/schema/beans/spring-beans.xsd">

    <bean id="..." class="...">
        <!-- collaborators and configuration for this bean go here -->
    </bean>

    <bean id="..." class="...">
        <!-- collaborators and configuration for this bean go here -->
    </bean>

    <!-- more bean definitions go here -->

</beans>
以下示例显示了服务层对象(services.xml)配置文件:
<?xml version="1.0" encoding="UTF-8"?>
<beans xmlns="http://www.springframework.org/schema/beans"
    xmlns:xsi="http://www.w3.org/2001/XMLSchema-instance"
    xsi:schemaLocation="http://www.springframework.org/schema/beans
        http://www.springframework.org/schema/beans/spring-beans.xsd">

    <!-- services -->

    <bean id="petStore" class="org.springframework.samples.jpetstore.services.PetStoreServiceImpl">
        <property name="accountDao" ref="accountDao"/>
        <property name="itemDao" ref="itemDao"/>
        <!-- additional collaborators and configuration for this bean go here -->
    </bean>

    <!-- more bean definitions for services go here -->

</beans>
以下示例显示了数据访问对象daos.xml文件:
<?xml version="1.0" encoding="UTF-8"?>
<beans xmlns="http://www.springframework.org/schema/beans"
    xmlns:xsi="http://www.w3.org/2001/XMLSchema-instance"
    xsi:schemaLocation="http://www.springframework.org/schema/beans
        http://www.springframework.org/schema/beans/spring-beans.xsd">

    <bean id="accountDao"
        class="org.springframework.samples.jpetstore.dao.jpa.JpaAccountDao">
        <!-- additional collaborators and configuration for this bean go here -->
    </bean>

    <bean id="itemDao" class="org.springframework.samples.jpetstore.dao.jpa.JpaItemDao">
        <!-- additional collaborators and configuration for this bean go here -->
    </bean>

    <!-- more bean definitions for data access objects go here -->

</beans>
3.2 实例化容器
        ApplicationContext Context = new ClassPathXmlApplicationContext("beans.xml");
        User user = (User) Context.getBean("user");
在配置容文件加载的时候,容器中管理的对象就已经实例化了
3.3 依赖注入
3.3.1 基于构造函数的依赖项注入
-
假如构造函数的参数为类
java代码
package x.y; public class Foo { public Foo(Bar bar, Baz baz) { // ... } } xml配置
<beans>
    <bean id="foo" class="x.y.Foo">
        <constructor-arg ref="bar"/>
        <constructor-arg ref="baz"/>
    </bean>

    <bean id="bar" class="x.y.Bar"/>

    <bean id="baz" class="x.y.Baz"/>
</beans>
引用另外的bean
-
假如构造函数的参数为简单数据类型(int,String)
java代码
package examples;

public class ExampleBean {

    // Number of years to calculate the Ultimate Answer
    private int years;

    // The Answer to Life, the Universe, and Everything
    private String ultimateAnswer;

    public ExampleBean(int years, String ultimateAnswer) {
        this.years = years;
        this.ultimateAnswer = ultimateAnswer;
    }
}
xml配置
-
使用
type属性显式指定了构造函数参数的类型(数据类型需要不一样,否则会有歧义)<bean id="exampleBean" class="examples.ExampleBean"> <constructor-arg type="int" value="7500000"/> <constructor-arg type="java.lang.String" value="42"/> </bean> -
使用
index属性可以显式指定构造函数参数的索引<bean id="exampleBean" class="examples.ExampleBean"> <constructor-arg index="0" value="7500000"/> <constructor-arg index="1" value="42"/> </bean> -
使用参数名称指定:
<bean id="exampleBean" class="examples.ExampleBean">
    <constructor-arg name="years" value="7500000"/>
    <constructor-arg name="ultimateAnswer" value="42"/>
</bean>
3.4 单例模式
bean的获取服从单例模式
java代码
public class Mytest {
    public static void main(String[] args) {
        ApplicationContext Context = new ClassPathXmlApplicationContext("beans.xml");
        User user = (User) Context.getBean("user");
        User user1 = (User) Context.getBean("user");
        System.out.println(user == user1);
    }
}
result
[外链图片转存失败,源站可能有防盗链机制,建议将图片保存下来直接上传(img-IP4yI07x-1624110709003)(C:\Users\Windows\AppData\Roaming\Typora\typora-user-images\image-20210619155051799.png)]
4. xml配置
4.1 alias 别名
<!--    别名,如果使用别名,也可以通过别名获取到这个对象-->
    <alias name="user" alias="user2"/>
4.2 Bean的配置
<!--    id: bean的唯一标识,相当于对象名-->
<!--    class: bean 对象所对应的绝对路径:包名+类型-->
<!--    name: 别名,可以同时取多个名 可通过空格,逗号,分割号等等分隔-->
    <bean id="userT" class="com.UserT" name="userT2,u2"/>
4.3 import
用于团队开发使用,可以将多个配置文件,导入合并为一个总的
    <import resource="beans1.xml"/>
    <import resource="beans2.xml"/>
    <import resource="beans3.xml"/>

//beans.xml
直接使用总的(beans.xml)


 846
846


 被折叠的 条评论
为什么被折叠?
被折叠的 条评论
为什么被折叠?
 到【灌水乐园】发言


