


Linux下无GUI配置DGL环境
1.使用python查看python的版本,按照对应版本到官网中找到对应的anaconda版本。历代版本下载链接Index of / (anaconda.com)
2.复制下载链接,使用wget指令下载到指定的文件夹下:例如下载到/home/Downloads文件夹下
wget [下载链接] -O /home/Downloads/

# 如果cannot found wget
sudo apt-get update  # 同步更新一下以防报错
sudo apt-get install wget # 下载指令
3.使用bash [anaconda的下载文件夹]来安装anaconda
bash /home/Downloads/anaconda3.20xx.xx...  # 可以敲到anaconda的时候tab键补全代码即可

# 之后就一直[enter键]下一步就好了
	#but
	# 在这个过程中,会出现一些询问(大概描述一下)
	# 1. 是否确定下载(yes/no):输入yes即可
	# 2. 确定下载安装的位置,默认为/home/用户名/anaconda3:如果需要更换安装位置可以直接输入完整的安装位置;否则直接[enter键]安装到默认位置,这个比较推荐
	# 3. 是否需要在安装的时候对anaconda的环境进行初始化:建议yes,这样就不用自己去配置全局变量了。
4.初始化.condarc文件(可能会报conda: command not found的错)
conda config --set show_channel_urls yes

# 如果报错conda: command not found
	source ~/.bashrc # 激活一下anaconda就好了
	# 这个时候你就会发现终端下你每次输入指令的 用户@xx:/$ 变成了 (base)用户@xx:/$
	# 这样就不会报错了
5.查看并修改.condarc文件 (可以忽略这步,因为我做了这步后面报错了,可以等到以后必要使用的时候再加镜像)
ls -alh # 查看是否存在.condarc文件
修改文件.condarc文件
vi /.condarc # 比起vi我更喜欢gedit指令
# PC端
channels:
  - http://mirrors.tuna.tsinghua.edu.cn/anaconda/pkgs/free/
  - http://mirrors.tuna.tsinghua.edu.cn/anaconda/cloud/conda-forge/
  - http://mirrors.tuna.tsinghua.edu.cn/anaconda/cloud/msys2/
  - http://mirrors.tuna.tsinghua.edu.cn/anaconda/cloud/bioconda/
  - http://mirrors.tuna.tsinghua.edu.cn/anaconda/pkgs/main/
  - http://mirrors.aliyun.com/anaconda/pkgs/main
  - http://mirrors.aliyun.com/anaconda/pkgs/r
  - http://mirrors.aliyun.com/anaconda/pkgs/msys2
show_channel_urls: true
custom_channels:
  conda-forge: http://mirrors.aliyun.com/anaconda/cloud
  msys2: http://mirrors.aliyun.com/anaconda/cloud
  bioconda: http://mirrors.aliyun.com/anaconda/cloud
  menpo: http://mirrors.aliyun.com/anaconda/cloud
  pytorch: http://mirrors.aliyun.com/anaconda/cloud
  simpleitk: http://mirrors.aliyun.com/anaconda/cloud
# 服务器端
channels:
  - defaults
show_channel_urls: true
channel_alias: https://mirrors.tuna.tsinghua.edu.cn/anaconda
default_channels:
  - https://mirrors.tuna.tsinghua.edu.cn/anaconda/pkgs/main
  - https://mirrors.tuna.tsinghua.edu.cn/anaconda/pkgs/free
  - https://mirrors.tuna.tsinghua.edu.cn/anaconda/pkgs/r
  - https://mirrors.tuna.tsinghua.edu.cn/anaconda/pkgs/pro
  - https://mirrors.tuna.tsinghua.edu.cn/anaconda/pkgs/msys2
custom_channels:
  conda-forge: https://mirrors.tuna.tsinghua.edu.cn/anaconda/cloud
  msys2: https://mirrors.tuna.tsinghua.edu.cn/anaconda/cloud
  bioconda: https://mirrors.tuna.tsinghua.edu.cn/anaconda/cloud
  menpo: https://mirrors.tuna.tsinghua.edu.cn/anaconda/cloud
  pytorch: https://mirrors.tuna.tsinghua.edu.cn/anaconda/cloud
  simpleitk: https://mirrors.tuna.tsinghua.edu.cn/anaconda/cloud
6.创建pytorch的虚拟python环境
conda create -n pytorch python=3.8
7.激活安装pytorch环境
conda activate pytorch # enter之后,(base)前缀会变成(pytorch)前缀
conda install pytorch torchvision torchaudio cudatoolkit=11.3 -c pytorch
8.查找conda,查看匹配版本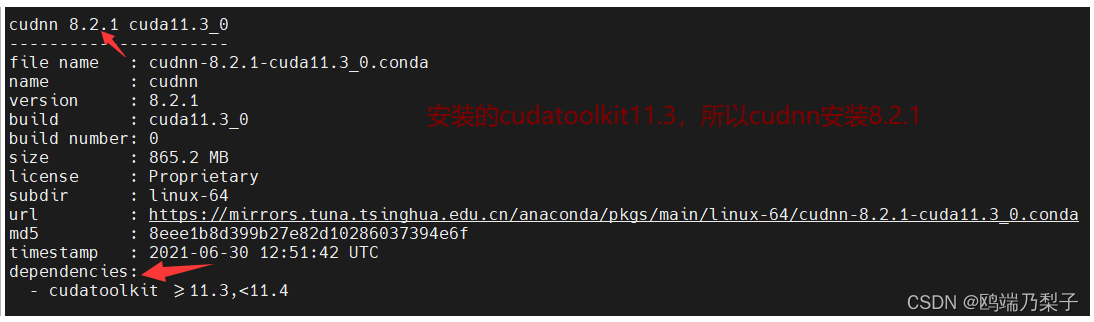
conda install cudnn=8.2.1

# 如果安装过程中出现failed爆红错误:Solving environment: failed with initial frozen solve. Retrying with flexible solve
# 使用指令更新一下conda就好了
	conda update --prefix [anaconda的安装目录] anaconda # 我等了半小时。。。python库真的好多
	# 其实可以先输入 conda update,他会提示你正确更新的代码,也就是上面这行代码,直接复试粘贴运行就好了。
9.安装dgl并查看
conda install -c dglteam dgl  # https://www.dgl.ai/pages/start.html 官网查找对应的cuda对应的下载代码

# 如果没有改.condarc文件应该就不会有这个报错
# 报错:Collecting package metadata (current_repodata.json): failed
# 	   UnavailableInvalidChannel: HTTP 404 NOT FOUND for channel dglteam
# conda没有给清华源授权,所以服务停止404了,所以需要安装。
	pip install torch torchvision

# 报错:CondaHTTPError: HTTP 000 CONNECTION FAILED for url
# 网络访问超时,继续试。或者改/增加.condarc文件里面的参数如下
	remote_read_timeout_secs: 5000.0 # 代表远程读取时间时长5s 如果还是报000错误可以继续改大一点继续试
10.测试运行
conda activate pytorch # 激活pytorch
python # 进入bash写python代码
import dgl
# 如果报错:ModuleNotFoundError: No module named 'dgl'
# 1. 按ctrl + D 退出bash
# 2. conda activate base
# 3. pip install dgl
# 4. conda activate pytorch
# 5. pip install dgl
# 如果在执行pip操作时,一片红或者加载包加载到一边中断,多试几次,可能是网络不稳定

# 再重新进行运行测试,不报错了就继续输入下面的代码
import torch as th
u, v = th.tensor([0, 0, 0, 1]), th.tensor([1, 2, 3, 3]) #u = 出节点集、v = 入节点集合
g = dgl.graph((u, v))
g
# 输出为:
# Graph(num_nodes=4, num_edges=4,
#      ndata_schemes={}
#      edata_schemes={})

# 环境测试完毕,安装成功
参考:如何搭建Pytorch环境(linux版)_computer literacy的博客-CSDN博客_linux pytorch


 4136
4136


 被折叠的 条评论
为什么被折叠?
被折叠的 条评论
为什么被折叠?
 到【灌水乐园】发言


