


Day01
-
初识electron
-
创建一个electron小demo
- yarn create electron-app my-app
- cd my-app
- yarn start
- yarn make // 打包成一个桌面应用程序
总结: 文件创建好了之后必须在vscode里面跑,不能在cmd里面跑
跑起来都是勒么个样子

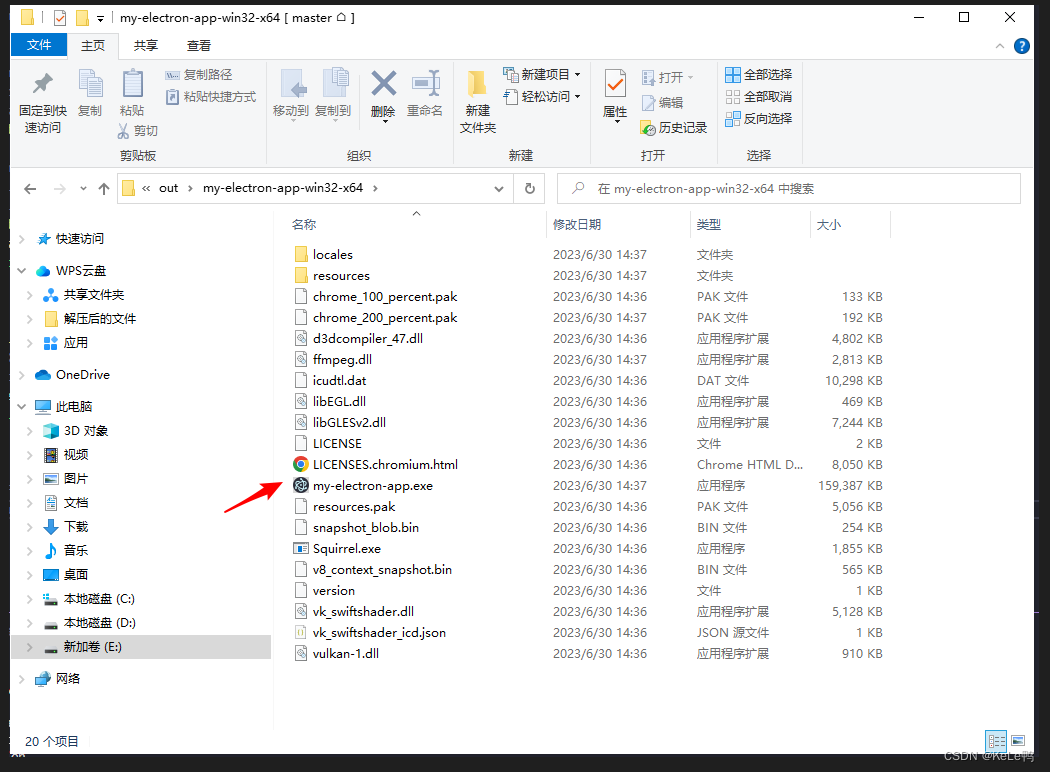
打包之后点击.exe文件就能运行在桌面,在新增的out文件夹里面
-
electron的渲染流程
- 主进程
- 它是唯一的一个主进程,作为整个程序的入口
- 运行在node.js中可以调用任何的node中的API
- 渲染进程
- 每个页面对应的html和js脚本文件
- 主进程
-
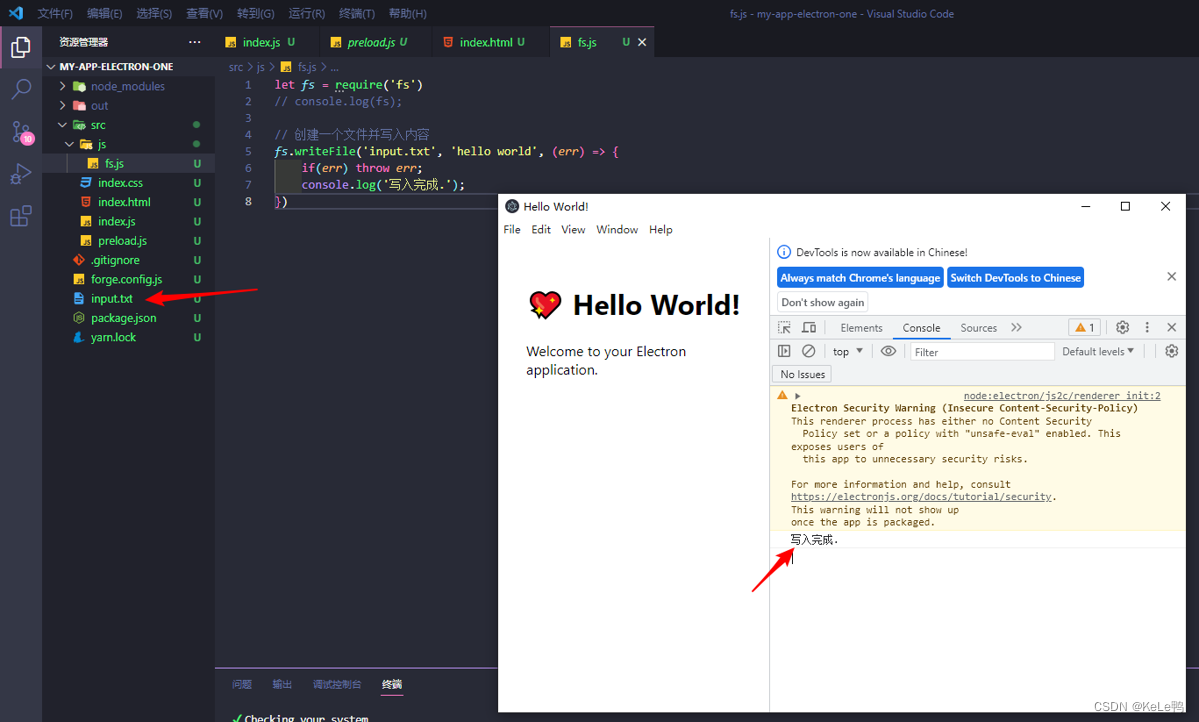
小demo:使用fs写入一段话给文件中
-
在index.html文件里面引入脚本文件
-
在index.js文件中进行配置,使得支持fs
-
在脚本文件中写入脚本
// index.html
<script src="./js/fs.js"></script>

// index.js
webPreferences: {
  // 配置浏览器选项
    // 支持node中的所有API
  nodeIntegration: true,
    // 上下文隔离关闭
  contextIsolation: false,
    // 预加载
  preload: path.join(__dirname, 'preload.js'),
}

//	js/fs.js
let fs = require('fs')
// console.log(fs);

// 创建一个文件并写入内容
fs.writeFile('input.txt', 'hello world', (err) => {
    if(err) throw err;
    console.log('写入完成.');
})
不出意外勒话就是这样的效果
你还可以给index.html里面添加一个按钮实现页面的交互效果

-
-
小demo:将文件拖动到electron中,然后将里面的内容进行展示
-
首先创建一个div用于标识文件拖动的区域
-
然后给这个div创建一个监听事件,监听拖动的行为,然后通过事件对象的形式把文件的路径获取到
// js/render.js let hold = document.querySelector('#hold'); hold.addEventListener('drop', (e) => { e.preventDefault(); // 阻止默认行为 e.stopPropagation(); // 阻止冒泡 console.log(e); for(const file of e.dataTransfer.files) { console.log(file); console.log(file.path + '文件路径'); } }) hold.addEventListener('dragover', (e) => { e.preventDefault(); e.stopPropagation(); }) -
没出意外勒话就是这么个效果
![[外链图片转存失败,源站可能有防盗链机制,建议将图片保存下来直接上传(img-4Rql8QDi-1688128483252)(C:\Users\way\AppData\Roaming\Typora\typora-user-images\image-20230630160942054.png)]](https://img-blog.csdnimg.cn/31e7421fa2ca4dbd8cb721238e7fd16d.png)
-
你还可以将拖入到框里面的文件通过fs写入到界面进行展示 引入fs模块 -> 通过readFile方法读取你拖入到框里面的文件 -> 回调将文件内容写出到界面
// index.html
<!DOCTYPE html>
<html>
  <head>
    <meta charset="UTF-8" />
    <title>Hello World!</title>
    <link rel="stylesheet" href="index.css" />
  </head>
  <body>

    <div id="hold" style="width: 300px; height: 200px; border: 1px solid #eee;">
      <p>将文件拖动到此处</p>
    </div>

    <div id="content">
      <h2>文件内容为:</h2>
    </div>

    <script src="./js/render.js"></script>
  </body>
</html>


// js/render.js
let fs = require('fs');

// 获取dom元素
let hold = document.querySelector('#hold');
let content = document.querySelector('#content');

// 事件进行监听
hold.addEventListener('drop', (e) => {
    e.preventDefault();  // 阻止默认行为
    e.stopPropagation();  // 阻止冒泡
    // console.log(e);
    for(const file of e.dataTransfer.files) {  // 遍历拖入的文件
        // console.log(file);
        // console.log(file.path + '文件路径');
        fs.readFile(file.path, (err, data) => {  // electron可以直接调用本地磁盘的文件,所以可以通过fs.readfile直接读取本地文件
            if(err) return;
            // console.log(data);
            let newDiv = document.createElement('div');		// 创建一个dom元素
            newDiv.className = "content";
            newDiv.innerHTML = `<p>${file.name}</p><br><code>${data}</code>`;  // 写到页面展示
            content.appendChild(newDiv);	// 添加到div元素中
        })
    }
})

hold.addEventListener('dragover', (e) => {
    e.preventDefault();
    e.stopPropagation();
})
没出意外勒话就是这么个效果

-
-
添加子页面
- 使用标签webview id=“” src=“” style=“” 可以在主页面生成一个子页面
- 必须在webPreferences配置项中开启识别webview标签 webviewTag
-
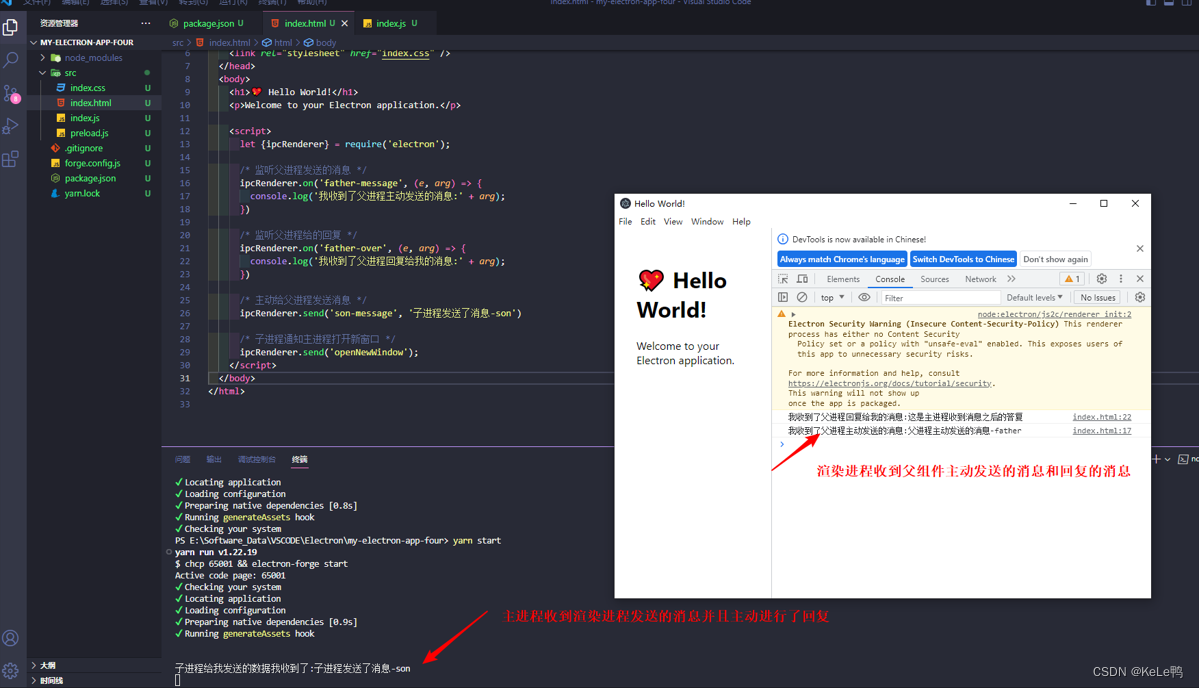
主进程(父进程)渲染进程(子进程)通信
- 主进程就是inde.js文件,子进程就是index.html文件
- 主进程使用ipcMain进行子进程发送过来的事件监听和回复,ipcMain.on e.reply 特别点:父进程通过该方法进行事件的发送mainWindow.webContents.send
- 子进程使用ipcRenderer进行事件的发送和父进程发送过来的事件进行监听 ipcRenderer.on ipcRenderer.send
// index.js  主进程文件
const { app, BrowserWindow, ipcMain} = require('electron');
const path = require('path');

/* 主进程监听事件 */
ipcMain.on('son-message', (e, arg) => {
  e.reply('father-over', '这是主进程收到消息之后的答复');
  console.log('子进程给我发送的数据我收到了:' + arg);
})

// Handle creating/removing shortcuts on Windows when installing/uninstalling.
if (require('electron-squirrel-startup')) {
  app.quit();
}


/* 主进程监听子进程发过来的打开新窗口的事件然后调用下面的方法打开新窗口 */
ipcMain.on('openNewWindow',(e, arg) => {
  newWindo('https://www.baidu.com')
})

/* 开启新窗口方法 */
const newWindo = (url) => {
  // Create the browser window.
  const mainWindow = new BrowserWindow({
    width: 800,
    height: 600,
    webPreferences: {
      nodeIntegration: true,
      contextIsolation: false,
    },
  });

  // and load the index.html of the app.
  mainWindow.loadURL(url)
};


const createWindow = () => {
  // Create the browser window.
  const mainWindow = new BrowserWindow({
    width: 800,
    height: 600,
    webPreferences: {
      nodeIntegration: true,
      contextIsolation: false,
      preload: path.join(__dirname, 'preload.js'),
    },
  });

  // and load the index.html of the app.
  mainWindow.loadFile(path.join(__dirname, 'index.html'));

  // Open the DevTools.
  mainWindow.webContents.openDevTools();

  setTimeout(() => {
    mainWindow.webContents.send('father-message', '父进程主动发送的消息-father')
  }, 2000);
};

app.on('ready', createWindow);

app.on('window-all-closed', () => {
  if (process.platform !== 'darwin') {
    app.quit();
  }
});

app.on('activate', () => {
  if (BrowserWindow.getAllWindows().length === 0) {
    createWindow();
  }
});


// index.html  子进程(渲染进程)文件
<!DOCTYPE html>
<html>
  <head>
    <meta charset="UTF-8" />
    <title>Hello World!</title>
    <link rel="stylesheet" href="index.css" />
  </head>
  <body>
    <h1>💖 Hello World!</h1>
    <p>Welcome to your Electron application.</p>

    <script>
      let {ipcRenderer} = require('electron');

      /* 监听父进程发送的消息 */
      ipcRenderer.on('father-message', (e, arg) => {
        console.log('我收到了父进程主动发送的消息:' + arg);
      })

      /* 监听父进程给的回复 */
      ipcRenderer.on('father-over', (e, arg) => {
        console.log('我收到了父进程回复给我的消息:' + arg);
      })

      /* 主动给父进程发送消息 */
      ipcRenderer.send('son-message', '子进程发送了消息-son')

      /* 子进程通知主进程打开新窗口 */
      ipcRenderer.send('openNewWindow');
    </script>
  </body>
</html>
主次进程收到消息之后的效果
-
子进程发送消息通知父进程打开新的页面
- ipcRenderer.send(‘openNewWindow’)
- 父进程使用ipcMain.on(‘openNewWindow’, (e, arg) => { newWindow(url) }) 代码在上面
效果
![[外链图片转存失败,源站可能有防盗链机制,建议将图片保存下来直接上传(img-Vz5LoV21-1688128483254)(C:\Users\way\AppData\Roaming\Typora\typora-user-images\image-20230630182507978.png)]](https://img-blog.csdnimg.cn/db5042dd1ec543ada0f4fd6c80fd827e.png)
`


 2692
2692


 被折叠的 条评论
为什么被折叠?
被折叠的 条评论
为什么被折叠?
 到【灌水乐园】发言


