


1.模板模式
1.1定义
定义一个操作中的基本骨架,而具体的实现步骤则写到它的子类,模板可以让子类不改变其结构而得到特定的步骤。
1.2针对的问题
做某一件事情的时候,有一个固定的步骤,但是每一个步骤的细节对于不同的对象来说具有不同的实现步骤,在定义某一件事的时候,又不可能需要去细化实现每个步骤。所以我们可以将固定步骤的骨架抽取出来用final修饰不可修改,具体的步骤实现只需要在子类中实现完成。
1.3实现代码
1)模板Template
/**
 * 抽象的模板类,定义一个主要的框架
 * @author Blue
 */
public abstract class Template {
    /**
     * 步骤1
     */
    protected abstract void step1();

    /**
     * 步骤2
     */
    protected abstract void step2();

    /**
     * 步骤3
     */
    protected abstract void step3();

    /**
     * 做某事
     */
    final void doSomething(){
        step1();
        step2();
        step3();
    }
}
2)具体实现类(去上班类)GoToWork
/**
 * 去上班类
 *
 * @author Blue
 */
public class GoToWork extends Template {
    @Override
    protected void step1() {
        System.out.println("起床洗漱准备东西");
    }

    @Override
    protected void step2() {
        System.out.println("出去吃早饭");
    }

    @Override
    protected void step3() {
        System.out.println("坐电梯上班");
    }
}
3)具体实现类(回家类)GoHome
/**
 * 回家类
 * @author Blue
 */
public class GoHome extends Template{
    @Override
    protected void step1() {
        System.out.println("准备东西关好门窗");
    }

    @Override
    protected void step2() {
        System.out.println("打扫卫生");
    }

    @Override
    protected void step3() {
        System.out.println("坐车回家");
    }
}
4)模板测试类Test
/**
 * 模板测试类
 * @author Blue
 */
public class Test {
    public static void main(String[] args) {
        //去上班类
        Template template1 = new GoToWork();
        template1.doSomething();
        System.out.println("================");
        //回家类
        Template template2 = new GoHome();
        template2.doSomething();
    }
}
5)运行结果:

2.策略模式
2.1定义
定义一组算法,将每个算法都封装起来,并且让它们可以互相切换。
2.2针对的问题(适用场景和解决的问题)
一个系统有很多类,这些类之间有很多相似的算法,区别仅仅是结果的不同,如果用if判断语句来调用不同的类对象,那么代码将变得复杂,不好维护,因此将各种的算法封装起来,提供相同的接口方法和设置切换策略来实现算法的切换。
2.3实现代码
1)策略接口Strategy
/**
 * 策略接口
 *
 * @author Blue
 */
public interface Strategy {

    /**
     * 计算方法
     *
     * @param num1
     * @param num2
     */
    void calculate(int num1, int num2);
}
2)加法策略AddStrategy
/**
 * 加法策略
 *
 * @author Blue
 */
public class AddStrategy implements Strategy {
    @Override
    public void calculate(int num1, int num2) {
        System.out.println("加法运算结果:" + (num1 + num2));
    }
}
3)减法策略SubStrategy
/**
 * 减法策略
 *
 * @author Blue
 */
public class SubStrategy implements Strategy {
    @Override
    public void calculate(int num1, int num2) {
        System.out.println("减法运算结果:" + (num1 - num2));
    }
}
4)上下文环境类Context
/**
 * 上下文环境类
 *
 * @author Blue
 */
public class Context {
    /**
     * 策略
     */
    private Strategy strategy;

    /**
     * 构造方法
     *
     * @param strategy
     */
    public Context(Strategy strategy) {
        this.strategy = strategy;
    }

    /**
     * 调用策略的方法
     *
     * @param num1
     * @param num2
     */
    public void call(int num1, int num2) {
        strategy.calculate(num1, num2);
    }

    /**
     * 调整策略的方法
     *
     * @param strategy
     */
    public void setStrategy(Strategy strategy) {
        this.strategy = strategy;
    }
}
5)策略模式的测试方法Test
/**
 * 策略模式测试方法
 *
 * @author Blue
 */
public class Test {
    public static void main(String[] args) {
        //创建环境对象并进行策略的设置
        Context context = new Context(new AddStrategy());
        context.call(1, 2);

        //切换策略
        context.setStrategy(new SubStrategy());
        context.call(1,2);
    }
}
6)运行结果:

3.责任链模式
3.1定义
使多个对象都有机会处理请求,从而避免了请求的发送者和接受者之间的耦合关系。将这些对象连成一条链,并沿着这条链传递该请求,直到有对象处理它为止。
3.2针对的问题
责任链上的处理者负责处理请求,客户只需要将请求发送到责任链上即可,无须关心请求的处理细节和请求的传递,所以责任链将请求的发送者和请求的处理者解耦了。
3.3实现代码
1)待检测产品类Product
/**
 * 待检验产品
 * @author Blue
 */
public class Product {
    /**
     * 产品长度
     */
    Integer length;

    /**
     * 产品宽度
     */
    Integer width;

    public Integer getLength() {
        return length;
    }

    public void setLength(Integer length) {
        this.length = length;
    }

    public Integer getWidth() {
        return width;
    }

    public void setWidth(Integer width) {
        this.width = width;
    }

    public Product(Integer length, Integer width) {
        this.length = length;
        this.width = width;
    }
}
2)处理器接口Processor
/**
 * 处理器接口定义
 *
 * @author Blue
 */
public interface Processor {
    /**
     * 判断产品是否通过
     * @param request 产品
     * @param chain 责任链
     * @return
     */
    boolean process(Product request, ProcessorChain chain);
}
3)处理器执行链ProcessorChain
/**
 * 处理器执行链定义
 *
 * @author Blue
 */
public class ProcessorChain {
    /**
     * 保存处理节点
     */
    private List<Processor> processorList = new ArrayList<>();

    /**
     * 处理节点下标
     */
    private int index = 0;

    /**
     * 动态扩展处理节点
     *
     * @param processor
     * @return
     */
    public ProcessorChain addProcessor(Processor processor) {
        processorList.add(processor);
        return this;
    }

    /**
     * 获取处理器处理
     *
     * @param product
     * @param chain
     * @return
     */
    public boolean process(Product product, ProcessorChain chain) {
        if (index == processorList.size()) {
            return true;
        }
        Processor processor = processorList.get(index);
        index++;
        return processor.process(product, chain);
    }
}
4)长度检查处理器LengthCheckProcessor
/**
 * 长度检查处理器
 *
 * @author Blue
 */
public class LengthCheckProcessor implements Processor {
    @Override
    public boolean process(Product request, ProcessorChain chain) {
        Integer length = request.getLength();
        Integer maxLength = 100;
        Integer minLength = 50;
        if (length < maxLength && length > minLength) {
            System.out.println("产品长度检验通过");
            return chain.process(request, chain);
        }
        // 产品长度未检验通过
        System.out.println("产品长度未检验通过");
        return false;
    }
}
5)宽度检查处理器WidthCheckProcessor
/**
 * 宽度检查处理器
 *
 * @author Blue
 */
public class WidthCheckProcessor implements Processor {
    @Override
    public boolean process(Product request, ProcessorChain chain) {
        Integer width = request.getWidth();
        Integer maxWidth = 100;
        Integer minWidth = 50;
        if (width < maxWidth && width > minWidth) {
            System.out.println("产品宽度检验通过");
            return chain.process(request, chain);
        }
        // 产品长度未检验通过
        System.out.println("产品宽度未检验通过");
        return false;
    }
}
6)责任链测试Test
/**
 * 责任链测试
 *
 * @author Blue
 */
public class Test {
    public static void main(String[] args) {
        int[][] arrays = {{60, 60}, {40, 40}, {40, 60}, {60, 40}};
        for (int[] array : arrays) {
            ProcessorChain processorChain = new ProcessorChain();

            //责任链添加处理结点
            processorChain.addProcessor(new LengthCheckProcessor());
            processorChain.addProcessor(new WidthCheckProcessor());

            Product product = new Product(array[0], array[1]);
            boolean checkResult = processorChain.process(product, processorChain);
            if (checkResult) {
                System.out.println("产品最终检验合格");
            } else {
                System.out.println("产品最终检验不合格");
            }
            System.out.println();
        }
    }
}
7)运行结果:

4.装饰器模式
4.1定义
动态的给一个对象添加一些额外的职责。就增加功能来说,装饰模式相比生成子类更加的灵活。
4.2针对的问题
需要给某个对象添加额外的功能,又不想改变原来的对象类
4.3实现代码
1)被装饰的接口Component
/**
 * 组件接口,被装饰的接口
 * @author Blue
 */
public interface Component {

    /**
     * 某一个操作
     */
    void operation();
}
2)被装饰者ConcreteComponent
/**
 * 被装饰者
 *
 * @author Blue
 */
public class ConcreteComponent implements Component{
    @Override
    public void operation() {
        System.out.println("还没有被装饰的方法...");
    }
}
3)装饰者抽象类Decorator
/**
 * 装饰者抽象类
 *
 * @author Blue
 */
public abstract class Decorator implements Component {

    /**
     * 被装饰者接口
     */
    protected Component component;

    /**
     * 构造方法
     *
     * @param component
     */
    public Decorator(Component component) {
        this.component = component;
    }

    @Override
    public void operation() {
        component.operation();
    }
}
4)具体装饰类A ConcreteDecoratorA
/**
 * 具体装饰类A
 * @author Blue
 */
public class ConcreteDecoratorA extends Decorator{
    /**
     * 构造方法
     *
     * @param component
     */
    public ConcreteDecoratorA(Component component) {
        super(component);
    }

    /**
     * 装饰者A的私有方法
     */
    private void methodA(){
        System.out.println("装饰者A的私有方法");
    }

    @Override
    public void operation() {
        methodA();
        super.operation();
    }
}
5)具体装饰类B ConcreteDecoratorB
/**
 * 具体装饰类B
 * @author Blue
 */
public class ConcreteDecoratorB extends Decorator{
    /**
     * 构造方法
     *
     * @param component
     */
    public ConcreteDecoratorB(Component component) {
        super(component);
    }

    /**
     * 装饰者B的私有方法
     */
    private void methodB(){
        System.out.println("装饰者B的私有方法");
    }

    @Override
    public void operation() {
        methodB();
        super.operation();
    }
}
6)测试装饰模式Test
/**
 * 测试装饰模式
 * @author Blue
 */
public class Test {
    public static void main(String[] args) {
        //没有被装饰的对象
        Component component = new ConcreteComponent();
        component.operation();
        System.out.println("===================");

        //被A类装饰过的对象
        Component decoratorA = new ConcreteDecoratorA(component);
        decoratorA.operation();
        System.out.println("===================");

        //被B类装饰过的A类对象
        Component decoratorB = new ConcreteDecoratorB(decoratorA);
        decoratorB.operation();
    }
}
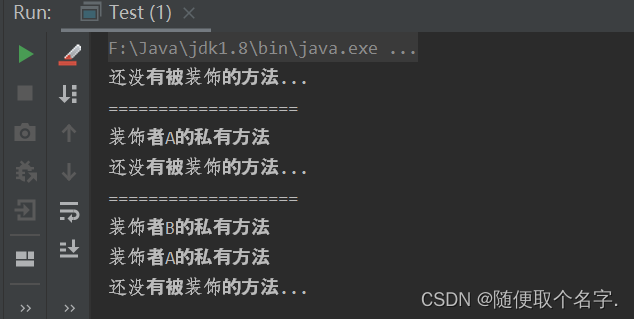
7)运行结果:
5.适配器模式
5.1定义
适配器将某一个类的接口转换为客户端期望的另一个接口表示,目的是消除接口不匹配所造成的类的适配问题
5.2针对的问题
有两个正常工作的接口或者类,但是他们之间的方法不兼容,不能在一起工作,因此需要一个适配者对两者进行适配
5.3实现代码
1)目标接口Target
/**
 * 目标接口
 *
 * @author Blue
 */
public interface Target {

    /**
     * 目标接口的低压充电方法
     */
    void lowVoltageCharge();
}
2)被适配者类BeAdapted
/**
 * 原有的抽象类(被适配器者)
 *
 * @author Blue
 */
public abstract class BeAdapted {
    /**
     * 高电压充电方法
     */
    void highVoltageCharge() {
    }
}
3)目标接口的实现类TargetImpl
/**
 * 目标接口的实现类
 *
 * @author Blue
 */
public class TargetImpl implements Target {
    @Override
    public void lowVoltageCharge() {
        System.out.println("进行低压充电");
    }
}
4)类适配器Adapter
/**
 * 类适配器
 *
 * @author Blue
 */
public class Adapter extends BeAdapted implements Target {
    @Override
    public void lowVoltageCharge() {
        //把高压转换为低压
        super.highVoltageCharge();
        System.out.println("高压转低压");
        System.out.println("进行低压充电...");
    }
}
5)适配器测试类Test
/**
 * 适配器测试类
 *
 * @author Blue
 */
public class Test {
    public static void main(String[] args) {
        //原有的低压充电方法
        Target target1 = new TargetImpl();
        target1.lowVoltageCharge();
        System.out.println("=================");

        //类适配器后的高压转为低压
        Target target2 = new Adapter();
        target2.lowVoltageCharge();
    }
}
6)运行结果:

6.观察者模式
6.1定义
定义对象间一种一对多的依赖关系,使得每当一个对象改变状态,则所有依赖于它的对象都会得到通知并被自动更新。
6.2针对的问题
一个对象发生改变,需要通知其他与之关联的对象做出反应,又不想一个个挑选是哪些对象与之关联,此时应使用观察者模式。此模式提供一个主题,订阅了该主题的对象,当主题发生变更时,都会收到通知。
6.3实现代码
1)主题接口,被观察者接口Subject
/**
 * 主题接口(被观察者接口)
 *
 * @author Blue
 */
public interface Subject {

    /**
     * 添加观察者
     *
     * @param observer 观察者
     */
    void addObserver(Observer observer);


    /**
     * 删除观察者
     *
     * @param observer
     */
    void removeObserver(Observer observer);


    /**
     * 通知观察者
     *
     * @param message
     */
    void notifyObservers(String message);
}
2)观察者接口Observer
/**
 * 观察者接口
 * @author Blue
 */
public interface Observer {

    /**
     * 接收并且更新被观察者
     *
     * @param message 消息
     */
    void receiveAndUpdate(String message);
}
3)具体的主题类ConcreteSubject
/**
 * 具体的主题类
 *
 * @author Blue
 */
public class ConcreteSubject implements Subject {

    /**
     * 观察者的对象集合
     */
    private final List<Observer> observers = new ArrayList<>();

    /**
     * 通知消息
     */
    private String message;


    /**
     * 添加被观察者
     *
     * @param observer 观察者
     */
    @Override
    public void addObserver(Observer observer) {
        observers.add(observer);
    }

    /**
     * 删除被观察者
     *
     * @param observer
     */
    @Override
    public void removeObserver(Observer observer) {
        observers.remove(observer);
    }

    /**
     * 通知被观察者
     */
    @Override
    public void notifyObservers(String message) {
        this.message = message;
        for (Observer observer : observers) {
            observer.receiveAndUpdate(this.message);
        }
    }
}
4)具体的观察者ConcreteObserver
/**
 * 具体的观察者
 *
 * @author Blue
 */
public class ConcreteObserver implements Observer {
    /**
     * 具体观察者实现了接收并且更新的方法
     * @param message 消息
     */
    @Override
    public void receiveAndUpdate(String message) {
        System.out.println("接收到了新的消息:" + message);
    }
}
5)观察模式测试类Test
/**
 * 测试被观察者和观察者
 * @author Blue
 */
public class Test {
    public static void main(String[] args) {
        //创建被观察者
        Subject subject = new ConcreteSubject();

        //创建观察者
        Observer observer1 = new ConcreteObserver();
        Observer observer2 = new ConcreteObserver();
        Observer observer3 = new ConcreteObserver();

        //添加观察者
        subject.addObserver(observer1);
        subject.addObserver(observer2);
        subject.addObserver(observer3);
        //通知观察者信息
        subject.notifyObservers("这是第一条信息");

        System.out.println("=========================");
        //移除一个观察者
        subject.removeObserver(observer2);

        subject.notifyObservers("这是移除后的信息");
    }
}
6)运行结果:


 208
208


 被折叠的 条评论
为什么被折叠?
被折叠的 条评论
为什么被折叠?
 到【灌水乐园】发言


