


嵌套路由【children】
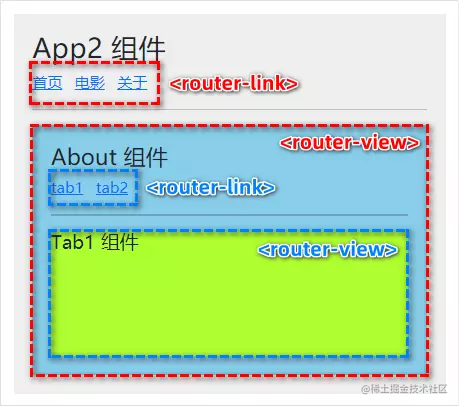
- 如果在路由视图中展示的组件包含自己的路由占位符(路由出口),则此处会用到嵌套路由;
- 如图所示:点击关于链接,则会展示
About组件,在其组件中又包含了路由链接和路由占位符;
- 路由嵌套规则:
- 某一个路由规则中采用
children来声明嵌套路由的规则; - 嵌套路由规则中的
path不能以/开头,访问需要使用过/fatherPath/sonPath的形式;
- 某一个路由规则中采用
- 示例展示:
- 路由模块 -
router/index.js:import { createRouter, createWebHashHistory, createWebHistory } from 'vue-router' // TODO 创建路由规则数组 const routes = [ { path: '/', // 路由重定向 redirect: '/guoMan' }, { path: '/teleplay', name: 'teleplay', component: () => import('@/views/Teleplay/index.vue'), children: [ { path: 'teleplayList', name: 'teleplayList', component: () => import('@/views/Teleplay/components/TeleplayList.vue') } ] }, { path: '/guoMan', name: 'guoMan', component: () => import('@/views/GuoMan/index.vue'), children: [ { path: 'guoManList', name: 'guoManList', component: () => import('@/views/GuoMan/components/GuoManList.vue') } ] }, { path: '/riMan', name: 'riMan', component: () => import('@/views/RiMan/index.vue'), children: [ { path: 'riManList', name: 'riManList', component: () => import('@/views/RiMan/components/RiManList.vue') } ] }, { path: '/movie', name: 'movie', component: () => import('@/views/Movie/index.vue'), children: [ { path: 'movieList', name: 'movieList', component: () => import('@/views/Movie/components/MovieList.vue') } ] } ] // TODO 创建路由 const router = createRouter({ // TODO 规定路由模式 // history: createWebHashHistory(), history: createWebHistory(), routes }) export default router - 文档结构展示:
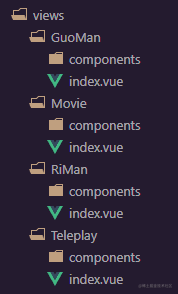
- 只展示一个目录中的,其他目录的都一样:
views/GuoMan/index.vue<script setup> import { ref, reactive, computed, onMounted } from 'vue' onMounted(() => {}); </script> <template> <h3>国漫</h3> <router-link to="/guoMan/guoManList" class="router-link">展示国漫列表</router-link> <hr> <router-view /> </template> <style scoped> h3 { color: #fff; font-size: 30px; font-family: '隶书'; } .router-link { padding: 0 10px; color: #fff; font-size: 24px; font-family: '隶书'; } </style>views/GuoMan/components/GuoManList.vue:<script setup> import { ref, reactive, computed, onMounted } from 'vue' let list = ref([ { id: 'w45', title: '完美世界', }, { id: 'y43', title: '一念永恒' }, { id: 'z27', title: '赘婿' } ]) onMounted(() => {}); </script> <template> <ul> <li v-for="({id, title}) in list" :key="id"> {{ title }} </li> </ul> </template> <style scoped> li { list-style: none; padding: 0 10px; color: yellow; font-size: 24px; font-family: '隶书'; } </style>
- 路由模块 -
- 运行展示:


 1万+
1万+


 被折叠的 条评论
为什么被折叠?
被折叠的 条评论
为什么被折叠?
 到【灌水乐园】发言


