


简介
MHA(MasterHigh Availability)是一套优秀的MySQL高可用环境下故障切换和主从复制的软件。 MHA 的出现就是解决MySQL 单点的问题。
原理:
1.利用虚拟ip的迁移实现高可用,发生数据延迟时,mha会等从库同步完主库的数据然后对虚拟ip进行迁移
2.MHA Manager 会定时探测集群中的 master 节点。当 master 出现故障时,它可以自动将最新数据的 slave 提升为新的 master, 然后将所有其他的 slave 重新指向新的 master。整个故障转移过程对应用程序完全透明。
本文主要介绍mha一主一从,以及一主二从的搭建以及故障模拟的过程
整体架构
一主一从
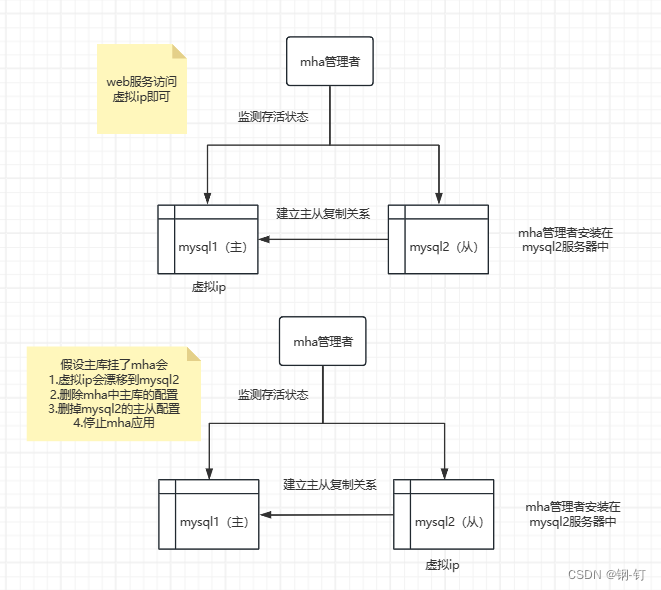
一主二从

一主一从
介绍
环境需求
两台linux服务器
1.环境准备
两台服务器都需要操作环境准备
①关闭selinx
#临时关闭:#Permissive
setenforce 0
#永久关闭selinux 重启后生效
vi /etc/selinux/config
SELINUX=enforcing 替换为SELINUX=disabled
#获取当前selinux状态
getenforce
②hosts配置
vim /etc/hosts
192.168.2.128 master
192.168.2.129 slave


2.建立主从复制关系
①原理
主库会把数据变更记录在二进制日志文件Binlog中。 从库连接主库,读取binlog日志,并写入自身中继日志relaylog。 slave重做中继日志,将改变反应它自己的数据。

②数据库配置
主从数据库都要配置
编辑mysql配置文件 linux(my.cnf) windows(my.ini)
#mysql服务ID,保证整个集群环境中唯一,取值范围:1-2^32-1,默认为1,从库建议设置为
#ip末尾
server-id=1
#开启GTID
gtid_mode=on
#强制GTID一致性
enforce-gtid-consistency=true
③创建用户
主库执行
2)新建用于同步的用户
##主库执行如下sql
#新建用户,并设置密码,只有从库可以连接该账号,可根据业务需求自行设定
create user 'slave'@'%' identified with mysql_native_password by 'root';
#赋予用户可主从复制的权限
grant replication slave on *.* to 'slave'@'%'
#刷新权限
flush privileges;
④配置主从关系
从库执行如下sql
1)启动mysql,配置同步参数
##如果是第一次和主库建立主从关系,执行该语句
#如果gtid_mode=on, 执行reset master命令会重置gtid的执行历史,gtid_purged系统变量会置为空,全局的gtid_excuted系统变量会置为空,mysql.gtid_executed表会被清理。
reset master;
#使用gtid的方式配置主从同步关系
CHANGE MASTER TO
#主服务器的ip地址
MASTER_HOST='192.168.0.128',
#主服务器上配置的用来主从同步的用户名和密码
MASTER_USER='slave',
MASTER_PASSWORD='root',
#主服务器端口
master_port=3306,
#让从库从主库GTID事务号1后开始截取
master_auto_position=1;
2)开启同步操作
#启动主从同步进程
start slave;
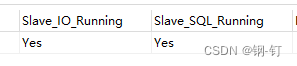
#检查状态 命令行执行可使用 show slave status \G
show slave status
#Slave_IO_Running 和 Slave_SQL_Running 线程都为yes 则同步成功
3.服务器之间通信
ssh-keygen实现两台机器之间相互免密钥登录
主从服务器都要配置
##查看sshd状态
systemctl status sshd
##设置开机自启
systemctl enable sshd
##开放22端口
firewall-cmd --zone=public --add-port=22/tcp --permanent;
##重新加载配置
sudo firewall-cmd --reload
##查看防火墙开放端口
firewall-cmd --list-all
配置免密访问
ssh-keygen -t rsa #创建密钥 一直回车即可
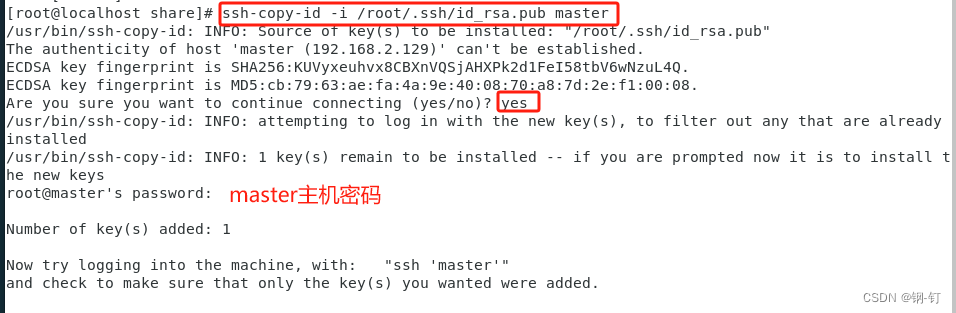
ssh-copy-id -i /root/.ssh/id_rsa.pub slave #发送ssh密钥到
slave ssh-copy-id -i /root/.ssh/id_rsa.pub master #发送ssh密钥到master
测试通信
ssh master date
ssh slave date

4.安装配置mha
①安装相关依赖包和mha
主从服务器都要安装
两节点配置epel的yum源
rpm -ivh http://yum.puppetlabs.com/puppetlabs-release-el-6.noarch.rpm
rpm -ivh https://mirrors.aliyun.com/epel/epel-release-latest-7.noarch.rpm
安装依赖包perl
yum install perl-DBD-MySQL perl-Config-Tiny perl-Log-Dispatch perl-Parallel-ForkManager perl-Time-HiRes -y
下载mha
#可在官网下载 https://github.com/yoshinorim/mha4mysql-manager/wiki/Downloads


安装mha
##cd 切到下载好的目录下执行
#安装 mha管理者和节点
rpm -Uvh mha4mysql-manager-0.56-0.el6.noarch.rpm mha4mysql-node-0.56-0.el6.noarch.rpm
②创建mha配置文件
创建日志目录
#创建日志目录(从库服务器)执行)
mkdir /var/log/masterha/app1 -p
在mysql创建mha用户(非必须)也可直接用root用户,用于mha连接mysql
#创建mha用户,在主数据库执行语句
use mysql;
create user 'mha'@'%' identified with mysql_native_password by 'root';
grant all privileges on *.* to 'mha'@'%';
创建mha配置文件
mkdir /etc/masterha
cd /etc/masterha
#创建配置文件
vim app1.conf
[server default]
# manager日志
manager_log=/var/log/masterha/app1/app1.log
# manager工作目录
manager_workdir=/var/log/masterha/app1
# master保存binlog的位置,这里的路径要与master里配置的binlog的路径一致,以便MHA能# 找到
master_binlog_dir=/usr/soft/mysql/mysql8/data
# 监控用户(监控各节点转态)
user=mha
# 监控用户密码
password=root
# 心跳检测的间隔时间
ping_interval=1
# 主从复制用户
repl_user=slave
# 复制用户密码
repl_password=root
# 设置ssh的登录用户名
ssh_user=root
#自动切换调用的脚本
master_ip_failover_script= /etc/masterha/master_ip_failover
#手动切换调用的脚本
master_ip_online_change_script= /etc/masterha/master_ip_online_change
#节点信息
[server1]
hostname=192.168.2.128
port=3306
#设置为候选master,设置该参数以后,发生主从切换以后将会将此从库提升为主库,
# 即使这个从库不是集群中最新的slave
candidate_master=1
#默认情况下如果一个slave落后master 超过100M的relay logs的话,MHA将不会选择该slave
# 作为一个新的master, 因为对于这个slave的恢复需要花费很长时间;通过设置
# check_repl_delay=0,MHA触发切换在选择一个新的master的时候将会忽略复制延时,这
# 个参数对于设置了candidate_master=1的主机非常有用,因为这个候选主在切换的过程中
# 一定是新的master
check_repl_delay=0
[server2]
hostname=192.168.2.129
port=3306
candidate_master=1
check_repl_delay=0
③修改mha脚本文件
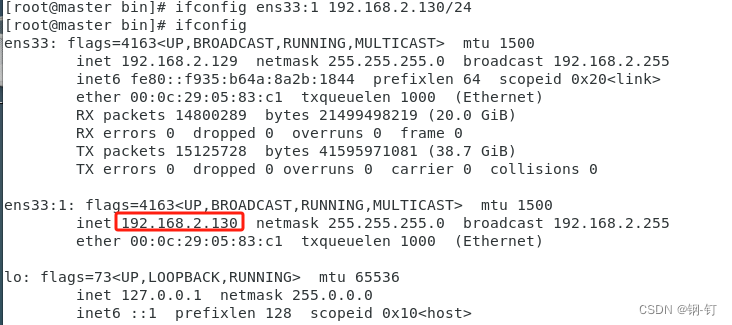
VIP:虚拟ip,就是供应用程序访问的ip,设置一个可用的ip即可
添加虚拟IP
#在主服务器上添加虚拟ip ens33为网卡名 ens33:1如果存在就使用ens33:2
ifconfig ens33:1 192.168.2.130/24
#使用ifconfig可查看添加的
ip ifconfig
#如果需要去除
ifconfig ens33:1 down
修改手动切换脚本文件
vim master_ip_failover
脚本在文档最后,把内容粘贴过来修改即可

修改自动切换脚本文件
vim master_ip_online_change

赋予vip脚本权限
#脚本赋予执行权限
chmod +x master_ip_*
④建立软链接
#把mysql命令和日志文件软链接到usr/bin便于系统识别
ln -s /usr/soft/mysql/mysql8/bin/mysql /usr/bin
ln -s /usr/soft/mysql/mysql8/bin/mysqlbinlog /usr/bin/mysqlbinlog
⑤测试mha
ssh通信
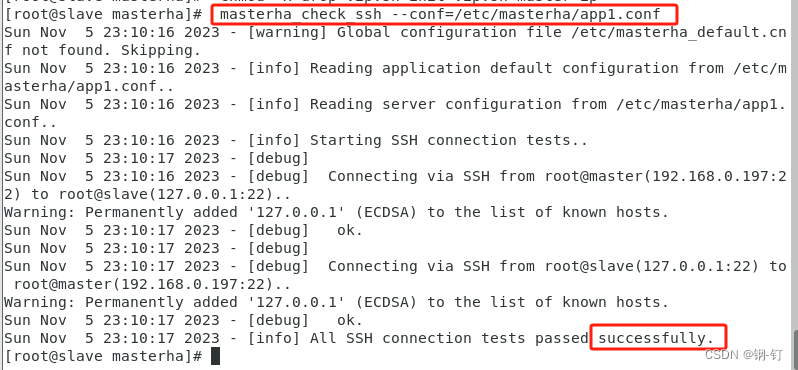
##验证ssh信任登录是否成功
masterha_check_ssh --conf=/etc/masterha/app1.conf
主从复制
##验证mysql主从复制是否成功 masterha_check_repl --conf=/etc/masterha/app1.conf

⑥启动MHA manager,并监控日志文件
#使用nohup启动
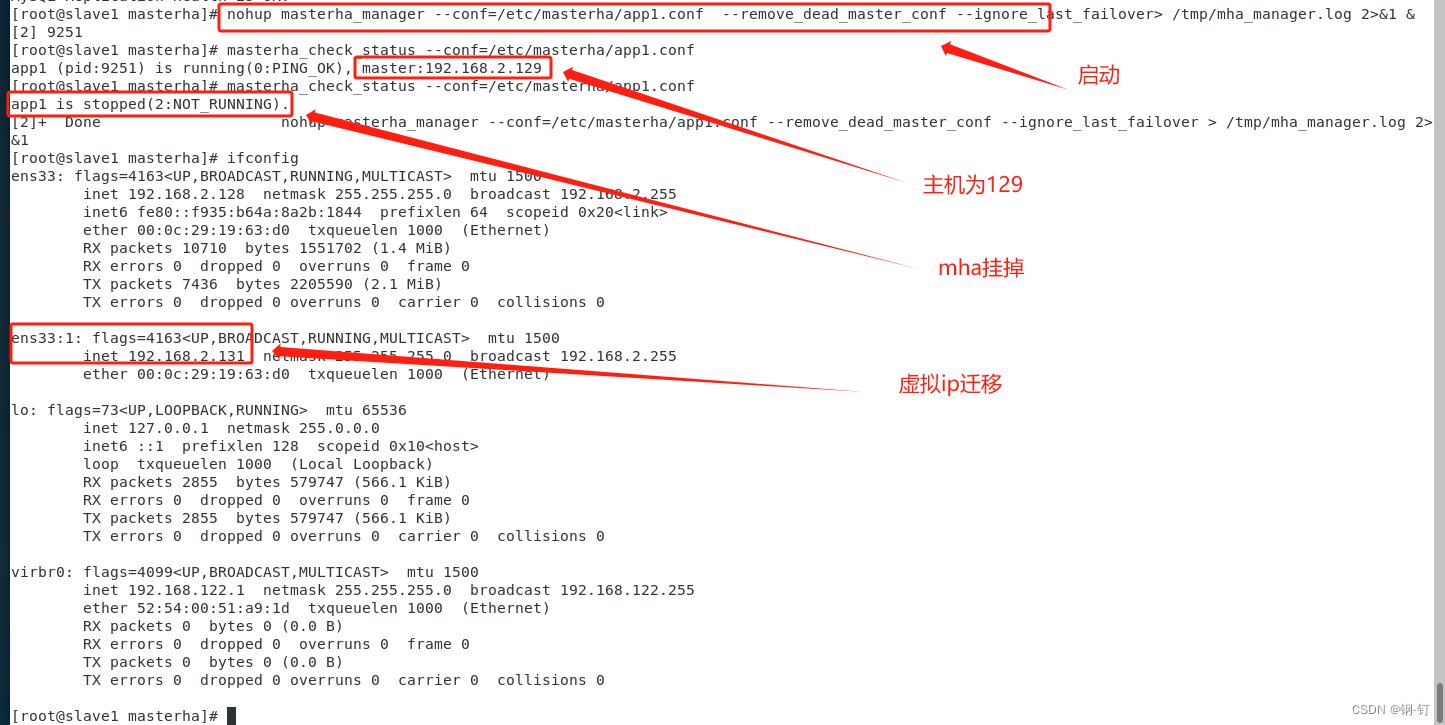
nohup masterha_manager --conf=/etc/masterha/app1.conf --remove_dead_master_conf --ignore_last_failover> /tmp/mha_manager.log 2>&1 &
#检查是否启动成功:
masterha_check_status --conf=/etc/masterha/app1.conf
#查看进程
ps -ef | grep masterha
##关闭mha
masterha_stop --conf=/etc/masterha/app1.conf
5.测试(模拟故障)
一.模拟主从数据库数据延迟,主机挂掉
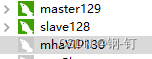
服务器 192.168.2.128 从服务器 192.168.2.129 主服务器 192.168.2.130 虚拟ip(web应用访问)
1.在master库上插入大量数据
我这里使用java代码通过xxl-job调度每秒插入1万条数据,插入大概一分钟后,搭建主从

2.搭建主从关系
#配置主从同步关系
CHANGE MASTER TO MASTER_HOST='192.168.2.129', #主服务器的ip地址 MASTER_USER='slave', #主服务器上配置的用来主从同步的用户名和密码 MASTER_PASSWORD='root',
master_auto_position=1
#启动同步
start slave
#查询同步状态
show slave status

发现主从数据已经产生延迟
master

slave
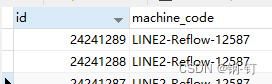
同一张表:主库 和 从库 相差大概一百六十万的数据
3.启动mha
mha配置文件

##验证ssh信任登录是否成功 masterha_check_ssh --conf=/etc/masterha/app1.conf

①服务器间通信无误
##验证mysql主从复制是否成功 masterha_check_repl --conf=/etc/masterha/app1.conf

②mha检测到主从数据延迟
#使用nohup启动
nohup masterha_manager --conf=/etc/masterha/app1.conf --remove_dead_master_conf --ignore_last_failover> /tmp/mha_manager.log 2>&1 &
#检查是否启动成功:
masterha_check_status --conf=/etc/masterha/app1.conf

③启动成功且master为129
④master可查询到mha用户已经连接

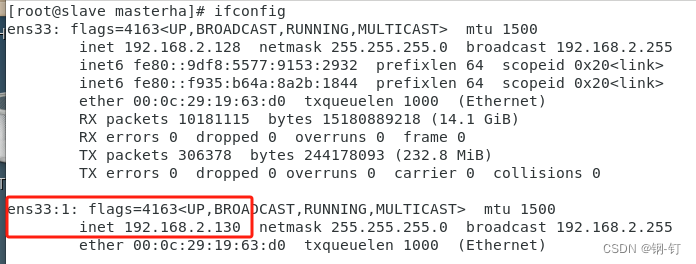
4.检查主库VIP并添加
ifconfig ens33:1 192.168.2.130/24 ifconfig
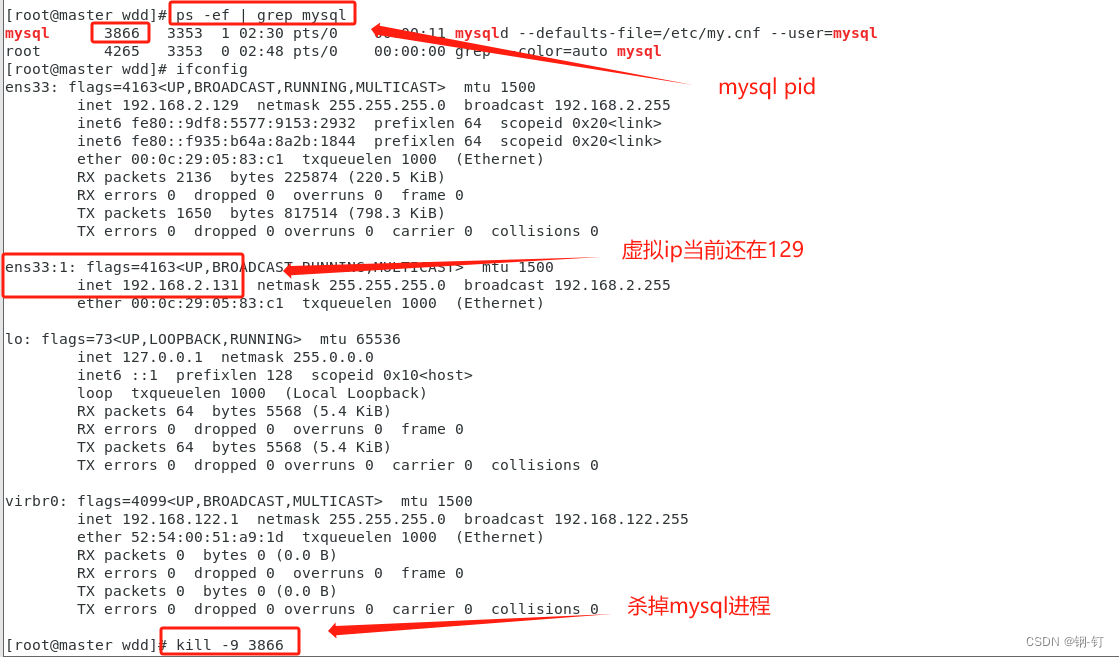
5.杀掉主库mysql
#查看进程 ps -ef | grep mysql kill -9 pid

6.查看master挂掉之后,mha会做的事情
①查看mha的状态

状态显示mha已经检测到主机129挂掉了
②查看slave虚拟ip

因为主从存在数据延迟,因此虚拟ip没有切换
③查看从库数据同步的情况

查看从库同步状态目前还存在数据还没有补完


查询从库数据库发现数据还在新增

过一段时间再次查看slave同步状态,发现同步配置已经被mha重置
④再次查看salve虚拟ip
查看slave的虚拟ip
发现mha已经将虚拟ip130已经添加到128(slave)
查看master的虚拟ip

发现master的虚拟ip已经被mha清除
尝试navicat连接虚拟ip192.168.2.130:3306

连接成功
⑤再次查看mha的状态
![]()
发现master已经停止运行了
⑥查看mha配置文件
发现mha将129的master配置删除了
7.总结
mha在主机挂掉之后的操作总结
1.等待slave复制完master的数据,将slave建立的同步配置删除
2.在第一步执行完毕后,将master的虚拟ip删除,在slave新增虚拟ip供应用访问
3.删除master的mha配置文件
4.将mha停止
8.再次重启master 比对数据

master

slave
数据一致
二.模拟主机修复过程
1.挂掉的机器数据还在
①修复129
![]()
②修复主从复制关系
在129上执行
#129当从库 128为主库 建立主从关系
#配置同步关系
CHANGE MASTER TO
MASTER_HOST='192.168.2.128', #主服务器的ip地址
MASTER_USER='slave', #主服务器上配置的用来主从同步的用户名和密码 MASTER_PASSWORD='root',
master_auto_position=1,
master_port=3306;
在启动前要注意mysql.gtid_executed库下,各个数据库服务执行的事务坐标。
#启动同步
start slave
#检查同步状态
show slave status
#确保io线程和sql线程为yes
③修复mha配置文件

④查看ssh连接及主从状态
##验证ssh信任登录是否成功
masterha_check_ssh --conf=/etc/masterha/app1.conf
##验证mysql主从复制是否成功
masterha_check_repl --conf=/etc/masterha/app1.conf
⑤启动mha
#使用nohup启动
nohup masterha_manager --conf=/etc/masterha/app1.conf --remove_dead_master_conf --ignore_last_failover> /tmp/mha_manager.log 2>&1 &
#检查是否启动成功:
masterha_check_status --conf=/etc/masterha/app1.conf
2.挂掉的机器数据不在了
1.需要使用
//全局读锁定: 执行了命令之后所有库所有表都被锁定只读,一般用在数据库联机备份,这个时候数据库的写操作将被阻塞,读操作顺利进行。
flush table with read lock;
//将当前主库锁住
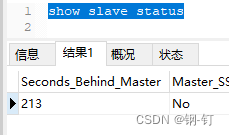
2.等待活着的从库同步完主库的数据
在从库使用
#检查同步状态
show slave status
查看数据复制情况,Seconds_Behind_Master=0说明数据已经同步完成
3.在存活的所有服务器上执行
reset master
如果gtid_mode=on, 执行reset master命令会重置gtid的执行历史,gtid_purged系统变量会置为空,全局的gtid_excuted系统变量会置为空,mysql.gtid_executed表会被清理。
4.重新建立主从关系,并等待修复的机器数据同步完成
5.解锁unlock tables;
一主二从
1.介绍
环境需求
三台linux服务器
相较于两台的优势
三台服务器(一主二从),可以保证一直有一台从服务器备份数据
2.搭建
在俩台的搭建基础上搭建
①host文件
192.168.2.129 master
192.168.2.128 slave1
192.168.2.130 slave2
②ssh通信
ssh-keygen -t rsa #创建密钥 一直回车即可
ssh-copy-id -i /root/.ssh/id_rsa.pub master
ssh-copy-id -i /root/.ssh/id_rsa.pub slave1
ssh-copy-id -i /root/.ssh/id_rsa.pub slave2
③建立主从
一主二从
[server default]
manager_log=/var/log/masterha/app1/app1.log
manager_workdir=/var/log/masterha/app1
master_binlog_dir=/mnt/sda/mysql/data
master_ip_failover_script=/etc/masterha/master_ip_failover
master_ip_online_change_script=/etc/masterha/master_ip_online_change
password=root
ping_interval=1
repl_password=root
repl_user=slave
ssh_user=root
user=mha

[server1]
candidate_master=1
check_repl_delay=0
hostname=192.168.2.129
port=3306

[server2]
candidate_master=1
check_repl_delay=0
hostname=192.168.2.128
port=3306

[server3]
hostname=192.168.2.130
port=3306
①当前主机状态
![]()
②当前从2的主机

③模拟故障杀掉主机并检查虚拟ip状态
④观测现象

问题记录
1.主库不可跳过事务

主库跳过了从1的0-1事务,从2就不可以连接主库
2.主从复制密码确保正确
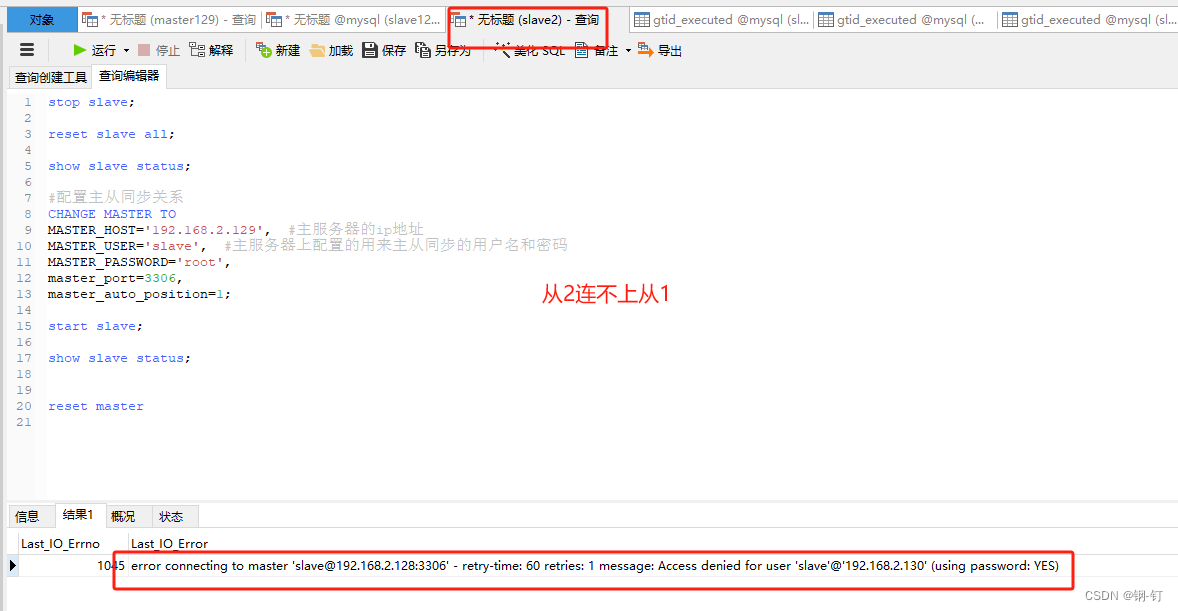
mha配置文件中主从复制的密码错误
3.purge_rerelay_logs
提示:可能故障转移脚本或purge_rerelay_logs脚本正在同一从属服务器上运行?

重启mha所在的机器即可
4.主从延迟太大

5.从库挂了

6.磁盘满了
 常用命令
常用命令
##验证ssh信任登录是否成功
masterha_check_ssh --conf=/etc/masterha/app1.conf

##验证mysql主从复制是否成功
masterha_check_repl --conf=/etc/masterha/app1.conf

#使用nohup启动
nohup masterha_manager --conf=/etc/masterha/app1.conf  --remove_dead_master_conf --ignore_last_failover> /tmp/mha_manager.log 2>&1 &

#检查是否启动成功:
masterha_check_status --conf=/etc/masterha/app1.conf

#查看进程
ps -ef | grep masterha

##关闭mha
masterha_stop --conf=/etc/masterha/app1.conf

##mha日志
vim /var/log/masterha/app1/app1.log

##启动mysql
mysqld --defaults-file=/etc/my.cnf --user=mysql &

##查看mysql进程
ps -ef | grep mysql

##停止3307数据库
mysqladmin -uroot  --port=3306 -p shutdown

##新增虚拟ip
ifconfig ens33:1 192.168.2.133/24

##去除网卡ens33:1的ip
ifconfig ens33:1 down

##查看网卡
ifconfig

#配置主从同步关系
CHANGE MASTER TO
MASTER_HOST='192.168.2.129',  #主服务器的ip地址
MASTER_USER='slave',  #主服务器上配置的用来主从同步的用户名和密码
MASTER_PASSWORD='root',
master_port=3306,
#让从库从主库GTID事务号1后开始截取
master_auto_position=1

#查询同步状态
show slave status;

#启动同步
start slave;

#停止同步


stop slave;

##会清空mysql.slave_relay_log_info,mysql.slave_worker_info这两张表,和清理中继日志
reset slave;

##除了完成RESET SLAVE的动作,还清空了mysql.slave_master_info表,和删除了所有的复制通道(replication channel),然后又创建了默认通道。
reset slave all;

##查看gtid的已执行和跳过事务的情况gtid_executed为已执行,gtid_purged为跳过执行
show global variables like '%gtid%';

##手动设置跳过某些事务
SET @@GLOBAL.GTID_PURGED = '3fb51462-81cb-11ee-9e9d-000c290583c1:1-10'

##如果gtid_mode=on, 执行reset master命令会重置gtid的执行历史,gtid_purged系统变量会置为空,全局的gtid_excuted系统变量会置为空,mysql.gtid_executed表会被清理。
reset master;

MHA Manager:
masterha_check_ssh:检查MHA的SSH配置状况
masterha_check_repl:检查MySQL的复制状况
masterha_manager:启动MHA
masterha_check_status:检测当前MHA运行状态
masterha_master_monitor:检测master是否宕机
masterha_master_switch:控制故障转移(自动或手动)
masterha_conf_host:添加或删除配置的server信息
masterha_stop:关闭MHA


#####(重新设置 执行该命令)删除 .ssh目录,在/root/.ssh或者/home/.ssh/下
rm -rf /root/.ssh/
脚本
master_ip_failover
#!/usr/bin/env perl
use strict;
use warnings FATAL => 'all';

use Getopt::Long;

my (
    $command,          $ssh_user,        $orig_master_host, $orig_master_ip,
    $orig_master_port, $new_master_host, $new_master_ip,    $new_master_port
);

my $vip = '192.168.1.100/24';
my $key = '1';
my $ssh_start_vip = "/sbin/ifconfig eth0:$key $vip";
my $ssh_stop_vip = "/sbin/ifconfig eth0:$key down";


GetOptions(
    'command=s'          => \$command,
    'ssh_user=s'         => \$ssh_user,
    'orig_master_host=s' => \$orig_master_host,
    'orig_master_ip=s'   => \$orig_master_ip,
    'orig_master_port=i' => \$orig_master_port,
    'new_master_host=s'  => \$new_master_host,
    'new_master_ip=s'    => \$new_master_ip,
    'new_master_port=i'  => \$new_master_port,
);

exit &main();

sub main {

    print "\n\nIN SCRIPT TEST====$ssh_stop_vip==$ssh_start_vip===\n\n";

    if ( $command eq "stop" || $command eq "stopssh" ) {

        my $exit_code = 1;
        eval {
            print "Disabling the VIP on old master: $orig_master_host \n";
            &stop_vip();
            $exit_code = 0;
        };
        if ($@) {
            warn "Got Error: $@\n";
            exit $exit_code;
        }
        exit $exit_code;
    }
    elsif ( $command eq "start" ) {

        my $exit_code = 10;
        eval {
            print "Enabling the VIP - $vip on the new master - $new_master_host \n";
            &start_vip();
            $exit_code = 0;
        };
        if ($@) {
            warn $@;
            exit $exit_code;
        }
        exit $exit_code;
    }
    elsif ( $command eq "status" ) {
        print "Checking the Status of the script.. OK \n";
        exit 0;
    }
    else {
        &usage();
        exit 1;
    }
}
sub start_vip() {
    `ssh $ssh_user\@$new_master_host \" $ssh_start_vip \"`;
}
# A simple system call that disable the VIP on the old_master
sub stop_vip() {
    `ssh $ssh_user\@$orig_master_host \" $ssh_stop_vip \"`;
}

sub usage {
    print
    "Usage: master_ip_failover --command=start|stop|stopssh|status --orig_master_host=host --orig_master_ip=ip --orig_master_port=port --new_master_host=host --new_master_ip=ip --new_master_port=port\n";
}
master_ip_online_change
#!/usr/bin/env perl

#  Copyright (C) 2011 DeNA Co.,Ltd.
#
#  This program is free software; you can redistribute it and/or modify
#  it under the terms of the GNU General Public License as published by
#  the Free Software Foundation; either version 2 of the License, or
#  (at your option) any later version.
#
#  This program is distributed in the hope that it will be useful,
#  but WITHOUT ANY WARRANTY; without even the implied warranty of
#  MERCHANTABILITY or FITNESS FOR A PARTICULAR PURPOSE.  See the
#  GNU General Public License for more details.
#
#  You should have received a copy of the GNU General Public License
#   along with this program; if not, write to the Free Software
#  Foundation, Inc.,
#  51 Franklin Street, Fifth Floor, Boston, MA  02110-1301  USA

## Note: This is a sample script and is not complete. Modify the script based on your environment.

use strict;
use warnings FATAL => 'all';

use Getopt::Long;
use MHA::DBHelper;
use MHA::NodeUtil;
use Time::HiRes qw( sleep gettimeofday tv_interval );
use Data::Dumper;

my $_tstart;
my $_running_interval = 0.1;
my (
  $command,          $orig_master_host, $orig_master_ip,
  $orig_master_port, $orig_master_user,
  $new_master_host,  $new_master_ip,    $new_master_port,
  $new_master_user,
);


my $vip = '192.168.1.100/24';  # Virtual IP
my $key = "1";
my $ssh_start_vip = "/sbin/ifconfig eth0:$key $vip";
my $ssh_stop_vip = "/sbin/ifconfig eth0:$key down";
my $ssh_user = "root";
my $new_master_password='Mobiyun!2345678';
my $orig_master_password='Mobiyun!2345678';
GetOptions(
  'command=s'              => \$command,
  #'ssh_user=s'             => \$ssh_user,
  'orig_master_host=s'     => \$orig_master_host,
  'orig_master_ip=s'       => \$orig_master_ip,
  'orig_master_port=i'     => \$orig_master_port,
  'orig_master_user=s'     => \$orig_master_user,
  #'orig_master_password=s' => \$orig_master_password,
  'new_master_host=s'      => \$new_master_host,
  'new_master_ip=s'        => \$new_master_ip,
  'new_master_port=i'      => \$new_master_port,
  'new_master_user=s'      => \$new_master_user,
  #'new_master_password=s'  => \$new_master_password,
);

exit &main();

sub current_time_us {
  my ( $sec, $microsec ) = gettimeofday();
  my $curdate = localtime($sec);
  return $curdate . " " . sprintf( "%06d", $microsec );
}

sub sleep_until {
  my $elapsed = tv_interval($_tstart);
  if ( $_running_interval > $elapsed ) {
    sleep( $_running_interval - $elapsed );
  }
}

sub get_threads_util {
  my $dbh                    = shift;
  my $my_connection_id       = shift;
  my $running_time_threshold = shift;
  my $type                   = shift;
  $running_time_threshold = 0 unless ($running_time_threshold);
  $type                   = 0 unless ($type);
  my @threads;

  my $sth = $dbh->prepare("SHOW PROCESSLIST");
  $sth->execute();

  while ( my $ref = $sth->fetchrow_hashref() ) {
    my $id         = $ref->{Id};
    my $user       = $ref->{User};
    my $host       = $ref->{Host};
    my $command    = $ref->{Command};
    my $state      = $ref->{State};
    my $query_time = $ref->{Time};
    my $info       = $ref->{Info};
    $info =~ s/^\s*(.*?)\s*$/$1/ if defined($info);
    next if ( $my_connection_id == $id );
    next if ( defined($query_time) && $query_time < $running_time_threshold );
    next if ( defined($command)    && $command eq "Binlog Dump" );
    next if ( defined($user)       && $user eq "system user" );
    next
      if ( defined($command)
      && $command eq "Sleep"
      && defined($query_time)
      && $query_time >= 1 );

    if ( $type >= 1 ) {
      next if ( defined($command) && $command eq "Sleep" );
      next if ( defined($command) && $command eq "Connect" );
    }

    if ( $type >= 2 ) {
      next if ( defined($info) && $info =~ m/^select/i );
      next if ( defined($info) && $info =~ m/^show/i );
    }

    push @threads, $ref;
  }
  return @threads;
}

sub main {
  if ( $command eq "stop" ) {
    ## Gracefully killing connections on the current master
    # 1. Set read_only= 1 on the new master
    # 2. DROP USER so that no app user can establish new connections
    # 3. Set read_only= 1 on the current master
    # 4. Kill current queries
    # * Any database access failure will result in script die.
    my $exit_code = 1;
    eval {
      ## Setting read_only=1 on the new master (to avoid accident)
      my $new_master_handler = new MHA::DBHelper();

      # args: hostname, port, user, password, raise_error(die_on_error)_or_not
      $new_master_handler->connect( $new_master_ip, $new_master_port,
        $new_master_user, $new_master_password, 1 );
      print current_time_us() . " Set read_only on the new master.. ";
      $new_master_handler->enable_read_only();
      if ( $new_master_handler->is_read_only() ) {
        print "ok.\n";
      }
      else {
        die "Failed!\n";
      }
      $new_master_handler->disconnect();

      # Connecting to the orig master, die if any database error happens
      my $orig_master_handler = new MHA::DBHelper();
      $orig_master_handler->connect( $orig_master_ip, $orig_master_port,
        $orig_master_user, $orig_master_password, 1 );

      ## Drop application user so that nobody can connect. Disabling per-session binlog beforehand
      #$orig_master_handler->disable_log_bin_local();
      #print current_time_us() . " Drpping app user on the orig master..\n";
      #FIXME_xxx_drop_app_user($orig_master_handler);

      ## Waiting for N * 100 milliseconds so that current connections can exit
      my $time_until_read_only = 15;
      $_tstart = [gettimeofday];
      my @threads = get_threads_util( $orig_master_handler->{dbh},
        $orig_master_handler->{connection_id} );
      while ( $time_until_read_only > 0 && $#threads >= 0 ) {
        if ( $time_until_read_only % 5 == 0 ) {
          printf
"%s Waiting all running %d threads are disconnected.. (max %d milliseconds)\n",
            current_time_us(), $#threads + 1, $time_until_read_only * 100;
          if ( $#threads < 5 ) {
            print Data::Dumper->new( [$_] )->Indent(0)->Terse(1)->Dump . "\n"
              foreach (@threads);
          }
        }
        sleep_until();
        $_tstart = [gettimeofday];
        $time_until_read_only--;
        @threads = get_threads_util( $orig_master_handler->{dbh},
          $orig_master_handler->{connection_id} );
      }

      ## Setting read_only=1 on the current master so that nobody(except SUPER) can write
      print current_time_us() . " Set read_only=1 on the orig master.. ";
      $orig_master_handler->enable_read_only();
      if ( $orig_master_handler->is_read_only() ) {
        print "ok.\n";
      }
      else {
        die "Failed!\n";
      }

      ## Waiting for M * 100 milliseconds so that current update queries can complete
      my $time_until_kill_threads = 5;
      @threads = get_threads_util( $orig_master_handler->{dbh},
        $orig_master_handler->{connection_id} );
      while ( $time_until_kill_threads > 0 && $#threads >= 0 ) {
        if ( $time_until_kill_threads % 5 == 0 ) {
          printf
"%s Waiting all running %d queries are disconnected.. (max %d milliseconds)\n",
            current_time_us(), $#threads + 1, $time_until_kill_threads * 100;
          if ( $#threads < 5 ) {
            print Data::Dumper->new( [$_] )->Indent(0)->Terse(1)->Dump . "\n"
              foreach (@threads);
          }
        }
        sleep_until();
        $_tstart = [gettimeofday];
        $time_until_kill_threads--;
        @threads = get_threads_util( $orig_master_handler->{dbh},
          $orig_master_handler->{connection_id} );
      }


                print "Disabling the VIP on old master: $orig_master_host \n";
                &stop_vip();


      ## Terminating all threads
      print current_time_us() . " Killing all application threads..\n";
      $orig_master_handler->kill_threads(@threads) if ( $#threads >= 0 );
      print current_time_us() . " done.\n";
      #$orig_master_handler->enable_log_bin_local();
      $orig_master_handler->disconnect();

      ## After finishing the script, MHA executes FLUSH TABLES WITH READ LOCK
      $exit_code = 0;
    };
    if ($@) {
      warn "Got Error: $@\n";
      exit $exit_code;
    }
    exit $exit_code;
  }
  elsif ( $command eq "start" ) {
    ## Activating master ip on the new master
    # 1. Create app user with write privileges
    # 2. Moving backup script if needed
    # 3. Register new master's ip to the catalog database

# We don't return error even though activating updatable accounts/ip failed so that we don't interrupt slaves' recovery.
# If exit code is 0 or 10, MHA does not abort
    my $exit_code = 10;
    eval {
      my $new_master_handler = new MHA::DBHelper();

      # args: hostname, port, user, password, raise_error_or_not
      $new_master_handler->connect( $new_master_ip, $new_master_port,
        $new_master_user, $new_master_password, 1 );

      ## Set read_only=0 on the new master
      #$new_master_handler->disable_log_bin_local();
      print current_time_us() . " Set read_only=0 on the new master.\n";
      $new_master_handler->disable_read_only();

      ## Creating an app user on the new master
      #print current_time_us() . " Creating app user on the new master..\n";
      #FIXME_xxx_create_app_user($new_master_handler);
      #$new_master_handler->enable_log_bin_local();
      $new_master_handler->disconnect();

      ## Update master ip on the catalog database, etc
                print "Enabling the VIP - $vip on the new master - $new_master_host \n";
                &start_vip();
                $exit_code = 0;
    };
    if ($@) {
      warn "Got Error: $@\n";
      exit $exit_code;
    }
    exit $exit_code;
  }
  elsif ( $command eq "status" ) {

    # do nothing
    exit 0;
  }
  else {
    &usage();
    exit 1;
  }
}

# A simple system call that enable the VIP on the new master
sub start_vip() {
    `ssh $ssh_user\@$new_master_host \" $ssh_start_vip \"`;
}
# A simple system call that disable the VIP on the old_master
sub stop_vip() {
    `ssh $ssh_user\@$orig_master_host \" $ssh_stop_vip \"`;
}

sub usage {
  print
"Usage: master_ip_online_change --command=start|stop|status --orig_master_host=host --orig_master_ip=ip --orig_master_port=port --new_master_host=host --new_master_ip=ip --new_master_port=port\n";
  die;
}


 913
913


 被折叠的 条评论
为什么被折叠?
被折叠的 条评论
为什么被折叠?
 到【灌水乐园】发言


