


前言
组件之间的通信一直是Vue学习中的一个重点, 所以我们更应该要熟练地掌握 ~
一、父组件–>子组件的通信
父组件提供数据, 向子组件中传递。
子组件通过props去接受父组件传递过来的参数。props项可以声明成数组或者对象形式,后者可以对props指进行校验。
App.vue
<template>
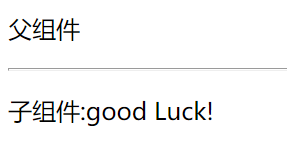
<p>父组件</p>
<hr />
<child :msg="msg"/>
</template>
<script>
import Child from "./Child.vue";
export default {
  data() {
    return {
      msg:'good Luck!'
    };
  },
  components: {
    Child,
  },
};
</script>
Child.vue
<template>
  <p>
    子组件:{{msg}}
  </p>
</template>
<script>
export default {
  name: "Child",
  props:{
      msg:{
        //  props的校验
          Type:String,
          required:true,
          default:''
      }
  }
}
</script>
二、子组件–>父组件的通信
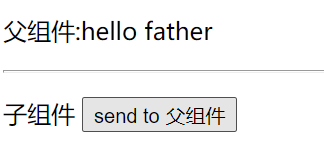
子组件中提供数据,通过$emit方法向父组件发送 自定义事件,来传递子组件中的数据。
父组件通过监听该自定义事件来接受传递过来的数据。
child.vue
<template>
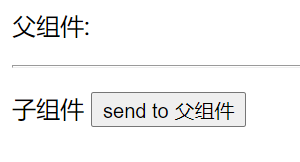
<p>
子组件
<button @click="sendMsg">send to 父组件</button>
</p>
</template>
<script>
export default {
  name: "Child",
  data() {
    return {
      msg: "hello father",
    };
  },
  //   创建自定义事件
  emits: ['sendData'],
  methods: {
    sendMsg() {
        this.$emit('sendData',this.msg)
    },
  },
};
</script>
App.vue
<template>
  <p>父组件:{{ data }}</p>
  <hr />
  <child @sendData="getData" />
</template>
<script>
import Child from "./Child.vue";
export default {
  data() {
    return {
      data: "",
    };
  },
  methods: {
    getData(val) {
      this.data = val;
    },
  },
  components: {
    Child,
  },
};
</script>
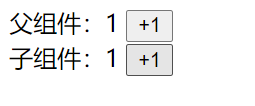
三、父子组件的数据双向同步
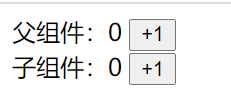
父组件在动态绑定属性值的前面加v-model来向子组件传值,同时实现父子组件数据的双向绑定。
子组件在emits中声明一个自定义事件,格式规定以update: 开头。通过$emit向父组件发送更新过后的值。
Child.vue
<template>
  <div>
    子组件:{{ count }}
    <button @click="increment">+1</button>
  </div>
</template>
<script>
export default {
  props: ["count"],
  emits: ["update:count"],
  methods: {
    increment() {
      this.$emit("update:count", this.count + 1);
    },
  },
};
</script>
App.vue
<template>
  <div>
    父组件:{{ number }}
    <button @click="number++">+1</button>
  </div>
  <child v-model:count="number" />
</template>
<script>
import Child from "./Child.vue";
export default {
  data() {
    return {
      number: 0,
    };
  },
  components: {
    Child,
  },
};
</script>
无论是更改子组件或父组件中的值,父子组件之间的值都会得到同步的改变。
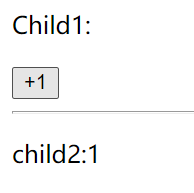
四、兄弟组件的通信
导入第三方包,来创建EventBus的实例,用该实例的emit()发送自定义事件,传递数据。通过该实例的 on()监听自定义事件,从而接受到数据。
安装mitt第三方包
cnpm i install mitt@2.1.0 -S
eventBus.js
// 导入mitt包
import mitt from 'mitt'
// 创建实例EventBus实例
const bus = mitt()
 // 将创建出来的EventBus实例共享出去
export default bus
Child1.vue
<template>
 <p> Child1:</p>
 <button @click="sendMsg">+1</button>
</template>
<script>
import bus from './eventBus'
export default {
    name:'Child1',
    data() {
        return {
            count:0,
        }
    },
   methods: {
       sendMsg(){
           bus.emit('msgData',this.count++)
       }
   },

}
</script>
Child2.vue
<template>
  <p>child2:{{data}}</p>
</template>
<script>
import bus from './eventBus'
export default {
    name:'Child2',
    data() {
        return {
            data:''
        }
    },
    created(){
        bus.on('msgData' ,(val) =>this.data=val)
    }
}
</script>
App.vue
<template>
  <child-1 />
  <hr/>
  <child-2 />
</template>
<script>
import Child1 from "./Child1.vue";
import Child2 from "./Child2.vue";

export default {
  name: "App",
  components: {
    Child1,
    Child2,
  },
};
</script>
点击Child1里的+1按钮,可以改变Child2的值
也可以直接用一个空的Vue实例作为中央事件总线,用它来触发事件和监听事件,巧妙而轻量地实现了任何组件间的通信,包括父子、兄弟、跨级。
   let Event=new Vue();
    Event.$emit(事件名,数据);//发送数据
    Event.$on(事件名,data => {});//监听事件并接收
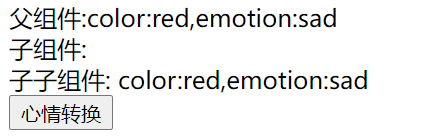
五、跨级组件通信
提供数据的组件内使用provide方法的返回一个对象,这个对象就是要共享的数据。如果要共享的数据是响应式的,需要从vue中导出computed方法,来包裹该数据,从而实现改变父组件中该数据的值,使用该数据的组件处也得到同步的改变。
用inject来接收传递过来的数据,接收响应式数据需要用.value,否则页面上会显示出双引号。
App.vue
<template>
  <div>
    父组件:color:{{ color }},emotion:{{ emotion }}
    <child :color="color" :emothon="emotion" />
    <button @click="changeEmotion">心情转换</button>
  </div>
</template>
<script>
import Child from "./Child.vue";
// 从vue中按需导入computed函数
import { computed } from "vue";
export default {
  data() {
    return {
      // 定义父组件向子孙组件共享的数据
      color: "red",
      emotion: "happy",
    };
  },

  provide() {
    //   返回要共享的数据
    return {
      color: this.color,
      //   使用computed函数将要共享的数据变成响应式的
      emotion: computed(() => this.emotion)
    };
  },
  methods: {
    changeEmotion() {
      this.emotion = "sad";
    },
  },
  components: {
    Child,
  },
};
</script>
Child.vue
<template>
  <div>
    子组件:
    <sub-child />
  </div>
</template>

```javascript
<script>
import SubChild from "./SubChild.vue";
export default {
  name: "Child",
  components: {
    SubChild,
  },
};
</script>```
SubChild.vue
<template>
  <div>子子组件: color:{{ color }},emotion:{{ emotion.value }}</div>
</template>
<script>
export default {
  name: "SubChild",
  // 子孙组件通过inject接收传过来的数据
  inject: ["color", "emotion"],
};
</script>

总结
- 使用的是vue3+vite , 所以是允许模板中有多个根节点的。
- 访问父 / 子实例还可以通过
$parent / $children - 组件之间的通信还可以使用
vuex状态管理工具, 当我们的项目比较大时,可以选择vuex。(vuex 后续整理~~)


 118
118


 被折叠的 条评论
为什么被折叠?
被折叠的 条评论
为什么被折叠?
 到【灌水乐园】发言


