


写在前面
我们将从以下四个方面进行介绍:
-
- 用于物体检测的背景减法算法主要思想。
-
- OpenCV图像过滤器。
-
- 利用轮廓检测物体。
-
- 建立进一步数据处理的结构。
1.背景扣除算法:
背景扣除算法有很多种,但是它们的原理几乎是相同的。假设有一段天空的视频,当没有鸟飞过的时候,则称此时视频的帧为背景,如果要获取视频中的小鸟时,我们只需要:用当前帧减去背景就可以了。

代码入下:
import os
import logging
import logging.handlers
import random
import numpy as np
import skvideo.io
import cv2
import matplotlib.pyplot as plt
import utils

# without this some strange errors happen
cv2.ocl.setUseOpenCL(False)
random.seed(123)

#=====================================================================
IMAGE_DIR = "./out"
VIDEO_SOURCE = "input.mp4"
SHAPE = (720, 1280) # HxW
#======================================================================

def train_bg_subtractor(inst, cap, num=500):
	'''
		BG substractor need process some amount of frames to start giving result
	'''
	print ('Training BG Subtractor...')
	i = 0
	for frame in cap:
		inst.apply(frame, None, 0.001)
		i += 1
		if i >= num:
			return cap


def main():
	log = logging.getLogger("main")
	# creting MOG bg subtractor with 500 frames in cache
	# and shadow detction
	bg_subtractor = cv2.createBackgroundSubtractorMOG2( history=500, detectShadows=True)
	# Set up image source
	# You can use also CV2, for some reason it not working for me
	cap = skvideo.io.vreader(VIDEO_SOURCE)
	# skipping 500 frames to train bg subtractor
	train_bg_subtractor(bg_subtractor, cap, num=500)
	frame_number = -1
	for frame in cap:
		if not frame.any():
			log.error("Frame capture failed, stopping...")
			break
		frame_number += 1
		utils.save_frame(frame, "./out/frame_%04d.png" % frame_number)
		fg_mask = bg_subtractor.apply(frame, None, 0.001)
		utils.save_frame(frame, "./out/fg_mask_%04d.png" % frame_number)
#======================================================================


if __name__ == "__main__":
	log = utils.init_logging()
	if not os.path.exists(IMAGE_DIR):
		log.debug("Creating image directory `%s`...", IMAGE_DIR)
		os.makedirs(IMAGE_DIR)
	main()
处理后得到如下的前景图像:
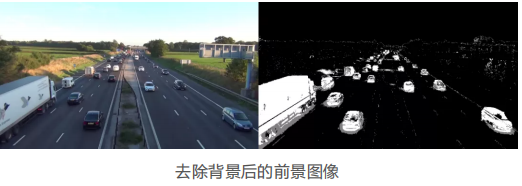
我们可以看出前景图像上有一些噪音,可以通过标准滤波技术可以将其消除。
2.滤波处理
针对我们现在的情况,我们将需要以下滤波函数:
Threshold、Erode、Dilate、Opening、 Closing。
首先,我们使用“Closing”来移除区域中的间隙,然后使用“Opening”来移除个别独立的像素点,然 后使用“Dilate”进行扩张以使对象变粗。代码如下:
def filter_mask(img):
	kernel = cv2.getStructuringElement(cv2.MORPH_ELLIPSE, (2, 2))
	# Fill any small holes
	closing = cv2.morphologyEx(img, cv2.MORPH_CLOSE, kernel)
	# Remove noise
	opening = cv2.morphologyEx(closing, cv2.MORPH_OPEN, kernel)
	# Dilate to merge adjacent blobs
	dilation = cv2.dilate(opening, kernel, iterations=2)
	# threshold
	th = dilation[dilation < 240] = 0
	return th
处理后的前景图像如下:

3.利用轮廓进行图像的检测。
我们将使用cv2.findContours()函数对轮廓进行检测。我们在使用的时候可以选择的参数为:
cv2.CV_RETR_EXTERNAL------仅获取外部轮廓。
cv2.CV_CHAIN_APPROX_TC89_L1------使用Teh-Chin链逼近算法(更快)
代码如下:
def get_centroid(x, y, w, h):
	x1 = int(w / 2)
	y1 = int(h / 2)
	cx = x + x1
	cy = y + y1
	return (cx, cy)


def detect_vehicles(fg_mask, min_contour_width=35, min_contour_height=35):
	matches = []
	# finding external contours
	im, contours, hierarchy = cv2.findContours( fg_mask, cv2.RETR_EXTERNAL, cv2.CHAIN_APPROX_TC89_L1)
	# filtering by with, height
	for (i, contour) in enumerate(contours):
		(x, y, w, h) = cv2.boundingRect(contour)
		contour_valid = (w >= min_contour_width) and (h >= min_contour_height)
		if not contour_valid:
			continue
		# getting center of the bounding box
		centroid = get_centroid(x, y, w, h)
		matches.append(((x, y, w, h), centroid))
	return matches
4.建立项目的整体框架
class PipelineRunner(object):
	'''
		Very simple pipline.
		Just run passed processors in order with passing context from one to another.
		You can also set log level for processors.
	'''
	def __init__(self, pipeline=None, log_level=logging.DEBUG):
		self.pipeline = pipeline or []
		self.context = {}
		self.log = logging.getLogger(self.__class__.__name__)
		self.log.setLevel(log_level)
		self.log_level = log_level
		self.set_log_level()


	def set_context(self, data):
		self.context = data

	def add(self, processor):
		if not isinstance(processor, PipelineProcessor):
			raise Exception( 'Processor should be an isinstance of PipelineProcessor.')
		processor.log.setLevel(self.log_level)
		self.pipeline.append(processor)

	def remove(self, name):
		for i, p in enumerate(self.pipeline):
			if p.__class__.__name__ == name:
				del self.pipeline[i]
				return True
		return False

	def set_log_level(self):
		for p in self.pipeline:
			p.log.setLevel(self.log_level)

	def run(self):
		for p in self.pipeline:
			self.context = p(self.context)
		self.log.debug("Frame #%d processed.", self.context['frame_number'])
		return self.context


class PipelineProcessor(object):
	'''
	Base class for processors.
	'''
	def __init__(self):
		self.log = logging.getLogger(self.__class__.__name__)


class ContourDetection(PipelineProcessor):
	'''
	Detecting moving objects.
	Purpose of this processor is to subtrac background, get moving objects
	and detect them with a cv2.findContours method, and then filter off-by
	width and height.
	bg_subtractor - background subtractor isinstance.
	min_contour_width - min bounding rectangle width.
	min_contour_height - min bounding rectangle height.
	save_image - if True will save detected objects mask to file.
	image_dir - where to save images(must exist).
	'''
	def __init__(self, bg_subtractor, min_contour_width=35, min_contour_height=35)
		super(ContourDetection, self).__init__()
		self.bg_subtractor = bg_subtractor
		self.min_contour_width = min_contour_width
		self.min_contour_height = min_contour_height
		self.save_image = save_image
		self.image_dir = image_dir

	def filter_mask(self, img, a=None):
		'''
		This filters are hand-picked just based on visual tests
		'''
		kernel = cv2.getStructuringElement(cv2.MORPH_ELLIPSE, (2, 2))
		# Fill any small holes
		closing = cv2.morphologyEx(img, cv2.MORPH_CLOSE, kernel)
		# Remove noise
		opening = cv2.morphologyEx(closing, cv2.MORPH_OPEN, kernel)
		# Dilate to merge adjacent blobs
		dilation = cv2.dilate(opening, kernel, iterations=2)
		return dilation

	def detect_vehicles(self, fg_mask, context):
		matches = []
		# finding external contours
		im2, contours, hierarchy = cv2.findContours( fg_mask, cv2.RETR_EXTERNAL, cv2.CHAIN_APPROX_TC89_L1)
		for (i, contour) in enumerate(contours):
			(x, y, w, h) = cv2.boundingRect(contour)
			contour_valid = (w >= self.min_contour_width) and ( h >= self.min_contour_height)
			if not contour_valid:
				continue
			centroid = utils.get_centroid(x, y, w, h)
			matches.append(((x, y, w, h), centroid))
		return matches

	def __call__(self, context):
		frame = context['frame'].copy()
		frame_number = context['frame_number']
		fg_mask = self.bg_subtractor.apply(frame, None, 0.001)
		# just thresholding values
		fg_mask[fg_mask < 240] = 0
		fg_mask = self.filter_mask(fg_mask, frame_number)
		if self.save_image:
			utils.save_frame(fg_mask, self.image_dir + "/mask_%04d.png" % frame_number, flip=False)
		context['objects'] = self.detect_vehicles(fg_mask, context)
		context['fg_mask'] = fg_mask
		return contex


class CLQ:
	'''
	Counting vehicles that entered in exit zone.
	Purpose of this class based on detected object and local cache create objects pathes and count that entered in exit zone defined by exit masks.
	exit_masks - list of the exit masks.
	path_size - max number of points in a path.
	max_dst - max distance between two points.
	'''


 3308
3308


 被折叠的 条评论
为什么被折叠?
被折叠的 条评论
为什么被折叠?
 到【灌水乐园】发言


