


Podman 是一个开源的容器运行时项目,可在大多数 Linux 平台上使用。Podman 提供与 Docker 非常相似的功能。正如前面提到的那样,它不需要在你的系统上运行任何守护进程,并且它也可以在没有 root 权限的情况下运行。
Podman 可以管理和运行任何符合 OCI(Open Container Initiative)规范的容器和容器镜像。Podman 提供了一个与 Docker 兼容的命令行前端来管理 Docker 镜像。
Podman 官网地址:https://podman.io/
dockers在实现CRI的时候,它需要一个守护进程,其次需要以root运行,因此这也带来了安全隐患。
podman不需要守护程序,也不需要root用户运行,从逻辑架构上,比docker更加合理。
在docker的运行体系中,需要多个daemon才能调用到OCI的实现RunC。
在容器管理的链路中,Docker Engine的实现就是dockerd
daemon,它在linux中需要以root运行,dockerd调用containerd,containerd调用containerd-shim,然后才能调用runC。顾名思义shim起的作用也就是“垫片”,避免父进程退出影响容器的运训
podman直接调用OCI,runtime(runC),通过common作为容器进程的管理工具,但不需要dockerd这种以root身份运行的守护进程。
在podman体系中,有个称之为common的守护进程,其运行路径通常是/usr/libexec/podman/conmon,它是各个容器进程的父进程,每个容器各有一个,common的父则通常是1号进程。podman中的common其实相当于docker体系中的containerd-shim。
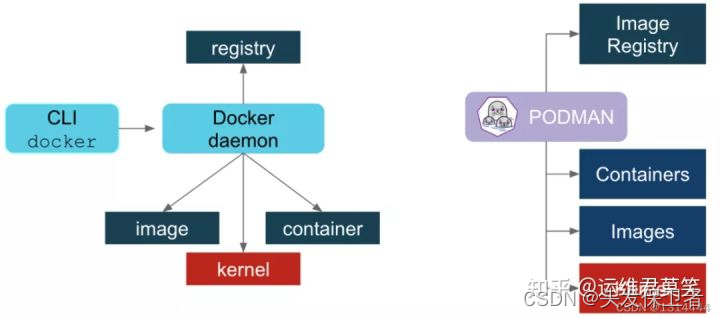
图中所体现的事情是,podman不需要守护进程,而dorker需要守护进程。在这个图的示意中,dorcker的containerd-shim与podman的common被归在Container一层。
podman的定位也是与docker兼容,因此在使用上面尽量靠近docker。在使用方面,可以分成两个方面来说,一是系统构建者的角度,二是使用者的角度。
在系统构建者方面,用podman的默认软件,与docker的区别不大,只是在进程模型、进程关系方面有所区别。如果习惯了docker几个关联进程的调试方法,在podman中则需要适应。可以通过pstree命令查看进程的树状结构。总体来看,podman比docker要简单。由于podman比docker少了一层daemon,因此重启的机制也就不同了。
在使用者方面,podman与docker的命令基本兼容,都包括容器运行时(run/start/kill/ps/inspect),本地镜像(images/rmi/build)、镜像仓库(login/pull/push)等几个方面。因此podman的命令行工具与docker类似,比如构建镜像、启停容器等。甚至可以通过alias
docker=podman可以进行替换。因此,即便使用了podman,仍然可以使用http://docker.io作为镜像仓库,这也是兼容性最关键的部分。
podman run           创建并启动容器
podman start         启动容器
podman ps            查看容器
podman stop          终止容器
podman restart       重启容器
podman attach        进入容器
podman exec          进入容器
podman export        导出容器
podman import        导入容器快照
podman rm            删除容器
podman logs          查看日志
镜像
podman search                检索镜像
podman pull                  获取镜像
podman images                列出镜像
podman image Is              列出镜像
podman rmi                   删除镜像
podman image rm              删除镜像
podman save                  导出镜像
podman load                  导入镜像
podmanfile                   定制镜像(三个)
  podman build             构建镜像
    podman run               运行镜像
    podmanfile               常用指令(四个)
      COPY                 复制文件
        ADD                  高级复制
        CMD                  容器启动命令
        ENV                  环境变量
        EXPOSE               暴露端口
部署podman
[root@cxr ~]# rm -rf /etc/yum.repos.d/*
[root@cxr ~]# curl -o /etc/yum.repos.d/CentOS-Base.repo https://mirrors.aliyun.com/repo/Centos-vault-8.5.2111.repo       //安装阿里云的yum源
  % Total    % Received % Xferd  Average Speed   Time    Time     Time  Current
                                 Dload  Upload   Total   Spent    Left  Speed
100  2495  100  2495    0     0   7128      0 --:--:-- --:--:-- --:--:--  7128
[root@cxr ~]# sed -i -e '/mirrors.cloud.aliyuncs.com/d' -e '/mirrors.aliyuncs.com/d' /etc/yum.repos.d/CentOS-Base.repo
[root@cxr ~]# yum clean all
Updating Subscription Management repositories.
Unable to read consumer identity
This system is not registered to Red Hat Subscription Management. You can use subscription-manager to register.
12 文件已删除
[root@cxr ~]# yum makecache                //重建一些缓存
Updating Subscription Management repositories.
Unable to read consumer identity
This system is not registered to Red Hat Subscription Management. You can use subscription-manager to register.
CentOS-8.5.2111 - Base - mirrors.aliyun.com                                                                                                                        2.1 MB/s | 4.6 MB     00:02
CentOS-8.5.2111 - Extras - mirrors.aliyun.com                                                                                                                       60 kB/s |  10 kB     00:00
CentOS-8.5.2111 - AppStream - mirrors.aliyun.com                                                                                                                   842 kB/s | 8.4 MB     00:10
元数据缓存已建立。
[root@cxr ~]# yum -y install podman            //安装podman
Podman 加速器
[root@cxr ~]# vim /etc/containers/registries.conf


[registries.search]
#registries = ['registry.access.redhat.com', 'registry.redhat.io']
registries = ["docker.io"]
[[docker.io]]
location="hzlytjqu.mirror.aliyuncs.com"
使用 Podman
使用 Podman 非常的简单,Podman 的指令跟 Docker 大多数都是相同的。下面我们来看几个常用的例子:
运行一个容器
[root@cxr ~]# podman run -d --name httpd docker.io/library/httpd
Trying to pull docker.io/library/httpd...
Getting image source signatures
Copying blob 60dd7398e74e done
Copying blob f646c69a26ec done
Copying blob 1fe172e4850f done
Copying blob e2fa1fe9b1ec done
Copying blob ea2ca81c6d4c done
Copying config c30a467716 done
Writing manifest to image destination
Storing signatures
85ddb503b6d9473e23ad451808e3402c06e66898854883e7614e5240b256284a

//查看镜像文件
[root@cxr ~]# podman  images
REPOSITORY                TAG      IMAGE ID       CREATED       SIZE
docker.io/library/httpd   latest   c30a46771695   2 weeks ago   148 MB
[root@cxr ~]# podman ps       //列出容器
CONTAINER ID  IMAGE                           COMMAND           CREATED         STATUS             PORTS  NAMES
85ddb503b6d9  docker.io/library/httpd:latest  httpd-foreground  13 minutes ago  Up 13 minutes ago         httpd
注意:如果在ps命令中添加-a,Podman 将显示所有容器。
检查正在运行的容器
您可以“检查”正在运行的容器的元数据和有关其自身的详细信息。我们甚至可以使用 inspect 子命令查看分配给容器的 IP 地址。由于容器以无根模式运行,因此未分配 IP 地址,并且该值将在检查的输出中列为“无”。
[root@cxr ~]# podman inspect -l | grep IPAddress       //查看最新的一个容器的IP地址
            "SecondaryIPAddresses": null,
            "IPAddress": "10.88.0.2",
[root@cxr ~]# curl 10.88.0.2            //在虚拟机上面访问
<html><body><h1>It works!</h1></body></html>
注意:-l 是最新容器的便利参数。您还可以使用容器的 ID 代替 -l。
查看一个运行中容器的日志
//选项
      --latest                  //最近的
[root@cxr ~]# podman  logs --latest
AH00558: httpd: Could not reliably determine the server's fully qualified domain name, using 10.88.0.2. Set the 'ServerName' directive globally to suppress this message
AH00558: httpd: Could not reliably determine the server's fully qualified domain name, using 10.88.0.2. Set the 'ServerName' directive globally to suppress this message
[Mon May 09 06:33:56.159778 2022] [mpm_event:notice] [pid 1:tid 140524922297664] AH00489: Apache/2.4.53 (Unix) configured -- resuming normal operations
[Mon May 09 06:33:56.160522 2022] [core:notice] [pid 1:tid 140524922297664] AH00094: Command line: 'httpd -D FOREGROUND'
10.88.0.1 - - [09/May/2022:06:49:43 +0000] "GET / HTTP/1.1" 200 45
查看一个运行容器中的进程资源使用情况,可以使用top观察容器中的 nginx pid
语法:
 				// podman top <container_id>

[root@cxr ~]# podman top httpd
USER       PID   PPID   %CPU    ELAPSED           TTY   TIME   COMMAND
root       1     0      0.000   19m3.837957346s   ?     0s     httpd -DFOREGROUND
www-data   7     1      0.000   19m3.838330615s   ?     0s     httpd -DFOREGROUND
www-data   9     1      0.000   19m3.838387983s   ?     0s     httpd -DFOREGROUND
www-data   10    1      0.000   19m3.838433739s   ?     0s     httpd -DFOREGROUND
停止一个运行中的容器
[root@cxr ~]# podman stop --latest
85ddb503b6d9473e23ad451808e3402c06e66898854883e7614e5240b256284a
[root@cxr ~]# podman ps
CONTAINER ID  IMAGE  COMMAND  CREATED  STATUS  PORTS  NAMES
删除一个容器
[root@cxr ~]# podman rm -f --latest
85ddb503b6d9473e23ad451808e3402c06e66898854883e7614e5240b256284a
[root@cxr ~]# podman ps -a
CONTAINER ID  IMAGE  COMMAND  CREATED  STATUS  PORTS  NAMES
配置别名
如果习惯了使用 Docker 命令,可以直接给 Podman 配置一个别名来实现无缝转移。你只需要在 .bashrc 下加入以下行内容即可:
[root@cxr ~]# echo "alias docker=podman" >> .bashrc
[root@cxr ~]# source .bashrc
[root@cxr ~]# alias
alias cp='cp -i'
alias docker='podman'
用户操作
在允许没有root特权的用户运行Podman之前,管理员必须安装或构建Podman并完成以下配置
cgroup V2Linux内核功能允许用户限制普通用户容器可以使用的资源,如果使用cgroupV2启用了运行Podman的Linux发行版,则可能需要更改默认的OCI运行时。某些较旧的版本runc不适用于cgroupV2,必须切换到备用OCI运行时crun。
[root@cxr ~]# vi /usr/share/containers/containers.conf
470 # Default OCI runtime
    471 #
    472 runtime = "crun"            //取消注释
[root@cxr ~]# podman run -d --name web -p 80:80 docker.io/library/nginx
Trying to pull docker.io/library/nginx:latest...
Getting image source signatures
Copying blob 186b1aaa4aa6 done
Copying blob a0bcbecc962e done
Copying blob b4df32aa5a72 done
Copying blob a9edb18cadd1 done
Copying blob a2abf6c4d29d done
Copying blob 589b7251471a done
Copying config 605c77e624 done
Writing manifest to image destination
Storing signatures
49ff530e2712812edf8de3a29720cea8193dcdcbe4d658861fc8384cdec36164
[root@cxr ~]# podman inspect web | grep crun
          "OCIRuntime": "crun",
安装slirp4netns和fuse-overlayfs
在普通用户环境中使用Podman时,建议使用fuse-overlayfs而不是VFS文件系统,至少需要版本0.7.6。现在新版本默认就是了。
[root@cxr ~]# yum -y install slirp4netns
[root@cxr ~]# yum -y install fuse-overlayfs
[root@cxr ~]# vim /etc/containers/storage.conf
mount_program = "/usr/bin/fuse-overlayfs"     //把这行解注释掉
/ etc / subuid和/ etc / subgid配置
Podman要求运行它的用户在/ etc / subuid和/ etc / subgid文件中列出一系列UID,shadow-utils或newuid包提供这些文件
[root@cxr ~]# yum -y install shadow-utils
//可以在/ etc / subuid和/ etc / subgid查看,每个用户的值必须唯一且没有任何重叠。

[root@cxr ~]# cat /etc/subuid
hei:100000:65536
cxr:165536:65536
[root@cxr ~]# cat /etc/subgid
hei:100000:65536
cxr:165536:65536

[root@cxr ~]# sysctl -w "net.ipv4.ping_group_range=0 200000"                   大于100000这个就表示tom可以操作podman

net.ipv4.ping_group_range = 0 200000
这个文件的格式是 USERNAME:UID:RANGE中/etc/passwd或输出中列出的用户名getpwent。
为用户分配的初始 UID。
为用户分配的 UID 范围的大小。
该usermod程序可用于为用户分配 UID 和 GID,而不是直接更新文件。
用户配置文件
三个主要的配置文件是container.conf、storage.conf和registries.conf。用户可以根据需要修改这些文件。
container.conf
// 用户配置文件
[root@localhost ~]# cat /usr/share/containers/containers.conf
[root@localhost ~]# cat /etc/containers/containers.conf
[root@localhost ~]# cat ~/.config/containers/containers.conf  //优先级最高
如果它们以该顺序存在。每个文件都可以覆盖特定字段的前一个文件。
配置storage.conf文件
[root@cxr ~]# vim /etc/containers/storage.conf
      /etc/containers/storage.conf
      $HOME/.config/containers/storage.con
在普通用户中/etc/containers/storage.conf的一些字段将被忽略
# Default Storage Driver, Must be set for proper operation.
driver = "overlay"             //这里改成overlay

mount_program = "/usr/bin/fuse-overlayfs"         //这里解注释
在普通用户中这些字段默认
graphroot=“
H
O
M
E
/
.
l
o
c
a
l
/
s
h
a
r
e
/
c
o
n
t
a
i
n
e
r
s
/
s
t
o
r
a
g
e
"
r
u
n
r
o
o
t
=
"
HOME/.local/share/containers/storage" runroot="
HOME/.local/share/containers/storage"runroot="XDG_RUNTIME_DIR/containers”
registries.conf
配置按此顺序读入,这些文件不是默认创建的,可以从/usr/share/containers或复制文件/etc/containers并进行修改。
1./etc/containers/registries.conf
2./etc/containers/registries.d/*
3.HOME/.config/containers/registries.conf
此文件里面写了docker账号的密码,以加密方式显示
[root@cxr ~]# podman login

Username: chen1544060135
Password:
Login Succeeded!

[root@cxr ~]# cat /run/user/0/containers/auth.json
{
        "auths": {
                "docker.io": {
                        "auth": "Y2hlbjE1NDQwNjAxMzU6Y3hyMjY1Nzk0NDk0Nw=="
                }
        }
//root用户
[root@cxr ~]# podman images
Failed to read /etc/containers/storage.conf toml: line 9: expected '.' or '=', but got '/' instead
REPOSITORY               TAG         IMAGE ID      CREATED       SIZE
docker.io/library/nginx  latest      605c77e624dd  4 months ago  146 MB
//普通用户
[cxr@cxr ~]$ podman images
REPOSITORY  TAG         IMAGE ID    CREATED     SIZE
[cxr@cxr ~]$ vim /etc/containers/storage.conf
-
卷
-
容器与root用户一起运行,则root容器中的用户实际上就是主机上的用户。
-
UID GID是在/etc/subuid和/etc/subgid等中用户映射中指定的第一个UID GID。
-
如果普通用户的身份从主机目录挂载到容器中,并在该目录中以根用户身份创建文件,则会看到它实际上是你的用户在主机上拥有的。
-
使用卷
[cxr@cxr ~]$ podman run -it -v "$(pwd)"/data:/data:Z busybox /bin/shFailed to read /etc/containers/storage.conf toml: line 9: expected '.' or '=', but got '/' instead
Failed to read /etc/containers/storage.conf toml: line 9: expected '.' or '=', but got '/' instead
/ # ls
bin   data  dev   etc   home  proc  root  run   sys   tmp   usr   var
/ # cd data/
/data # touch 123
/data # ls -l
total 0
-rw-r--r--    1 root     root             0 May  9 14:19 123
- 在主机上查看
[cxr@cxr ~]$ ll data/
总用量 0
-rw-r--r--. 1 cxr cxr 0 5月   9 10:19 123
[cxr@cxr ~]$ echo "hell world" >> data/123
[cxr@cxr ~]$ cat data/123
hell world
- 在容器中查看
/data # cat 123
hell world
//我们可以发现在容器里面的文件的属主和属组都属于root,那么如何才能让其属于tom用户呢?下面告诉你答案
/data # ls -l
total 4
-rw-r--r--    1 root     root            11 May  9 14:25 123
//只要在运行容器的时候加上一个--userns=keep-id即可。

[cxr@cxr ~]$ podman run -it --name test -v "$(pwd)"/data:/data:Z --userns=keep-id docker.io/library/busybox /bin/sh
~ $ cd data/
/data $ ls -l
total 4
-rw-r--r--    1 cxr       cxr              11 Dec 9 20:20 123
- 使用普通用户映射容器端口时会报“ permission denied”的错误
[cxr@cxr ~]$ podman run -d -p 80:80 httpd
Error: rootlessport cannot expose privileged port 80, you can add 'net.ipv4.ip_unprivileged_port_start=80' to /etc/sysctl.conf (currently 1024), or choose a larger port number (>= 1024): listen tcp 0.0.0.0:80: bind: permission denied
- 普通用户可以映射>= 1024的端口
[cxr@cxr ~]$ podman run -d -p 1024:80 httpd
1b8bac418f079d9c9eec0449d9fde218218b11a76c8ca5de2dbe93fd86319401
[cxr@cxr ~]$ ss -antl
State    Recv-Q   Send-Q      Local Address:Port       Peer Address:Port   Process
LISTEN   0        32          192.168.122.1:53              0.0.0.0:*
LISTEN   0        128               0.0.0.0:22              0.0.0.0:*
LISTEN   0        5               127.0.0.1:631             0.0.0.0:*
LISTEN   0        128               0.0.0.0:111             0.0.0.0:*
LISTEN   0        128               0.0.0.0:80              0.0.0.0:*
LISTEN   0        128                  [::]:22                 [::]:*
LISTEN   0        5                   [::1]:631                [::]:*
LISTEN   0        128                     *:1024                  *:*
LISTEN   0        128                  [::]:111                [::]:*


 692
692


 被折叠的 条评论
为什么被折叠?
被折叠的 条评论
为什么被折叠?
 到【灌水乐园】发言


